
Web Plugin Example
In this example, we will take the widget described in the Simple Web Plugin Example and show how to set up communications between the widget and the Web environment.
Setting up Communications
There are two ways of interacting with the content in a Web page. The first way involves the use of QWebElement to read and modify the page content and structure; this is useful for certain types of application, as demonstrated by the DOM Traversal Example and the Simple Selector Example.
The second way is to add Qt objects to the page, connecting their signals to JavaScript functions, and executing the object's slots directly from JavaScript in the page. We explore this approach in this example.
To perform this communication, we require an updated CSVView widget from the Simple Web Plugin Example that can emit a signal whenever a row is selected, a JavaScript function to modify elements on the page, and some glue code to make the connection.
On the page, the plugin is declared like this:
<object type="text/csv;header=present;charset=utf8"
        data="qrc:/data/accounts.csv"
        width="100%" height="300">
</object>
As in the previous example, the <object> definition includes information about the data to be displayed, its location, and the dimensions of the plugin in the page.
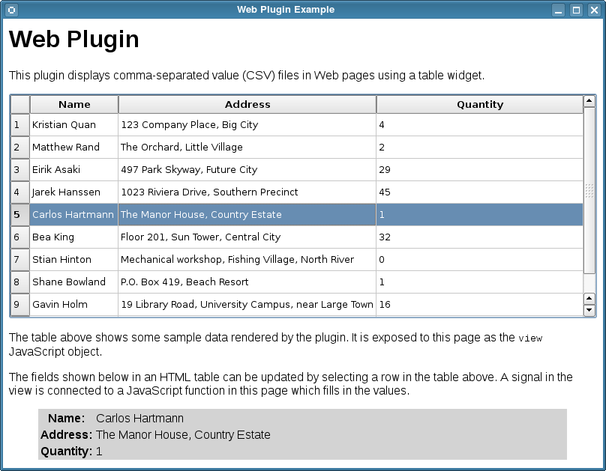
Later in the document, we include a table that we will update with data from the CSVView widget:
<table>
<tr>
  <th>Name:</th>
  <td id="customers_name"></td>
</tr><tr>
  <th>Address:</th>
  <td id="customers_address"></td>
</tr><tr>
  <th>Quantity:</th>
  <td id="customers_quantity"></td>
</tr>
</table>
The CSVView widget is similar to the previous version. However, we wish to obtain and export individual rows of data, so we define the rowSelected() signal and exportRow() slot to perform this task.
class CSVView : public QTableView { Q_OBJECT public: CSVView(const QString &mimeType, QWidget *parent = 0); signals: void rowSelected(const QString &name, const QString &address, const QString &quantity); public slots: void updateModel(); private slots: void exportRow(const QModelIndex ¤t); private: void addRow(bool firstLine, QStandardItemModel *model, const QList<QStandardItem *> &items); QString mimeType; };
Since we wish to obtain one row of data at a time, the constructor includes code to restrict how the user can interact with the view:
CSVView::CSVView(const QString &mimeType, QWidget *parent)
    : QTableView(parent)
{
    this->mimeType = mimeType;
}
The exportRow() slot provides a convenient mechanism for obtaining and emitting the values found on the current row of the table:
void CSVView::exportRow(const QModelIndex ¤t) { QString name = model()->index(current.row(), 0).data().toString(); QString address = model()->index(current.row(), 1).data().toString(); QString quantity = model()->index(current.row(), 2).data().toString(); emit rowSelected(name, address, quantity); }
This slot is connected to a signal belonging to the view's selection model: currentChanged(). This can be seen by examining the updateModel() function in the source code.
exportRow() emits the rowSelected() signal, passing strings containing the name, address and quantity in the current table row. To see how this data is passed to the Web page, we need to look at the CSVFactory class.
Connecting Components Together
In the CSVFactory class, we reimplement the create() function to create instances of the CSVView class, as in the previous example.
QObject *CSVFactory::create(const QString &mimeType, const QUrl &url,
                            const QStringList &argumentNames,
                            const QStringList &argumentValues) const
{
    if (mimeType != "text/csv")
        return 0;

    QHash<QString, QString> arguments;
    for (int i = 0; i < argumentNames.count(); ++i)
        arguments[argumentNames[i]] = argumentValues[i];

    CSVView *view = new CSVView(arguments["type"]);
We also expose the view widget to the frame in the page that contains the elements, and set up a connection between the view and a JavaScript function defined in the page header:
    QWebFrame *frame = webView->page()->mainFrame();
    frame->addToJavaScriptWindowObject("view", view);
    frame->evaluateJavaScript("view.rowSelected.connect(fillInTable);\n");
The view is added to the Web page as view, and the connection code we evaluate performs a signal-slot connection from the view's rowSelected() signal to a pure JavaScript function:
view.rowSelected.connect(fillInTable);
fillInTable is the name of the JavaScript function to modify the form's input elements. This function expects three arguments: the name, address and quantity values for a row of data.
Whenever the current row changes in the view object, the exportRow() slot is called, the data found in the selected row is extracted from the model and emitted in the rowSelected() signal as three strings, and the above connection ensures that fillInTable() will be called with the current items of data. The appropriate type conversions occur behind the scenes to ensure that each QString is converted to a JavaScript string object.
The rest of the function is the same as in the previous example:
    QNetworkRequest request(url);
    QNetworkReply *reply = manager->get(request);
    connect(reply, SIGNAL(finished()), view, SLOT(updateModel()));
    connect(reply, SIGNAL(finished()), reply, SLOT(deleteLater()));

    return view;
}
We now give the JavaScript fillInForm() function to show what it does with the strings it is given. The function itself is defined in the HTML page header:
<script type="text/javascript">
function fillInTable(name, address, quantity)
{
    var nameElement = document.getElementById("customers_name");
    var addressElement = document.getElementById("customers_address");
    var quantityElement = document.getElementById("customers_quantity");

    nameElement.innerHTML = name;
    addressElement.innerHTML = address;
    quantityElement.innerHTML = quantity;
}
</script>
We obtain the elements in the page that we wish to update by using the HTML Document Object Model (DOM) API. The values of these elements are updated with the name, address and quantity strings supplied.
Linking Things Together
Although we have used the widgets to demonstrate the use of signals and slots for communication between Qt components and JavaScript in the browser, we do not need to embed widgets in Web pages to be able to do this. By inserting objects into pages and evaluating JavaScript, Qt applications can be made to examine and process information found online.
One additional improvement that can be made to this example is to create a relation between the embedded widget and the table to be updated. We could do this by including <param> elements within the <object> element that refers to the table cells by their id attributes. This would help us to avoid hard-coding the customers_name, customers_address and customers_quantity identifiers in the script.
Files:
© 2016 The Qt Company Ltd. Documentation contributions included herein are the copyrights of their respective owners. The documentation provided herein is licensed under the terms of the GNU Free Documentation License version 1.3 as published by the Free Software Foundation. Qt and respective logos are trademarks of The Qt Company Ltd. in Finland and/or other countries worldwide. All other trademarks are property of their respective owners.