
Enginio QML Examples - Todos
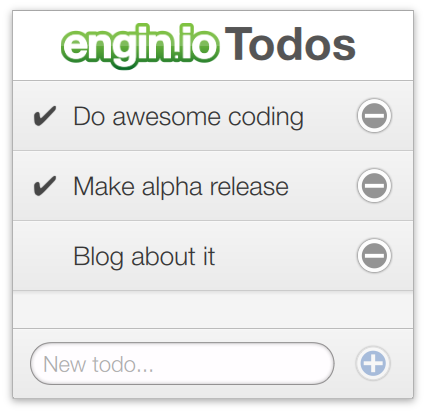
In this example a simple list of objects is displayed in a ListView. Each item in the list is a "To Do" object which can be done or not yet done. Todos can be added and removed (when hovering with the mouse).
In this simple schema, the objects will only have two properties that are added to the default properties (such as creation date, which always exists): a string title and a bool completed. The object type will be created when a call to create, or, in this case, a call to EnginioModel::append() is made.
A todo object will look like this in JSON:
{
  "title": "Buy Milk",
  "completed": false
}
The example uses Qt Quick Controls, Layouts, and Enginio.
import Enginio 1.0
The first step is to create an Enginio model and its Enginio client with the backend configuration. To get nice debug output in case something goes wrong, the client's onError signal handler is implented. Since the error is a JSON object, JSON.stringify is used to format it to a string.
EnginioModel {
    id: enginioModel
    client: EnginioClient {
        backendId: backendHelper.backendId
        onError: console.log("Enginio error:", JSON.stringify(reply.data))
    }
    query: {"objectType": "objects.todos" }
}
A ListView is used to display the list of Todos. In the delegate, the properties of the Enginio objects are used.
ListView {
    id: listview
    model: enginioModel
    delegate: listItemDelegate
    anchors.top: header.bottom
    anchors.bottom: footer.top
    width: parent.width
    clip: true

    // Animations
    add: Transition { NumberAnimation { properties: "y"; from: root.height; duration: 250 } }
    removeDisplaced: Transition { NumberAnimation { properties: "y"; duration: 150 } }
    remove: Transition { NumberAnimation { property: "opacity"; to: 0; duration: 150 } }
}
It is easy to add a new Todo object to the model using a TextInput. By implementing the onAccepted signal handler, the Todo data is appended to the model. After appending the new Todo, the text property is cleared so that the next Todo can be entered.
BorderImage {

    anchors.left: parent.left
    anchors.right: addButton.left
    anchors.verticalCenter: parent.verticalCenter
    anchors.margins: 16
    source:"images/textfield.png"
    border.left: 14 ; border.right: 14 ; border.top: 8 ; border.bottom: 8

    TextInput{
        id: textInput
        anchors.fill: parent
        clip: true
        anchors.leftMargin: 14
        anchors.rightMargin: 14
        verticalAlignment: Text.AlignVCenter
        font.pixelSize: 22
        Text {
            id: placeholderText
            anchors.fill: parent
            verticalAlignment: Text.AlignVCenter
            visible: !(parent.text.length || parent.inputMethodComposing)
            font: parent.font
            text: "New todo..."
            color: "#aaa"
        }
        onAccepted: {
            enginioModel.append({"title": textInput.text, "completed": false})
            textInput.text = ""
        }
    }
}

Item {
    id: addButton

    width: 40 ; height: 40
    anchors.margins: 20
    anchors.right: parent.right
    anchors.verticalCenter: parent.verticalCenter
    enabled: textInput.text.length
    Image {
        source: addMouseArea.pressed ? "qrc:icons/add_icon_pressed.png" : "qrc:icons/add_icon.png"
        anchors.centerIn: parent
        opacity: enabled ? 1 : 0.5
    }
    MouseArea {
        id: addMouseArea
        anchors.fill: parent
        onClicked: textInput.accepted()
    }
}
}
Inside the delegate, the data for the index is available by using the property names (title and completed). The title property is directly assigned to the text displayed on each list item. The completed boolean is used to display the item with a strikeout font and a light color.
Text {
    id: todoText
    text: title
    font.pixelSize: 26
    color: "#333"

    anchors.verticalCenter: parent.verticalCenter
    anchors.left: checkbox.right
    anchors.right: parent.right
    anchors.leftMargin: 12
    anchors.rightMargin: 40
    elide: Text.ElideRight
}
The Enginio::EnginioModel::setProperty() function is called to update the data in the Enginio backend.
MouseArea {
    id: mouse
    anchors.fill: parent
    hoverEnabled: true
    onClicked: {
        if (index !== -1 && _synced) {
            enginioModel.setProperty(index, "completed", !completed)
        }
    }
}
The _synced property can be used to ascertain whether an item has been synced or not. It is always available in the delegate, and may be used, for example, to disable the user interface until syncing has completed.
Image {
    id: removeIcon

    source: removeMouseArea.pressed ? "qrc:icons/delete_icon_pressed.png" : "qrc:icons/delete_icon.png"
    anchors.margins: 20
    anchors.verticalCenter: parent.verticalCenter
    anchors.right: parent.right
    opacity: enabled ? 1 : 0.5
    Behavior on opacity {NumberAnimation{duration: 100}}
    MouseArea {
        id: removeMouseArea
        anchors.fill: parent
        onClicked: enginioModel.remove(index)
    }
}
Finally, a remove button is visible when hovering over an item with the mouse. Removal is implemented by calling EnginioModel::remove() with the row of the item.
MouseArea {
    id: removeMouseArea
    anchors.fill: parent
    onClicked: enginioModel.remove(index)
}
Files:
© 2017 The Qt Company Ltd. Documentation contributions included herein are the copyrights of their respective owners. The documentation provided herein is licensed under the terms of the GNU Free Documentation License version 1.3 as published by the Free Software Foundation. Qt and respective logos are trademarks of The Qt Company Ltd. in Finland and/or other countries worldwide. All other trademarks are property of their respective owners.