C
Anti-Aliasing
Qt 3D Studio has multiple ways to combat aliasing (the "jaggies") prevalent in real-time rendering of 3D models. Each technique offers its own benefits and limitations. Multiple techniques may be combined, albeit incurring the performance cost of each.
Causes of Aliasing
Before covering the details of the different techniques and technologies, we illustrate the three main causes of aliasing. Following those are the details on each of the possible solutions. Understanding which technology best targets your problems will help you to balance visual quality with sufficient rendering speed.
Geometry Aliasing
By default, all geometry is rendered one on-screen pixel at a time. As seen below at left, this can leave harsh edges that may be easily noticeable in high-contrast cases (most noticeably in this black-and-white case).

Effective techniques for reducing aliasing for geometry (click to view full size).
The most correct fix for this is to use Multisample Anti-Aliasing, as this gathers more geometric detail only as needed. Using Temporal AA or Progressive AA can also mitigate the issue in a correct manner.
Using the FXAA or SMAA image effects will smooth the edges, but may misinterpret fine details. For example, notice how the corners of the lower square are not quite correct, or how the sides of the circle are slightly squashed.
Finally, in certain limited cases you may be able to use a silhouette opacity map to smooth the edges of selected geometry.
Texture Aliasing
When a texture is sub-sample - fewer pixels than in the original are displayed - you may see undesirable artifacts based on which pixels are chosen. This effect is worsened when the model is moving, as very different pixels may be chosen at different times. In the image below, notice how the line between E3 and F3 is missing, strongly present between G3 and H3, then gone for the next 5 columns, and so on.
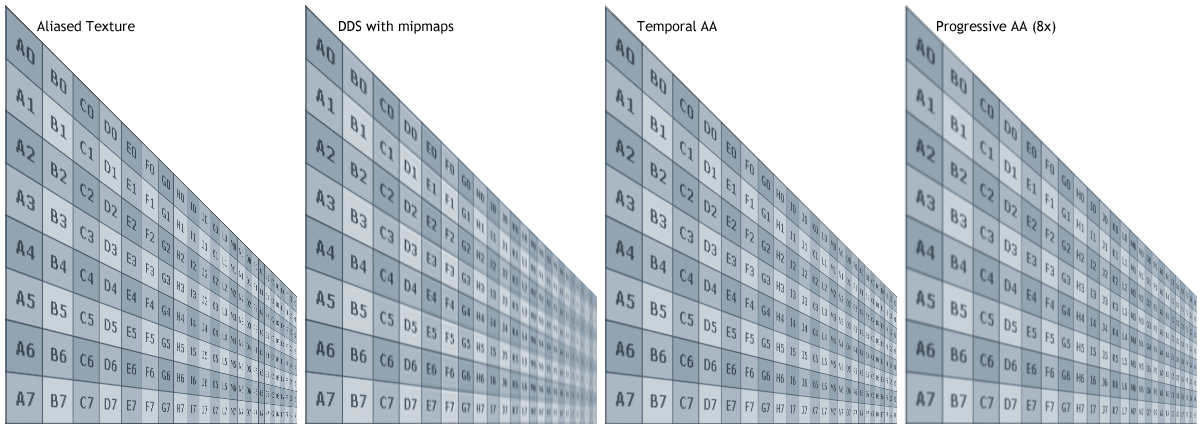
Effective techniques for reducing aliasing for textures (click to view full size).
The simplest (and arguably the best) fix for this problem is to use mipmapping in the image texture itself. Alternative fixes include using either Temporal AA or Progressive AA to gather more information from the texture.
Using Multisample Anti-Aliasing will not fix this problem. Using the FXAA or SMAA image effects will remove some ugly artifacts, but do so in a way that is obviously not correct when the texture is predictable by humans.
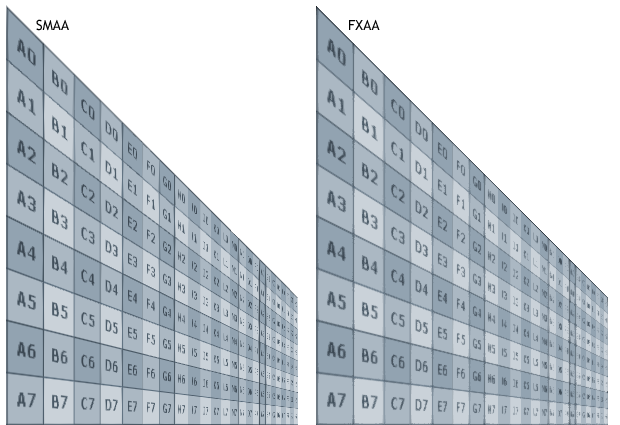
Image effects do not work well when textures are predictable (click to view full size).
Reflection
Aliasing
Similar to Texture Aliasing, a material reflecting the environment will sub-sample the image. In some case - s seen in the lines at the bottom of the reflection at lef - t becomes obvious when fine details are being skipped.
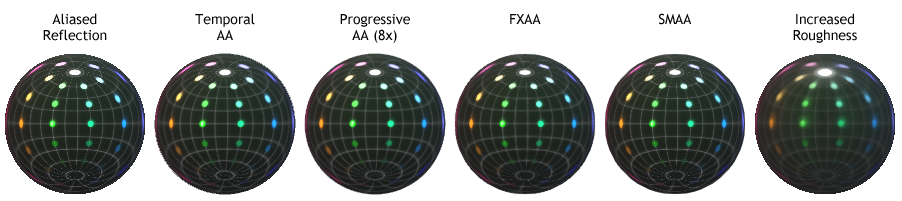
Effective techniques for reducing aliasing for reflections (click to view full size).
The most correct solutions in this case are using Temporal AA or Progressive AA to find the extra information. Using the FXAA or SMAA image effects can hide obvious glittering problems by blurring them out, but this may be noticeably incorrect when the environment is predictable.
A simple alternative solution that may be acceptable is to make the material less glossy, more rough. In this case lower-resolution mipmaps of the environment are automatically used, blending the sharp details together.
Anti-Aliasing Technologies
Aliasing is caused when there is more `information' present in the original than we can represent in the pixels on screen. Anti-aliasing technologies fall into three categories:
- ways to find real additional information for a single pixel and represent them all at the same
- image effects that attempt to find where things look bad and sweep the problems under the carpet
- cheats employed by artists that attempt to workaround the limitations
Technologies that Find Additional Information
Multisample AA
Multisample AA (MSAA) operates on an entire layer. The edges of geometry are super-sampled, resulting in smoother silhouettes. This technique has no effect on the materials inside geometry, however.
- To use it: select a Layer in the Timeline palette, and then select either 2x or 4x for the Multisample AA property in the Inspector palette.
- Pros: good results on geometry silhouettes, where aliasing is often most noticeable; works with fast animation without issue.
- Cons: can be expensive to use; does not help with texture or reflection issues.
Temporal AA
Temporal AA operates on an entire layer. The camera is jiggled very slightly between frames, and the result of each new frame is blended with the previous frame.
- To use it: select a Layer in the Timeline palette, and then turn on the Temporal AA checkbox in the Inspector palette.
- Pros: due to the jiggling camera it finds real details that were otherwise lost; low impact on performance.
- Cons: fast-moving objects cause one-frame ghosting.
Progressive AA
Progressive AA (PAA) operates on an entire layer. When all content of the layer has stopped moving, the camera is jiggled very slightly between frames, and the result of each new frame is blended with the previous frames. The more frames you accumulate, the better looking the result.
- To use it: select a Layer in the Timeline palette, and then select 2x, 4x, or 8x for the Progressive AA property in the Inspector palette.
- Pros: provides wonderful detail on static images with no performance cost.
- Cons: does not take effect if any visual changes are occurring; 8x PAA takes one eighth of a secon - o finish rendering (at 60fps), which may be noticeable.
Mipmaps
Mipmapping stores along with a texture some pre-calculated lower resolution versions of that texture. Whenever the texture is being displayed at a smaller size, the rendering system automatically uses these low-resolution images (which combine many details into a single pixel) blending them into the result as needed.
- To use it: use NVIDIA's free Texture Tools plugin for Photoshop to save your image as a DDS with "Generate MIP maps" checked in the interface. You may need to resize your image so that its dimensions are powers of 2, e.g. 32, 64, 128, 256, etc. For more details, see the section Optimizing Images/Saving as DDS/Using MIP Maps.
- Pros: very low performance impact; greatly improves image quality for textures; encourages you to use DDS, which load and render faster than PNGs.
- Cons: requires using external tools to optimize your images; uses 33% more graphics memory than the same image without mipmaps.
Supersample AA
Supersample AA (SSAA) operates on an entire layer, or even multiple layers. It is not mentioned or compared above because the performance penalty can be severe, and because it requires additional work from the artist. This technique should be used as a last resort.
- To use it: save a layer as its own sub-presentation. Specify the size of this presentation to be larger then the size you want to display it at (roughly 1.4 times larger in each dimension seems to provide good results). Add this presentation to your application (in the
.uiafile). Where you wish to display the presentation create a Rectangle with a diffuse map on it. (The source and size of the image you select do not matter.) Select the Diffuse Map image in the image palette, and select your presentation as the Sub-Presentation for that image. The presentation will be rendered at the size you specify, and then used as an image map on your Rectangle. Bilinear interpolation will be used when sampling the texture, providing a form of supersample anti-aliasing in the final result. - Pros: provides full-scene anti-aliasing with no limitations on animation.
- Cons: can severely degrade performance when your presentation is already limited by the fill-rate of the graphics system (this is often the case).
Image Effects
FXAA
Fast Approximate Anti-Alising (FXAA) is an effect that can be applied to an entire layer. It looks for pixels at a similar distance from the camera that are different, and smoothes the edges.
- To use it: copy the FXAA effect to your project by opening the Effect Library at the bottom of the Project palette and draggin the
FXAA.effectfile into your Project palette. Then, drag the FXAA effect from the Project palette onto the Layer in the Timeline that you wish it to apply to. There are no configurable parameters for this effect in the Inspector palette. - Pros: relatively inexpensive, can clean up a lot of common problems so that they are not distracting.
- Cons: because it is based on the already-aliased image, the fixes that it makes are usually blurring/hiding extra information instead of adding additional information (see the corner between "G4" and "H5" in the Texture Anti-Aliasing example); it can negatively effect fine text details (see the "small text" on the Geometry Anti-Aliasing example).
SMAA
Enhanced Subpixel Morphological Antialiasing (SMAA) is an effect that can be applied to an entire layer. It attempts to be smarter than FXAA about how it cleans up the image.
- To use it: copy the SMAA effect to your project by opening the Effect Library at the bottom of the Project palette and draggin the
SMAA.effectfile into your Project palette. Then, drag the SMAA effect from the Project palette onto the Layer in the Timeline that you wish it to apply to. There are no configurable parameters for this effect in the Inspector palette. - Pros: can clean up a lot of common problems so that they are not distracting; does not add as many `incorrect' details as FXAA.
- Cons: more expensive than FXAA; as an image-based effect it cannot add missing details reliably.
Artist-Employed Cheats
Silhouette Opacity Maps
When your model has a consistent silhouette you can apply an opacity map that makes the outer edge of the geometry transparent. Using a gradient for the opacity will let the edge of the object smoothly disappear. However, even if your opacity map transitions directly from fully-opaque to fully-transparent over the space of one pixel - as is the case shown in the geometry example above - the result will provide anti-aliased edges. This is because image maps, including opacity maps, use bilinear interpolation.
- To use it: construct an opacity map that makes the outer silhouette of your geometry transparent, and apply it to either the Diffuse Map or Opacity Map channel for the material.
- Pros: can show softer transitions than normal AA; can be applied per model instead of per-layer.
- Cons: cannot be used if the silhouette of the object will ever change; multiple overlapping models that employ transparency consume fill rate performance, which is often at a premium.
Modifying Materials or Geometry
As demonstrated in the picture for Reflection Aliasing above, sometimes the simplest fix for problems is to change the artwork. If you are getting distracting specular glints on the corner of your model, ask yourself: Can I make the material softer? Can I modify the geometry to smooth or change the reflection angle? Can I edit the environment map to reduce sharp transitions?
There is no one-size-fits all solution to certain problems. While it is our aim to produce a product that consistently produces pleasing, realistic real-time results, being open to occasionally modifying your artistic vision is sometimes the most pragmatic way to get the best possible renderings.
Available under certain Qt licenses.
Find out more.