
Getting Started Programming with Qt Widgets
In this topic, we teach basic Qt knowledge by implementing a simple Notepad application using C++ and the Qt Widgets module. We use the Qt Creator IDE and Qt Designer to generate some code, but you could also write all the code yourself.
After reading this topic, you are ready to refer to our overviews and API documentation, to find the information you need for the application you are developing.
In this topic, we first use Qt Creator to create a project with the necessary files. Then we use Qt Designer to modify the user interface files to show a text edit and a push button in a window on the desktop. This represents a simple Qt application that has a GUI. Finally, we add user interaction to the application by creating actions for opening and saving files.
You can find the final Notepad source files in the qtdoc repository in the snippets/widgets-tutorial/notepad directory. You can either fetch the Qt 5 sources from Qt Project or install them as part of Qt 5.
Creating the Notepad Project
Setting up a new project in Qt Creator is aided by a wizard that guides you step-by-step through the project creation process. The wizard prompts you to enter the settings needed for that particular type of project and creates the project for you.
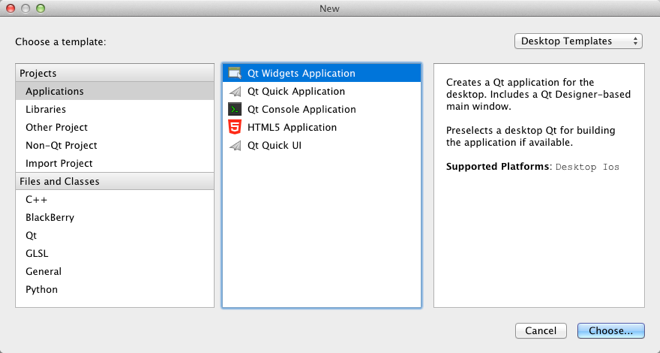
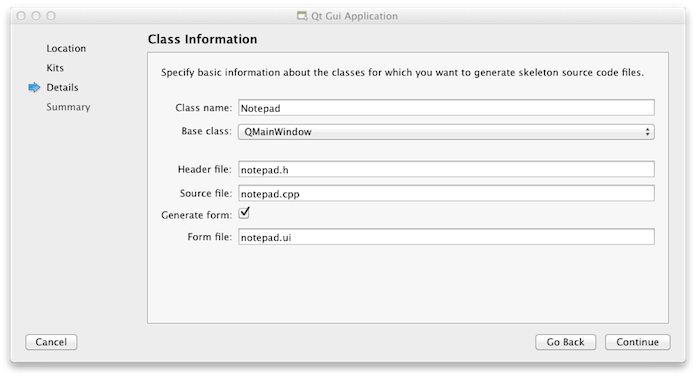
To create the Notepad project, select File > New File or Project > Applications > Qt Widgets Application > Choose, and follow the instructions of the wizard. In the Class Information dialog, type Notepad as the class name and select QMainWindow as the base class.
The Qt Widgets Application wizard creates a project that contains a main source file and a set of files that specify a user interface (Notepad widget):
- notepad.pro - the project file.
- main.cpp - the main source file for the application.
- notepad.cpp - the source file of the notepad class of the Notepad widget.
- notepad.h - the header file of the notepad class for the Notepad widget.
- notepad.ui - the UI form for the Notepad widget.
The .cpp, .h, and .ui files come with the necessary boiler plate code for you to be able to build and run the project. The .pro file is complete. We will take a closer look at the file contents in the following sections.
Learn More
| About | Here |
|---|---|
| Using Qt Creator | Qt Creator |
| Creating other kind of applications with Qt Creator | Qt Creator Tutorials |
Main Source File
The wizard generates the following code in the main.cpp file:
#include "notepad.h"
#include <QApplication>

int main(int argc, char *argv[])
{
    QApplication a(argc, argv);
    Notepad w;
    w.show();

    return a.exec();
}
Let us go through the code line by line. The following lines include the header files for the Notepad widget and QApplication. All Qt classes have a header file named after them.
#include "notepad.h"
#include <QApplication>
The following line defines the main function that is the entry point for all C and C++ based applications:
int main(int argc, char *argv[])
{
The following line creates a QApplication object. This object manages application-wide resources and is necessary to run any Qt program that uses Qt Widgets. It constructs an application object with argc command line arguments run in argv. (For GUI applications that do not use Qt Widgets, you can use QGuiApplication instead.)
QApplication a(argc, argv);
The following line creates the Notepad object. This is the object for which the wizard created the class and the UI file. The user interface contains visual elements that are called widgets in Qt. Examples of widgets are text edits, scroll bars, labels, and radio buttons. A widget can also be a container for other widgets; a dialog or a main application window, for example.
Notepad w;
The following line shows the Notepad widget on the screen in its own window. Since widgets also function as containers (for instance a QMainWindow, which has toolbars, menus, a status bar, and a few other widgets), it is possible to show a single widget in its own window. Widgets are not visible by default; the function show() makes the widget visible.
w.show();The following line makes the QApplication enter its event loop. When a Qt application is running, events are generated and sent to the widgets of the application. Examples of events are mouse presses and key strokes.
return a.exec();
Learn More
| About | Here |
|---|---|
| Widgets and Window Geometry | Window and Dialog Widgets |
| Events and event handling | The Event System |
Designing a UI
The wizard generates a user interface definition in XML format, notepad.ui. When you open the notepad.ui file in Qt Creator, it automatically opens in the integrated Qt Designer.
When you build the application, Qt Creator launches the Qt User Interface Compiler (uic) that reads the .ui file and creates a corresponding C++ header file, ui_notepad.h.
Using Qt Designer
The wizard creates an application that uses a QMainWindow. It has its own layout to which you can add a menu bar, dock widgets, tool bars, and a status bar. The center area can be occupied by any kind of widget. The wizard places the Notepad widget there.
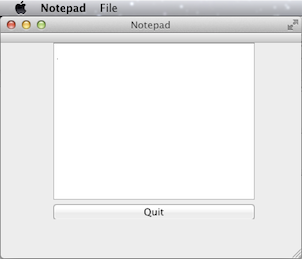
Let us use Qt Designer to add a QTextEdit object and a QPushButton object to the main window. When you type text in the text edit widget, it receives key pressed events and responds by drawing the text typed. The button will exit the Notepad application when pushed (that is, clicked with the mouse).
To add widgets in Qt Designer:
- In the Qt Creator Editor mode, double-click the notepad.ui file in the Projects view to launch the file in the integrated Qt Designer.
- Drag and drop the following widgets to the form:
- Text Edit (QTextEdit)
- Push Button (QPushButton)
- Double-click the Push Button widget and enter the text Quit.
- In the Properties pane, change the value of objectName to quitButton.
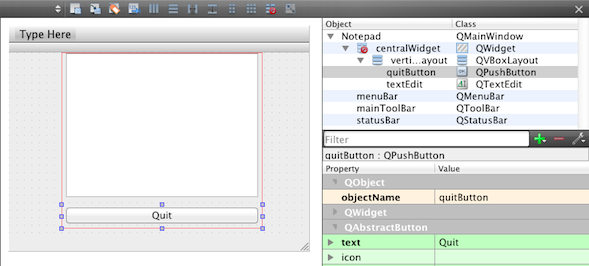
- Press Ctrl+A (or Cmd+A) to select the widgets and click Lay out Vertically (or press Ctrl+L) to apply a vertical layout (QVBoxLayout).
- Press Ctrl+S (or Cmd+S) to save your changes.
The UI now looks as follows in Qt Designer:
You can view the generated XML file in the code editor:
<?xml version="1.0" encoding="UTF-8"?>
<ui version="4.0">
 <class>Notepad</class>
 <widget class="QMainWindow" name="Notepad">
  <property name="geometry">
   <rect>
    <x>0</x>
    <y>0</y>
    <width>400</width>
    <height>300</height>
   </rect>
  </property>
  <property name="windowTitle">
   <string>Notepad</string>
  </property>
  <widget class="QWidget" name="centralWidget">
   <widget class="QWidget" name="">
    <property name="geometry">
     <rect>
      <x>70</x>
      <y>0</y>
      <width>268</width>
      <height>235</height>
     </rect>
    </property>
    <layout class="QVBoxLayout" name="verticalLayout">
     <item>
      <widget class="QTextEdit" name="textEdit"/>
     </item>
     <item>
      <widget class="QPushButton" name="quitButton">
       <property name="text">
        <string>Quit</string>
       </property>
      </widget>
     </item>
    </layout>
   </widget>
  </widget>
  <widget class="QMenuBar" name="menuBar">
    ...
The following line contains the XML declaration, which specifies the XML version and character encoding used in the document:
<?xml version="1.0" encoding="UTF-8"?>
The rest of the file specifies an ui element that defines a Notepad widget:
<ui version="4.0">
The following snippet creates a QVBoxLayout widget that contains a QTextEdit and QPushButton widget. As mentioned, widgets can contain other widgets. It is possible to set the bounds (the location and size) of child widgets directly, but it is usually easier to use a layout. A layout manages the bounds of a widget's children. QVBoxLayout, for instance, places the children in a vertical row.
<layout class="QVBoxLayout" name="verticalLayout">
 <item>
  <widget class="QTextEdit" name="textEdit"/>
 </item>
 <item>
  <widget class="QPushButton" name="quitButton">
   <property name="text">
    <string>Quit</string>
   </property>
  </widget>
 </item>
</layout>
The UI file is used together with the header and source file of the Notepad class. We will look at the rest of the UI file in the later sections.
Notepad Header File
The wizard generated a header file for the Notepad class that has the necessary #includes, a constructor, a destructor, and the Ui object. The file looks as follows:
#include <QMainWindow>

namespace Ui {
class Notepad;
}

class Notepad : public QMainWindow
{
    Q_OBJECT

public:
    explicit Notepad(QWidget *parent = 0);
    ~Notepad();

private:
    Ui::Notepad *ui;
};
The following line includes QMainWindow that provides a main application window:
#include <QMainWindow>The following lines declare the Notepad class in the Ui namespace, which is the standard namespace for the UI classes generated from .ui files by the uic tool:
namespace Ui {
class Notepad;
}
The class declaration contains the Q_OBJECT macro. It must come first in the class definition, and declares our class as a QObject. Naturally, it must also inherit from QObject. A QObject adds several abilities to a normal C++ class. Notably, the class name and slot names can be queried at run-time. It is also possible to query a slot's parameter types and invoke it.
class Notepad : public QMainWindow
{
    Q_OBJECT
The following lines declare a constructor that has a default argument called parent. The value 0 indicates that the widget has no parent (it is a top-level widget).
public:
    explicit Notepad(QWidget *parent = 0);
The following line declares a virtual destructor to free the resources that were acquired by the object during its life-cycle. According to the C++ naming convention, destructors have the same name as the class they are associated with, prefixed with a tilde (~). In QObject, destructors are virtual to ensure that the destructors of derived classes are invoked properly when an object is deleted through a pointer-to-base-class.
~Notepad();The following lines declare a member variable which is a pointer to the Notepad UI class. A member variable is associated with a specific class, and accessible for all its methods.
private:
    Ui::Notepad *ui;
Notepad Source File
The source file that the wizard generated for the Notepad class looks as follows:
#include "notepad.h"
#include "ui_notepad.h"

Notepad::Notepad(QWidget *parent) :
    QMainWindow(parent),
    ui(new Ui::Notepad)
{

    ui->setupUi(this);
}

Notepad::~Notepad()
{
    delete ui;
}
The following lines include the Notepad class header file that was generated by the wizard and the UI header file that was generated by the uic tool:
#include "notepad.h"
#include "ui_notepad.h"
The following line defines the Notepad constructor:
Notepad::Notepad(QWidget *parent) :
The following line calls the QMainWindow constructor, which is the base class for the Notepad class:
QMainWindow(parent),
The following line creates the UI class instance and assigns it to the ui member:
ui(new Ui::Notepad)
The following line sets up the UI:
ui->setupUi(this);
In the destructor, we delete the ui:
Notepad::~Notepad()
{
    delete ui;
}
Project File
The wizard generates the following project file, notepad.pro, for us:
QT       += core gui

greaterThan(QT_MAJOR_VERSION, 4): QT += widgets

TARGET = Notepad
TEMPLATE = app

SOURCES += main.cpp\
        notepad.cpp

HEADERS  += notepad.h

FORMS    += notepad.ui
The project file specifies the application name and the qmake template to use for generating the project, as well as the source, header, and UI files included in the project.
You could also use qmake's -project option to generate the .pro file. Although, in that case, you have to remember to add the line QT += widgets to the generated file in order to link against the Qt Widgets Module.
Learn More
| About | Here |
|---|---|
| Using Qt Designer | Qt Designer Manual |
| Layouts | Layout Management, Widgets and Layouts, Layout Examples |
| The widgets that come with Qt | Qt Widget Gallery |
| Main windows and main window classes | Application Main Window, Main Window Examples |
| QObjects and the Qt Object model (This is essential to understand Qt) | Object Model |
| qmake and the Qt build system | qmake Manual |
Adding User Interaction
We now have a user interface, but it does not really do anything useful, as it only contains a text edit and a push button, as well as some standard functions for quitting, minimizing and maximizing the application. To make the application useful, we will add user interaction to it. First, we will add functionality to the push button. Second, we will add functions for loading a file to the text edit and for saving the contents of the text edit as a file.
Adding Push Buttons
Most desktop operating systems have standard ways of enabling users to quit applications. However, in this example we use this basic function to illustrate how you can add user interaction to applications. To do this, we add a slot that we connect to the Quit button.
To exit the application when the Quit button is pushed, you use the Qt signals and slots mechanism. A signal is emitted when a particular event occurs and a slot is a function that is called in response to a particular signal. Qt widgets have predefined signals and slots that you can use directly from Qt Designer.
To use Qt Designer to add a slot for the quit function, right-click the Quit button to open a context-menu and then select Go to slot > clicked().
A private slot, on_quitButton_clicked(), is added to the Notepad widget class header file, notepad.h and a private function, Notepad::on_quitButton_clicked(), is added to the Notepad widget class source file, notepad.cpp. We just need to write the code to execute the quit function in the source file.
Let us look at the modified code in the header file, notepad.h:
namespace Ui {
class Notepad;
}

class Notepad : public QMainWindow
{
    Q_OBJECT

public:
    explicit Notepad(QWidget *parent = 0);
    ~Notepad();

private slots:
    void on_quitButton_clicked();

private:
    Ui::Notepad *ui;
};
The following code uses Qt's signals and slots mechanism to make the application exit when the Quit button is pushed. Qt Designer uses QMetaObject auto-connection facilities to connect the button's clicked() signal to a slot in the Notepad class. The uic tool automatically generates code in the dialog's setupUi() function to do this, so Qt Designer only needs to declare and implement a slot with a name that follows a standard convention.
private slots:
    void on_quitButton_clicked();
The corresponding code in the source file, notepad.cpp, looks as follows:
void Notepad::on_quitButton_clicked()
{

}
The code defines the private function that is executed when QPushButton emits the clicked() signal.
We now complement the code to have the quit() slot of QApplication exit Notepad:
void Notepad::on_quitButton_clicked()
{
    QCoreApplication::quit();
}
Learn More
| About | Here |
|---|---|
| Signals and slots | Signals & Slots |
Adding Menu Items
Often, in a main window, the same slot should be invoked by several widgets. Examples are menu items and buttons on a tool bar. To make this easier, Qt provides QAction, which can be given to several widgets, and be connected to a slot. For instance, both QMenu and QToolBar can create menu items and tool buttons from the same QAction.
To learn how to use actions with signals and slots, we add menu items to open and save a document and connect them to slots.
As before, we use Qt Designer to add the widgets to the user interface. The wizard creates an application with a QMenu widget, with the text Type Here as a placeholder for menu and menu item names. Double-click the text to enter names for the File menu and Open and Save menu items. Qt Designer automatically generates the appropriate actions.
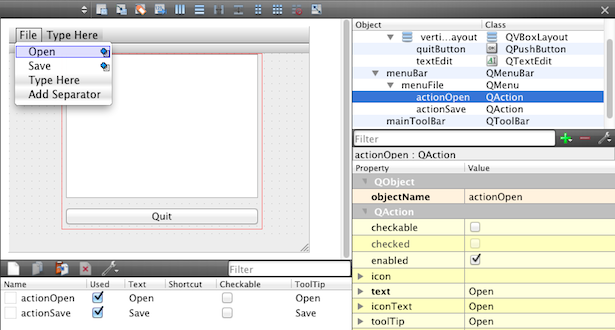
To connect the actions to slots, right-click an action and select Go to slot > triggered().
QAction instances are created with the text that should appear on the widgets that we add them to (in our case, menu items). If we also wanted to add the actions to a tool bar, we could have specified icons for them.
The modified code in notepad.ui now looks as follows:
  <widget class="QMenuBar" name="menuBar">
   <property name="geometry">
    <rect>
     <x>0</x>
     <y>0</y>
     <width>400</width>
     <height>22</height>
    </rect>
   </property>
   <widget class="QMenu" name="menuFile">
    <property name="title">
     <string>File</string>
    </property>
    <addaction name="actionOpen"/>
    <addaction name="actionSave"/>
   </widget>
   <addaction name="menuFile"/>
  </widget>
  <widget class="QToolBar" name="mainToolBar">
   <attribute name="toolBarArea">
    <enum>TopToolBarArea</enum>
   </attribute>
   <attribute name="toolBarBreak">
    <bool>false</bool>
   </attribute>
  </widget>
  <widget class="QStatusBar" name="statusBar"/>
  <action name="actionOpen">
   <property name="text">
    <string>Open</string>
   </property>
  </action>
  <action name="actionSave">
   <property name="text">
    <string>Save</string>
   </property>
  </action>
 </widget>
Qt Designer adds the private slots on_actionOpen_triggered() and on_actionSave_triggered() to notepad.h and the private functions Notepad::on_actionOpen_triggered() and Notepad::on_actionSave_triggered() to notepad.cpp.
In the following sections, we complement the code to load and save files. When a menu item is clicked, the item triggers the action, and the respective slot is invoked.
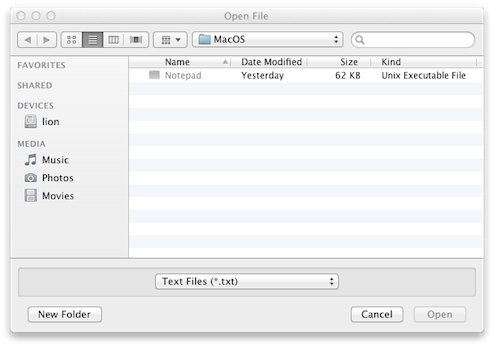
Opening Files
In this section, we implement the functionality of the on_actionOpen_triggered() slot. The first step is asking the user for the name of the file to open. Qt comes with QFileDialog, which is a dialog from which the user can select a file. The appearance of the dialog depends on the desktop platform that you run the application on. The following image shows the dialog on macOS:
We complement the code generated by Qt Designer in notepad.cpp, as follows:
void Notepad::on_actionOpen_triggered()
{
    QString fileName = QFileDialog::getOpenFileName(this, tr("Open File"), QString(),
            tr("Text Files (*.txt);;C++ Files (*.cpp *.h)"));

    if (!fileName.isEmpty()) {
        QFile file(fileName);
        if (!file.open(QIODevice::ReadOnly)) {
            QMessageBox::critical(this, tr("Error"), tr("Could not open file"));
            return;
        }
        QTextStream in(&file);
        ui->textEdit->setText(in.readAll());
        file.close();
    }
}
The static getOpenFileName() function displays a modal file dialog. It returns the file path of the file selected, or an empty string if the user canceled the dialog.
If we have a file name, we try to open the file with open(), which returns true if the file could be opened. We will not go into error handling here, but you can follow the links from the learn more section. If the file could not be opened, we use QMessageBox to display a dialog with an error message (see the QMessageBox class description for further details).
Actually reading in the data is trivial using the QTextStream class, which wraps the QFile object. The readAll() function returns the contents of the file as a QString. The contents can then be displayed in the text edit. We then close() the file to return the file descriptor back to the operating system.
We now use the function tr() around our user visible strings. This function is necessary when you want to provide your application in more than one language (for example, English and Chinese). We will not go into details here, but you can follow the Qt Linguist link from the learn more table.
To use QFileDialog, QFile, QMessageBox, and QTextStream, add the following includes to notepad.cpp:
#include <QFileDialog>
#include <QFile>
#include <QMessageBox>
#include <QTextStream>
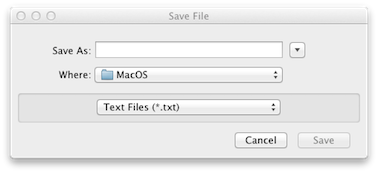
Saving Files
Now, let us move on to the on_actionSave_triggered() slot, which also uses QFileDialog to create a dialog in which the user can save a file with the specified name in the specified location.
We complement the code generated by Qt Designer in notepad.cpp, as follows:
void Notepad::on_actionSave_triggered()
{
    QString fileName = QFileDialog::getSaveFileName(this, tr("Save File"), QString(),
            tr("Text Files (*.txt);;C++ Files (*.cpp *.h)"));

    if (!fileName.isEmpty()) {
        QFile file(fileName);
        if (!file.open(QIODevice::WriteOnly)) {
            // error message
        } else {
            QTextStream stream(&file);
            stream << ui->textEdit->toPlainText();
            stream.flush();
            file.close();
        }
    }
}
When we write the contents of the text edit to the file, we use the QTextStream class again. QTextStream can also write QStrings to the file with the << operator.
Learn More
| About | Here |
|---|---|
| MDI applications | QMdiArea, MDI Example |
| Files and I/O devices | QFile, QIODevice |
| tr() and internationalization | Qt Linguist Manual, Writing Source Code for Translation, Internationalization with Qt |
Building and Running Notepad
Now that you have all the necessary files, select Build > Build Project Notepad to build and run the application. Qt Creator uses qmake and make to create an executable in the directory specified in the build settings of the project and runs it.
Building and Running from the Command Line
To build the application from the command line, switch to the directory in which you have the .cpp file of the application and add the project file (suffixed .pro) described earlier. The following shell commands then build the application:
qmake
make (or nmake on Windows)
The commands create an executable in the project directory. The qmake tool reads the project file and produces a Makefile with instructions on how to build the application. The make tool (or the nmake tool) then reads the Makefile and produces the executable binary.
© 2017 The Qt Company Ltd. Documentation contributions included herein are the copyrights of their respective owners. The documentation provided herein is licensed under the terms of the GNU Free Documentation License version 1.3 as published by the Free Software Foundation. Qt and respective logos are trademarks of The Qt Company Ltd. in Finland and/or other countries worldwide. All other trademarks are property of their respective owners.