Warning
This section contains snippets that were automatically translated from C++ to Python and may contain errors.
Qt Quick How-tos
This page aims to provide an easily discoverable, useful reference that shows the simplest and best way of performing specific tasks in Qt Quick. Each solution provides QML and/or C++ code snippets where applicable, and every snippet is automatically tested by Qt to ensure they remain functional.
How do I:
See which item has active focus
Write a property change signal handler for the window’s activeFocusItem property:
import QtQuick
import QtQuick.Controls

ApplicationWindow {
    width: 400
    height: 400
    visible: true
    title: qsTr("Active focus debugging example")

    onActiveFocusItemChanged: print("activeFocusItem: " + activeFocusItem)

    Row {
        TextField {
            objectName: "textField1"
        }
        TextField {
            objectName: "textField2"
        }
    }
}
This will print the item which currently has active focus to the console. To ensure that the output is useful, give each item a descriptive objectName.
Create a time picker like Android’s TimePickerDialog
We’ve prepared an example that consists of a few QML files which demonstrate how to do this. They can be used in your application in the following manner:
import QtQuick
import QtQuick.Layouts
import QtQuick.Controls.Material

ApplicationWindow {
    id: window
    width: 600
    height: 600
    visible: true
    title: qsTr("Time Picker Example")

    Material.theme: darkThemeSwitch.checked ? Material.Dark : Material.Light

    // Shows the selected time and opens the dialog.
    TimeComponentLabel {
        id: openDialogLabel
        width: parent.width - 80
        anchors.centerIn: parent
        font.pixelSize: Qt.application.font.pixelSize * 8
        renderTypeQuality: Text.VeryHighRenderTypeQuality
        interactive: !timePickerDialog.opened

        text: Qt.formatTime(new Date(1970, 1, 1, timePickerDialog.hours, timePickerDialog.minutes), "hh:mm")

        onTapped: timePickerDialog.openWithMode(TimePicker.Mode.Hours)
    }

    ColumnLayout {
        // We always want the openDialogLabel to be centered in the window, not us.
        // For that reason, we use anchors rather than putting the root items into a ColumnLayout.
        anchors.horizontalCenter: parent.horizontalCenter
        anchors.top: openDialogLabel.bottom
        anchors.topMargin: 24
        spacing: 12

        Switch {
            id: is24HourSwitch
            text: qsTr("24 Hour")
            checked: timePickerDialog.is24Hour
        }
        Switch {
            id: darkThemeSwitch
            text: qsTr("Dark")
        }
    }

    TimePickerDialog {
        id: timePickerDialog
        anchors.centerIn: parent
        is24Hour: is24HourSwitch.checked

        onTimeAccepted: print("A time was chosen - do something here!")
    }
}
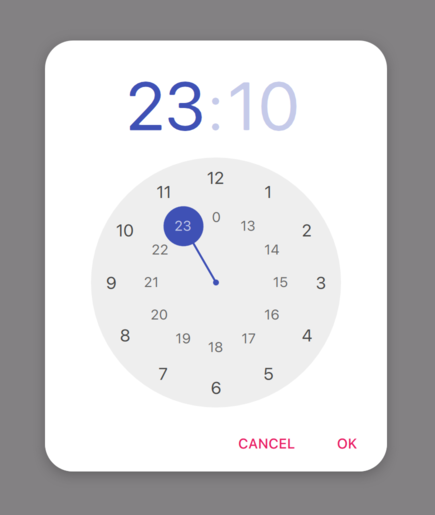
TimePickerDialog in its light theme.
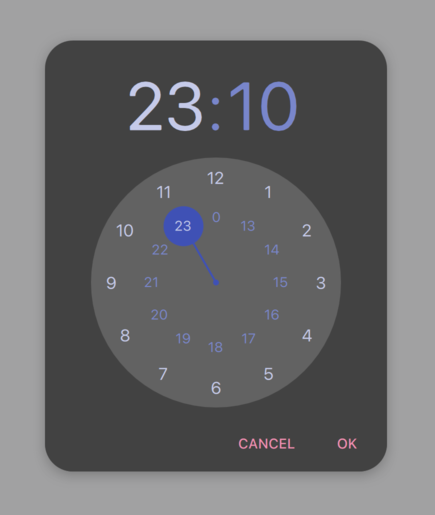
TimePickerDialog in its dark theme.
Use a C++ enum in JavaScript
To expose a C++ enum to JavaScript (that is, QJSEngine, not QQmlEngine or QQmlApplicationEngine), use newQMetaObject() and registerModule():
The enum can then be used from JavaScript:
export function backendStatusUpdate(backendStatus) {
    if (backendStatus === Backend.Error) {
        console.warn("Error!")
        return
    }

    console.log("Backend loaded successfully")
}
When using QQmlEngine or QQmlApplicationEngine, there are easier options; see Choosing the Correct Integration Method Between C++ and QML for more information.
backend.h:
<Code snippet "how-tos/how-to-cpp-enum-js/backend.h:file" not found>
backend.cpp:
<Code snippet "how-tos/how-to-cpp-enum-js/backend.cpp:file" not found>
For more information, see QObject Integration.
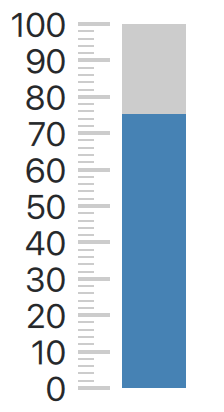
Create a Gauge
We’ve prepared an example that consists of a few C++ and QML files which demonstrate how to do this. They can be used in your application in the following manner:
import QtQuick.Controls

import GaugeHowTo

ApplicationWindow {
    width: 400
    height: 400
    title: qsTr("Gauge example")

    Gauge {
        minimumValue: 0
        value: 75
        maximumValue: 100
    }
}