Warning
This section contains snippets that were automatically translated from C++ to Python and may contain errors.
Widgets Tutorial - Nested Layouts#
Just as widgets can contain other widgets, layouts can be used to provide different levels of grouping for widgets. Here, we want to display a label alongside a line edit at the top of a window, above a table view showing the results of a query.
We achieve this by creating two layouts: queryLayout is a QHBoxLayout that contains QLabel and QLineEdit widgets placed side-by-side; mainLayout is a QVBoxLayout that contains queryLayout and a QTableView arranged vertically.
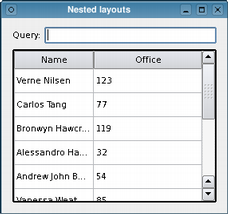
Note that we call the mainLayout's addLayout() function to insert the queryLayout above the resultView table.
We have omitted the code that sets up the model containing the data shown by the QTableView widget, resultView. For completeness, we show this below.
As well as QHBoxLayout and QVBoxLayout , Qt also provides QGridLayout and QFormLayout classes to help with more complex user interfaces. These can be seen if you run Qt Designer.
Setting up the Model#
In the code above, we did not show where the table’s data came from because we wanted to concentrate on the use of layouts. Here, we see that the model holds a number of items corresponding to rows, each of which is set up to contain data for two columns.
    model = QStandardItemModel()
    model.setHorizontalHeaderLabels({ QApplication.translate("nestedlayouts", "Name"),
                                      QApplication.translate("nestedlayouts", "Office") })
    rows = {
        QStringList{ "Verne Nilsen", "123" },
        QStringList{ "Carlos Tang", "77" },
        QStringList{ "Bronwyn Hawcroft", "119" },
        QStringList{ "Alessandro Hanssen", "32" },
        QStringList{ "Andrew John Bakken", "54" },
        QStringList{ "Vanessa Weatherley", "85" },
        QStringList{ "Rebecca Dickens", "17" },
        QStringList{ "David Bradley", "42" },
        QStringList{ "Knut Walters", "25" },
        QStringList{ "Andrea Jones", "34" }

*> = QList<QStandardItem()
    for row in rows:
        items.clear()
        for text in row:
            items.append(QStandardItem(text))
        model.appendRow(items)

    resultView.setModel(model)
    resultView.verticalHeader().hide()
    resultView.horizontalHeader().setStretchLastSection(True)
The use of models and views is covered in the Item Views Examples and in the Model/View Programming overview.