Getting to Know Qt Designer
Launching Designer
Once you have installed Qt, you can start Qt Designer in the same way as any other application on the development host. You can also launch Qt Designer directly from Qt Creator. Qt Creator automatically opens all .ui files in the integrated Qt Designer, in Design mode.
Generally, the integrated Qt Designer contains the same functions as the standalone Qt Designer. For more information about the differences, see the Qt Creator Manual.
If you have large forms that do not fit in the Qt Creator Design mode, you can open them in the stand-alone Qt Designer.
The User Interface
When used as a standalone application, Qt Designer's user interface can be configured to provide either a multi-window user interface (the default mode), or it can be used in docked window mode. When used from within an integrated development environment (IDE) only the multi-window user interface is available. You can switch modes in the Preferences dialog from the Edit menu.
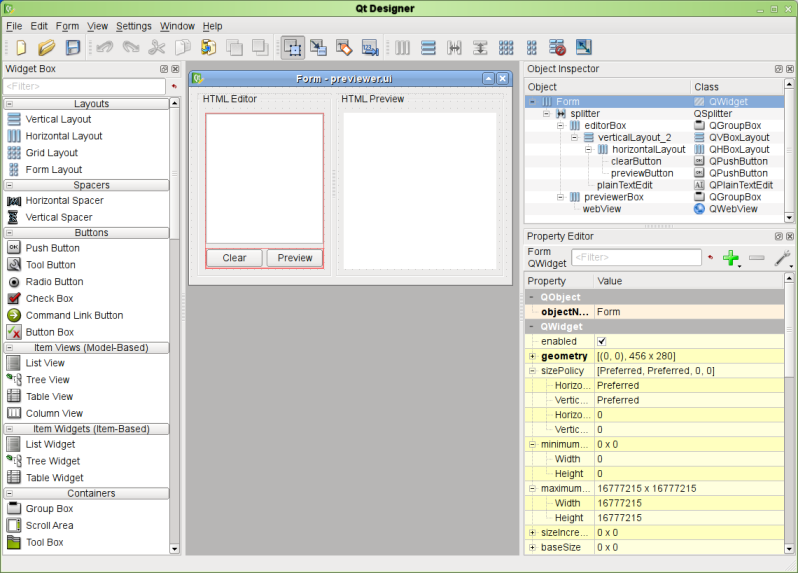
In multi-window mode, you can arrange each of the tool windows to suit your working style. The main window consists of a menu bar, a tool bar, and a widget box that contains the widgets you can use to create your user interface.
 | Qt Designer's Main Window The menu bar provides all the standard actions for managing forms, using the clipboard, and accessing application-specific help. The current editing mode, the tool windows, and the forms in use can also be accessed via the menu bar. The tool bar displays common actions that are used when editing a form. These are also available via the main menu. The widget box provides common widgets and layouts that are used to design components. These are grouped into categories that reflect their uses or features. |
Most features of Qt Designer are accessible via the menu bar, the tool bar, or the widget box. Some features are also available through context menus that can be opened over the form windows. On most platforms, the right mouse is used to open context menus.
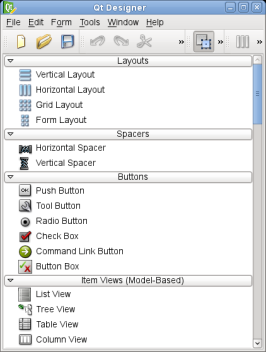
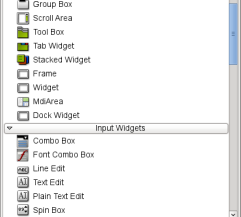 | Qt Designer's Widget Box The widget box provides a selection of standard Qt widgets, layouts, and other objects that can be used to create user interfaces on forms. Each of the categories in the widget box contain widgets with similar uses or related features. You can display all of the available objects in a category by clicking on the handle next to the category label. When in Widget Editing Mode, you can add objects to a form by dragging the appropriate items from the widget box onto the form, and dropping them in the required locations. Qt Designer provides a scratch pad feature that allows you to collect frequently used objects in a separate category. The scratch pad category can be filled with any widget currently displayed in a form by dragging them from the form and dropping them onto the widget box. These widgets can be used in the same way as any other widgets, but they can also contain child widgets. Open a context menu over a widget to change its name or remove it from the scratch pad. |
The Concept of Layouts in Qt
A layout is used to arrange and manage the elements that make up a user interface. Qt provides a number of classes to automatically handle layouts -- QHBoxLayout, QVBoxLayout, QGridLayout, and QFormLayout. These classes solve the challenge of laying out widgets automatically, providing a user interface that behaves predictably. Fortunately knowledge of the layout classes is not required to arrange widgets with Qt Designer. Instead, select one of the Lay Out Horizontally, Lay Out in a Grid, etc., options from the context menu.
Each Qt widget has a recommended size, known as sizeHint(). The layout manager will attempt to resize a widget to meet its size hint. In some cases, there is no need to have a different size. For example, the height of a QLineEdit is always a fixed value, depending on font size and style. In other cases, you may require the size to change, e.g., the width of a QLineEdit or the width and height of item view widgets. This is where the widget size constraints -- minimumSize and maximumSize constraints come into play. These are properties you can set in the property editor. For example, to override the default sizeHint(), simply set minimumSize and maximumSize to the same value. Alternatively, to use the current size as a size constraint value, choose one of the Size Constraint options from the widget's context menu. The layout will then ensure that those constraints are met. To control the size of your widgets via code, you can reimplement sizeHint() in your code.
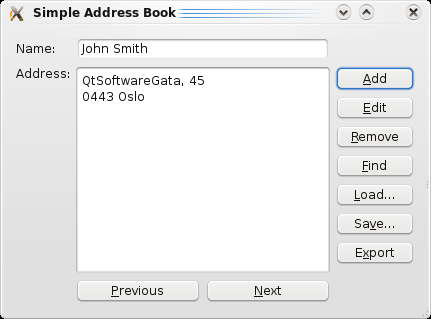
The screenshot below shows the breakdown of a basic user interface designed using a grid. The coordinates on the screenshot show the position of each widget within the grid.
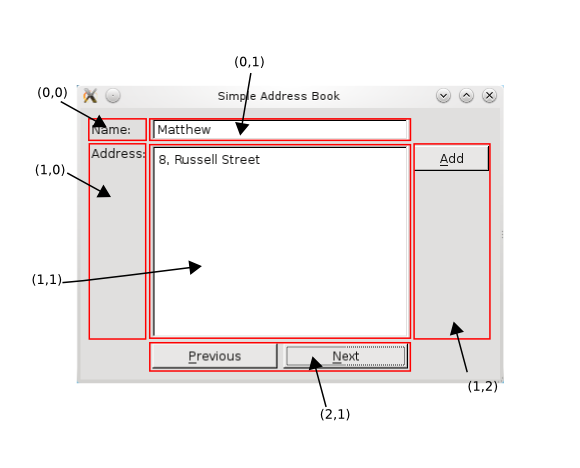
Note: Inside the grid, the QPushButton objects are actually nested. The buttons on the right are first placed in a QVBoxLayout; the buttons at the bottom are first placed in a QHBoxLayout. Finally, they are put into coordinates (1,2) and (2,1) of the QGridLayout.
To visualize, imagine the layout as a box that shrinks as much as possible, attempting to squeeze your widgets in a neat arrangement, and, at the same time, maximize the use of available space.
Qt's layouts help when you:
- Resize the user face to fit different window sizes.
- Resize elements within the user interface to suit different localizations.
- Arrange elements to adhere to layout guidelines for different platforms.
So, you no longer have to worry about rearranging widgets for different platforms, settings, and languages.
The example below shows how different localizations can affect the user interface. When a localization requires more space for longer text strings the Qt layout automatically scales to accommodate this, while ensuring that the user interface looks presentable and still matches the platform guidelines.
| A Dialog in English | A Dialog in French |
|---|---|
|
|

The process of laying out widgets consists of creating the layout hierarchy while setting as few widget size constraints as possible.
For a more technical perspective on Qt's layout classes, refer to the Layout Management documentation.
© 2025 The Qt Company Ltd. Documentation contributions included herein are the copyrights of their respective owners. The documentation provided herein is licensed under the terms of the GNU Free Documentation License version 1.3 as published by the Free Software Foundation. Qt and respective logos are trademarks of The Qt Company Ltd. in Finland and/or other countries worldwide. All other trademarks are property of their respective owners.
