
Usage
Introduction
The QmlLive system is structured in a modular fashion to be able to meet various requirements.
Normally, in the early phase of a project, you want to use QmlLive Bench, which has everything included in a typical desktop application.
Later in the project, you may want to test your UI code on a target device. For this, you can use the QmlLive Bench in combination with the QmlLive Runtime. This combination offers you a default QML renderer to run on the device and a small remote application on the desktop to control it.
For C++ developers, you can integrate the QmlLive system into your own custom runtime using the LiveNodeEngine class with a few lines of code, and then use the QmlLive Bench to control it.
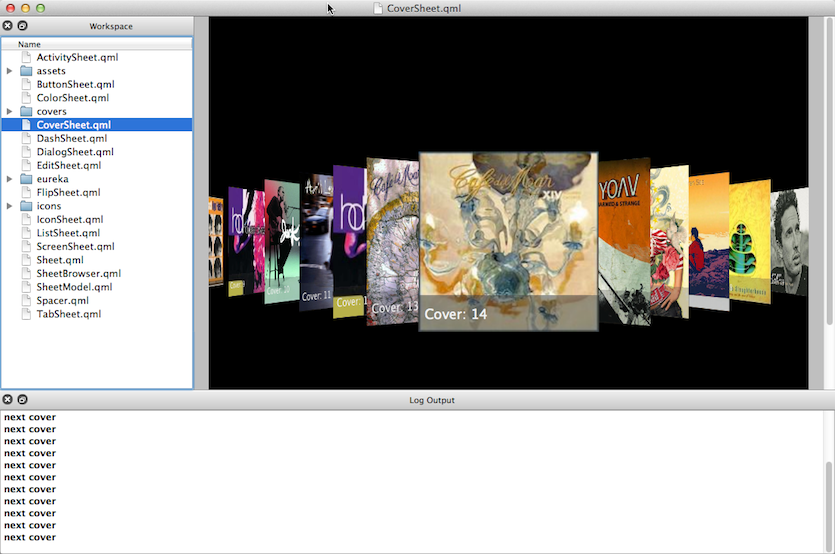
The Workbench
The standard workbench is the all inclusive QML live reloading tool, that allows you to select a workspace to watch over and provides a default QML runtime for the selected QML document.
To launch the Workbench, run the following command:
$(QMLIVEPROJECT)/bin/qmllivebench[.exe]
You can pass command line arguments to the QmlLive Bench as follows:
qmllivebench [options] <workspace>
qmllivebench [options] <workspace/file.qml>
The following options are supported:
| Option | Description |
|---|---|
-version | Display version information. |
-pluginpath | Specify the path to QmlLive plugins. |
-importpath | Specify the path to the QML import. |
-stayontop | Keep the viewer window on top. |
-addhost <name, address[,port]> | Add or update the remote host configuration and then exit. |
-rmhost <name> | Remove the specified remote host configuration and then exit. |
-probehost <name> | Suggest the specified host to be online and to connect; implies -remotely. |
-noremote | Do not try to talk to a running Bench; do not listen for remote connections. |
-remoteonly | Talk to a running Bench; do nothing if there is no bench running. |
-ping | Check if there is a Bench running and accepting remote connections. |
-maxdirwatch <number> | Limit the number of directories to watch for changes. |
-project | Loads a project's .qmllive document that contains the workspace path, import paths, and the main document in JSON format. |
The following arguments are supported:
| Argument | Description |
|---|---|
workspace | Specify the workspace folder to watch. If this folder points to a QML document, then the directory is assumed to be the workspace and the file is the active document. |
document | The main QML document to load, initially. |
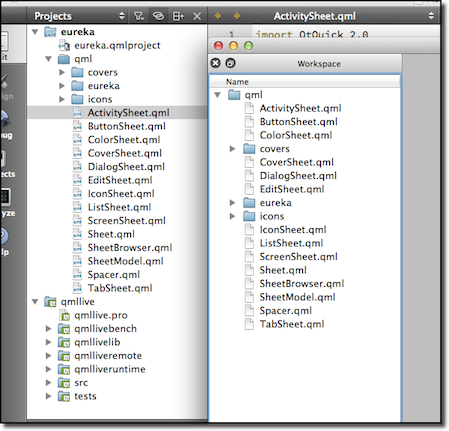
Integrate with Qt Creator
You can integrate the QmlLive Bench into Qt Creator, as an external tool. To do so:
- From Qt Creator, open the Settings/Options dialog.
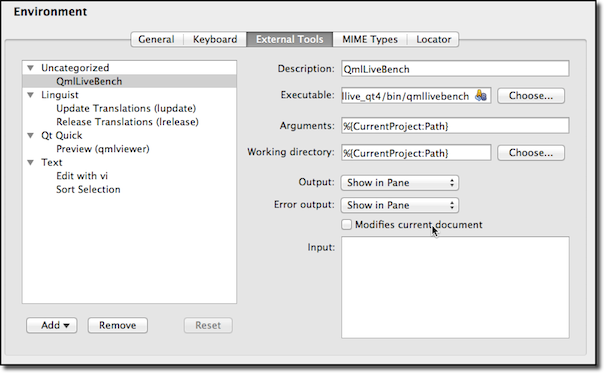
- Open the Environment group. The External Tools tab is located here.
- Under Executable, enter the path to your QmlLive Bench executable.
QmlLive Bench is now availabe under Tool > External > QmlLive Bench. To launch QmlLive Bench easily, you can also assign a shortcut to the tool.
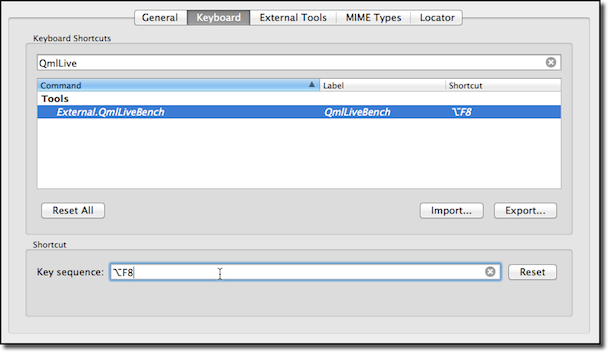
Now when you press Alt+F8 QmlLive Bench launches with the current project root folder open, as its workspace.
QmlLive Runtime
The QmlLive Runtime tool provides a default runtime, with a default QML viewer, and listens on a given port for IPC calls from the remote. This tool is ideal for development on a target device, when no extra C++ code is required.
To call the runtime, run the following command:
$(QMLIVEPROJECT)/bin/qmlliveruntime[.exe]
To use the runtime, run the following command:
qmlliveruntime [options] <workspace>
The following options are supported:
| Option | Description |
|---|---|
-version | Display version information. |
-ipcport <port> | The port which the IPC listens on. |
-updates-as-overlay | Allow the viewer to receive updates with read only workspace. |
-update-on-connect | Update all workspace documents, initially. This is a blocking option. |
-pluginpath | Specify the path to QmlLive plugins. |
-importpath | Specify the path to the QML import. |
-fullscreen | Show the viewer window in fullscreen mode. |
-transparent | Make the viewer window transparent. |
-frameless | Run the viewer with no window frame. |
-stayontop | Keep the viewer window on top. |
Not all projects are designed in a way to allow the designer working on isolated panels or screens. Sometimes, it may be necessary to deploy the whole project to a target device to run it. Receiving updates normally requires write access to the deployed files. But, depending on the target platform, the project may be deployed to a location which is not writable by the user. In most cases, modifying the file permissions after deployment can help. However, a more convenient method is to let the QmlLive Runtime store all updates in a writable workspace overlay. Use the -updates-as-overlay option to enable this feature.
When you update documents later, after application startup, you may encounter other constraints. If this is the case the -update-on-connect option can help. When this option is used, all workspace documents are updated before any QML components are instantiated.
Custom Runtime
You can create your own custom runtime with QmlLive features. This way, you can use your QML view setup with your additional C++ code together with the QmlLive system.
For this, you need to use the LiveNodeEngine class to be able to receive workspace changes and active document updates. By default, the IPC listens on port 10234.
The code snippet below shows an example of a minimal custom QmlLive runtime:
#include <QtGui>
#include <QtQuick>

// Use QmlLive headers
#include "livenodeengine.h"
#include "remotereceiver.h"

class MyQmlApplicationEngine : public QQmlApplicationEngine
{
    Q_OBJECT

public:
    MyQmlApplicationEngine(const QString &mainQml); // Perform some setup here

    QString mainQml() const;
    QQuickWindow *mainWindow();
    QList<QQmlError> warnings() const;

    // ...
};

int main(int argc, char **argv)
{
    QGuiApplication app(argc, argv);
    MyQmlApplicationEngine engine(QStringLiteral("qml/customruntime-window.qml"));

    if (!qEnvironmentVariableIsSet("MY_APP_ENABLE_QMLLIVE"))
        return app.exec();

#if defined(QT_NO_DEBUG)
    qWarning() << "QmlLive support was disabled at compile time";
#else
    LiveNodeEngine node;

    // Let QmlLive know your runtime
    node.setQmlEngine(&engine);

    // Allow it to display QML components with non-QQuickWindow root object
    QQuickView fallbackView(&engine, 0);
    node.setFallbackView(&fallbackView);

    // Tell it where file updates should be stored relative to
    node.setWorkspace(app.applicationDirPath(),
                      LiveNodeEngine::AllowUpdates | LiveNodeEngine::UpdatesAsOverlay);

    // Listen to IPC call from remote QmlLive Bench
    RemoteReceiver receiver;
    receiver.registerNode(&node);
    receiver.listen(10234);

    // Advanced use: let it know the initially loaded QML component (do this
    // only after registering to receiver!)
    node.usePreloadedDocument(engine.mainQml(), engine.mainWindow(), engine.warnings());
#endif

    return app.exec();
}
On platforms where pkg-config is supported, add the following lines to your project file, if QmlLive is installed on your build host:
CONFIG += link_pkgconfig
PKGCONFIG += qmllive
Another option is to compile everything directly into your application by including $(QMLLIVEPROJECT)/src/src.pri in your project file.
© 2019 Luxoft Sweden AB. Documentation contributions included herein are the copyrights of their respective owners. The documentation provided herein is licensed under the terms of the GNU Free Documentation License version 1.3 as published by the Free Software Foundation. Qt and respective logos are trademarks of The Qt Company Ltd. in Finland and/or other countries worldwide. All other trademarks are property of their respective owners.