Qt Quick Examples - Window and Screen
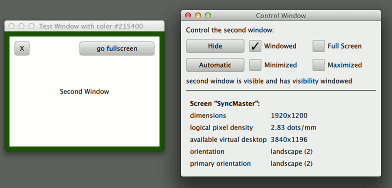
This example demonstrates the Window and Screen types in QML.

Window and Screen shows how to:
- create a window in QML
- control its visibility
- present a splash screen during application startup
- access the properties of the Screen
It also demonstrates how to package QML into resources and provide an icon to create a standalone QML desktop application.
Running the Example
To run the example from Qt Creator, open the Welcome mode and select the example from Examples. For more information, visit Building and Running an Example.
Window Implementation
A splash screen can be created with the Qt.SplashScreen flag, and should be ApplicationModal to prevent interaction with the main window. If the splash window is also transparent, and showing a partially transparent image, then it will look like a shaped window.
Window {
    id: splash
    color: "transparent"
    title: "Splash Window"
    modality: Qt.ApplicationModal
    flags: Qt.SplashScreen
    property int timeoutInterval: 2000
    signal timeout
In this example a Timer will automatically dismiss the splash screen, but in a real application you might want to connect to a signal from the application logic to hide the splash when initialization is complete.
Timer {
    interval: splash.timeoutInterval; running: true; repeat: false
    onTriggered: {
        splash.visible = false
        splash.timeout()
    }
}
The main window in this example is the control window, with some buttons and checkboxes to control and provide feedback on the state of a secondary window. Each checkbox has a binding to the property whose state it is displaying, and also an onClicked handler to change the state. This is the typical pattern to create a two-way binding while avoiding binding loops.
Shared.CheckBox {
    text: "Windowed"
    height: showButton.height
    width: col.cellWidth
    Binding on checked { value: root.testWindow.visibility === Window.Windowed }
    onClicked: root.testWindow.visibility = Window.Windowed
}
Screen has several properties which are generally useful to applications which need to rotate some content when the screen orientation changes, to position windows on the screen or to convert real units to logical pixel units. CurrentScreen.qml (which is displayed inline in window.qml, or can be run by itself with qmlscene) simply displays the property values, while the splash screen uses them to center the window on the screen.
    x: (Screen.width - splashImage.width) / 2
    y: (Screen.height - splashImage.height) / 2
If a Window is nested inside an Item or another Window, the inner window becomes transient for the outer one (see Window for more explanation). But if you want to create multiple top-level windows as unrelated peers, you can create them inside a non-visual QtObject root item, as this example does.
© 2024 The Qt Company Ltd. Documentation contributions included herein are the copyrights of their respective owners. The documentation provided herein is licensed under the terms of the GNU Free Documentation License version 1.3 as published by the Free Software Foundation. Qt and respective logos are trademarks of The Qt Company Ltd. in Finland and/or other countries worldwide. All other trademarks are property of their respective owners.

