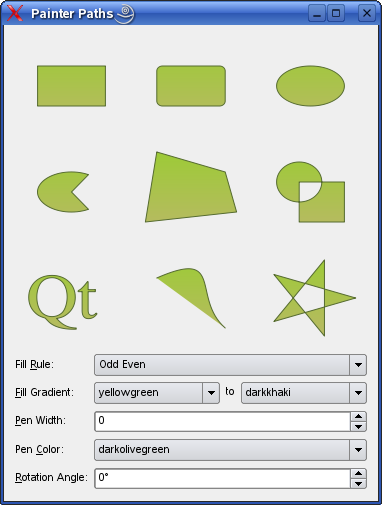
Painter Paths Example
The Painter Paths example shows how painter paths can be used to beuild complex shapes for rendering.
The QPainterPath class provides a container for painting operations, enabling graphical shapes to be constructed and reused.
A painter path is an object composed of a number of graphical building blocks (such as rectangles, ellipses, lines, and curves), and can be used for filling, outlining, and clipping. The main advantage of painter paths over normal drawing operations is that complex shapes only need to be created once, but they can be drawn many times using only calls to QPainter::drawPath().
The example consists of two classes:
- The
RenderAreaclass which is a custom widget displaying a single painter path. - The
Windowclass which is the applications main window displaying severalRenderAreawidgets, and allowing the user to manipulate the painter paths' filling, pen, color and rotation angle.
First we will review the Window class, then we will take a look at the RenderArea class.
Window Class Definition
The Window class inherits QWidget, and is the applications main window displaying several RenderArea widgets, and allowing the user to manipulate the painter paths' filling, pen, color and rotation angle.
class Window : public QWidget
{
    Q_OBJECT

public:
    Window();

private slots:
    void fillRuleChanged();
    void fillGradientChanged();
    void penColorChanged();
We declare three private slots to respond to user input regarding filling and color: fillRuleChanged(), fillGradientChanged() and penColorChanged().
When the user changes the pen width and the rotation angle, the new value is passed directly on to the RenderArea widgets using the QSpinBox::valueChanged() signal. The reason why we must implement slots to update the filling and color, is that QComboBox doesn't provide a similar signal passing the new value as argument; so we need to retrieve the new value, or values, before we can update the RenderArea widgets.
private:
    void populateWithColors(QComboBox *comboBox);
    QVariant currentItemData(QComboBox *comboBox);
We also declare a couple of private convenience functions: populateWithColors() populates a given QComboBox with items corresponding to the color names Qt knows about, and currentItemData() returns the current item for a given QComboBox.
    QList<RenderArea*> renderAreas;
    QLabel *fillRuleLabel;
    QLabel *fillGradientLabel;
    QLabel *fillToLabel;
    QLabel *penWidthLabel;
    QLabel *penColorLabel;
    QLabel *rotationAngleLabel;
    QComboBox *fillRuleComboBox;
    QComboBox *fillColor1ComboBox;
    QComboBox *fillColor2ComboBox;
    QSpinBox *penWidthSpinBox;
    QComboBox *penColorComboBox;
    QSpinBox *rotationAngleSpinBox;
};
Then we declare the various components of the main window widget. We also declare a convenience constant specifying the number of RenderArea widgets.
Window Class Implementation
In the Window constructor, we define the various painter paths and create corresponding RenderArea widgets which will render the graphical shapes:
Window::Window()
{
    QPainterPath rectPath;
    rectPath.moveTo(20.0, 30.0);
    rectPath.lineTo(80.0, 30.0);
    rectPath.lineTo(80.0, 70.0);
    rectPath.lineTo(20.0, 70.0);
    rectPath.closeSubpath();
We construct a rectangle with sharp corners using the QPainterPath::moveTo() and QPainterPath::lineTo() functions.
QPainterPath::moveTo() moves the current point to the point passed as argument. A painter path is an object composed of a number of graphical building blocks, i.e. subpaths. Moving the current point will also start a new subpath (implicitly closing the previously current path when the new one is started). The QPainterPath::lineTo() function adds a straight line from the current point to the given end point. After the line is drawn, the current point is updated to be at the end point of the line.
We first move the current point starting a new subpath, and we draw three of the rectangle's sides. Then we call the QPainterPath::closeSubpath() function which draws a line to the beginning of the current subpath. A new subpath is automatically begun when the current subpath is closed. The current point of the new path is (0, 0). We could also have called QPainterPath::lineTo() to draw the last line as well, and then explicitly start a new subpath using the QPainterPath::moveTo() function.
QPainterPath also provide the QPainterPath::addRect() convenience function, which adds a given rectangle to the path as a closed subpath. The rectangle is added as a clockwise set of lines. The painter path's current position after the rect has been added is at the top-left corner of the rectangle.
    QPainterPath roundRectPath;
    roundRectPath.moveTo(80.0, 35.0);
    roundRectPath.arcTo(70.0, 30.0, 10.0, 10.0, 0.0, 90.0);
    roundRectPath.lineTo(25.0, 30.0);
    roundRectPath.arcTo(20.0, 30.0, 10.0, 10.0, 90.0, 90.0);
    roundRectPath.lineTo(20.0, 65.0);
    roundRectPath.arcTo(20.0, 60.0, 10.0, 10.0, 180.0, 90.0);
    roundRectPath.lineTo(75.0, 70.0);
    roundRectPath.arcTo(70.0, 60.0, 10.0, 10.0, 270.0, 90.0);
    roundRectPath.closeSubpath();
Then we construct a rectangle with rounded corners. As before, we use the QPainterPath::moveTo() and QPainterPath::lineTo() functions to draw the rectangle's sides. To create the rounded corners we use the QPainterPath::arcTo() function.
QPainterPath::arcTo() creates an arc that occupies the given rectangle (specified by a QRect or the rectangle's coordinates), beginning at the given start angle and extending the given degrees counter-clockwise. Angles are specified in degrees. Clockwise arcs can be specified using negative angles. The function connects the current point to the starting point of the arc if they are not already connected.
    QPainterPath ellipsePath;
    ellipsePath.moveTo(80.0, 50.0);
    ellipsePath.arcTo(20.0, 30.0, 60.0, 40.0, 0.0, 360.0);
We also use the QPainterPath::arcTo() function to construct the ellipse path. First we move the current point starting a new path. Then we call QPainterPath::arcTo() with starting angle 0.0 and 360.0 degrees as the last argument, creating an ellipse.
Again, QPainterPath provides a convenience function ( QPainterPath::addEllipse()) which creates an ellipse within a given bounding rectangle and adds it to the painter path. If the current subpath is closed, a new subpath is started. The ellipse is composed of a clockwise curve, starting and finishing at zero degrees (the 3 o'clock position).
    QPainterPath piePath;
    piePath.moveTo(50.0, 50.0);
    piePath.arcTo(20.0, 30.0, 60.0, 40.0, 60.0, 240.0);
    piePath.closeSubpath();
When constructing the pie chart path we continue to use a combination of the mentioned functions: First we move the current point, starting a new subpath. Then we create a line from the center of the chart to the arc, and the arc itself. When we close the subpath, we implicitly construct the last line back to the center of the chart.
    QPainterPath polygonPath;
    polygonPath.moveTo(10.0, 80.0);
    polygonPath.lineTo(20.0, 10.0);
    polygonPath.lineTo(80.0, 30.0);
    polygonPath.lineTo(90.0, 70.0);
    polygonPath.closeSubpath();
Constructing a polygon is equivalent to constructing a rectangle.
QPainterPath also provide the QPainterPath::addPolygon() convenience function which adds the given polygon to the path as a new subpath. Current position after the polygon has been added is the last point in polygon.
    QPainterPath groupPath;
    groupPath.moveTo(60.0, 40.0);
    groupPath.arcTo(20.0, 20.0, 40.0, 40.0, 0.0, 360.0);
    groupPath.moveTo(40.0, 40.0);
    groupPath.lineTo(40.0, 80.0);
    groupPath.lineTo(80.0, 80.0);
    groupPath.lineTo(80.0, 40.0);
    groupPath.closeSubpath();
Then we create a path consisting of a group of subpaths: First we move the current point, and create a circle using the QPainterPath::arcTo() function with starting angle 0.0, and 360 degrees as the last argument, as we did when we created the ellipse path. Then we move the current point again, starting a new subpath, and construct three sides of a square using the QPainterPath::lineTo() function.
Now, when we call the QPainterPath::closeSubpath() function the last side is created. Remember that the QPainterPath::closeSubpath() function draws a line to the beginning of the current subpath, i.e the square.
QPainterPath provide a convenience function, QPainterPath::addPath() which adds a given path to the path that calls the function.
    QPainterPath textPath;
    QFont timesFont("Times", 50);
    timesFont.setStyleStrategy(QFont::ForceOutline);
    textPath.addText(10, 70, timesFont, tr("Qt"));
When creating the text path, we first create the font. Then we set the font's style strategy which tells the font matching algorithm what type of fonts should be used to find an appropriate default family. QFont::ForceOutline forces the use of outline fonts.
To construct the text, we use the QPainterPath::addText() function which adds the given text to the path as a set of closed subpaths created from the supplied font. The subpaths are positioned so that the left end of the text's baseline lies at the specified point.
    QPainterPath bezierPath;
    bezierPath.moveTo(20, 30);
    bezierPath.cubicTo(80, 0, 50, 50, 80, 80);
To create the Bezier path, we use the QPainterPath::cubicTo() function which adds a Bezier curve between the current point and the given end point with the given control point. After the curve is added, the current point is updated to be at the end point of the curve.
In this case we omit to close the subpath so that we only have a simple curve. But there is still a logical line from the curve's endpoint back to the beginning of the subpath; it becomes visible when filling the path as can be seen in the applications main window.
    QPainterPath starPath;
    starPath.moveTo(90, 50);
    for (int i = 1; i < 5; ++i) {
        starPath.lineTo(50 + 40 * std::cos(0.8 * i * M_PI),
                        50 + 40 * std::sin(0.8 * i * M_PI));
    }
    starPath.closeSubpath();
The final path that we construct shows that you can use QPainterPath to construct rather complex shapes using only the previous mentioned QPainterPath::moveTo(), QPainterPath::lineTo() and QPainterPath::closeSubpath() functions.
    renderAreas.push_back(new RenderArea(rectPath));
    renderAreas.push_back(new RenderArea(roundRectPath));
    renderAreas.push_back(new RenderArea(ellipsePath));
    renderAreas.push_back(new RenderArea(piePath));
    renderAreas.push_back(new RenderArea(polygonPath));
    renderAreas.push_back(new RenderArea(groupPath));
    renderAreas.push_back(new RenderArea(textPath));
    renderAreas.push_back(new RenderArea(bezierPath));
    renderAreas.push_back(new RenderArea(starPath));
Now that we have created all the painter paths that we need, we create a corresponding RenderArea widget for each. In the end, we make sure that the number of render areas is correct using the Q_ASSERT() macro.
    fillRuleComboBox = new QComboBox;
    fillRuleComboBox->addItem(tr("Odd Even"), Qt::OddEvenFill);
    fillRuleComboBox->addItem(tr("Winding"), Qt::WindingFill);

    fillRuleLabel = new QLabel(tr("Fill &Rule:"));
    fillRuleLabel->setBuddy(fillRuleComboBox);
Then we create the widgets associated with the painter paths' fill rule.
There are two available fill rules in Qt: The Qt::OddEvenFill rule determine whether a point is inside the shape by drawing a horizontal line from the point to a location outside the shape, and count the number of intersections. If the number of intersections is an odd number, the point is inside the shape. This rule is the default.
The Qt::WindingFill rule determine whether a point is inside the shape by drawing a horizontal line from the point to a location outside the shape. Then it determines whether the direction of the line at each intersection point is up or down. The winding number is determined by summing the direction of each intersection. If the number is non zero, the point is inside the shape.
The Qt::WindingFill rule can in most cases be considered as the intersection of closed shapes.
    fillColor1ComboBox = new QComboBox;
    populateWithColors(fillColor1ComboBox);
    fillColor1ComboBox->setCurrentIndex(fillColor1ComboBox->findText("mediumslateblue"));

    fillColor2ComboBox = new QComboBox;
    populateWithColors(fillColor2ComboBox);
    fillColor2ComboBox->setCurrentIndex(fillColor2ComboBox->findText("cornsilk"));

    fillGradientLabel = new QLabel(tr("&Fill Gradient:"));
    fillGradientLabel->setBuddy(fillColor1ComboBox);

    fillToLabel = new QLabel(tr("to"));
    fillToLabel->setSizePolicy(QSizePolicy::Fixed, QSizePolicy::Fixed);

    penWidthSpinBox = new QSpinBox;
    penWidthSpinBox->setRange(0, 20);

    penWidthLabel = new QLabel(tr("&Pen Width:"));
    penWidthLabel->setBuddy(penWidthSpinBox);

    penColorComboBox = new QComboBox;
    populateWithColors(penColorComboBox);
    penColorComboBox->setCurrentIndex(penColorComboBox->findText("darkslateblue"));

    penColorLabel = new QLabel(tr("Pen &Color:"));
    penColorLabel->setBuddy(penColorComboBox);

    rotationAngleSpinBox = new QSpinBox;
    rotationAngleSpinBox->setRange(0, 359);
    rotationAngleSpinBox->setWrapping(true);
    rotationAngleSpinBox->setSuffix(QLatin1String("\xB0"));

    rotationAngleLabel = new QLabel(tr("&Rotation Angle:"));
    rotationAngleLabel->setBuddy(rotationAngleSpinBox);
We also create the other widgets associated with the filling, the pen and the rotation angle.
    connect(fillRuleComboBox, QOverload<int>::of(&QComboBox::activated),
            this, &Window::fillRuleChanged);
    connect(fillColor1ComboBox, QOverload<int>::of(&QComboBox::activated),
            this, &Window::fillGradientChanged);
    connect(fillColor2ComboBox, QOverload<int>::of(&QComboBox::activated),
            this, &Window::fillGradientChanged);
    connect(penColorComboBox, QOverload<int>::of(&QComboBox::activated),
            this, &Window::penColorChanged);

    for (RenderArea *area : qAsConst(renderAreas)) {
        connect(penWidthSpinBox, QOverload<int>::of(&QSpinBox::valueChanged),
                area, &RenderArea::setPenWidth);
        connect(rotationAngleSpinBox, QOverload<int>::of(&QSpinBox::valueChanged),
                area, &RenderArea::setRotationAngle);
    }
We connect the comboboxes activated() signals to the associated slots in the Window class, while we connect the spin boxes valueChanged() signal directly to the RenderArea widget's respective slots.
    QGridLayout *topLayout = new QGridLayout;

    int i = 0;
    for (RenderArea *area : qAsConst(renderAreas)) {
        topLayout->addWidget(area, i / 3, i % 3);
        ++i;
    }

    QGridLayout *mainLayout = new QGridLayout;
    mainLayout->addLayout(topLayout, 0, 0, 1, 4);
    mainLayout->addWidget(fillRuleLabel, 1, 0);
    mainLayout->addWidget(fillRuleComboBox, 1, 1, 1, 3);
    mainLayout->addWidget(fillGradientLabel, 2, 0);
    mainLayout->addWidget(fillColor1ComboBox, 2, 1);
    mainLayout->addWidget(fillToLabel, 2, 2);
    mainLayout->addWidget(fillColor2ComboBox, 2, 3);
    mainLayout->addWidget(penWidthLabel, 3, 0);
    mainLayout->addWidget(penWidthSpinBox, 3, 1, 1, 3);
    mainLayout->addWidget(penColorLabel, 4, 0);
    mainLayout->addWidget(penColorComboBox, 4, 1, 1, 3);
    mainLayout->addWidget(rotationAngleLabel, 5, 0);
    mainLayout->addWidget(rotationAngleSpinBox, 5, 1, 1, 3);
    setLayout(mainLayout);
We add the RenderArea widgets to a separate layout which we then add to the main layout along with the rest of the widgets.
    fillRuleChanged();
    fillGradientChanged();
    penColorChanged();
    penWidthSpinBox->setValue(2);

    setWindowTitle(tr("Painter Paths"));
}
Finally, we initialize the RenderArea widgets by calling the fillRuleChanged(), fillGradientChanged() and penColorChanged() slots, and we set the initial pen width and window title.
void Window::fillRuleChanged()
{
    Qt::FillRule rule = (Qt::FillRule)currentItemData(fillRuleComboBox).toInt();

    for (RenderArea *area : qAsConst(renderAreas))
        area->setFillRule(rule);
}

void Window::fillGradientChanged()
{
    QColor color1 = qvariant_cast<QColor>(currentItemData(fillColor1ComboBox));
    QColor color2 = qvariant_cast<QColor>(currentItemData(fillColor2ComboBox));

    for (RenderArea *area : qAsConst(renderAreas))
        area->setFillGradient(color1, color2);
}

void Window::penColorChanged()
{
    QColor color = qvariant_cast<QColor>(currentItemData(penColorComboBox));

    for (RenderArea *area : qAsConst(renderAreas))
        area->setPenColor(color);
}
The private slots are implemented to retrieve the new value, or values, from the associated comboboxes and update the RenderArea widgets.
First we determine the new value, or values, using the private currentItemData() function and the qvariant_cast() template function. Then we call the associated slot for each of the RenderArea widgets to update the painter paths.
void Window::populateWithColors(QComboBox *comboBox)
{
    const QStringList colorNames = QColor::colorNames();
    for (const QString &name : colorNames)
        comboBox->addItem(name, QColor(name));
}
The populateWithColors() function populates the given combobox with items corresponding to the color names Qt knows about provided by the static QColor::colorNames() function.
QVariant Window::currentItemData(QComboBox *comboBox)
{
    return comboBox->itemData(comboBox->currentIndex());
}
The currentItemData() function simply return the current item of the given combobox.
RenderArea Class Definition
The RenderArea class inherits QWidget, and is a custom widget displaying a single painter path.
class RenderArea : public QWidget
{
    Q_OBJECT

public:
    explicit RenderArea(const QPainterPath &path, QWidget *parent = nullptr);

    QSize minimumSizeHint() const override;
    QSize sizeHint() const override;

public slots:
    void setFillRule(Qt::FillRule rule);
    void setFillGradient(const QColor &color1, const QColor &color2);
    void setPenWidth(int width);
    void setPenColor(const QColor &color);
    void setRotationAngle(int degrees);

protected:
    void paintEvent(QPaintEvent *event) override;
We declare several public slots updating the RenderArea widget's associated painter path. In addition we reimplement the QWidget::minimumSizeHint() and QWidget::sizeHint() functions to give the RenderArea widget a reasonable size within our application, and we reimplement the QWidget::paintEvent() event handler to draw its painter path.
private:
    QPainterPath path;
    QColor fillColor1;
    QColor fillColor2;
    int penWidth;
    QColor penColor;
    int rotationAngle;
};
Each instance of the RenderArea class has a QPainterPath, a couple of fill colors, a pen width, a pen color and a rotation angle.
RenderArea Class Implementation
The constructor takes a QPainterPath as argument (in addition to the optional QWidget parent):
RenderArea::RenderArea(const QPainterPath &path, QWidget *parent)
    : QWidget(parent), path(path)
{
    penWidth = 1;
    rotationAngle = 0;
    setBackgroundRole(QPalette::Base);
}
In the constructor we initialize the RenderArea widget with the QPainterPath parameter as well as initializing the pen width and rotation angle. We also set the widgets background role; QPalette::Base is typically white.
QSize RenderArea::minimumSizeHint() const
{
    return QSize(50, 50);
}

QSize RenderArea::sizeHint() const
{
    return QSize(100, 100);
}
Then we reimplement the QWidget::minimumSizeHint() and QWidget::sizeHint() functions to give the RenderArea widget a reasonable size within our application.
void RenderArea::setFillRule(Qt::FillRule rule)
{
    path.setFillRule(rule);
    update();
}

void RenderArea::setFillGradient(const QColor &color1, const QColor &color2)
{
    fillColor1 = color1;
    fillColor2 = color2;
    update();
}

void RenderArea::setPenWidth(int width)
{
    penWidth = width;
    update();
}

void RenderArea::setPenColor(const QColor &color)
{
    penColor = color;
    update();
}

void RenderArea::setRotationAngle(int degrees)
{
    rotationAngle = degrees;
    update();
}
The various public slots updates the RenderArea widget's painter path by setting the associated property and make a call to the QWidget::update() function, forcing a repaint of the widget with the new rendering preferences.
The QWidget::update() slot does not cause an immediate repaint; instead it schedules a paint event for processing when Qt returns to the main event loop.
void RenderArea::paintEvent(QPaintEvent *)
{
    QPainter painter(this);
    painter.setRenderHint(QPainter::Antialiasing);
A paint event is a request to repaint all or parts of the widget. The paintEvent() function is an event handler that can be reimplemented to receive the widget's paint events. We reimplement the event handler to render the RenderArea widget's painter path.
First, we create a QPainter for the RenderArea instance, and set the painter's render hints. The QPainter::RenderHints are used to specify flags to QPainter that may, or may not, be respected by any given engine. QPainter::Antialiasing indicates that the engine should anti-alias the edges of primitives if possible, i.e. put additional pixels around the original ones to smooth the edges.
    painter.scale(width() / 100.0, height() / 100.0);
    painter.translate(50.0, 50.0);
    painter.rotate(-rotationAngle);
    painter.translate(-50.0, -50.0);
Then we scale the QPainter's coordinate system to ensure that the painter path is rendered in the right size, i.e that it grows with the RenderArea widget when the application is resized. When we constructed the various painter paths, they were all rnedered within a square with a 100 pixel width which is equivalent to RenderArea::sizeHint(). The QPainter::scale() function scales the coordinate system by the RenderArea widget's current width and height divided by 100.
Now, when we are sure that the painter path has the right size, we can translate the coordinate system to make the painter path rotate around the RenderArea widget's center. After we have performed the rotation, we must remember to translate the coordinate system back again.
    painter.setPen(QPen(penColor, penWidth, Qt::SolidLine, Qt::RoundCap, Qt::RoundJoin));
    QLinearGradient gradient(0, 0, 0, 100);
    gradient.setColorAt(0.0, fillColor1);
    gradient.setColorAt(1.0, fillColor2);
    painter.setBrush(gradient);
    painter.drawPath(path);
}
Then we set the QPainter's pen with the instance's rendering preferences. We create a QLinearGradient and set its colors corresponding to the RenderArea widget's fill colors. Finally, we set the QPainter's brush (the gradient is automatically converted into a QBrush), and draw the RenderArea widget's painter path using the QPainter::drawPath() function.
© 2024 The Qt Company Ltd. Documentation contributions included herein are the copyrights of their respective owners. The documentation provided herein is licensed under the terms of the GNU Free Documentation License version 1.3 as published by the Free Software Foundation. Qt and respective logos are trademarks of The Qt Company Ltd. in Finland and/or other countries worldwide. All other trademarks are property of their respective owners.
