C
Create a Renesas e2 Studio project
This topic provides you step-by-step instructions to create a Renesas e2 studio project, and integrate application and platform sources.
The following instructions guide you through the complete process:
Create e2 studio project and configure the FSP
- Launch e2 studio and create a new project for RA6M3G using File > New > Renesas C/C++ Project > Renesas RA.
- Select C++ as the project language and click Next.
- Select Executable and FreeRTOS and click Next.
- Select FreeRTOS - Minimal – Static Allocation as the project template. Follow the wizard and complete the steps to create the project.
- Configure the FSP Stacks as described in the Renesas RA6M3G FSP configuration topic.
Export platform sources
- Run the following command to export the platform sources:
export QUL_ROOT=/path/to/QtMCUs/2.4
$QUL_ROOT/bin/platformexporter --infile $QUL_ROOT/lib/QulPlatformTargets_<PLATFORM_NAME>-export.json --outdir <DESTINATION_FOLDER>
set QUL_ROOT=C:\path\to\QtMCUs\2.4
%QUL_ROOT%\bin\platformexporter.exe --infile %QUL_ROOT%\lib\QulPlatformTargets_<PLATFORM_NAME>-export.json --outdir <DESTINATION_FOLDER>
- Import the exported platform sources into a top level directory named platform. To import the platform sources into the project,
- Create a new folder named platform under the project
- Right click on folder name and go to Import -> File System.
- On the Import dialog box, browse the platform sources folder.
- Select all source and header files except FreeRTOSConfig.h and linker file ek-ra6m3g.ld.
Note: Skip FreeRTOSConfig.h as it is already configured in the earlier step.
Develop application backend
- Create UI communicator struct
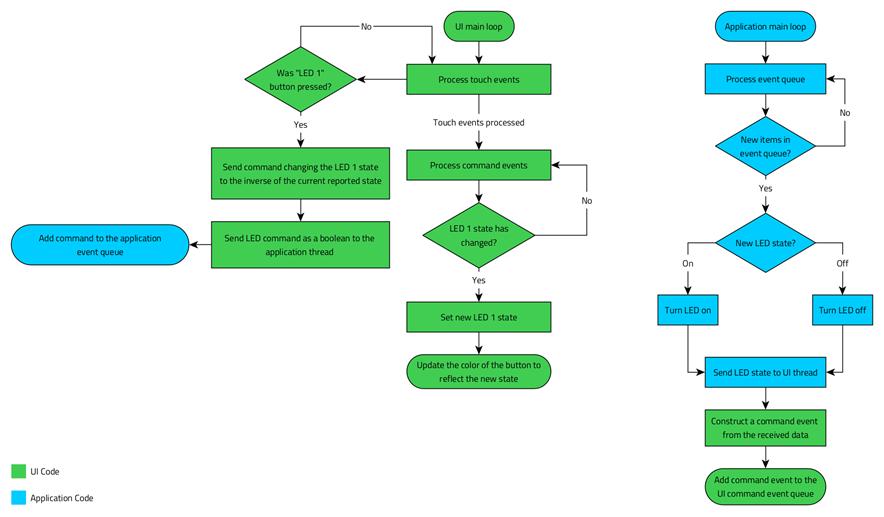
The backend enables the application's UI to communicate with the platform and get the required information from the hardware. In this case, the communicator gets the status of the on-board LED. The following diagram describes the workflow between the two components:
- Right click source folder in the Project Explorer and select New > Class.
- Put
UICommunicatorin theClass namefield. Rename theHeaderandSourceto uicommunicator.h and uicommunicator.cpp respectively and click Finish. - Open uicommunicator.h and change it to look like the following:
#ifndef UICOMMUNICATOR_H
#define UICOMMUNICATOR_H

#include <qul/singleton.h>
#include <qul/property.h>
#include <qul/eventqueue.h>

struct UICommunicator : public Qul::Singleton<UICommunicator>
{
    friend struct Qul::Singleton<UICommunicator>;

    enum Command { LED1State };

    Qul::Property<bool> led1Status;

    void sendFromUI(Command command, bool commandData);
    void receiveToUI(Command command, bool commandData);

private:
    UICommunicator();
    UICommunicator(const UICommunicator &);
    UICommunicator &operator=(const UICommunicator &);
};

struct CommandEvent
{
    UICommunicator::Command command;
    bool commandData;
};

class CommandEventQueue : public Qul::EventQueue<struct CommandEvent, Qul::EventQueueOverrunPolicy_Discard, 10>
{
public:
    void onEvent(const CommandEvent &commandEvent);
};

#endif // UICOMMUNICATOR_H
The header declares the
UICommunicatorstruct, which inheritsQul::Singleton, enabling easy integration with UI code. For more information, refer to Singleton class reference. The header also declares theCommandenumeration that has a list of commands, and theCommandEventQueueto manage the queue. Use enumeration to establish communication between the UI and the application. The header also declares theled1Statusproperty to indicate the status of the on-board LED. This property is exposed to the QML context, which uses it to determine the color of the button. TheUICommunicatorclass also has thesendFromUIandreceiveToUIfunctions to send and receive commands. In addition, use theCommandEventQueueto communicate with the UI thread in a thread-safe way. Instead of callingreceiveToUIfrom the application thread, add the commands to theCommandEventQueue, which is then processed by the QUL thread to callreceiveToUI. - Open uicommunicator.cpp and change it to look like the following:
#include "uicommunicator.h"

extern void sendCommandToAppThread(bool led1Status);

UICommunicator::UICommunicator()
{
    led1Status.setValue(false);
}

void UICommunicator::sendFromUI(Command command, bool commandData)
{
    QUL_UNUSED(command)

    sendCommandToAppThread(commandData);
}

void UICommunicator::receiveToUI(Command command, bool commandData)
{
    switch (command) {
    case LED1State:
        led1Status.setValue(commandData);
        break;
    default:
        break;
    }
}

void CommandEventQueue::onEvent(const CommandEvent &commandEvent)
{
    UICommunicator::instance().receiveToUI(commandEvent.command, commandEvent.commandData);
}

static CommandEventQueue commandEventQueue;

void sendToUI(bool led1Data)
{
    CommandEvent commandEvent;
    commandEvent.command = UICommunicator::LED1State;
    commandEvent.commandData = led1Data;
    commandEventQueue.postEvent(commandEvent);
}
The
UICommunicatorclass initializesled1Statustofalse. ItssendFromUI()member function sends a boolean value containing the LED’s new state to the application thread. ThereceiveToUI()member function uses the command argument to find if the property requires an update. Next, theCommandEventQueueclass overrides theonEvent()function. This function overrides callsreceiveToUI()on theUICommunicatorinstance, with thecommandandcommandDataparameters. In addition, create a static instance ofCommandEventQueuefor thesendToUI()function to post events. The function constructs aCommandEventfrom the given boolean value and adds it to thecommandEventQueuefor processing. ThesendToUI()gets called from application thread when the LED’s state changes.
Export UI sources
- Change YourProject.qmlproject file to add interface file, uicommunicator.h, created in earlier step.
InterfaceFiles { files: ["/path/to/uicommunicator.h"] } - Export the UI sources using the
qmlprojectexportertool.export QUL_ROOT=/path/to/QtMCUs/2.4 export QMLPROJECT_FILE=/path/to/YourProject.qmlproject export BOARDDEFAULTS=$QUL_ROOT/platform/boards/renesas/ek-ra6m3g-freertos/cmake/BoardDefaults_16bpp.qmlprojectconfig export APPLICATION_EXPORT_DIR=<DESTINATION_FOLDER>/ui_sources $QUL_ROOT/bin/qmlprojectexporter $QMLPROJECT_FILE --platform=ek-ra6m3g-freertos --toolchain=GCC --boarddefaults=$BOARDDEFAULTS_FILE_PATH --outdir=$APPLICATION_EXPORT_DIR
set QUL_ROOT=C:\path\to\QtMCUs\2.4
set QMLPROJECT_FILE=C:\path\to\YourProject.qmlproject
set BOARDDEFAULTS=%QUL_ROOT%\platform\boards\renesas\ek-ra6m3g-freertos\cmake\BoardDefaults_16bpp.qmlprojectconfig
set APPLICATION_EXPORT_DIR=<DESTINATION_FOLDER>\ui_sources

%QUL_ROOT%\bin\qmlprojectexporter.exe %QMLPROJECT_FILE% --platform=ek-ra6m3g-freertos --toolchain=GCC --boarddefaults=%BOARDDEFAULTS_FILE_PATH% --outdir=%APPLICATION_EXPORT_DIR%
- Import the UI sources into the ui_sources top-level directory. To import the UI sources into the project,
- Right-click on project name in Project Explorer.
- Go to New -> Folder.
- On the New Folder wizard, click on Advanced and select Link to alternate location.
- Browse the <DESTINATION_FOLDER>\ui_sources folder, generated in the earlier step.
- Click Finish.
Configure e2 studio project
- Open C/C++ Project Settings. Right-click on the project in the Project Explorer and choose Properties from the context menu to make the following changes:
- Add the
platformfolder to the project's source locations. Right-click on the project in the Project Explorer and Properties, then C/C++ General > Paths and Symbols > Source Location. - Add include paths from IDE-Import-Instructions.txt to the C++ include directories list under C/C++ General > Paths and Symbols > Includes. Check Add to all configurations and Add to all languages. For this application, add the following include directories:
- <QUL_ROOT>/include
- <QUL_ROOT>/src/3rdparty/qoi
- <QUL_ROOT>/src/3rdparty/minihdlc
- <PROJECT_LOC>/platform/boards/renesas/ek-ra6m3g-freertos
- <PROJECT_LOC>/platform/boards/renesas/ek-ra6m3g-common
- <PROJECT_LOC>/ui_sources
- Add the following libraries to the C/C++ Build > Settings > Tool Settings > GNU Arm Cross C++ Linker > Libraries list:
- Add the following from
<Qt-install-dir>/QtMCUs/<QUL-version>/lib:libQulMonotypeUnicode_cortex-m4-hf-fpv4-sp-d16_Windows_armgcc _MinSizeRel.alibQulMonotypeUnicodeEngineShaperDisabled_cortex-m4-hf-fpv4 -sp-d16_Windows_armgcc_MinSizeRel.alibQulPNGDecoderLodePNG_cortex-m4-hf-fpv4-sp-d16 _Windows_armgcc_MinSizeRel.alibQulCore_cortex-m4-hf-fpv4-sp-d16_Windows_armgcc_MinSizeRel.alibQulDeviceLink_ek-ra6m3g-freertos_Windows_armgcc_MinSizeRel.a
Note: The
%APPLICATION_EXPORT_DIR%\config\YourProject.1.libraries.txtfile lists the Qt Quick Ultralite libraries that an application should link against. - Add the following from
- Set the C++ language standard to GNU ISO 2014 C++ under C/C++ Build > Settings > Tool Settings > Gnu Arm Cross C++ Compiler > Optimization. Select the Do not use exceptions, Do not use RTTI, and Do not use thread-safe statics options.
Note: Apply these settings to all project configurations.
- Add
ucHeap=__HeapBasepreprocessor definition under C/C++ Build > Settings > Tool Settings > GNU Arm Cross C Compiler.Note: This enables FreeRTOS use the heap that is usually reserved for
std malloc. Ensure that your project does not usestd mallocsor move FreeRTOS heap. The current RA6 FreeRTOS platform port uses FreeRTOSpvPortMalloc(), so it needs a sizable part of RAM to work. You can change this behavior by overriding the functions in platform/mem-freertos.cpp.
- Add the
- Edit script/fsp.ld and append the following code:
QulModuleResourceData : { . = ALIGN(4); __qspi_flash_start__ = .; *(QulModuleResourceData) } > QSPI_FLASH QulFontResourceData : { . = ALIGN(4); *(QulFontResourceData) } > QSPI_FLASH QulResourceData : { . = ALIGN(4); *(QulResourceData) . = ALIGN(4); __qspi_flash_end__ = .; } > QSPI_FLASH - Edit src/hal_entry.cpp to insert the following code in the
R_BSP_WarmStart()function definition. It enables the S1 button on the board.R_ICU_ExternalIrqOpen(&g_S1_irq_ctrl, &g_S1_irq_cfg); R_ICU_ExternalIrqEnable(&g_S1_irq_ctrl);
Note: This code should be inside the
BSP_WARM_START_POST_Cif block, right afterR_IOPORT_Open(). - Edit app_thread_entry.cpp to replace the code with the following:
#include "app_thread.h"

extern void sendToUI(bool led1Data);

void app_thread_entry(void *pvParameters)
{
    FSP_PARAMETER_NOT_USED(pvParameters);
    bool led1State;
    while (true) {
        // Wait for an event from the user interface
        if (pdTRUE == xQueueReceive(g_app_queue, (void *) &led1State, portMAX_DELAY)) {
            bsp_io_level_t level;
            level = led1State ? BSP_IO_LEVEL_HIGH : BSP_IO_LEVEL_LOW;
            R_BSP_PinAccessEnable();
            R_BSP_PinWrite(BSP_IO_PORT_04_PIN_03, level); // blue LED on EK-RA6M3
            R_BSP_PinAccessDisable();
            sendToUI(led1State);
        }
    }
}

static bool led1Level = false;
extern "C" void s1_irq_callback(external_irq_callback_args_t *p_args)
{
    FSP_PARAMETER_NOT_USED(p_args);
    R_BSP_PinAccessEnable();
    uint32_t level = R_BSP_PinRead(BSP_IO_PORT_04_PIN_03); // blue LED on EK-RA6M3
    R_BSP_PinAccessDisable();
    led1Level = !(level & 0x01);
    xQueueSendFromISR(g_app_queue, &led1Level, NULL);
}
The first line declares
sendToUIextern symbol. Next, theapp_thread_entry()function uses a simple while loop, waiting for an item ong_app_queue. When it finds an item (aboolvalue) on the queue, it toggles (on/off) the blue LED1 based on the item value. Finally, it sends the change notification to the UI thread.The last function is the callback for s1 interrupt defined in the FSP configuration. It checks the LED1 status and adds the inverse value to the
g_app_queue, to toggle the LED1 depending on its earlier state. - Edit qul_thread_entry.cpp and replace the existing code with the following:
#include "qul_thread.h"

#include <qsg_ui.h>

#include <qul/application.h>
#include <qul/qul.h>

#include <platforminterface/log.h>

#include <FreeRTOS.h>
#include <task.h>

extern "C" {
void vApplicationStackOverflowHook(TaskHandle_t xTask, signed char *pcTaskName)
{
    (void) xTask;
    (void) pcTaskName;

    Qul::PlatformInterface::log("vApplicationStackOverflowHook");
    configASSERT(false);
}

void vApplicationMallocFailedHook(void)
{
    Qul::PlatformInterface::log("vApplicationMallocFailedHook");
    configASSERT(false);
}
}

void qul_thread_entry(void *pvParameters)
{
    FSP_PARAMETER_NOT_USED(pvParameters);

    Qul::Application _qul_app;
    static struct ::qsg_ui _qul_item;

    Qul::initHardware();
    Qul::initPlatform();

    _qul_app.setRootItem(&_qul_item);
#ifdef APP_DEFAULT_UILANGUAGE
    _qul_app.settings().uiLanguage.setValue(APP_DEFAULT_UILANGUAGE);
#endif
    _qul_app.exec();
}

static bool ledEvent = false;
void sendCommandToAppThread(bool led1Status)
{
    ledEvent = led1Status;
    xQueueSend(g_app_queue, &ledEvent, 0);
}
The
qul_thread_entry()function starts the Qt Quick Ultralite UI in the given thread. Call thesendCommandToAppThread()function from the UI code, to get the requestedled1Statusand post it tog_app_queue.qul_thread_entry()creates application instance and serves as an entry point to process loop of Quick Ultralite.
Your application is now ready. Build and flash it to the RA6M3G board to test that everything works as intended. Next, you can try experimenting with the code. For example, configure an interrupt for the S2 button and implement a callback to toggle LED2 and update the LED's status in the UI.
Available under certain Qt licenses.
Find out more.