C
Getting started on Infineon
This topic provides all the necessary information to get started on the Infineon platforms supported by Qt Quick Ultralite. Qt for MCUs is an Infineon Certified HMI Tool.
Note: Make sure you have all the prerequisites installed before setting up the development environment.
Setting up the development environment
Configuring the Qt Creator IDE
To develop for MCUs using the Qt Creator IDE, the MCU plugin is required. Qt Online Installer enables it by default when you install the Qt for MCUs SDK.
To build and run your application on MCUs, you must create a kit:
- Select Edit > Preferences > Devices > MCU.
Note: If you cannot see the MCU tab, select Help > About Plugins, enable the McuSupport plugin, and restart Qt Creator to apply changes.
- If not already set, provide the path to the Qt for MCUs installation directory.

- Select a Target supported by the Qt for MCUs SDK. For example, Qt for MCUs 2.8.4 - TVIIC2D4M-BAREMETAL 32bpp.
- In the Requirements section, ensure that the platform-specific requirements are met.
- Select Automatically create kits for all available targets on start to create kits automatically.
Note: You can also create/update kits manually using Create Kit and Update Kit.
- Select Apply and restart Qt Creator if you choose to create kits automatically.
Configuring CMake variables
You can also set up the development environment from the command prompt. For more information on how to use CMake with Qt Quick Ultralite when developing applications for Infineon boards, see CMake manual for Infineon boards.
Building applications with prebuilt Qt Quick Ultralite libraries
Building applications using Qt Creator IDE
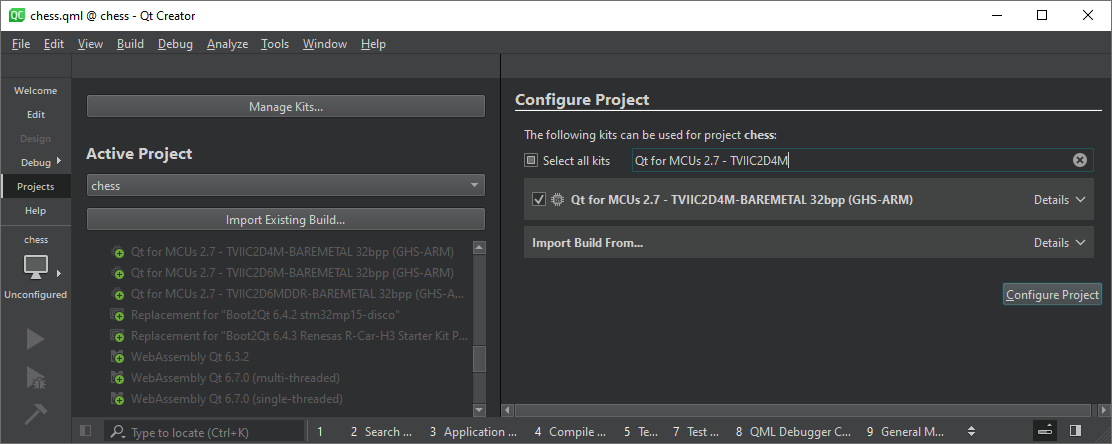
- Open the CMake project file for the example you want to build.
- In the Configure Project window:
- Select the kit you created earlier. For example, Qt for MCUs 2.8.4 - TVIIC2D4M-BAREMETAL 32bpp.
- Select Configure Project.
Once the project is configured, select Run or press Ctrl+r on your keyboard to build and flash the binary to the target.
Note: Flashing using Qt Creator will only work with a MiniProg4 debug probe.
Building applications using the command prompt
You can also build applications from the command prompt. The examples below illustrate how to build the minimal example for TVIIC2D4M-BAREMETAL, TVIIC2D4MLITE-BAREMETAL, TVIIC2D6M-BAREMETAL, or TVIIC2D6MDDR-BAREMETAL target.
QUL_ROOT and QUL_TOOLS are used in the command line examples below as if they were set as environment variables. For example:
export QUL_ROOT=$HOME/Qt/QtMCUs/2.8.4
export QUL_TOOLS=$HOME/Qt/Tools/QtMCUs
set QUL_ROOT=C:\Qt\QtMCUs\2.8.4
set QUL_TOOLS=C:\Qt\Tools\QtMCUs
cd %QUL_ROOT%\examples\minimal
mkdir build
cd build
cmake .. -G "Ninja" -DCMAKE_BUILD_TYPE=MinSizeRel -DQul_ROOT=%QUL_ROOT% -DCMAKE_TOOLCHAIN_FILE=%QUL_ROOT%\lib\cmake\Qul\toolchain\ghs-arm.cmake -DQUL_TARGET_TOOLCHAIN_DIR=C:\ghs\comp_201714 -DQUL_BOARD_SDK_DIR=C:\TVII-GraphicsDriver -DINFINEON_AUTO_FLASH_UTILITY_DIR="C:\Program Files (x86)\Infineon\Auto Flash Utility 1.4" -DQUL_PLATFORM=tviic2d4m-baremetal
cmake --build .
cd %QUL_ROOT%\examples\minimal
mkdir build
cd build
cmake .. -G "Ninja" -DCMAKE_BUILD_TYPE=MinSizeRel -DQul_ROOT=%QUL_ROOT% -DCMAKE_TOOLCHAIN_FILE=%QUL_ROOT%\lib\cmake\Qul\toolchain\ghs-arm.cmake -DQUL_TARGET_TOOLCHAIN_DIR=C:\ghs\comp_201714 -DQUL_BOARD_SDK_DIR=C:\TVII-GraphicsDriver -DINFINEON_AUTO_FLASH_UTILITY_DIR="C:\Program Files (x86)\Infineon\Auto Flash Utility 1.4" -DQUL_PLATFORM=tviic2d4mlite-baremetal
cmake --build .
cd %QUL_ROOT%\examples\minimal
mkdir build
cd build
cmake .. -G "Ninja" -DCMAKE_BUILD_TYPE=MinSizeRel -DQul_ROOT=%QUL_ROOT% -DCMAKE_TOOLCHAIN_FILE=%QUL_ROOT%\lib\cmake\Qul\toolchain\ghs-arm.cmake -DQUL_TARGET_TOOLCHAIN_DIR=C:\ghs\comp_201714 -DQUL_BOARD_SDK_DIR=C:\TVII-GraphicsDriver -DINFINEON_AUTO_FLASH_UTILITY_DIR="C:\Program Files (x86)\Infineon\Auto Flash Utility 1.4" -DQUL_PLATFORM=tviic2d6m-baremetal
cmake --build .
cd %QUL_ROOT%\examples\minimal
mkdir build
cd build
cmake .. -G "Ninja" -DCMAKE_BUILD_TYPE=MinSizeRel -DQul_ROOT=%QUL_ROOT% -DCMAKE_TOOLCHAIN_FILE=%QUL_ROOT%\lib\cmake\Qul\toolchain\ghs-arm.cmake -DQUL_TARGET_TOOLCHAIN_DIR=C:\ghs\comp_201714 -DQUL_BOARD_SDK_DIR=C:\TVII-GraphicsDriver -DINFINEON_AUTO_FLASH_UTILITY_DIR="C:\Program Files (x86)\Infineon\Auto Flash Utility 1.4" -DQUL_PLATFORM=tviic2d6mddr-baremetal
cmake --build .
Once you have successfully built the minimal example application, use the one of the following commands to flash it:
With the MiniProg4 probe:
Using the automatically generated flash target:
cmake --build . --target flash_minimal
Or manually:
"C:\Program Files (x86)\Infineon\Auto Flash Utility 1.4\bin\openocd.exe" -s "C:\Program Files (x86)\Infineon\Auto Flash Utility 1.4\scripts" -f interface/kitprog3.cfg -c "set ENABLE_SEMPERFLASH_0 1" -c "transport select swd" -f target/traveo2_c2d_4m.cfg -c "program MinSizeRel/minimal.elf verify exit"
"C:\Program Files (x86)\Infineon\Auto Flash Utility 1.4\bin\openocd.exe" -s "C:\Program Files (x86)\Infineon\Auto Flash Utility 1.4\scripts" -f interface/kitprog3.cfg -c "set ENABLE_SEMPERFLASH_0 1" -c "transport select swd" -f target/traveo2_c2d_4m.cfg -c "program MinSizeRel/minimal.elf verify exit"
"C:\Program Files (x86)\Infineon\Auto Flash Utility 1.4\bin\openocd.exe" -s "C:\Program Files (x86)\Infineon\Auto Flash Utility 1.4\scripts" -f interface/kitprog3.cfg -c "transport select swd" -f target/traveo2_6m.cfg -c "program MinSizeRel/minimal.elf verify exit"
"C:\Program Files (x86)\Infineon\Auto Flash Utility 1.4\bin\openocd.exe" -s "C:\Program Files (x86)\Infineon\Auto Flash Utility 1.4\scripts" -f interface/kitprog3.cfg -c "transport select swd" -f target/traveo2_6m_ddr.cfg -c "program MinSizeRel/minimal.elf verify exit"
With the J-Link probe:
"C:\Program Files (x86)\Infineon\Auto Flash Utility 1.4\bin\openocd.exe" -s "C:\Program Files (x86)\Infineon\Auto Flash Utility 1.4\scripts" -f interface/jlink.cfg -c "set ENABLE_SEMPERFLASH_0 1" -c "transport select swd" -f target/traveo2_c2d_4m.cfg -c "program MinSizeRel/minimal.elf verify exit"
"C:\Program Files (x86)\Infineon\Auto Flash Utility 1.4\bin\openocd.exe" -s "C:\Program Files (x86)\Infineon\Auto Flash Utility 1.4\scripts" -f interface/jlink.cfg -c "set ENABLE_SEMPERFLASH_0 1" -c "transport select swd" -f target/traveo2_c2d_4m.cfg -c "program MinSizeRel/minimal.elf verify exit"
"C:\Program Files (x86)\Infineon\Auto Flash Utility 1.4\bin\openocd.exe" -s "C:\Program Files (x86)\Infineon\Auto Flash Utility 1.4\scripts" -f interface/jlink.cfg -c "transport select swd" -f target/traveo2_6m.cfg -c "program MinSizeRel/minimal.elf verify exit"
"C:\Program Files (x86)\Infineon\Auto Flash Utility 1.4\bin\openocd.exe" -s "C:\Program Files (x86)\Infineon\Auto Flash Utility 1.4\scripts" -f interface/jlink.cfg -c "transport select swd" -f target/traveo2_6m_ddr.cfg -c "program MinSizeRel/minimal.elf verify exit"
The same procedure applies to any other application.
Debugging using GDB
For debugging, GHS probe, J-Link Ultra+ probe, and Miniprog4 are known to work and are recommended. Other debuggers might work, please check with Infineon or the tool vendor.
Note: The GDB backtrace might be inaccurate or incomplete when using the Green Hills compiler.
Requirements
Debugging with GDB requires the GNU Arm GCC 12.3.rel1 Toolchain. It can be downloaded from GNU Arm Embedded Toolchain Downloads.
Compilation
Make sure to use -DCMAKE_BUILD_TYPE=Debug when configuring, in order for the built executable to get the necessary DWARF2 debug table.
Starting the GDB server
Set the INFINEON_AUTO_FLASH_UTILITY_DIR environment variable
Set INFINEON_AUTO_FLASH_UTILITY_DIR as shown below, with the path adjusted to the correct location for your machine:
set INFINEON_AUTO_FLASH_UTILITY_DIR="C:\Program Files (x86)\Infineon\Auto Flash Utility 1.4"
With the MiniProg4 probe:
With the MiniProg4 probe connected, execute the following command:
%INFINEON_AUTO_FLASH_UTILITY_DIR%\bin\openocd -s %INFINEON_AUTO_FLASH_UTILITY_DIR%\scripts -f interface/kitprog3.cfg -c "transport select swd" -f target/traveo2_c2d_4m.cfg
%INFINEON_AUTO_FLASH_UTILITY_DIR%\bin\openocd -s %INFINEON_AUTO_FLASH_UTILITY_DIR%\scripts -f interface/kitprog3.cfg -c "transport select swd" -f target/traveo2_c2d_4m.cfg
%INFINEON_AUTO_FLASH_UTILITY_DIR%\bin\openocd -s %INFINEON_AUTO_FLASH_UTILITY_DIR%\scripts -f interface/kitprog3.cfg -c "transport select swd" -f target/traveo2_6m.cfg
%INFINEON_AUTO_FLASH_UTILITY_DIR%\bin\openocd -s %INFINEON_AUTO_FLASH_UTILITY_DIR%\scripts -f interface/kitprog3.cfg -c "transport select swd" -f target/traveo2_6m_ddr.cfg
With the J-Link probe:
Connect the J-Link probe to the J-Tag socket on the board and execute the following command:
%INFINEON_AUTO_FLASH_UTILITY_DIR%\bin\openocd -s %INFINEON_AUTO_FLASH_UTILITY_DIR%\scripts -f interface/jlink.cfg -c "transport select swd" -f target/traveo2_c2d_4m.cfg
%INFINEON_AUTO_FLASH_UTILITY_DIR%\bin\openocd -s %INFINEON_AUTO_FLASH_UTILITY_DIR%\scripts -f interface/jlink.cfg -c "transport select swd" -f target/traveo2_c2d_4m.cfg
%INFINEON_AUTO_FLASH_UTILITY_DIR%\bin\openocd -s %INFINEON_AUTO_FLASH_UTILITY_DIR%\scripts -f interface/jlink.cfg -c "transport select swd" -f target/traveo2_6m.cfg
%INFINEON_AUTO_FLASH_UTILITY_DIR%\bin\openocd -s %INFINEON_AUTO_FLASH_UTILITY_DIR%\scripts -f interface/jlink.cfg -c "transport select swd" -f target/traveo2_6m_ddr.cfg
Cores available for debugging
OpenOCD is now connected to the MCU and is waiting for GDB connections. If you look into the terminal output, you will find several ports that you can connect to. The first is the CM0+ (Cortex-M0+) core, and the remaining are CM7 (Cortex-M7) cores (one on TRAVEO T2G CYT3DL and two on TRAVEO T2G CYT4DN and TRAVEO T2G CYT4EN). When you connect to the GDB server using GDB, choose the port corresponding to the core you want to debug.
Qt for MCUs by default uses CM0+ for the bootloader, and the first CM7 core for the application.
Connecting with GDB
Now you can connect to the GDB server and step through instructions.
Set the ARMGCC_DIR environment variable
Set ARMGCC_DIR as shown below, with the path adjusted to the correct location for your machine:
set ARMGCC_DIR="C:\Qt\Tools\QtMCUs\arm_gcc_12_3_1\bin"
With the MiniProg4 probe:
%ARMGCC_DIR%\arm-none-eabi-gdb.exe C:/path/to/binary/application.elf -ex "target remote localhost:3334"
(gdb) monitor reset
(gdb) continue
With the J-Link probe:
Note: As these boards are based on ARM big.LITTLE CPU architecture, make sure you use the monitor traveo2 reset_halt command to restart.
%ARMGCC_DIR%\arm-none-eabi-gdb.exe C:/path/to/binary/application.elf -ex "target remote localhost:3334"
(gdb) monitor traveo2 reset_halt sysresetreq
(gdb) continue
Board-specific information
| Hardware | Board | Compiler | Operating System(s) |
|---|---|---|---|
| TRAVEO T2G | TRAVEO T2G CYT3DL, CYT3DL (4M LITE KIT), CYT4DN and CYT4EN | IAR Functional Safety Build Tools for Arm V8.22.3 and Green Hills MULTI Compiler for Embedded ARM 2017.1.4 | Bare Metal |
Available under certain Qt licenses.
Find out more.
