C
Getting started on Renesas
Overview
This topic provides all the necessary information to get started on the Renesas platforms supported by Qt Quick Ultralite.
Note: Make sure you have all the prerequisites installed before setting up the development environment.
Setting up the development environment
Configuring the Qt Creator IDE
To develop for MCUs using the Qt Creator IDE, the MCU plugin is required. Qt Online Installer enables it by default when you install the Qt for MCUs SDK.
To build and run your application on MCUs, you must create a kit:
- Select Edit > Preferences > Devices > MCU.
Note: If you cannot see the MCU tab, select Help > About Plugins, enable the McuSupport plugin, and restart Qt Creator to apply changes.
- If not already set, provide the path to the Qt for MCUs installation directory.
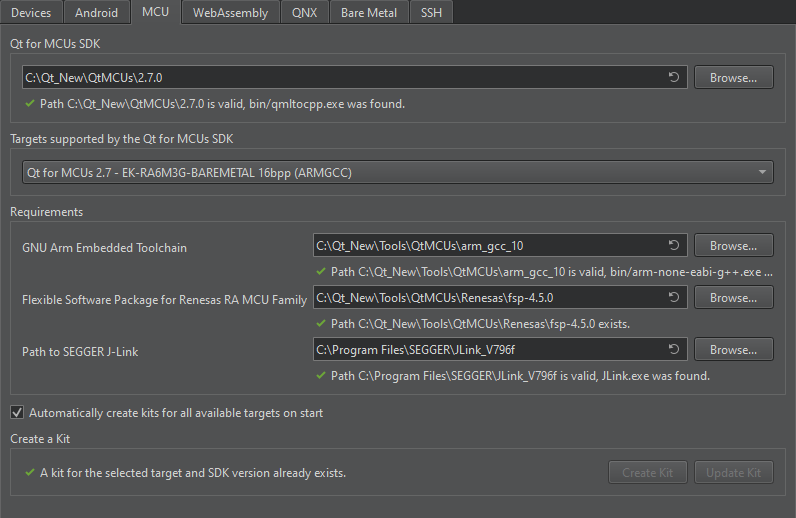
- Select a Target supported by the Qt for MCUs SDK. For example, Qt for MCUs 2.8.4 - EK-RA6M3G-BAREMETAL 16bpp.
- In the Requirements section, ensure that the platform-specific requirements are met.
- Select Automatically create kits for all available targets on start to create kits automatically.
Note: You can also create/update kits manually using Create Kit and Update Kit.
- Select Apply and restart Qt Creator if you choose to create kits automatically.
Configuring CMake variables
You can also set up the development environment from the command prompt. For more information on how to use CMake with Qt Quick Ultralite when developing applications for Renesas boards, see CMake manual for Renesas RA boards and CMake manual for Renesas RH boards.
Building applications with prebuilt Qt Quick Ultralite libraries
Building applications using Qt Creator IDE
- Open the CMake project file for the example you want to build.
- In the Configure Project window:
- Select the kit you created earlier. For example, Qt for MCUs 2.8.4 - EK-RA6M3G-BAREMETAL 16bpp.
- Select Configure Project.
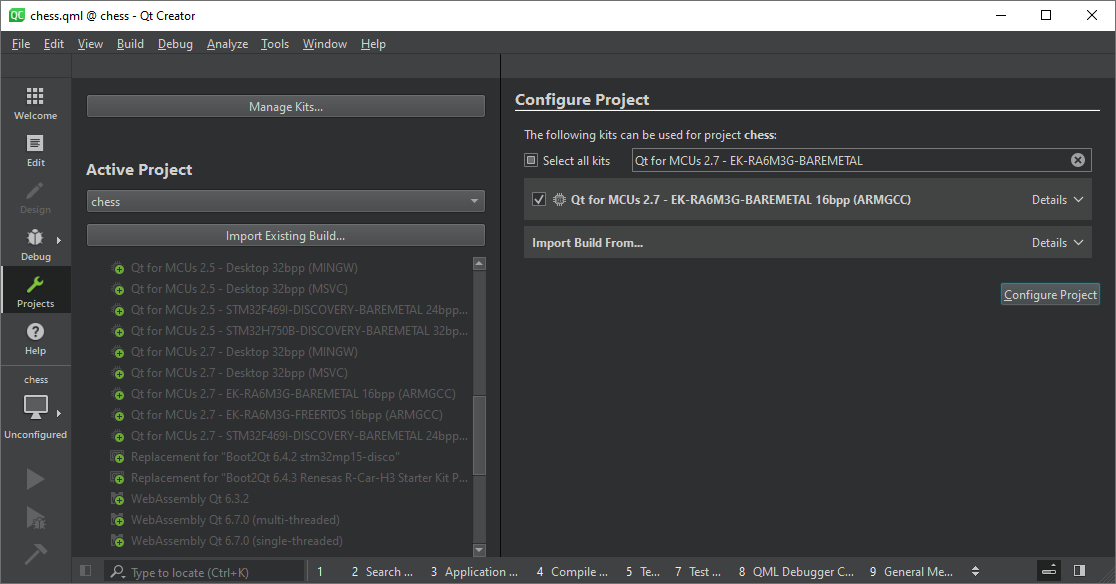
Once the project is configured, select Run or press Ctrl+r on your keyboard to build and flash the binary to the target.
Building applications using the command prompt
You can also build applications from the command prompt. The examples below illustrate how to build the minimal example for EK-RA6M3G, EK-RA8D1, and RH850/D1M1A.
QUL_ROOT and QUL_TOOLS are used in the command line examples below as if they were set as environment variables. For example:
export QUL_ROOT=$HOME/Qt/QtMCUs/2.8.4
export QUL_TOOLS=$HOME/Qt/Tools/QtMCUs
set QUL_ROOT=C:\Qt\QtMCUs\2.8.4
set QUL_TOOLS=C:\Qt\Tools\QtMCUs
Warning: Building with the Ninja generator fails with incremental builds on GHS. Qt recommends using NMake Makefiles or NMake Makefiles JOM.
Building an example application for EK-RA6M3G
The following command builds the minimal example for EK-RA6M3G:
cd $QUL_ROOT/examples/minimal
mkdir build
cd build
cmake .. -G "Ninja" -DCMAKE_BUILD_TYPE=MinSizeRel -DQul_ROOT=$QUL_ROOT -DCMAKE_TOOLCHAIN_FILE=$QUL_ROOT/lib/cmake/Qul/toolchain/armgcc.cmake -DQUL_TARGET_TOOLCHAIN_DIR=$QUL_TOOLS/arm_gcc_12_3_1 -DQUL_PLATFORM=EK-RA6M3G-baremetal -DQUL_BOARD_SDK_DIR=$QUL_TOOLS/Renesas/fsp-5.2.0 -DJLINK_PATH=/opt/SEGGER/JLink
cmake --build .
cd %QUL_ROOT%\examples\minimal
mkdir build
cd build
cmake .. -G "Ninja" -DCMAKE_BUILD_TYPE=MinSizeRel -DQul_ROOT=%QUL_ROOT% -DCMAKE_TOOLCHAIN_FILE=%QUL_ROOT%\lib\cmake\Qul\toolchain\armgcc.cmake -DQUL_TARGET_TOOLCHAIN_DIR=%QUL_TOOLS%\arm_gcc_12_3_1 -DQUL_PLATFORM=EK-RA6M3G-baremetal -DQUL_BOARD_SDK_DIR=%QUL_TOOLS%\Renesas\fsp-5.2.0 -DJLINK_PATH=%PROGRAMFILES%\SEGGER\JLink
cmake --build .
Building an example application for EK-RA8D1
The following command builds the minimal example for EK-RA8D1:
cd $QUL_ROOT/examples/minimal
mkdir build
cd build
cmake .. -G "Ninja" -DCMAKE_BUILD_TYPE=MinSizeRel -DQul_ROOT=$QUL_ROOT -DCMAKE_TOOLCHAIN_FILE=$QUL_ROOT/lib/cmake/Qul/toolchain/armgcc.cmake -DQUL_TARGET_TOOLCHAIN_DIR=$QUL_TOOLS/arm_gcc_12_2_mpacbti_rel1 -DQUL_PLATFORM=EK-RA8D1-baremetal -DQUL_BOARD_SDK_DIR=$QUL_TOOLS/Renesas/fsp-5.2.0 -DJLINK_PATH=/opt/SEGGER/JLink
cmake --build .
cd %QUL_ROOT%\examples\minimal
mkdir build
cd build
cmake .. -G "Ninja" -DCMAKE_BUILD_TYPE=MinSizeRel -DQul_ROOT=%QUL_ROOT% -DCMAKE_TOOLCHAIN_FILE=%QUL_ROOT%\lib\cmake\Qul\toolchain\armgcc.cmake -DQUL_TARGET_TOOLCHAIN_DIR=%QUL_TOOLS%\arm_gcc_12_2_mpacbti_rel1 -DQUL_PLATFORM=EK-RA8D1-baremetal -DQUL_BOARD_SDK_DIR=%QUL_TOOLS%\Renesas\fsp-5.2.0 -DJLINK_PATH=%PROGRAMFILES%\SEGGER\JLink
cmake --build .
Building an example application for RH850/D1M1A
The following command builds the minimal example for RH850/D1M1A:
cd $QUL_ROOT/examples/minimal
mkdir build
cd build
cmake .. -G "Ninja" -DCMAKE_BUILD_TYPE=MinSizeRel -DQul_ROOT=$QUL_ROOT -DCMAKE_TOOLCHAIN_FILE=$QUL_ROOT/lib/cmake/Qul/toolchain/ghs.cmake -DQUL_TARGET_TOOLCHAIN_DIR=/opt/ghs/comp_201815 -DQUL_PLATFORM=rh850-d1m1a-baremetal -DQUL_BOARD_SDK_DIR=$HOME/Renesas_Electronics/D1x_RGL/rgl_ghs_D1Mx_obj_V2.1.0a -DRENESAS_FLASH_PROGRAMMER_PATH="$HOME/Renesas Electronics/Renesas Flash Programmer"
cmake --build .
cd %QUL_ROOT%\examples\minimal
mkdir build
cd build
cmake .. -G "Ninja" -DCMAKE_BUILD_TYPE=MinSizeRel -DQul_ROOT=%QUL_ROOT% -DCMAKE_TOOLCHAIN_FILE=%QUL_ROOT%\lib\cmake\Qul\toolchain\ghs.cmake -DQUL_TARGET_TOOLCHAIN_DIR=C:\ghs\comp_201815 -DQUL_PLATFORM=rh850-d1m1a-baremetal -DQUL_BOARD_SDK_DIR=C:\Renesas_Electronics\D1x_RGL\rgl_ghs_D1Mx_obj_V2.1.0a -DRENESAS_FLASH_PROGRAMMER_PATH="C:\Program Files (x86)\Renesas Electronics\Renesas Flash Programmer"
cmake --build .
Flashing the example application
Once you have successfully built the minimal example application, use the following command to flash it:
cmake --build . --target flash_minimal
Note: The same procedure applies to any other application.
Debugging using Renesas e2 Studio
You can use Renesas e2 studio to debug applications built with Qt Quick Ultralite.
Debugging applications on RA boards
The following instructions guide you to start debugging on RA boards.
Note: The RA6M3G board is used in the example below.
- Open Renesas e2 studio.
- Create new C/C++ Project.
- Select Renesas Debug Only Project > Next.
- Enter Project name and select Next.
- Select Debug Hardware > Hardware and from there the debug probe you have. For example, J-Link Arm.
- Select Device Settings > Target Device > RA > RA/RA6 > R7FA6M3AH.
- Provide the executable path to the binary you want to debug. For example,
C:\Qt\QtMCUs\2.7.0\examples\chess\chess.elf. - Select Finish.
- Select Launch in 'Debug' mode.
- GDB server will upload your binary to the target and start debugging.
Debugging applications on RH boards
The following instructions guide you to start debugging on RH boards.
Note: The RH850 board is used in the example below.
- Open Renesas e2 studio.
- Create new C/C++ Project.
- Select Renesas Debug Only Project > Next.
- Enter Project name and select Next.
- Select Debug Hardware > Hardware and from there the debug probe you have. For example, E1 (RH850) or E2 (RH850).
- Select Device Settings > Target Device > RH850 > RH850/D1M1A-V2 > R7F701462.
- Provide the executable path to the binary you want to debug. For example,
C:\Qt\QtMCUs\2.7.0\examples\chess\chess.run. - Select Finish.
- Select Launch in 'Debug' mode.
- GDB server will upload your binary to the target and start debugging.
Supported Renesas Boards
Tier 1: Reference Targets
| Hardware board | MCU | Compiler | Operating system(s) |
|---|---|---|---|
| RH850/D1M1A Evaluation Board | RH850/D1M1A (R7F701461) | Green Hills MULTI 7.1.6, Compiler 2015.1.7 or 2018.1.5 | AUTOSAR Classic Platform, Bare Metal |
Tier 2: Verified Targets
Available under certain Qt licenses.
Find out more.
