Qt Sensors - Explorer QML Example
Demonstrates how to read the meta-data of available sensors.
The example is implemented as a typical model-view application. The models are written with C++ and exposed to QML, and the views are implemented as QML types in the QML application.
Exposing and Importing the Models
The QML models written in C++ are exposed in the project build files as a SensorModels QML module.
CMake:
qt_add_qml_module(sensor_explorer
    URI SensorModels
    VERSION 1.0
)qmake:
CONFIG += qmltypes
QML_IMPORT_NAME = SensorModels
QML_IMPORT_MAJOR_VERSION = 1
The individual model elements are exposed as part of the model code by using the QML_ELEMENT macro as illustrated here:
class AvailableSensorsModel: public QAbstractListModel
{
    Q_OBJECT
    QML_ELEMENT
To access the models in the QML application, the module is imported by the application QML:
import SensorModels
Populating the Model of Available Sensors
The AvailableSensorsModel is a list model that provides information on available sensors on the device. The model is populated once at the element's construction time:
beginResetModel();
m_availableSensors.clear();

for (const QByteArray &type : QSensor::sensorTypes()) {
    for (const QByteArray &identifier : QSensor::sensorsForType(type)) {
        QSensor* sensor = new QSensor(type, this);
        sensor->setIdentifier(identifier);
        // Don't put in sensors we can't connect to
        if (!sensor->connectToBackend())
            continue;
        m_availableSensors.append(sensor);
    }
}
endResetModel();
The model's data() function returns a pointer to the requested sensor object.
QVariant AvailableSensorsModel::data(const QModelIndex &index, int role) const
{
    if (role != Qt::DisplayRole)
        return QVariant();
    return QVariant::fromValue<QSensor*>(m_availableSensors.at(index.row()));
}
Since the sensor (QSensor) is a QObject, the QML is then able to directly access all metaproperties and -functions directly.
Note: It would be possible to refresh the sensor list later at will, but for the simplicity of the example such functionality is not exposed to QML.
Populating the Model of Sensor Properties
The SensorPropertyModel is a table model that provides individual sensor's property-value pairs as columns. The column 0 provides the property's name and the column 1 provides the property's value. The population of the properties is done by reading the metadata of the sensors. The model reads both the sensor's metadata as well as the sensor's reading's metadata. The code below illustrates the reading of the reading metadata:
int firstProperty = QSensorReading::staticMetaObject.propertyOffset();
QSensorReading *reading = m_sensor->reading();
if (reading) {
    const QMetaObject *mo = reading->metaObject();
    for (int i = firstProperty; i < mo->propertyCount(); ++i) {
        QByteArray name = mo->property(i).name();
        m_values.append(std::tuple<QByteArray, QByteArray>
                        (name, reading->property(name).toByteArray()));
    }
}
This metadata access allows providing the model data for all sensors without prior compile-time understanding of their properties.
Once the metadata is set, the code then subscribes to the QSensor::readingChanged() signal to detect sensor reading changes. Upon such changes (for example a rotation value changes), the model data is updated accordingly.
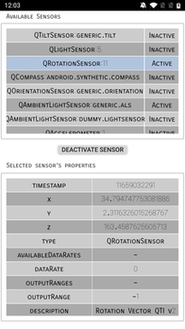
Viewing the Models
The QML application is based on two views. The first view shows the available sensors as a selectable list. The second view shows the selected sensor's properties and their values. The delegates for viewing the individual items are simplistic rectangle and text items.
Binding the two views functionally together is done by binding the property model's sensor property to the current selection of the available sensors model:
SensorPropertyModel {
    id: propertyModel
    sensor: availableSensorsModel.get(sensorsView.currentIndex)
}
When the selected sensor changes, the sensor of the property model changes accordingly.
The following snippet illustrates how the property view is implemented. For more details about QML models and views, please see Models and Views in Qt Quick.
TableView {
    id: propertyView
    anchors.fill: parent
    model: propertyModel
    columnSpacing: 1
    rowSpacing: 1
    boundsMovement: Flickable.StopAtBounds
    clip: true

    delegate: Rectangle {
        implicitHeight: 30
        implicitWidth: propertyView.width * 0.5
        color: (model.row % 2 == 0) ? "#CCCCCC" : "#AAAAAA"
        Text {
            anchors.centerIn: parent
            text: display
        }
    }
}
For clarity it should be mentioned that the display attribute used by the text element refers to the Qt::DisplayRole role of the model, which is provided by default by Qt models.
Activating the Sensors
The example has a button for activating and deactivating the currently selected sensor. The button is enabled only if a sensor is currently selected, as illustrated below.
Button {
    id: activateButton
    Layout.preferredHeight: 30
    Layout.alignment: Qt.AlignCenter
    enabled: propertyModel.sensor
    text: !propertyModel.sensor ? qsTr("Select sensor")
                                : (propertyModel.sensor.active ? qsTr("Deactivate sensor")
                                                               : qsTr("Activate sensor"))
    onClicked: propertyModel.sensor.active = !propertyModel.sensor.active
}
On clicking the button, the sensor's active property is toggled on/off.
© 2024 The Qt Company Ltd. Documentation contributions included herein are the copyrights of their respective owners. The documentation provided herein is licensed under the terms of the GNU Free Documentation License version 1.3 as published by the Free Software Foundation. Qt and respective logos are trademarks of The Qt Company Ltd. in Finland and/or other countries worldwide. All other trademarks are property of their respective owners.
