Model/View Tutorial
Every UI developer should know about ModelView programming and the goal of this tutorial is to provide you with an easily understandable introduction to this topic.
Table, list and tree widgets are components frequently used in GUIs. There are 2 different ways how these widgets can access their data. The traditional way involves widgets which include internal containers for storing data. This approach is very intuitive, however, in many non-trivial applications, it leads to data synchronization issues. The second approach is model/view programming, in which widgets do not maintain internal data containers. They access external data through a standardized interface and therefore avoid data duplication. This may seem complicated at first, but once you take a closer look, it is not only easy to grasp, but the many benefits of model/view programming also become clearer.
In the process, we will learn about some basic technologies provided by Qt, such as:
- The difference between standard and model/view widgets
- Adapters between forms and models
- Developing a simple model/view application
- Predefined models
- Intermediate topics such as:
- Tree views
- Selection
- Delegates
- Debugging with model test
You will also learn whether your new application can be written easier with model/view programming or if classic widgets will work just as well.
This tutorial includes example code for you to edit and integrate into your project. The tutorial's source code is located in Qt's examples/widgets/tutorials/modelview directory.
For more detailed information you may also want to look at the reference documentation
1. Introduction
Model/View is a technology used to separate data from views in widgets that handle data sets. Standard widgets are not designed for separating data from views and this is why Qt has two different types of widgets. Both types of widgets look the same, but they interact with data differently.
| Standard widgets use data that is part of the widget. |
|
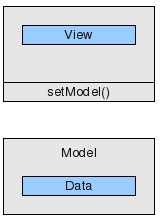
| View classes operate on external data (the model) |
|
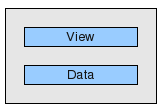
1.1 Standard Widgets
Let's have a closer look at a standard table widget. A table widget is a 2D array of the data elements that the user can change. The table widget can be integrated into a program flow by reading and writing the data elements that the table widget provides. This method is very intuitive and useful in many applications, but displaying and editing a database table with a standard table widget can be problematic. Two copies of the data have to be coordinated: one outside the widget; one inside the widget. The developer is responsible for synchronizing both versions. Besides this, the tight coupling of presentation and data makes it harder to write unit tests.
1.2 Model/View to the Rescue
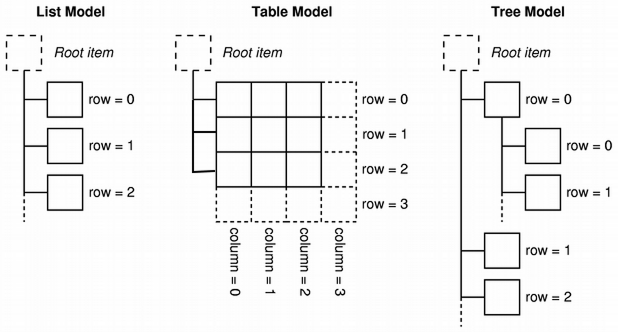
Model/view stepped up to provide a solution that uses a more versatile architecture. Model/view eliminates the data consistency problems that may occur with standard widgets. Model/view also makes it easier to use more than one view of the same data because one model can be passed on to many views. The most important difference is that model/view widgets do not store data behind the table cells. In fact, they operate directly from your data. Since view classes do not know your data's structure, you need to provide a wrapper to make your data conform to the QAbstractItemModel interface. A view uses this interface to read from and write to your data. Any instance of a class that implements QAbstractItemModel is said to be a model. Once the view receives a pointer to a model, it will read and display its content and be its editor.
1.3 Overview of the Model/View Widgets
Here is an overview of the model/view widgets and their corresponding standard widgets.
| Widget | Standard Widget (an item based convenience class) | Model/View View Class (for use with external data) |
|---|---|---|
 | QListWidget | QListView |
 | QTableWidget | QTableView |
| QTreeWidget | QTreeView |
 | QColumnView shows a tree as a hierarchy of lists | |
 | QComboBox can work as both a view class and also as a traditional widget | |
1.4 Using Adapters between Forms and Models
Having adapters between forms and models can come in handy.
We can edit data stored in tables directly from within the table itself, but it's much more comfortable to edit data in text fields. There is no direct model/view counterpart that separates data and views for widgets that operate on one value (QLineEdit, QCheckBox ...) instead of a dataset, so we need an adapter in order to connect the form to the source of data.
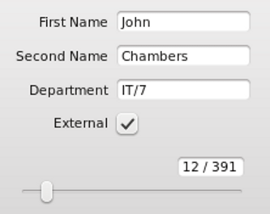
QDataWidgetMapper is a great solution because it maps form widgets to a table row and makes it very easy to build forms for database tables.
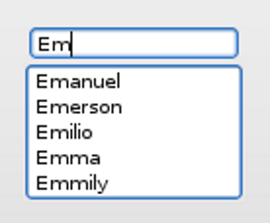
Another example of an adapter is QCompleter. Qt has QCompleter for providing auto-completions in Qt widgets such as QComboBox and, as shown below, QLineEdit. QCompleter uses a model as its data source.
2. A Simple Model/View Application
If you want to develop a model/view application, where should you start? We recommend starting with a simple example and extending it step-by-step. This makes understanding the architecture a lot easier. Trying to understand the model/view architecture in detail before invoking the IDE has proven to be less convenient for many developers. It is substantially easier to start with a simple model/view application that has demo data. Give it a try! Simply replace the data in the examples below with your own.
Below are 7 very simple and independent applications that show different sides of model/view programming. The source code can be found inside the examples/widgets/tutorials/modelview directory.
2.1 A Read Only Table
We start with an application that uses a QTableView to show data. We will add editing capabilities later.
(file source: examples/widgets/tutorials/modelview/1_readonly/main.cpp)
// main.cpp
#include <QApplication>
#include <QTableView>
#include "mymodel.h"

int main(int argc, char *argv[])
{
    QApplication a(argc, argv);
    QTableView tableView;
    MyModel myModel;
    tableView.setModel(&myModel);
    tableView.show();
    return a.exec();
}
We have the usual main() function:
Here is the interesting part: We create an instance of MyModel and use tableView.setModel(&myModel); to pass a pointer of it to tableView. tableView will invoke the methods of the pointer it has received to find out two things:
- How many rows and columns should be displayed.
- What content should be printed into each cell.
The model needs some code to respond to this.
We have a table data set, so let's start with QAbstractTableModel since it is easier to use than the more general QAbstractItemModel.
(file source: examples/widgets/tutorials/modelview/1_readonly/mymodel.h)
// mymodel.h
#include <QAbstractTableModel>

class MyModel : public QAbstractTableModel
{
    Q_OBJECT
public:
    explicit MyModel(QObject *parent = nullptr);

    int rowCount(const QModelIndex &parent = QModelIndex()) const override;
    int columnCount(const QModelIndex &parent = QModelIndex()) const override;
    QVariant data(const QModelIndex &index, int role = Qt::DisplayRole) const override;
};
QAbstractTableModel requires the implementation of three abstract methods.
(file source: examples/widgets/tutorials/modelview/1_readonly/mymodel.cpp)
// mymodel.cpp
#include "mymodel.h"

MyModel::MyModel(QObject *parent)
    : QAbstractTableModel(parent)
{
}

int MyModel::rowCount(const QModelIndex & /*parent*/) const
{
   return 2;
}

int MyModel::columnCount(const QModelIndex & /*parent*/) const
{
    return 3;
}

QVariant MyModel::data(const QModelIndex &index, int role) const
{
    if (role == Qt::DisplayRole)
       return QString("Row%1, Column%2")
                   .arg(index.row() + 1)
                   .arg(index.column() +1);

    return QVariant();
}
The number of rows and columns is provided by MyModel::rowCount() and MyModel::columnCount(). When the view has to know what the cell's text is, it calls the method MyModel::data(). Row and column information is specified with parameter index and the role is set to Qt::DisplayRole. Other roles are covered in the next section. In our example, the data that should be displayed is generated. In a real application, MyModel would have a member called MyData, which serves as the target for all reading and writing operations.
This small example demonstrates the passive nature of a model. The model does not know when it will be used or which data is needed. It simply provides data each time the view requests it.
What happens when the model's data needs to be changed? How does the view realize that data has changed and needs to be read again? The model has to emit a signal that indicates what range of cells has changed. This will be demonstrated in section 2.3.
2.2 Extending the Read Only Example with Roles
In addition to controlling what text the view displays, the model also controls the text's appearance. When we slightly change the model, we get the following result:
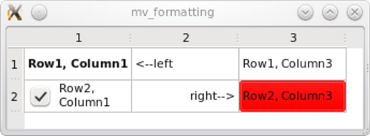
In fact, nothing except for the data() method needs to be changed to set fonts, background colour, alignment and a checkbox. Below is the data() method that produces the result shown above. The difference is that this time we use parameter int role to return different pieces of information depending on its value.
(file source: examples/widgets/tutorials/modelview/2_formatting/mymodel.cpp)
// mymodel.cpp
QVariant MyModel::data(const QModelIndex &index, int role) const
{
    int row = index.row();
    int col = index.column();
    // generate a log message when this method gets called
    qDebug() << QString("row %1, col%2, role %3")
            .arg(row).arg(col).arg(role);

    switch (role) {
    case Qt::DisplayRole:
        if (row == 0 && col == 1) return QString("<--left");
        if (row == 1 && col == 1) return QString("right-->");

        return QString("Row%1, Column%2")
                .arg(row + 1)
                .arg(col +1);
    case Qt::FontRole:
        if (row == 0 && col == 0) { // change font only for cell(0,0)
            QFont boldFont;
            boldFont.setBold(true);
            return boldFont;
        }
        break;
    case Qt::BackgroundRole:
        if (row == 1 && col == 2)  // change background only for cell(1,2)
            return QBrush(Qt::red);
        break;
    case Qt::TextAlignmentRole:
        if (row == 1 && col == 1) // change text alignment only for cell(1,1)
            return int(Qt::AlignRight | Qt::AlignVCenter);
        break;
    case Qt::CheckStateRole:
        if (row == 1 && col == 0) // add a checkbox to cell(1,0)
            return Qt::Checked;
        break;
    }
    return QVariant();
}
Each formatting property will be requested from the model with a separate call to the data() method. The role parameter is used to let the model know which property is being requested:
| enum Qt::ItemDataRole | Meaning | Type |
|---|---|---|
| Qt::DisplayRole | text | QString |
| Qt::FontRole | font | QFont |
| BackgroundRole | brush for the background of the cell | QBrush |
| Qt::TextAlignmentRole | text alignment | enum Qt::AlignmentFlag |
| Qt::CheckStateRole | suppresses checkboxes with QVariant(), sets checkboxes with Qt::Checked | enum Qt::ItemDataRole |
Refer to the Qt namespace documentation to learn more about the Qt::ItemDataRole enum's capabilities.
Now we need to determine how using a separated model impacts the application's performance, so let's trace how often the view calls the data() method. In order to track how often the view calls the model, we have put a debug statement in the data() method, which logs onto the error output stream. In our small example, data() will be called 42 times. Each time you hover the cursor over the field, data() will be called again -- 7 times for each cell. That's why it is important to make sure that your data is available when data() is invoked and expensive lookup operations are cached.
2.3 A Clock inside a Table Cell
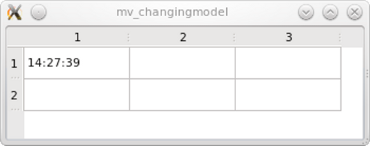
We still have a read only table, but this time the content changes every second because we are showing the current time.
(file source: examples/widgets/tutorials/modelview/3_changingmodel/mymodel.cpp)
QVariant MyModel::data(const QModelIndex &index, int role) const
{
    int row = index.row();
    int col = index.column();

    if (role == Qt::DisplayRole && row == 0 && col == 0)
        return QTime::currentTime().toString();

    return QVariant();
}
Something is missing to make the clock tick. We need to tell the view every second that the time has changed and that it needs to be read again. We do this with a timer. In the constructor, we set its interval to 1 second and connect its timeout signal.
(file source: examples/widgets/tutorials/modelview/3_changingmodel/mymodel.cpp)
MyModel::MyModel(QObject *parent)
    : QAbstractTableModel(parent)
    , timer(new QTimer(this))
{
    timer->setInterval(1000);
    connect(timer, &QTimer::timeout , this, &MyModel::timerHit);
    timer->start();
}
Here is the corresponding slot:
(file source: examples/widgets/tutorials/modelview/3_changingmodel/mymodel.cpp)
void MyModel::timerHit()
{
    // we identify the top left cell
    QModelIndex topLeft = createIndex(0,0);
    // emit a signal to make the view reread identified data
    emit dataChanged(topLeft, topLeft, {Qt::DisplayRole});
}
We ask the view to read the data in the top left cell again by emitting the dataChanged() signal. Note that we did not explicitly connect the dataChanged() signal to the view. This happened automatically when we called setModel().
2.4 Setting up Headers for Columns and Rows
Headers can be hidden via a view method: tableView->verticalHeader()->hide();
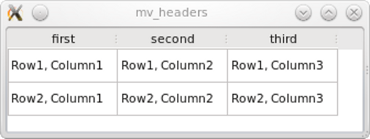
The header content, however, is set via the model, so we reimplement the headerData() method:
(file source: examples/widgets/tutorials/modelview/4_headers/mymodel.cpp)
QVariant MyModel::headerData(int section, Qt::Orientation orientation, int role) const
{
    if (role == Qt::DisplayRole && orientation == Qt::Horizontal) {
        switch (section) {
        case 0:
            return QString("first");
        case 1:
            return QString("second");
        case 2:
            return QString("third");
        }
    }
    return QVariant();
}
Note that method headerData() also has a parameter role which has the same meaning as in MyModel::data().
2.5 The Minimal Editing Example
In this example, we are going to build an application that automatically populates a window title with content by repeating values entered into table cells. To be able to access the window title easily we put the QTableView in a QMainWindow.
The model decides whether editing capabilities are available. We only have to modify the model in order for the available editing capabilities to be enabled. This is done by reimplementing the following virtual methods: setData() and flags().
(file source: examples/widgets/tutorials/modelview/5_edit/mymodel.h)
// mymodel.h
#include <QAbstractTableModel>
#include <QString>

const int COLS= 3;
const int ROWS= 2;

class MyModel : public QAbstractTableModel
{
    Q_OBJECT
public:
    MyModel(QObject *parent = nullptr);
    int rowCount(const QModelIndex &parent = QModelIndex()) const override;
    int columnCount(const QModelIndex &parent = QModelIndex()) const override;
    QVariant data(const QModelIndex &index, int role = Qt::DisplayRole) const override;
    bool setData(const QModelIndex &index, const QVariant &value, int role = Qt::EditRole) override;
    Qt::ItemFlags flags(const QModelIndex &index) const override;
private:
    QString m_gridData[ROWS][COLS];  //holds text entered into QTableView
signals:
    void editCompleted(const QString &);
};
We use the two-dimensional array QString m_gridData to store our data. This makes m_gridData the core of MyModel. The rest of MyModel acts like a wrapper and adapts m_gridData to the QAbstractItemModel interface. We have also introduced the editCompleted() signal, which makes it possible to transfer the modified text to the window title.
(file source: examples/widgets/tutorials/modelview/5_edit/mymodel.cpp)
bool MyModel::setData(const QModelIndex &index, const QVariant &value, int role)
{
    if (role == Qt::EditRole) {
        if (!checkIndex(index))
            return false;
        //save value from editor to member m_gridData
        m_gridData[index.row()][index.column()] = value.toString();
        //for presentation purposes only: build and emit a joined string
        QString result;
        for (int row = 0; row < ROWS; row++) {
            for (int col= 0; col < COLS; col++)
                result += m_gridData[row][col] + ' ';
        }
        emit editCompleted(result);
        return true;
    }
    return false;
}
setData() will be called each time the user edits a cell. The index parameter tells us which field has been edited and value provides the result of the editing process. The role will always be set to Qt::EditRole because our cells only contain text. If a checkbox were present and user permissions are set to allow the checkbox to be selected, calls would also be made with the role set to Qt::CheckStateRole.
(file source: examples/widgets/tutorials/modelview/5_edit/mymodel.cpp)
Qt::ItemFlags MyModel::flags(const QModelIndex &index) const
{
    return Qt::ItemIsEditable | QAbstractTableModel::flags(index);
}
Various properties of a cell can be adjusted with flags().
Returning Qt::ItemIsSelectable | Qt::ItemIsEditable | Qt::ItemIsEnabled is enough to show an editor that a cell can be selected.
If editing one cell modifies more data than the data in that particular cell, the model must emit a dataChanged() signal in order for the data that has been changed to be read.
3. Intermediate Topics
3.1 TreeView
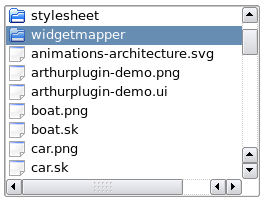
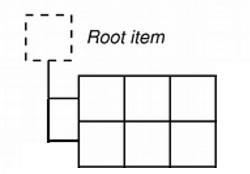
You can convert the example above into an application with a tree view. Simply replace QTableView with QTreeView, which results in a read/write tree. No changes have to be made to the model. The tree won't have any hierarchies because there aren't any hierarchies in the model itself.
QListView, QTableView and QTreeView all use a model abstraction, which is a merged list, table and tree. This makes it possible to use several different types of view classes from the same model.
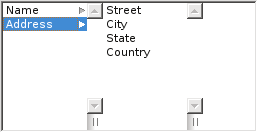
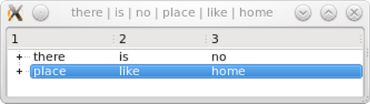
This is how our example model looks so far:
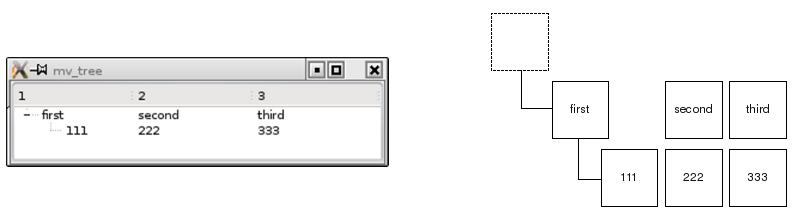
We want to present a real tree. We have wrapped our data in the examples above in order to make a model. This time we use QStandardItemModel, which is a container for hierarchical data that also implements QAbstractItemModel. To show a tree, QStandardItemModel must be populated with QStandardItems, which are able to hold all the standard properties of items like text, fonts, checkboxes or brushes.
(file source: examples/widgets/tutorials/modelview/6_treeview/mainwindow.cpp)
// modelview.cpp
#include "mainwindow.h"

#include <QTreeView>
#include <QStandardItemModel>
#include <QStandardItem>

MainWindow::MainWindow(QWidget *parent)
    : QMainWindow(parent)
    , treeView(new QTreeView(this))
    , standardModel(new QStandardItemModel(this))
{
    setCentralWidget(treeView);

    QList<QStandardItem *> preparedRow = prepareRow("first", "second", "third");
    QStandardItem *item = standardModel->invisibleRootItem();
    // adding a row to the invisible root item produces a root element
    item->appendRow(preparedRow);

    QList<QStandardItem *> secondRow = prepareRow("111", "222", "333");
    // adding a row to an item starts a subtree
    preparedRow.first()->appendRow(secondRow);

    treeView->setModel(standardModel);
    treeView->expandAll();
}

QList<QStandardItem *> MainWindow::prepareRow(const QString &first,
                                              const QString &second,
                                              const QString &third) const
{
    return {new QStandardItem(first),
            new QStandardItem(second),
            new QStandardItem(third)};
}
We simply instantiate a QStandardItemModel and add a couple of QStandardItems to the constructor. We can then make a hierarchical data structure because a QStandardItem can hold other QStandardItems. Nodes are collapsed and expanded within the view.
3.2 Working with Selections
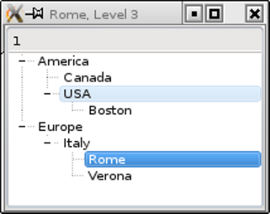
We want to access a selected item's content in order to output it into the window title together with the hierarchy level.
So let's create a couple of items:
(file source: examples/widgets/tutorials/modelview/7_selections/mainwindow.cpp)
#include "mainwindow.h"

#include <QTreeView>
#include <QStandardItemModel>
#include <QItemSelectionModel>

MainWindow::MainWindow(QWidget *parent)
    : QMainWindow(parent)
    , treeView(new QTreeView(this))
    , standardModel(new QStandardItemModel(this))
{
    setCentralWidget(treeView);
    auto *rootNode = standardModel->invisibleRootItem();

    // defining a couple of items
    auto *americaItem = new QStandardItem("America");
    auto *mexicoItem =  new QStandardItem("Canada");
    auto *usaItem =     new QStandardItem("USA");
    auto *bostonItem =  new QStandardItem("Boston");
    auto *europeItem =  new QStandardItem("Europe");
    auto *italyItem =   new QStandardItem("Italy");
    auto *romeItem =    new QStandardItem("Rome");
    auto *veronaItem =  new QStandardItem("Verona");

    // building up the hierarchy
    rootNode->    appendRow(americaItem);
    rootNode->    appendRow(europeItem);
    americaItem-> appendRow(mexicoItem);
    americaItem-> appendRow(usaItem);
    usaItem->     appendRow(bostonItem);
    europeItem->  appendRow(italyItem);
    italyItem->   appendRow(romeItem);
    italyItem->   appendRow(veronaItem);

    // register the model
    treeView->setModel(standardModel);
    treeView->expandAll();

    // selection changes shall trigger a slot
    QItemSelectionModel *selectionModel = treeView->selectionModel();
    connect(selectionModel, &QItemSelectionModel::selectionChanged,
            this, &MainWindow::selectionChangedSlot);
}
Views manage selections within a separate selection model, which can be retrieved with the selectionModel() method. We retrieve the selection Model in order to connect a slot to its selectionChanged() signal.
(file source: examples/widgets/tutorials/modelview/7_selections/mainwindow.cpp)
void MainWindow::selectionChangedSlot(const QItemSelection & /*newSelection*/, const QItemSelection & /*oldSelection*/)
{
    // get the text of the selected item
    const QModelIndex index = treeView->selectionModel()->currentIndex();
    QString selectedText = index.data(Qt::DisplayRole).toString();
    // find out the hierarchy level of the selected item
    int hierarchyLevel = 1;
    QModelIndex seekRoot = index;
    while (seekRoot.parent().isValid()) {
        seekRoot = seekRoot.parent();
        hierarchyLevel++;
    }
    QString showString = QString("%1, Level %2").arg(selectedText)
                         .arg(hierarchyLevel);
    setWindowTitle(showString);
}
We get the model index that corresponds to the selection by calling treeView->selectionModel()->currentIndex() and we get the field's string by using the model index. Then we just calculate the item's hierarchyLevel. Top level items do not have parents and the parent() method will return a default constructed QModelIndex(). This is why we use the parent() method to iterate to the top level while counting the steps performed during iteration.
The selection model (as shown above) can be retrieved, but it can also be set with QAbstractItemView::setSelectionModel. This is how it's possible to have 3 view classes with synchronized selections because only one instance of a selection model is used. To share a selection model between 3 views use selectionModel() and assign the result to the second and third view class with setSelectionModel().
3.3 Predefined Models
The typical way to use model/view is to wrap specific data to make it usable with view classes. Qt, however, also provides predefined models for common underlying data structures. If one of the available data structures is suitable for your application, a predefined model can be a good choice.
| QStringListModel | Stores a list of strings |
| QStandardItemModel | Stores arbitrary hierarchical items |
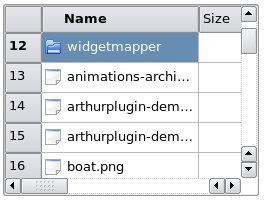
| QFileSystemModel | Encapsulate the local file system |
| QSqlQueryModel | Encapsulate an SQL result set |
| QSqlTableModel | Encapsulates an SQL table |
| QSqlRelationalTableModel | Encapsulates an SQL table with foreign keys |
| QSortFilterProxyModel | Sorts and/or filters another model |
3.4 Delegates
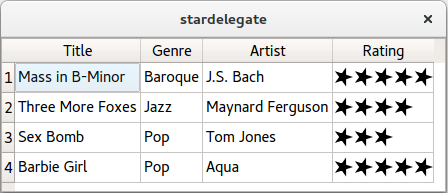
In all examples so far, data is presented as text or a checkbox in a cell and is edited as text or a checkbox. The component that provides these presentation and editing services is called a delegate. We are only just beginning to work with the delegate because the view uses a default delegate. But imagine that we want to have a different editor (e.g., a slider or a drop down list) Or imagine that we want to present data as graphics. Let's take a look at an example called Star Delegate, in which stars are used to show a rating:
The view has a setItemDelegate() method that replaces the default delegate and installs a custom delegate. A new delegate can be written by creating a class that inherits from QStyledItemDelegate. In order to write a delegate that displays stars and has no input capabilities, we only need to override 2 methods.
class StarDelegate : public QStyledItemDelegate
{
    Q_OBJECT
public:
    StarDelegate(QWidget *parent = nullptr);
    void paint(QPainter *painter, const QStyleOptionViewItem &option,
               const QModelIndex &index) const;
    QSize sizeHint(const QStyleOptionViewItem &option,
                   const QModelIndex &index) const;
};
paint() draws stars depending on the content of the underlying data. The data can be looked up by calling index.data(). The delegate's sizeHint() method is used to obtain each star's dimensions, so the cell will provide enough height and width to accommodate the stars.
Writing custom delegates is the right choice if you want to show your data with a custom graphical representation inside the grid of the view class. If you want to leave the grid, you would not use a custom delegate but a custom view class.
Other references to delegates in Qt Documentation:
- Spin Box Delegate Example
- QAbstractItemDelegate Class Reference
- QSqlRelationalDelegate Class Reference
- QStyledItemDelegate Class Reference
- QItemDelegate Class Reference
3.5 Debugging with ModelTest
The passive nature of models provides new challenges for programmers. Inconsistencies in the model can cause the application to crash. Since the model is hit by numerous calls from the view, it is hard to find out which call has crashed the application and which operation has introduced the problem.
Qt Labs provides software called ModelTest, which checks models while your programming is running. Every time the model is changed, ModelTest scans the model and reports errors with an assert. This is especially important for tree models, since their hierarchical nature leaves many possibilities for subtle inconsistencies.
Unlike view classes, ModelTest uses out of range indexes to test the model. This means your application may crash with ModelTest even if it runs perfectly without it. So you also need to handle all of the indexes that are out of range when using ModelTest.
4. Good Sources of Additional Information
4.1 Books
Model/View programming is covered quite extensively in the documentation of Qt but also in several good books.
- C++ GUI Programming with Qt 4 / Jasmin Blanchette, Mark Summerfield, Prentice Hall, 2nd edition, ISBN 0-13-235416-0. Also available in German: C++ GUI Programmierung mit Qt 4: Die offizielle Einführung, Addison-Wesley, ISBN 3-827327-29-6
- The Book of Qt4, The Art of Building Qt Applications / Daniel Molkentin, Open Source Press, ISBN 1-59327-147-6. Translated from Qt 4, Einführung in die Applikationsentwicklung, Open Source Press, ISBN 3-937514-12-0.
- Foundations of Qt Development / Johan Thelin, Apress, ISBN 1-59059-831-8.
- Advanced Qt Programming / Mark Summerfield, Prentice Hall, ISBN 0-321-63590-6. This book covers Model/View programming on more than 150 pages.
The following list provides an overview of example programs contained in the first three books listed above. Some of them make very good templates for developing similar applications.
| Example name | View class used | Model used | Aspects covered | |
|---|---|---|---|---|
| Team Leaders | QListview | QStringListModel | Book 1, Chapter 10, Figure 10.6 | |
| Color Names | QListView | QSortFilterProxyModel applied to QStringListModel | Book 1, Chapter 10, Figure 10.8 | |
| Currencies | QTableView | custom model based on QAbstractTableModel | Read only | Book 1, Chapter 10, Figure 10.10 |
| Cities | QTableView | Custom model based on QAbstractTableModel | Read / write | Book 1, Chapter 10, Figure 10.12 |
| Boolean Parser | QTreeView | Custom model based on QAbstractItemModel | Read only | Book 1, Chapter 10, Figure 10.14 |
| Track Editor | QTableWidget | Custom delegate providing a custom editor | Book 1, Chapter 10, Figure 10.15 | |
| Address Book | QListView QTableView QTreeView | Custom model based on QAbstractTableModel | Read / write | Book2, Chapter 8.4 |
| Address Book with sorting | QSortfilterProxyModel | Introducing sort and filter capabilities | Book2, Chapter 8.5 | |
| Address Book with checkboxes | Introducing checkboxes in model/view | Book2, Chapter 8.6 | ||
| Address Book with transposed grid | Custom proxy Model based on QAbstractProxyModel | Introducing a custom model | Book2, Chapter 8.7 | |
| Address Book with drag and drop | Introducing drag and drop support | Book2, Chapter 8.8 | ||
| Address Book with custom editor | Introducing custom delegates | Book2, Chapter 8.9 | ||
| Views | QListView QTableView QTreeView | QStandardItemModel | Read only | Book 3, Chapter 5, figure 5-3 |
| Bardelegate | QTableView | Custom delegate for presentation based on QAbstractItemDelegate | Book 3, Chapter 5, figure 5-5 | |
| Editdelegate | QTableView | Custom delegate for editing based on QAbstractItemDelegate | Book 3, Chapter 5, figure 5-6 | |
| Singleitemview | Custom view based on QAbstractItemView | Custom view | Book 3, Chapter 5, figure 5-7 | |
| listmodel | QTableView | Custom Model based on QAbstractTableModel | Read only | Book 3, Chapter 5, Figure 5-8 |
| treemodel | QTreeView | Custom Model based on QAbstractItemModel | Read only | Book 3, Chapter 5, Figure 5-10 |
| edit integers | QListView | Custom Model based on QAbstractListModel | Read / write | Book 3, Chapter 5, Listing 5-37, Figure 5-11 |
| sorting | QTableView | QSortFilterProxyModel applied to QStringListModel | Demonstrates sorting | Book 3, Chapter 5, Figure 5-12 |
4.2 Qt Documentation
Qt 5.0 comes with 19 examples for model/view. The examples can be found on the Item Views Examples page.
| Example name | View class used | Model used | Aspects covered |
|---|---|---|---|
| Address Book | QTableView | QAbstractTableModel QSortFilterProxyModel | Usage of QSortFilterProxyModel to generate different subsets from one data pool |
| Basic Sort/Filter Model | QTreeView | QStandardItemModel QSortFilterProxyModel | |
| Chart | Custom view | QStandardItemModel | Designing custom views that cooperate with selection models |
| Color Editor Factory | QTableWidget | Enhancing the standard delegate with a new custom editor to choose colours | |
| Combo Widget Mapper | QDataWidgetMapper to map QLineEdit, QTextEdit and QComboBox | QStandardItemModel | Shows how a QComboBox can serve as a view class |
| Custom Sort/Filter Model | QTreeView | QStandardItemModel QSortFilterProxyModel | Subclass QSortFilterProxyModel for advanced sorting and filtering |
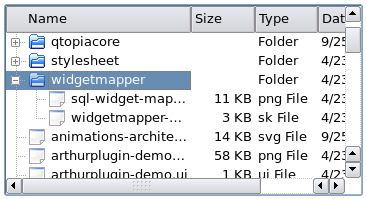
| Dir View | QTreeView | QFileSystemModel | Very small example to demonstrate how to assign a model to a view |
| Editable Tree Model | QTreeView | Custom tree model | Comprehensive example for working with trees, demonstrates editing cells and tree structure with an underlying custom model |
| Fetch More | QListView | Custom list model | Dynamically changing model |
| Frozen Column | QTableView | QStandardItemModel | |
| Interview | Multiple | Custom item model | Multiple views |
| Pixelator | QTableView | Custom table model | Implementation of a custom delegate |
| Puzzle | QListView | Custom list model | Model/view with drag and drop |
| Simple DOM Model | QTreeView | Custom tree model | Read only example for a custom tree model |
| Simple Tree Model | QTreeView | Custom tree model | Read only example for a custom tree model |
| Simple Widget Mapper | QDataWidgetMapper to map QLineEdit, QTextEdit and QSpinBox | QStandardItemModel | Basic QDataWidgetMapper usage |
| Spin Box Delegate | QTableView | QStandardItemModel | Custom delegate that uses a spin box as a cell editor |
| Spreadsheet | QTableView | Custom delegates | |
| Star Delegate | QTableWidget | Comprehensive custom delegate example. | |
A reference document for model/view technology is also available.
© 2023 The Qt Company Ltd. Documentation contributions included herein are the copyrights of their respective owners. The documentation provided herein is licensed under the terms of the GNU Free Documentation License version 1.3 as published by the Free Software Foundation. Qt and respective logos are trademarks of The Qt Company Ltd. in Finland and/or other countries worldwide. All other trademarks are property of their respective owners.