Qt State Machine QML 指南
Qt State Machine QML API 为在 QML 中创建和执行状态图提供了类型。它类似于基于 Harel'sStatecharts 的 C++ 状态机框架:A visual formalism for complex systems)的 C++ State Machine framework 相似,后者也是 UML 状态图的基础。与C++ counterpart 一样,该框架提供了基于状态图 XML(SCXML)的应用程序接口和执行模型,以便在 QML 应用程序中嵌入状态图的元素和语义。
对于具有多种可视化状态(独立于应用程序的逻辑状态)的用户界面,可考虑使用 QML 状态和转换(States and Transitions)。
有关框架提供的用于创建事件驱动状态机的 QML 类型的完整列表,请参阅 "同时使用 QtQuick 和 QtQuick": Qt State Machine QML Types
同时使用 QtQuick 和 QtQml.StateMachine 导入
警告: 如果你试图在一个 QML 文件中同时导入QtQuick 和QtQml. StateMachine ,请确保 最后导入QtQml. StateMachine 。这样, 状态类型就由声明式状态机框架提供,而不是由QtQuick :
import QtQuick
import QtQml.StateMachine

StateMachine {
    State {
        // okay, is of type QtQml.StateMachine.State
    }
}
或者,你也可以将QtQml. StateMachine 导入一个单独的命名空间,以避免与 QtQuick 的State项产生任何歧义:
import QtQuick
import QtQml.StateMachine as DSM

DSM.StateMachine {
    DSM.State {
        // ...
    }
}
一个简单的状态机
为了演示状态机 API 的核心功能,我们来看一个例子:状态机有三个状态:s1 、s2 和s3 。状态机由一个按钮(Button)控制;点击按钮后,状态机将转换到另一个状态。最初,状态机处于s1 状态。下面的状态图显示了示例中的不同状态。
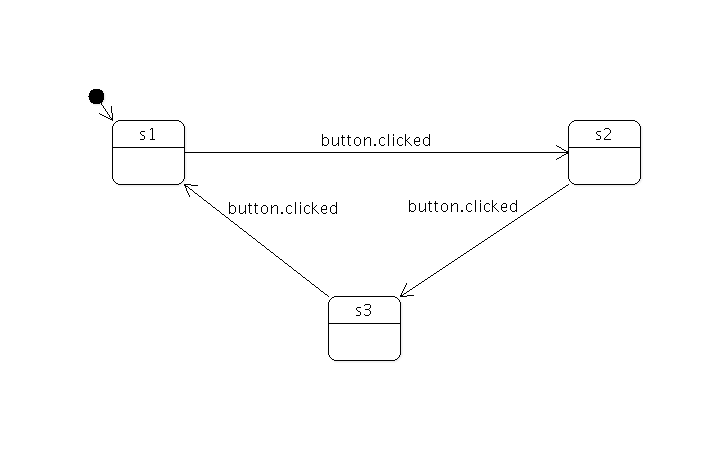
下面的代码段显示了创建这样一个状态机所需的代码。
    Button {
        anchors.fill: parent
        id: button

        // change the button label to the active state id
        text: s1.active ? "s1" : s2.active ? "s2" : "s3"
    }

    StateMachine {
        id: stateMachine
        // set the initial state
        initialState: s1

        // start the state machine
        running: true

        State {
            id: s1
            // create a transition from s1 to s2 when the button is clicked
            SignalTransition {
                targetState: s2
                signal: button.clicked
            }
            // do something when the state enters/exits
            onEntered: console.log("s1 entered")
            onExited: console.log("s1 exited")
        }

        State {
            id: s2
            // create a transition from s2 to s3 when the button is clicked
            SignalTransition {
                targetState: s3
                signal: button.clicked
            }
            // do something when the state enters/exits
            onEntered: console.log("s2 entered")
            onExited: console.log("s2 exited")
        }
        State {
            id: s3
            // create a transition from s3 to s1 when the button is clicked
            SignalTransition {
                targetState: s1
                signal: button.clicked
            }
            // do something when the state enters/exits
            onEntered: console.log("s3 entered")
            onExited: console.log("s3 exited")
        }
    }
状态机异步运行,成为应用程序事件循环的一部分。
结束的状态机
上一节中定义的状态机永远不会结束。为了使状态机能够结束,它需要有一个顶层最终状态(FinalState object)。当状态机进入顶层终态时,状态机发出finished 信号并停止。
要在图中引入最终状态,只需创建一个FinalState 对象,并将其作为一个或多个转换的目标。
共享转换
假设我们希望用户能够随时点击 "退出 "按钮退出应用程序。为此,我们需要创建一个最终状态,并将其作为与 "退出 "按钮的clicked()信号相关联的过渡的目标。我们可以为每个状态添加一个过渡,但这似乎是多余的,而且我们还必须记住为将来添加的每个新状态添加这样一个过渡。
我们可以通过将s1 、s2 和s3 的状态分组来实现相同的行为(即无论状态机处于哪个状态,点击退出按钮都会退出)。具体做法是创建一个新的顶层状态,并使原来的三个状态成为新状态的子状态。下图显示了新的状态机。
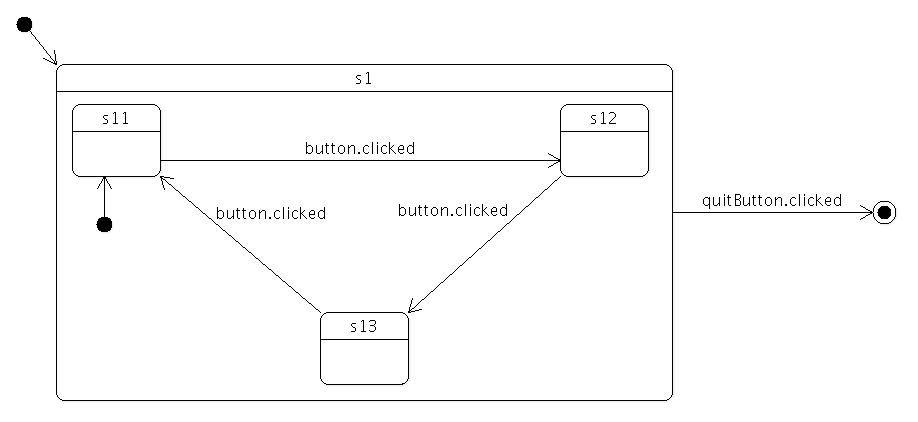
原来的三个状态被重新命名为s11 、s12 和s13 ,以表明它们现在是新的顶级状态s1 的子状态。子状态隐式继承了父状态的转换。这意味着现在只需从s1 添加一个过渡到最终状态s2 即可。添加到s1 的新状态将自动继承这一过渡。
要对状态进行分组,只需在创建状态时指定适当的父级状态。此外,还需要指定哪个子状态为初始状态(当父状态为转换目标时,状态机应进入的子状态)。
    Row {
        anchors.fill: parent
        spacing: 2
        Button {
            id: button
            // change the button label to the active state id
            text: s11.active ? "s11" : s12.active ? "s12" : "s13"
        }
        Button {
            id: quitButton
            text: "quit"
        }
    }

    StateMachine {
        id: stateMachine
        // set the initial state
        initialState: s1

        // start the state machine
        running: true

        State {
            id: s1
            // set the initial state
            initialState: s11

            // create a transition from s1 to s2 when the button is clicked
            SignalTransition {
                targetState: s2
                signal: quitButton.clicked
            }
            // do something when the state enters/exits
            onEntered: console.log("s1 entered")
            onExited: console.log("s1 exited")
            State {
                id: s11
                // create a transition from s11 to s12 when the button is clicked
                SignalTransition {
                    targetState: s12
                    signal: button.clicked
                }
                // do something when the state enters/exits
                onEntered: console.log("s11 entered")
                onExited: console.log("s11 exited")
            }

            State {
                id: s12
                // create a transition from s12 to s13 when the button is clicked
                SignalTransition {
                    targetState: s13
                    signal: button.clicked
                }
                // do something when the state enters/exits
                onEntered: console.log("s12 entered")
                onExited: console.log("s12 exited")
            }
            State {
                id: s13
                // create a transition from s13 to s11 when the button is clicked
                SignalTransition {
                    targetState: s11
                    signal: button.clicked
                }
                // do something when the state enters/exits
                onEntered: console.log("s13 entered")
                onExited: console.log("s13 exited")
            }
        }
        FinalState {
            id: s2
            onEntered: console.log("s2 entered")
            onExited: console.log("s2 exited")
        }
        onFinished: Qt.quit()
    }
在本例中,我们希望应用程序在状态机结束时退出,因此状态机的finished()信号与应用程序的quit()槽相连。
子状态可以覆盖继承的转换。例如,下面的代码添加了一个过渡,当状态机处于s12 状态时,它能有效地使退出按钮被忽略。
            State {
                id: s12
                // create a transition from s12 to s13 when the button is clicked
                SignalTransition {
                    targetState: s13
                    signal: button.clicked
                }

                // ignore Quit button when we are in state 12
                SignalTransition {
                    targetState: s12
                    signal: quitButton.clicked
                }

                // do something when the state enters/exits
                onEntered: console.log("s12 entered")
                onExited: console.log("s12 exited")
            }
过渡可以以任何状态为目标,而不管目标状态在状态层次结构中处于什么位置。
使用历史状态
想象一下,我们想在上一节讨论的示例中添加一个 "中断 "机制;用户可以点击一个按钮,让 状态机执行一些无关的任务,之后状态机应恢复之前的状态(即返回到旧的状态,也就是本例中 的三个状态之一)。
这种行为很容易用历史状态来建模。历史状态(HistoryState object)是一种伪状态,代表父状态最后退出前的子状态。
历史状态是作为我们希望记录当前子状态的状态的子状态创建的;当状态机在运行时检测到存在这样一个状态时,它会在父状态退出时自动记录当前(真实)的子状态。向历史状态的转换实际上是向状态机之前保存的子状态的转换;状态机会自动 "转发 "到真实的子状态。
下图显示了添加中断机制后的状态机。
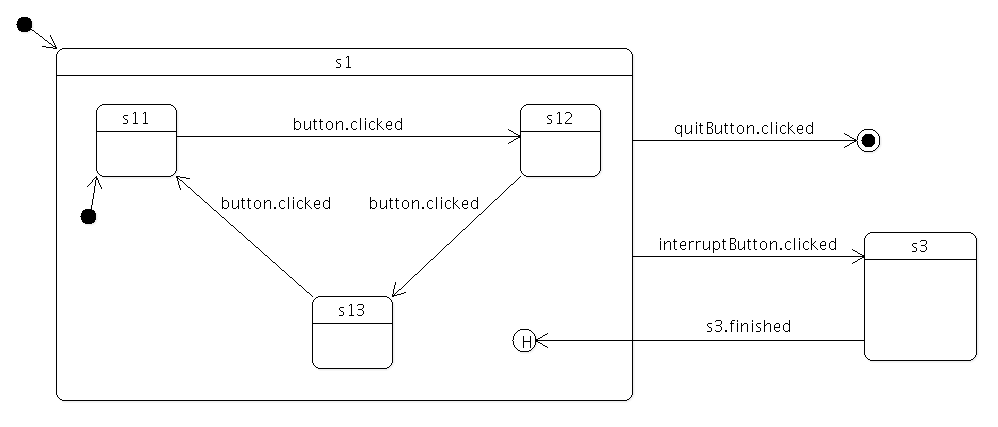
下面的代码展示了如何实现该机制;在本例中,当输入s3 时,我们只需显示一个消息框,然后立即通过历史状态返回到s1 的前一个子状态。
    Row {
        anchors.fill: parent
        spacing: 2
        Button {
            id: button
            // change the button label to the active state id
            text: s11.active ? "s11" : s12.active ? "s12" :  s13.active ? "s13" : "s3"
        }
        Button {
            id: interruptButton
            text: s1.active ? "Interrupt" : "Resume"
        }
        Button {
            id: quitButton
            text: "quit"
        }
    }

    StateMachine {
        id: stateMachine
        // set the initial state
        initialState: s1

        // start the state machine
        running: true

        State {
            id: s1
            // set the initial state
            initialState: s11

            // create a transition from s1 to s2 when the button is clicked
            SignalTransition {
                targetState: s2
                signal: quitButton.clicked
            }
            // do something when the state enters/exits
            onEntered: console.log("s1 entered")
            onExited: console.log("s1 exited")
            State {
                id: s11
                // create a transition from s1 to s2 when the button is clicked
                SignalTransition {
                    targetState: s12
                    signal: button.clicked
                }
                // do something when the state enters/exits
                onEntered: console.log("s11 entered")
                onExited: console.log("s11 exited")
            }

            State {
                id: s12
                // create a transition from s2 to s3 when the button is clicked
                SignalTransition {
                    targetState: s13
                    signal: button.clicked
                }
                // do something when the state enters/exits
                onEntered: console.log("s12 entered")
                onExited: console.log("s12 exited")
            }
            State {
                id: s13
                // create a transition from s3 to s1 when the button is clicked
                SignalTransition {
                    targetState: s1
                    signal: button.clicked
                }
                // do something when the state enters/exits
                onEntered: console.log("s13 entered")
                onExited: console.log("s13 exited")
            }

            // create a transition from s1 to s3 when the button is clicked
            SignalTransition {
                targetState: s3
                signal: interruptButton.clicked
            }
            HistoryState {
                id: s1h
            }
        }
        FinalState {
            id: s2
            onEntered: console.log("s2 entered")
            onExited: console.log("s2 exited")
        }
        State {
            id: s3
            SignalTransition {
                targetState: s1h
                signal: interruptButton.clicked
            }
            // do something when the state enters/exits
            onEntered: console.log("s3 entered")
            onExited: console.log("s3 exited")
        }
        onFinished: Qt.quit()
    }
使用并行状态
假设你想在单个状态机中模拟汽车的一组互斥属性。假设我们感兴趣的属性是 "干净 "与 "脏污"、"移动 "与 "不动"。这将需要四个互斥状态和八个转换来表示这些状态,并在所有可能的组合之间自由移动,如下面的状态图所示。
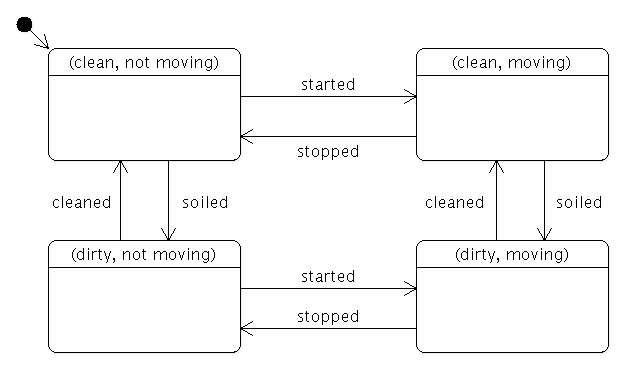
如果我们增加第三个属性(如红色 vs 蓝色),状态总数将翻倍,达到 8 个;如果我们增加第四个属性(如封闭 vs 可转换),状态总数将再次翻倍,达到 16 个。
使用并行状态可以减少这种指数式增长,当我们添加更多属性时,状态和转换的数量可以线性增长。此外,在并行状态中添加或删除状态时,不会影响任何同级状态。下面的状态图显示了汽车示例中的不同并行状态。
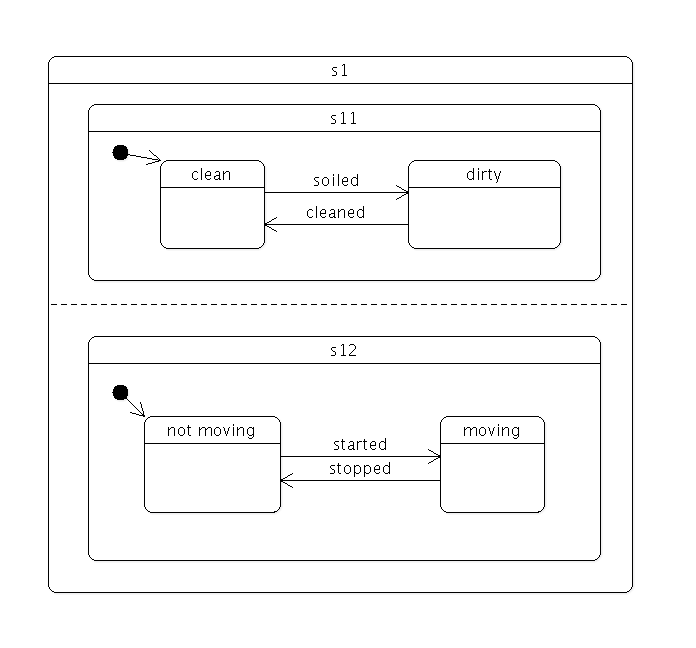
要创建并行状态组,请将 childMode 设置为QState.ParallelStates。
进入并行状态组后,所有子状态将同时进入。各个子状态内的转换操作正常。但是,任何子状态都可能发生退出父状态的转换。当这种情况发生时,父状态及其所有子状态都会退出。
状态机框架的并行性遵循交错语义。所有并行操作都将在事件处理的单一原子步骤中执行,因此任何事件都不会中断并行操作。不过,事件仍将按顺序处理,因为机器本身是单线程的。例如,假设有两个转场同时退出同一个并行状态组,并且它们的条件同时为真。在这种情况下,两个事件中最后处理的事件不会产生任何影响。
退出复合状态
子状态可以是最终状态(FinalState 对象);当进入最终子状态时,父状态会发出State::finished 信号。下图显示了一个复合状态s1 ,它在进入最终状态前做了一些处理:
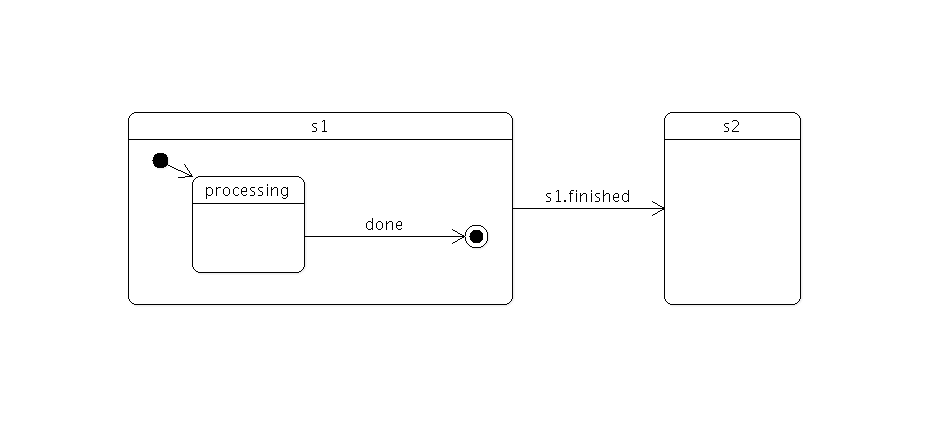
当s1 进入最终状态时,s1 会自动发出finished 。我们使用信号转换使该事件触发状态变化:
State {
    id: s1
    SignalTransition {
        targetState: s2
        signal: s1.finished
    }
}
在复合状态中使用最终状态对隐藏复合状态的内部细节非常有用。外部世界应能进入该状态,并在该状态完成工作后收到通知,而无需知道内部细节。在构建复杂(深嵌套)的状态机时,这是一种非常强大的抽象和封装机制。(在上面的例子中,你当然可以直接从s1 的done 状态创建一个过渡,而不是依赖s1 的 finished() 信号,但这样做的后果是,s1 的实现细节就会暴露出来并受到依赖)。
对于并行状态组,当所有子状态都进入最终状态时,就会发出State::finished 信号。
无目标过渡
过渡不需要目标状态。无目标状态转换的触发方式与其他转换相同,区别在于它不会导致任何状态变化。这样,当机器处于特定状态时,就可以对信号或事件做出反应,而无需离开该状态。例如
Button {
    id: button
    text: "button"
    StateMachine {
        id: stateMachine
        initialState: s1
        running: true
        State {
            id: s1
            SignalTransition {
                signal: button.clicked
                onTriggered: console.log("button pressed")
            }
        }
    }
}
每次点击按钮时,都会显示 "按钮已按下 "信息,但状态机仍处于当前状态(s1)。如果明确将目标状态设置为 s1,则每次都会退出并重新进入 s1(将发出QAbstractState::entered 和QAbstractState::exited 信号)。
相关信息
© 2025 The Qt Company Ltd. Documentation contributions included herein are the copyrights of their respective owners. The documentation provided herein is licensed under the terms of the GNU Free Documentation License version 1.3 as published by the Free Software Foundation. Qt and respective logos are trademarks of The Qt Company Ltd. in Finland and/or other countries worldwide. All other trademarks are property of their respective owners.

