简单的 MQTT 客户端
创建简约的遥测应用程序。

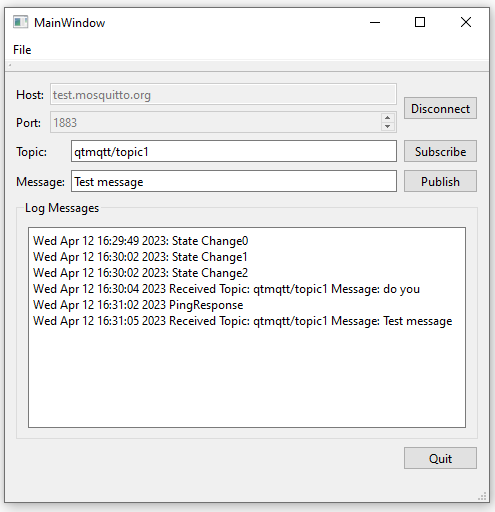
Simple MQTT Client演示如何创建简约的客户端应用程序。
要使用该应用程序,首先要指定主机、端口、安全开/关、WebSockets 开/关和协议。然后点击连接。然后,您可以订阅一个主题并发送信息,您也会收到该信息。您也可以运行应用程序两次。在一个程序中 "发布",在另一个程序中 "订阅",信息就会被传送。
simpleclient 选项
- 主机 - 您可以使用 test.mosquitto.org 或 broker.hivemq.com
- 端口 - 连接端口,取决于 WebSockets 选择和安全选择
- WebSockets - 您可以指定:选择(启用)或不选择(禁用)
- 安全 - 您可以指定:选择(启用)或不选择(禁用)
- 协议 - 您可以指定
- mqtt 3.1
- mqtt 3.1.1
- mqtt 5.0
- 主题 - 要发布或订阅的主题
- Message - 如果要发布,要在主题上发送的消息
连接设置
这些是通常的组合,可用于 test.mositto.org。对于 broker.hivemq.com,请查看链接中的信息。请注意,如果启用了安全功能,可能需要在计算机上安装证书。还可能需要在代码中将证书添加到 mqtt 客户端。
- 端口 1883,安全=禁用,WebSockets=禁用 - 通过 tcp 的 mqtt
- 端口 8883,安全=已启用,WebSockets=已禁用 - 通过 SSL 的 mqtt
- 端口 8080,安全=已禁用,WebSockets=已启用 - 通过 webockets 的 mqtt
- 端口 8081,安全=已启用,WebSockets=已启用 - 通过安全网络接口的 mqtt
有关代理的更多信息,请参阅
注意: 端口号 1883 和 8080 未加密,因此仅适用于开发和测试目的。在生产中,请始终使用加密连接。
注: WebAssembly 仅支持启用 WebSockets。
创建客户端
首先,我们使用QMqttClient 类创建一个 MQTT 客户端。该类提供了用于设置唯一客户端 ID 以及要连接的代理主机名和端口的属性:
    m_client = new QMqttClient(this);
    m_client->setHostname(ui->lineEditHost->text());
    m_client->setPort(static_cast<quint16>(ui->spinBoxPort->value()));
我们不设置客户端 ID,因此它会自动为我们生成。
接下来,我们连接到QMqttClient::messageReceived() 以接收发送到代理的所有消息:
    connect(m_client, &QMqttClient::messageReceived, this, [this](const QByteArray &message, const QMqttTopicName &topic) {
        const QString content = QDateTime::currentDateTime().toString()
                    + " Received Topic: "_L1
                    + topic.name()
                    + " Message: "_L1
                    + message
                    + u'\n';
        ui->editLog->insertPlainText(content);
    });
当用户在客户端订阅主题时,我们会在指定主题上调用QMqttClient::subscribe() :
void MainWindow::on_buttonSubscribe_clicked()
{
    auto subscription = m_client->subscribe(ui->lineEditTopic->text());
    if (!subscription) {
        QMessageBox::critical(this, u"Error"_s,
                              u"Could not subscribe. Is there a valid connection?"_s);
        return;
    }
在本例中,我们订阅了所有主题。有关如何接收特定主题消息的更多信息,请参阅MQTT 订阅示例。
有关如何在Qt Quick 应用程序中使用QMqttClient 类的示例,请参阅Qt Quick Subscription。
文件:
© 2025 The Qt Company Ltd. Documentation contributions included herein are the copyrights of their respective owners. The documentation provided herein is licensed under the terms of the GNU Free Documentation License version 1.3 as published by the Free Software Foundation. Qt and respective logos are trademarks of The Qt Company Ltd. in Finland and/or other countries worldwide. All other trademarks are property of their respective owners.

