天气信息
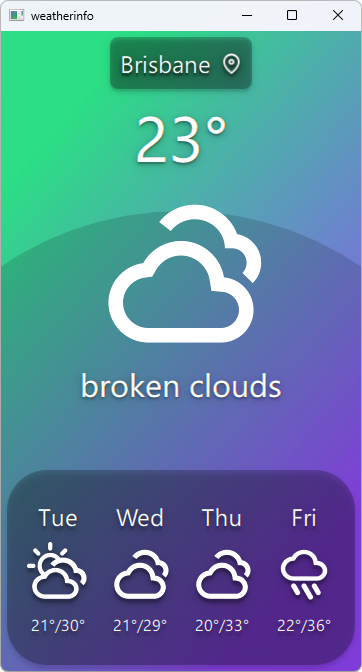
Weather Info 示例展示了如何在 C++ 插件中使用用户的当前位置从网络服务中检索本地内容。 Qt Quick的 C++ 插件中,使用 Qt Positioning.
关键字 Qt Positioning类:

运行示例
要运行来自 Qt Creator,打开Welcome 模式,并从Examples 中选择示例。更多信息,请参阅Qt Creator: 教程:构建并运行。
天气数据提供程序
该示例使用了几个不相关的天气数据提供程序:
运行时会自动选择要使用的提供商,如果所选提供商不可用,则可以更改。但不能手动指定。
注意: 所有提供商都使用免费计划,这意味着对天气请求的数量有一定限制。如果超出限制,提供商将暂时不可用。当所有提供商都不可用时,应用程序将无法显示任何天气信息。在这种情况下,需要等待至少一个提供商再次可用。
应用程序数据模型
本示例的关键部分是应用程序的数据模型,包含在WeatherData 和AppModel 类中。WeatherData 表示从 HTTP 服务获取的天气信息。这是一个简单的数据类,但我们使用Q_PROPERTY 将其很好地展示给 QML。它还使用了QML_ANONYMOUS 宏,这样 QML 就能识别它了。
class WeatherData : public QObject {
    Q_OBJECT
    Q_PROPERTY(QString dayOfWeek
               READ dayOfWeek WRITE setDayOfWeek
               NOTIFY dataChanged)
    Q_PROPERTY(QString weatherIcon
               READ weatherIcon WRITE setWeatherIcon
               NOTIFY dataChanged)
    Q_PROPERTY(QString weatherDescription
               READ weatherDescription WRITE setWeatherDescription
               NOTIFY dataChanged)
    Q_PROPERTY(QString temperature
               READ temperature WRITE setTemperature
               NOTIFY dataChanged)
    QML_ANONYMOUS

public:
    explicit WeatherData(QObject *parent = 0);
    WeatherData(const WeatherData &other);
    WeatherData(const WeatherInfo &other);

    QString dayOfWeek() const;
    QString weatherIcon() const;
    QString weatherDescription() const;
    QString temperature() const;

    void setDayOfWeek(const QString &value);
    void setWeatherIcon(const QString &value);
    void setWeatherDescription(const QString &value);
    void setTemperature(const QString &value);

signals:
    void dataChanged();
};
AppModel 它是整个应用程序的状态模型。启动时,我们使用QGeoPositionInfoSource::createDefaultSource() 获取平台的默认位置源。
AppModel::AppModel(QObject*parent) :   QObject(parent),d(newAppModelPrivate) { d->src =QGeoPositionInfoSource::createDefaultSource(this);if(d->src) { d->useGps = true; connect(d->src, &QGeoPositionInfoSource::positionUpdated, this, &AppModel::positionUpdated); connect(d->src, &AppModel ::errorOccurred, this, &AppModel::errorUpdated)QGeoPositionInfoSource::errorOccurred, this, &AppModel::positionError);#if QT_CONFIG(permissions)        QLocationPermissionpermission; permission.setAccuracy(QLocationPermission::精确); permission.setAvailability(QLocationPermission::WhenInUse);switch(qApp->checkPermission(permission)) {caseQt::PermissionStatus::Undetermined: qApp->requestPermission(permission, [this](constQPermission&permission) {if(permission.status()==Qt::PermissionStatus::Granted) d->src->startUpdates();elsepositionError(QGeoPositionInfoSource::AccessError); });break;caseQt::PermissionStatus::Denied:            qWarning("Location permission is denied");
            positionError(QGeoPositionInfoSource::AccessError);break;caseQt::PermissionStatus::Granted: d->src->startUpdates();break; }#else d->src->startUpdates();#endif}else{ d->useGps = false; d->city = "Brisbane";emitcityChanged(); requestWeatherByCity(); } QTimer*refreshTimer = newQTimer(this); connect(refreshTimer, &QTimer::timeout, this, &AppModel::refreshWeather);using namespacestd::chrono; refreshTimer->start(60s); }
如果没有可用的默认来源,我们会选择一个静态位置并获取其天气信息。如果有位置源,我们会将positionUpdated() 信号连接到AppModel 上的插槽,然后调用startUpdates() 开始定期更新设备位置。
收到位置更新后,我们将使用返回坐标的经度和纬度来获取指定位置的天气数据。
void AppModel::positionUpdated(QGeoPositionInfo gpsPos)
{
    d->coord = gpsPos.coordinate();

    if (!d->useGps)
        return;

    requestWeatherByCoordinates();
}
为了让用户界面了解这一过程,在使用新城市时会发出cityChanged() 信号,而在天气更新时会发出weatherChanged() 信号。
该模型还使用了QML_ELEMENT 宏,使其可在 QML 中使用。
class AppModel : public QObject
{
    Q_OBJECT
    Q_PROPERTY(bool ready
               READ ready
               NOTIFY readyChanged)
    Q_PROPERTY(bool hasSource
               READ hasSource
               NOTIFY readyChanged)
    Q_PROPERTY(bool hasValidCity
               READ hasValidCity
               NOTIFY cityChanged)
    Q_PROPERTY(bool hasValidWeather
               READ hasValidWeather
               NOTIFY weatherChanged)
    Q_PROPERTY(bool useGps
               READ useGps WRITE setUseGps
               NOTIFY useGpsChanged)
    Q_PROPERTY(QString city
               READ city WRITE setCity
               NOTIFY cityChanged)
    Q_PROPERTY(WeatherData *weather
               READ weather
               NOTIFY weatherChanged)
    Q_PROPERTY(QQmlListProperty<WeatherData> forecast
               READ forecast
               NOTIFY weatherChanged)
    QML_ELEMENT

public:
    explicit AppModel(QObject *parent = 0);
    ~AppModel();

    bool ready() const;
    bool hasSource() const;
    bool useGps() const;
    bool hasValidCity() const;
    bool hasValidWeather() const;
    void setUseGps(bool value);

    QString city() const;
    void setCity(const QString &value);

    WeatherData *weather() const;
    QQmlListProperty<WeatherData> forecast() const;

public slots:
    Q_INVOKABLE void refreshWeather();

signals:
    void readyChanged();
    void useGpsChanged();
    void cityChanged();
    void weatherChanged();
};
我们使用QQmlListProperty 来获取天气预报信息,其中包含未来几天的天气预报(具体天数由提供商决定)。这使得从 QML 访问预报变得容易。
将自定义模型公开到 QML
为了将模型暴露到 QML UI 层,我们使用了QML_ELEMENT 和QML_ANONYMOUS 宏。有关这些宏的更多详情,请参阅QQmlEngine 类说明。
要在 QML 中使用这些类型,我们需要相应地更新我们的构建。
CMake 生成
对于基于 CMake 的联编,我们需要在CMakeLists.txt 中添加以下内容:
qt_add_qml_module(weatherinfo
    URI Weather
    VERSION 1.0
    SOURCES
        appmodel.cpp appmodel.h
        openmeteobackend.cpp openmeteobackend.h
        openweathermapbackend.cpp openweathermapbackend.h
        providerbackend.cpp providerbackend.h
        weatherapibackend.cpp weatherapibackend.h
    QML_FILES
        BigForecastIcon.qml
        ForecastIcon.qml
        WeatherIcon.qml
        WeatherInfo.qml
    RESOURCES
        icons/weather-few-clouds.svg
        icons/weather-fog.svg
        icons/weather-haze.svg
        icons/weather-icy.svg
        icons/weather-overcast.svg
        icons/weather-showers.svg
        icons/weather-sleet.svg
        icons/weather-snow.svg
        icons/weather-storm.svg
        icons/weather-sunny-very-few-clouds.svg
        icons/weather-sunny.svg
        icons/weather-thundershower.svg
        icons/weather-showers-scattered.svg
        icons/waypoint.svg
)
qmake 编译
对于 qmake 联编,我们需要按以下方式修改weatherinfo.pro 文件:
CONFIG += qmltypes
QML_IMPORT_NAME = Weather
QML_IMPORT_MAJOR_VERSION = 1

qml_resources.files = \
    qmldir \
    BigForecastIcon.qml \
    ForecastIcon.qml \
    WeatherIcon.qml \
    WeatherInfo.qml \
    icons/weather-few-clouds.svg \
    icons/weather-fog.svg \
    icons/weather-haze.svg \
    icons/weather-icy.svg \
    icons/weather-overcast.svg \
    icons/weather-showers.svg \
    icons/weather-showers-scattered.svg \
    icons/weather-sleet.svg \
    icons/weather-snow.svg \
    icons/weather-storm.svg \
    icons/weather-sunny-very-few-clouds.svg \
    icons/weather-sunny.svg \
    icons/weather-thundershower.svg \
    icons/waypoint.svg

qml_resources.prefix = /qt/qml/Weather

RESOURCES += qml_resources
在 QML 中实例化模型
最后,在实际的 QML 中,我们将AppModel 实例化:
Window {
    id: window
    AppModel {
        id: appModel
        onReadyChanged: {
            if (appModel.ready)
                statesItem.state = "ready"
            else
                statesItem.state = "loading"
        }
    }
}
一旦模型被这样实例化,我们就可以在 QML 文档的其他地方使用它的属性:
    BigForecastIcon {
        id: current
        Layout.fillWidth: true
        Layout.fillHeight: true

        weatherIcon: (appModel.hasValidWeather
                      ? appModel.weather.weatherIcon
                      : "sunny")
    }
© 2025 The Qt Company Ltd. Documentation contributions included herein are the copyrights of their respective owners. The documentation provided herein is licensed under the terms of the GNU Free Documentation License version 1.3 as published by the Free Software Foundation. Qt and respective logos are trademarks of The Qt Company Ltd. in Finland and/or other countries worldwide. All other trademarks are property of their respective owners.

