Qt Quick 粒子示例 - Affectors
这是 QML 粒子系统中使用 Affectors 的示例集。
这是有关在粒子系统中使用 Affectors 的 QML 小范例集。每个示例都是一个强调特定类型或特征的小 QML 文件。
Age 演示使用 Age 效果器提前结束粒子的生命。
Age {
    anchors.fill: parent
    system: particles
    once: true
    lifeLeft: 1200
    advancePosition: false
}
当你在屏幕上移动影响器时,影响器中的粒子(尚未受到影响的粒子)会跳转到接近生命结束的时间段。这样它们就有一小段时间来完成消逝,但如果将 lifeLeft 改为 0(默认值),它们就会立即到达生命终点。
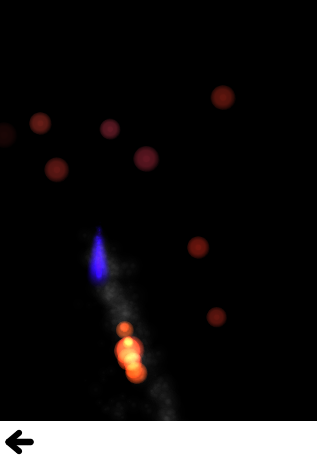
Attractor 演示使用 Attractor 效果器模拟黑洞
Attractor {
    id: gs; pointX: root.width/2; pointY: root.height/2; strength: 4000000;
    affectedParameter: Attractor.Acceleration
    proportionalToDistance: Attractor.InverseQuadratic
}
场景中的所有粒子,包括火箭飞船的排气管和颗粒,都会被拉向黑洞。这种效果在靠近黑洞的地方更为强烈,因此靠近屏幕上方的小行星几乎不会受到任何影响,而靠近中间的小行星有时会出现急剧的弯曲。为了让效果更完美,一个 Age affector 会覆盖黑洞,摧毁与之接触的粒子。
自定义影响器直接在 javascript 中操作粒子的属性。其中一个影响因子用于使树叶在落下时前后摇摆,看起来更像树叶,而不仅仅是转圈:
Affector {
    width: parent.width
    height: parent.height - 100
    onAffectParticles: (particles, dt) => {
        //Wobbly movement
        for (var i=0; i<particles.length; i++) {
            var particle = particles[i];
            particle.rotation += particle.vx * 0.15 * dt;
            particle.update = true;
        }
    }
}
另一个效果器用于在树叶 "着地 "时为其提供轻微的摩擦力,使其看起来更自然:
Affector {//Custom Friction, adds some 'randomness'
    x: -60
    width: parent.width + 120
    height: 100
    anchors.bottom: parent.bottom
    onAffectParticles: (particles, dt) => {
        for (var i=0; i<particles.length; i++) {
            var particle = particles[i];
            var pseudoRand = (Math.floor(particle.t*1327) % 10) + 1;
            var yslow = dt * pseudoRand * 0.5 + 1;
            var xslow = dt * pseudoRand * 0.05 + 1;
            if (particle.vy < 1)
                particle.vy = 0;
            else
                particle.vy = (particle.vy / yslow);
            if (particle.vx < 1)
                particle.vx = 0;
            else
                particle.vx = (particle.vx / xslow);
            particle.update = true;
        }
    }
}
摩擦力与自定义影响因子中的落叶类似,只是它在整个下落过程中使用的是平面摩擦力,而不是自定义影响因子。
Friction {
    anchors.fill: parent
    anchors.margins: -40
    factor: 0.4
}
重力是一种方便的影响因子,可为其内部的粒子施加恒定的加速度
Gravity {
    system: sys
    magnitude: 32
    angle: ground.rotation + 90
}
GroupGoal 为火焰球和非火焰球设置了两个粒子组,并提供了在它们之间转换的各种方法。
ParticleGroup {
    name: "unlit"
    duration: 1000
    to: {"lighting":1, "unlit":99}
    ImageParticle {
        source: "images/particleA.png"
        colorVariation: 0.1
        color: "#2060160f"
    }
    GroupGoal {
        whenCollidingWith: ["lit"]
        goalState: "lighting"
        jump: true
    }
}
非火焰球每秒都有百分之一的几率自行点亮,但它们也有一个GroupGoal 设置为整个组。当未点亮组中的所有粒子与点亮组中的粒子发生碰撞时,这个影响因子会对它们产生影响,并使它们移动到点亮组中。
ParticleGroup {
    name: "lighting"
    duration: 100
    to: {"lit":1}
}
点亮组是一个中间组,这样光晕会逐渐增强,过渡也不会太生硬。因此,100 毫秒后它会自动移动到照明组中。
ParticleGroup {
    name: "lit"
    duration: 10000
    onEntered: root.score++
    TrailEmitter {
        id: fireballFlame
        group: "flame"

        emitRatePerParticle: 48
        lifeSpan: 200
        emitWidth: 8
        emitHeight: 8

        size: 24
        sizeVariation: 8
        endSize: 4
    }

    TrailEmitter {
        id: fireballSmoke
        group: "smoke"
照明组中也有用于增加火光和烟雾的 TrailEmitters,但不会在任何地方过渡。还有两个GroupGoal 对象可以让未点亮组中的粒子过渡到点亮组(然后再过渡到点亮组)。
GroupGoal {
    groups: ["unlit"]
    goalState: "lit"
    jump: true
    system: particles
    x: -15
    y: -55
    height: 75
    width: 30
    shape: MaskShape {source: "images/matchmask.png"}
}
第一个对象只是一个与引燃火焰图像位置绑定的区域。当未点燃的小球穿过火焰时,它们会直接进入点燃组,因为引燃火焰的温度非常高。
//Click to enflame
GroupGoal {
    groups: ["unlit"]
    goalState: "lighting"
    jump: true
    enabled: ma.pressed
    width: 18
    height: 18
    x: ma.mouseX - width/2
    y: ma.mouseY - height/2
}
第二个区域与上次指针交互的位置绑定,因此触摸或点击未点亮的小球(由于它们不断移动,这很困难)会使它们移动到点亮组。
移动 "显示了通过中途改变轨迹可以获得的一些简单效果。红色粒子有一个影响其位置的作用力,可使其向前跳跃 120px。
Affector {
    groups: ["A"]
    x: 120
    width: 80
    height: 80
    once: true
    position: PointDirection { x: 120; }
}
绿色粒子的影响因子会影响其速度,但会有一定的角度变化。通过在现有的前进速度上添加一些随机方向的速度,它们开始呈锥形喷射。
Affector {
    groups: ["B"]
    x: 120
    y: 240
    width: 80
    height: 80
    once: true
    velocity: AngleDirection { angleVariation:360; magnitude: 72 }
}
蓝色粒子有一个影响其加速度的影响因子,由于它是相对于假值设置的,因此会重置加速度,而不是增加加速度。一旦蓝色粒子到达影响器,它们的水平速度就会随着垂直速度的减小而停止增加。
Affector {
    groups: ["C"]
    x: 120
    y: 400
    width: 80
    height: 120
    once: true
    relative: false
    acceleration: PointDirection { y: -80; }
}
SpriteGoal 如果粒子被绘制成精灵,ImageParticle 。
SpriteGoal {
    groups: ["meteor"]
    system: sys
    goalState: "explode"
    jump: true
    anchors.fill: rocketShip
    width: 60
    height: 60
}
SpriteGoal 在屏幕上跟随火箭飞船的图像,当它与ImageParticle 画成精灵的粒子相互作用时,它会指示粒子立即移动到 "爆炸 "状态,在本例中就是小行星碎裂成许多碎片的动画。
湍流 "会产生带有烟雾的火焰,两组粒子都会受到 "湍流 "影响器的影响。这就产生了微弱的风效果。
Turbulence {
    id: turb
    enabled: true
    height: (parent.height / 2) - 4
    width: parent.width
    x: parent. width / 4
    anchors.fill: parent
    NumberAnimation on strength{from: 16; to: 64; easing.type: Easing.InOutBounce; duration: 1800; loops: -1}
}
要使风改变方向,可在 noiseSource 参数中加入黑白噪点图像(目前使用的是默认噪点源)。
漫步 "使用 "漫步 "效果器为雪花飘落时添加一些水平漂移。
Wander {
    id: wanderer
    system: particles
    anchors.fill: parent
    xVariance: 360/(wanderer.affectedParameter+1);
    pace: 100*(wanderer.affectedParameter+1);
}
将 Wander 应用于轨迹的不同属性会产生不同的运动,因此该示例可以让您轻松玩转并查看差异。
© 2026 The Qt Company Ltd. Documentation contributions included herein are the copyrights of their respective owners. The documentation provided herein is licensed under the terms of the GNU Free Documentation License version 1.3 as published by the Free Software Foundation. Qt and respective logos are trademarks of The Qt Company Ltd. in Finland and/or other countries worldwide. All other trademarks are property of their respective owners.
