
Qt Quick 3D 物理学——简单示例
演示如何搭建一个简单的物理场景。
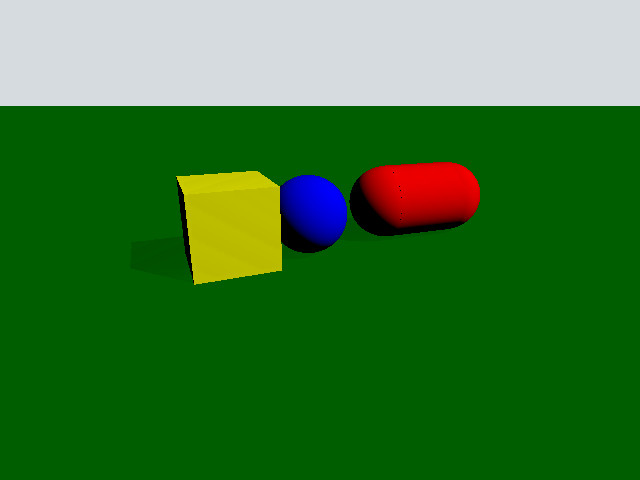
本示例通过解析一个简单示例的代码,对 Quick 3D Physics 的基本功能进行了入门级概述。请注意,本介绍假设读者已熟悉Qt Quick 3D 模块。
设置
整个示例的内容均包含在main.qml文件中,并在此文件中完成设置。首先来看一下创建物理世界的对象。该节点名为PhysicsWorld :
PhysicsWorld {
    scene: viewport.scene
}我们将scene 属性设置为View3D 的场景。scene 属性定义了模拟将从何处查找待模拟的物理节点。任何放置在场景节点之外的物理节点都不会被纳入模拟范围。
场景
让我们来看看这个场景。
View3D {
    id: viewport
    anchors.fill: parent

    environment: SceneEnvironment {
        clearColor: "#d6dbdf"
        backgroundMode: SceneEnvironment.Color
    }

    PerspectiveCamera {
        position: Qt.vector3d(-200, 100, 500)
        eulerRotation: Qt.vector3d(-20, -20, 0)
        clipFar: 5000
        clipNear: 1
    }

    DirectionalLight {
        eulerRotation.x: -45
        eulerRotation.y: 45
        castsShadow: true
        brightness: 1
        shadowFactor: 50
    }

    StaticRigidBody {
        position: Qt.vector3d(0, -100, 0)
        eulerRotation: Qt.vector3d(-90, 0, 0)
        collisionShapes: PlaneShape {}
        Model {
            source: "#Rectangle"
            scale: Qt.vector3d(10, 10, 1)
            materials: PrincipledMaterial {
                baseColor: "green"
            }
            castsShadows: false
            receivesShadows: true
        }
    }

    DynamicRigidBody {
        position: Qt.vector3d(-100, 100, 0)
        collisionShapes: BoxShape {
            id: boxShape
        }
        Model {
            source: "#Cube"
            materials: PrincipledMaterial {
                baseColor: "yellow"
            }
        }
    }

    DynamicRigidBody {
        position: Qt.vector3d(0, 100, 0)
        collisionShapes: SphereShape {
            id: sphereShape
        }
        Model {
            source: "#Sphere"
            materials: PrincipledMaterial {
                baseColor: "blue"
            }
        }
    }

    DynamicRigidBody {
        position: Qt.vector3d(75, 200, 0)
        collisionShapes: CapsuleShape {
            id: capsuleShape
        }

        Model {
            geometry: CapsuleGeometry {}
            materials: PrincipledMaterial {
                baseColor: "red"
            }
        }
    }
}由于我们需要绘制物理对象,因此我们的场景仅是一个View3D 。它包含用于渲染的PerspectiveCamera 和DirectionalLight ,但更重要的是,它包含一个StaticRigidBody 和三个DynamicRigidBody 节点。在物理学中,刚体是指密度均匀、不可变形的固体。 我们提供两种类型的刚体:StaticRigidBody 和DynamicRigidBody 。StaticRigidBody 是一个包含静态(不可移动)刚体的 QML 节点。从技术上讲,虽然可以移动该刚体,但这会带来性能开销。另一方面,DynamicRigidBody 则用于可以移动的对象。DynamicRigidBody 具有isKinematic 属性,当该属性设置为true时,刚体将不受外部力影响,并可通过脚本和动画进行控制。例如,足球通常不具有运动学特性,而电梯或移动平台通常具有。这也意味着,如果更新足球的position 属性,它不会移动到该位置,而电梯则会。
若要与其他物理对象交互,需设置collisionShapes 属性。collisionShapes 属性是一个列表,可包含一个或多个形状,这些形状将作为一个刚体单元协同作用。您可以根据它们之间的相对位置对这些形状进行定位和旋转。请注意,平面、三角网格和高度图形状仅在刚体为运动学刚体时才能与动态刚体配合使用。
形状
我们的场景包含四个物理对象(平面、立方体、球体、胶囊)。我们将逐一介绍它们。
平面
StaticRigidBody {
    position: Qt.vector3d(0, -100, 0)
    eulerRotation: Qt.vector3d(-90, 0, 0)
    collisionShapes: PlaneShape {}
    Model {
        source: "#Rectangle"
        scale: Qt.vector3d(10, 10, 1)
        materials: PrincipledMaterial {
            baseColor: "green"
        }
        castsShadows: false
        receivesShadows: true
    }
}我们通过创建一个“StaticRigidBody ”节点来生成平面。在此节点中,我们将collisionShapes 属性设置为包含一个PlaneShape 。平面将空间划分为其“上方”和“下方”两部分。位于平面“下方”的一切物体都会与其发生碰撞,并被推至其上方。该平面位于YZ平面上,“上方”方向指向正X轴。 我们在StaticRigidBody 节点中放置了一个Model来渲染该平面。这是一种常见的模式,可确保当物理对象在场景中发生交互时,模型也能以相同的方式移动和旋转。由于我们希望该平面位于XY平面上,因此使用eulerRotation 属性对其进行旋转。我们以类似的方式旋转该模型。
盒子
DynamicRigidBody {
    position: Qt.vector3d(-100, 100, 0)
    collisionShapes: BoxShape {
        id: boxShape
    }
    Model {
        source: "#Cube"
        materials: PrincipledMaterial {
            baseColor: "yellow"
        }
    }
}我们通过创建一个DynamicRigidBody 节点,并在collisionShapes 中添加一个BoxShape 来生成一个球体。由于这是一个动态节点,该立方体将像自由物体一样通过碰撞和移动与场景进行交互。由于立方体模型比单位立方体大一百倍,我们需要相应地对其进行缩放。鉴于这是一个动态物体且具有物理重量,我们设置了density 属性。
球体
DynamicRigidBody {
    position: Qt.vector3d(0, 100, 0)
    collisionShapes: SphereShape {
        id: sphereShape
    }
    Model {
        source: "#Sphere"
        materials: PrincipledMaterial {
            baseColor: "blue"
        }
    }
}我们在collisionShapes 中创建一个DynamicRigidBody 节点和一个SphereShape ,以此生成一个球体。
胶囊
DynamicRigidBody {
    position: Qt.vector3d(75, 200, 0)
    collisionShapes: CapsuleShape {
        id: capsuleShape
    }

    Model {
        geometry: CapsuleGeometry {}
        materials: PrincipledMaterial {
            baseColor: "red"
        }
    }
}我们通过在collisionShapes 中添加一个DynamicRigidBody 节点和一个CapsuleShape 来创建一个胶囊。我们利用Qt Quick 3D 提供的内置CapsuleGeometry来构建胶囊模型。
文件:
© 2026 The Qt Company Ltd. Documentation contributions included herein are the copyrights of their respective owners. The documentation provided herein is licensed under the terms of the GNU Free Documentation License version 1.3 as published by the Free Software Foundation. Qt and respective logos are trademarks of The Qt Company Ltd. in Finland and/or other countries worldwide. All other trademarks are property of their respective owners.
