CAN 总线管理器
该示例用于发送和接收 CAN 总线帧。
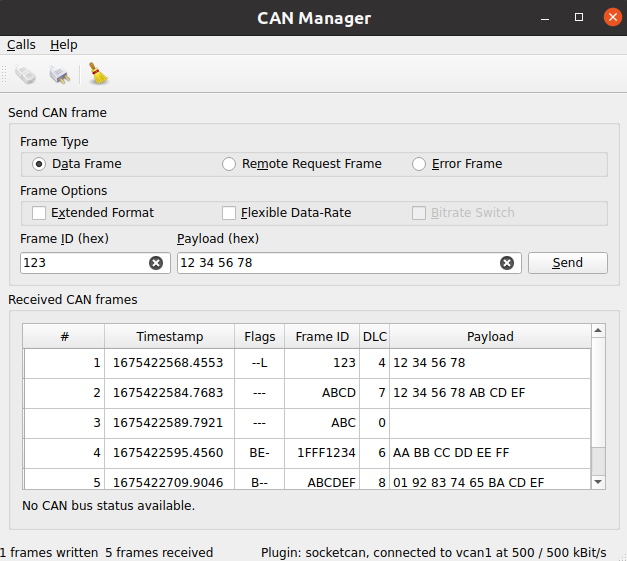
示例发送和接收 CAN 总线帧。接收的帧根据其类型排序。连接对话框用于调整 CAN 总线连接参数。
关键字 Qt Serial Bus本例中使用的类:
创建 QCanBusDevice
执行任何 CAN 通信都需要QCanBusDevice 的实例。
ConnectDialog 允许指定所有需要的参数。然后,使用提供的插件和接口名称创建设备:
    QString errorString;
    m_canDevice.reset(QCanBus::instance()->createDevice(p.pluginName, p.deviceInterfaceName,
                                                        &errorString));
    connect(m_canDevice.get(), &QCanBusDevice::errorOccurred,
            this, &MainWindow::processErrors);
    connect(m_canDevice.get(), &QCanBusDevice::framesReceived,
            this, &MainWindow::processReceivedFrames);
    connect(m_canDevice.get(), &QCanBusDevice::framesWritten,
            this, &MainWindow::processFramesWritten);
建立的连接允许处理接收的帧,控制发送的帧并处理错误。
设备创建后,使用QCanBusDevice::connectDevice() 启动通信。
处理接收到的帧
QCanBusDevice 当有新帧时,系统会发出framesReceived() 信号。当有available frames 时,可使用readFrame() 方法读取单个QCanBusFrame 。收到帧后,可从中提取frameId 、timeStamp 或payload 等单个参数:
    while (m_canDevice->framesAvailable()) {
        m_numberFramesReceived++;
        const QCanBusFrame frame = m_canDevice->readFrame();

        QString data;
        if (frame.frameType() == QCanBusFrame::ErrorFrame)
            data = m_canDevice->interpretErrorFrame(frame);
        else
            data = QString::fromLatin1(frame.payload().toHex(' ').toUpper());

        const QString time = QString::fromLatin1("%1.%2  ")
                .arg(frame.timeStamp().seconds(), 10, 10, ' '_L1)
                .arg(frame.timeStamp().microSeconds() / 100, 4, 10, '0'_L1);

        const QString flags = frameFlags(frame);

        const QString id = QString::number(frame.frameId(), 16).toUpper();
        const QString dlc = QString::number(frame.payload().size());

        m_model->appendFrame(QStringList({QString::number(m_numberFramesReceived),
                                          time, flags, id, dlc, data}));
    }
发送帧
要通过 CAN 总线发送自定义数据,用户至少需要提供一个frameId 和一个payload 。也可选择配置其他QCanBusFrame 参数:
    const uint frameId = m_ui->frameIdEdit->text().toUInt(nullptr, 16);
    QString data = m_ui->payloadEdit->text();
    m_ui->payloadEdit->setText(formatHexData(data));
    const QByteArray payload = QByteArray::fromHex(data.remove(u' ').toLatin1());

    QCanBusFrame frame = QCanBusFrame(frameId, payload);
    frame.setExtendedFrameFormat(m_ui->extendedFormatBox->isChecked());
    frame.setFlexibleDataRateFormat(m_ui->flexibleDataRateBox->isChecked());
    frame.setBitrateSwitch(m_ui->bitrateSwitchBox->isChecked());

    if (m_ui->errorFrame->isChecked())
        frame.setFrameType(QCanBusFrame::ErrorFrame);
    else if (m_ui->remoteFrame->isChecked())
        frame.setFrameType(QCanBusFrame::RemoteRequestFrame);
准备好帧后,就可以使用QCanBusDevice::writeFrame() 方法发送:
m_canDevice->writeFrame(frame);
运行示例
运行示例 Qt Creator,打开Welcome 模式,并从Examples 中选择示例。更多信息,请参阅Qt Creator: 教程:构建并运行。
© 2026 The Qt Company Ltd. Documentation contributions included herein are the copyrights of their respective owners. The documentation provided herein is licensed under the terms of the GNU Free Documentation License version 1.3 as published by the Free Software Foundation. Qt and respective logos are trademarks of The Qt Company Ltd. in Finland and/or other countries worldwide. All other trademarks are property of their respective owners.
