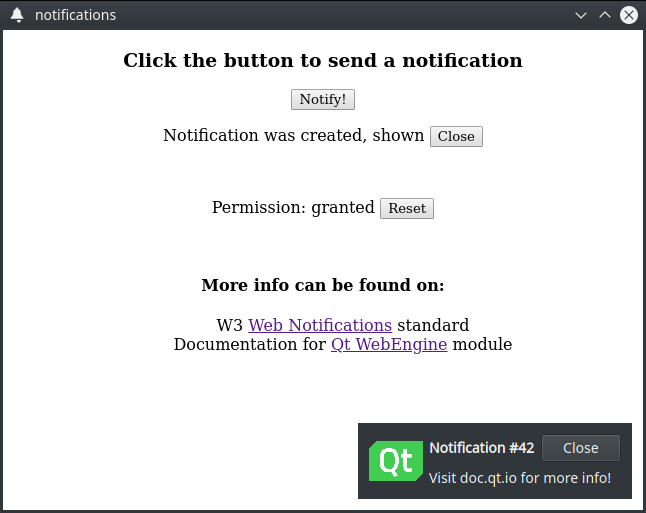
WebEngine 通知示例
演示如何向用户传递 HTML5 网络通知。

WebEngine Notifications演示了如何使用QWebEngineProfile::setNotificationPresenter() 方法和QWebEngineNotification 类向用户显示 HTML5 网络通知。
运行示例
要从 Qt Creator,打开Welcome 模式并从Examples 中选择示例。有关详细信息,请参阅Qt Creator: 教程:构建并运行。
HTML 页面
在本例中,我们创建了一个内部 HTML 页面,该页面通过资源集合文件 (.qrc) 添加。该页面显示用于请求权限的按钮,并包含触发该请求所需的 JavaScript 代码:
            Notification.requestPermission().then(function (permission) {
                if (permission == 'granted')
                    createNotification()
            })
页面还包含一个创建通知的按钮。以下 JavaScript 结构将在按下事件中执行:
    function createNotification() {
        let title = 'Notification #' + ++notificationsCreated
        let options = { body: 'Visit doc.qt.io for more info!', icon: 'icon.png', }

        let notification = new Notification(title, options)
    }
主函数
在main 函数中,我们实例化了一个QWebEngineView ,加载了内部 HTML 页面,并设置了处理通知所需的回调。
请求功能权限
然后,我们使用QWebEnginePage::permissionRequested() 调用请求用户允许在其设备上显示通知。
    QObject::connect(view.page(), &QWebEnginePage::permissionRequested,
                     [&] (QWebEnginePermission permission) {
                         if (permission.permissionType() != QWebEnginePermission::PermissionType::Notifications)
                             return;
                         permission.grant();
                     });
处理新通知
然后,我们构建一个NotificationPopup ,封装 HTML 网络通知的数据。我们还使用QWebEngineProfile::setNotificationPresenter() 调用来设置处理程序,并将其与popup 结合使用,以处理所有新通知。
    auto popup = new NotificationPopup(&view);
    profile->setNotificationPresenter([&] (std::unique_ptr<QWebEngineNotification> notification)
                                      { popup->present(notification); });
向用户显示通知
本例中的NotificationPopup 类是一个基于QWidget 的简单类,它使用多个QLabel 实例来显示通知的标题、消息和图标。
class NotificationPopup : public QWidget
{
    Q_OBJECT

    QLabel m_icon, m_title, m_message;
    std::unique_ptr<QWebEngineNotification> notification;
显示通知
在present 方法中,我们首先关闭并释放上一个通知(如果有的话),然后通过调用内部通知实例上的std::unique_ptr::swap 方法来获取新通知的所有权。
    void present(std::unique_ptr<QWebEngineNotification> &newNotification)
    {
        if (notification) {
            notification->close();
            notification.reset();
        }

        notification.swap(newNotification);
然后,我们通过调用QWebEngineNotification::title(),QWebEngineNotification::message(),QWebEngineNotification::icon() 查询通知实例的标题、信息和图标,并在弹出窗口中设置相应的标签。
        m_title.setText("<b>" + notification->title() + "</b>");
        m_message.setText(notification->message());
        m_icon.setPixmap(QPixmap::fromImage(notification->icon()).scaledToHeight(m_icon.height()));
之后,我们就可以通过调用QWidget::show() 方法向用户显示通知了。在这一步中,我们还会调用QWebEngineNotification::show() 方法,向JavaScript 代码通知我们的显示事件。
        show();
notification->show();最后,我们设置了一个回调,通过连接QWebEngineNotification::closed() 信号来处理JavaScript 端的关闭事件。我们还安排了一个定时器事件来自动关闭活动通知。
        connect(notification.get(), &QWebEngineNotification::closed, this, &NotificationPopup::onClosed);
        QTimer::singleShot(10000, notification.get(), [&] () { onClosed(); });

    }
关闭活动通知
我们通过超时或处理JavaScript 事件来执行当前活动通知的关闭步骤。首先,我们通过调用QWidget::hide() 隐藏弹出窗口部件。然后,我们通过调用QWebEngineNotification::close() 方法通知JavaScript 代码。最后,我们通过std::unique_ptr::reset() 方法销毁通知对象。
    void onClosed()
    {
        hide();
        notification->close();
        notification.reset();
    }
实现用户交互
为了实现通知的点击步骤,我们通过QWidget::mouseReleaseEvent() 来处理鼠标交互。在此事件中,JavaScript 代码会通过调用QWebEngineNotification::click() 方法收到通知。然后,我们自动执行关闭步骤,因为通知被认为已完全处理完毕,不再需要,因此可以销毁。
    void mouseReleaseEvent(QMouseEvent *event) override
    {
        QWidget::mouseReleaseEvent(event);
        if (notification && event->button() == Qt::LeftButton) {
            notification->click();
            onClosed();
        }
    }
© 2025 The Qt Company Ltd. Documentation contributions included herein are the copyrights of their respective owners. The documentation provided herein is licensed under the terms of the GNU Free Documentation License version 1.3 as published by the Free Software Foundation. Qt and respective logos are trademarks of The Qt Company Ltd. in Finland and/or other countries worldwide. All other trademarks are property of their respective owners.

