Warning
This section contains snippets that were automatically translated from C++ to Python and may contain errors.
Scene Graph - Custom Material#
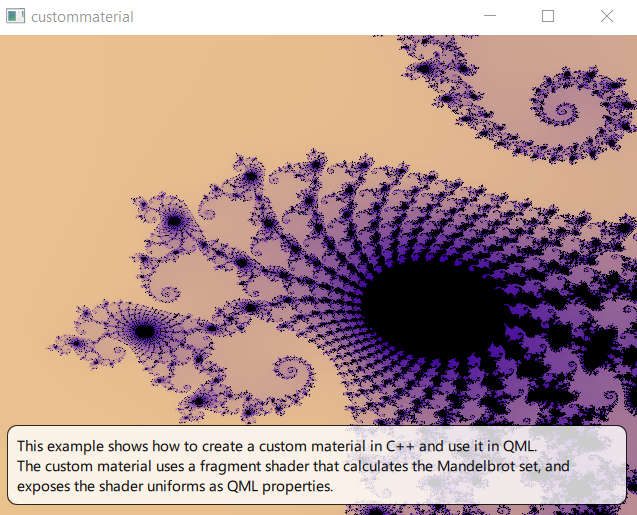
Shows how to implement a custom material in the Qt Quick Scene Graph.
The custom material example shows how to implement an item that is rendered using a material with a custom vertex and fragment shader.
Shader and material#
The main functionality is in the fragment shader
<Code snippet "/data/qt5-full-663/6.6.3/Src/qtbase/scenegraph/custommaterial/shaders/mandelbrot.frag" not found>
The fragment and vertex shaders are combined into a QSGMaterialShader subclass.
class CustomShader(QSGMaterialShader):

# public
    CustomShader()

        setShaderFileName(VertexStage, ":/scenegraph/custommaterial/shaders/mandelbrot.vert.qsb")
        setShaderFileName(FragmentStage, ":/scenegraph/custommaterial/shaders/mandelbrot.frag.qsb")

    bool updateUniformData(RenderState state,
                           QSGMaterial newMaterial, QSGMaterial oldMaterial) override
A QSGMaterial subclass encapsulates the shader together with the render state. In this example, we add state information corresponding to the shader uniforms. The material is responsible for creating the shader by reimplementing createShader() .
class CustomMaterial(QSGMaterial):

# public
    CustomMaterial()
    QSGMaterialType type() override
    int compare(QSGMaterial other) override
    QSGMaterialShader createShader(QSGRendererInterface.RenderMode) override

        return CustomShader()

    class():
        center[2] = float()
        zoom = float()
        limit = int()
        dirty = bool()
    } uniforms
To update the uniform data, we reimplement updateUniformData() .
def updateUniformData(self, RenderState state, QSGMaterial newMaterial, QSGMaterial oldMaterial):

    changed = False
    buf = state.uniformData()
    Q_ASSERT(buf.size() >= 84)
    if state.isMatrixDirty():
        m = state.combinedMatrix()
        memcpy(buf.data(), m.constData(), 64)
        changed = True

    if state.isOpacityDirty():
        opacity = state.opacity()
        memcpy(buf.data() + 64, opacity, 4)
        changed = True

    customMaterial = CustomMaterial(newMaterial)
    if oldMaterial != newMaterial or customMaterial.uniforms.dirty:
        memcpy(buf.data() + 68, customMaterial.uniforms.zoom, 4)
        memcpy(buf.data() + 72, customMaterial.uniforms.center, 8)
        memcpy(buf.data() + 80, customMaterial.uniforms.limit, 4)
        customMaterial.uniforms.dirty = False
        changed = True

    return changed
Item and node#
We create a custom item to show off our new material:
from PySide6.QtQuick import QQuickItem
class CustomItem(QQuickItem):

    Q_OBJECT
    Q_PROPERTY(qreal zoom READ zoom WRITE setZoom NOTIFY zoomChanged)
    Q_PROPERTY(int iterationLimit READ iterationLimit WRITE setIterationLimit NOTIFY iterationLimitChanged)
    Q_PROPERTY(QPointF center READ center WRITE setCenter NOTIFY centerChanged)
    QML_ELEMENT
# public
    CustomItem = explicit(QQuickItem parent = None)
    def zoom():

        return m_zoom

    def iterationLimit():

        return m_limit

    def center():

        return m_center

# public slots
    def setZoom(zoom):
    def setIterationLimit(iterationLimit):
    def setCenter(center):
# signals
    def zoomChanged(zoom):
    def iterationLimitChanged(iterationLimit):
    def centerChanged(center):
# protected
    QSGNode updatePaintNode(QSGNode , UpdatePaintNodeData ) override
    def geometryChange(newGeometry, oldGeometry):
# private
    m_geometryChanged = True
    m_zoom = qreal()
    m_zoomChanged = True
    m_limit = int()
    m_limitChanged = True
    m_center = QPointF()
    m_centerChanged = True
The CustomItem declaration adds three properties corresponding to the uniforms that we want to expose to QML.
Q_PROPERTY(qreal zoom READ zoom WRITE setZoom NOTIFY zoomChanged)
Q_PROPERTY(int iterationLimit READ iterationLimit WRITE setIterationLimit NOTIFY iterationLimitChanged)
Q_PROPERTY(QPointF center READ center WRITE setCenter NOTIFY centerChanged)
As with every custom Qt Quick item, the implementation is split in two: in addition to CustomItem, which lives in the GUI thread, we create a QSGNode subclass that lives in the render thread.
class CustomNode(QSGGeometryNode):

# public
    CustomNode()

        m = CustomMaterial()
        setMaterial(m)
        setFlag(OwnsMaterial, True)
        g = QSGGeometry(QSGGeometry.defaultAttributes_TexturedPoint2D(), 4)
        QSGGeometry.updateTexturedRectGeometry(g, QRect(), QRect())
        setGeometry(g)
        setFlag(OwnsGeometry, True)

    def setRect(bounds):

        QSGGeometry.updateTexturedRectGeometry(geometry(), bounds, QRectF(0, 0, 1, 1))
        markDirty(QSGNode.DirtyGeometry)

    def setZoom(zoom):

        m = CustomMaterial(material())
        m.uniforms.zoom = zoom
        m.uniforms.dirty = True
        markDirty(DirtyMaterial)

    def setLimit(limit):

        m = CustomMaterial(material())
        m.uniforms.limit = limit
        m.uniforms.dirty = True
        markDirty(DirtyMaterial)

    def setCenter(center):

        m = CustomMaterial(material())
        m.uniforms.center[0] = center.x()
        m.uniforms.center[1] = center.y()
        m.uniforms.dirty = True
        markDirty(DirtyMaterial)
The node owns an instance of the material, and has logic to update the material’s state. The item maintains the corresponding QML properties. It needs to duplicate the information from the material since the item and material live on different threads.
def setZoom(self, zoom):

    if qFuzzyCompare(m_zoom, zoom):
        return
    m_zoom = zoom
    m_zoomChanged = True
    zoomChanged.emit(m_zoom)
    update()

def setIterationLimit(self, limit):

    if m_limit == limit:
        return
    m_limit = limit
    m_limitChanged = True
    iterationLimitChanged.emit(m_limit)
    update()

def setCenter(self, center):

    if m_center == center:
        return
    m_center = center
    m_centerChanged = True
    centerChanged.emit(m_center)
    update()
The information is copied from the item to the scene graph in a reimplementation of updatePaintNode() . The two threads are at a synchronization point when the function is called, so it is safe to access both classes.
QSGNode CustomItem.updatePaintNode(QSGNode old, UpdatePaintNodeData )

    node = CustomNode(old)
    if not node:
        node = CustomNode()
    if m_geometryChanged:
        node.setRect(boundingRect())
    m_geometryChanged = False
    if m_zoomChanged:
        node.setZoom(m_zoom)
    m_zoomChanged = False
    if m_limitChanged:
        node.setLimit(m_limit)
    m_limitChanged = False
    if m_centerChanged:
        node.setCenter(m_center)
    m_centerChanged = False
    return node
The rest of the example#
The application is a straightforward QML application, with a QGuiApplication and a QQuickView that we pass a .qml file.
In the QML file, we create the customitem which we anchor to fill the root.
CustomItem {
    property real t: 1
    anchors.fill: parent
    center: Qt.point(-0.748, 0.1);
    iterationLimit: 3 * (zoom + 30)
    zoom: t * t / 10
    NumberAnimation on t {
        from: 1
        to: 60
        duration: 30*1000;
        running: true
        loops: Animation.Infinite
    }
}
To make the example a bit more interesting we add an animation to change the zoom level and iteration limit. The center stays constant.
