C
TI AM62x Quick Start Guide
Qt offers all the necessary tools to design, develop, build, and deploy your application onto the target.
This guide describes how to use the GUIs of Qt tools to develop Linux applications on a TI AM62x. It describes the overall process and provides step-by-step instructions for the following tasks:
- Designing a simple UI using Qt Design Studio.
- Creating a project in Qt Creator and utilizing the ready-made Qt Board Support Package (QBSP) for the TI AM62x device.
- Building and debugging the project on the target hardware.
Note: Qt for Device Creation requires a license. If you don't have one, you can request a free trial.
Overview
The following figure illustrates the basic concept of the software development process when you're using Qt tools and Boot to Qt Software Stack.

- Development Host is a development computer running Qt tools on Windows, Linux, or macOS.
- Qt tools includes development tools such as Qt Creator and Qt Design Studio, and quality assurance (QA) tools such as Squish.
- QBSP SDK contains a cross-compilation toolchain that is integrated into Qt Creator, and a device image that can be used to boot your device using Boot to Qt Software Stack.
- Target HW is your development target that runs your embedded Linux application.
- Upload and debug an application (via Ethernet, Wi-Fi, or USB). Use Qt Creator to upload and debug your application on the target HW.
- Flash a QBSP image represents ways (such as SD card) to install Linux on the target hardware.
Applicable TI AM62x Target Devices
The instructions in this guide apply to the TI AM62x target device.
Note: For more details on the supported target devices and development hosts, see Supported Target Devices and Development Hosts.
Installing Qt
Follow the procedures in this guide to get all the required resources, including Qt Creator and Qt Design Studio.
- Sign in to Qt Account Downloads.
- Download the Qt online installer. The installer is available for the following hosts:
- Linux
- Mac
- Windows
- Open the installer.
- Continue to Installation Folder and select Custom installation.
- Select Next.
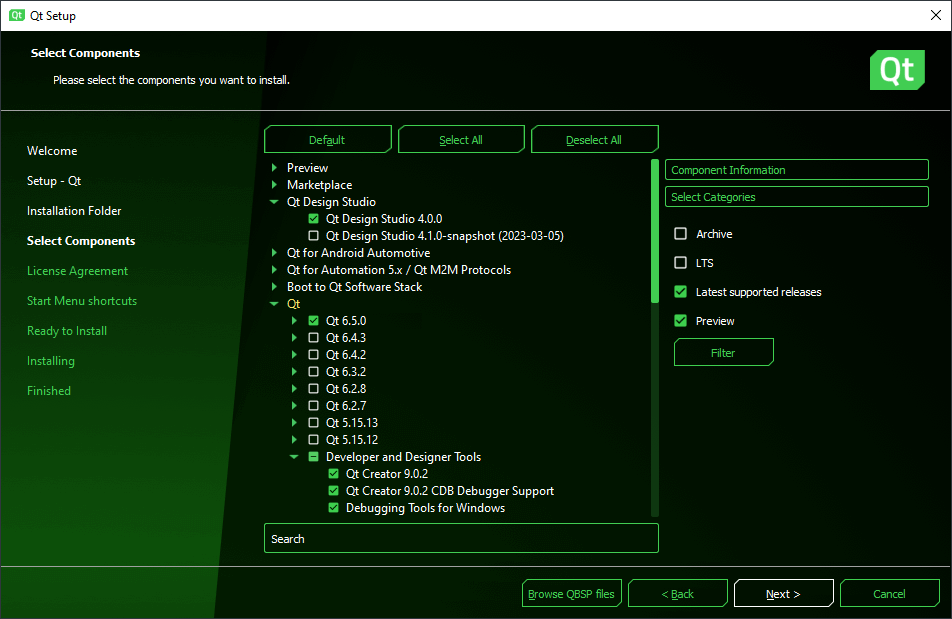
- In Select Components, select the latest official release of Qt. The required developer and designer tools (such as Qt Creator and Qt Design Studio) are preselected in the installer.
- Select Next.
- Continue to Ready to Install and select Install.
Note: If you have Qt already installed, use the Qt Maintenance Tool to install the missing tools.
Installing a QBSP Using the Qt Online Installer
- Open the Qt online installer.
- Continue to Select Components and open the top-level Boot to Qt Software Stack dropdown menu.
- Open the correct Qt release -specific Boot to Qt Software Stack dropdown menu.
- Select TI AM62x.
- Continue to Ready to Install and select Install.

Note: You can also develop the required QBSP file yourself. For more details, see Building QBSP with Yocto.
Creating an Application UI
You can use Qt Design Studio to create a cross-platform UI, also for embedded Linux applications.
- Open Qt Design Studio.
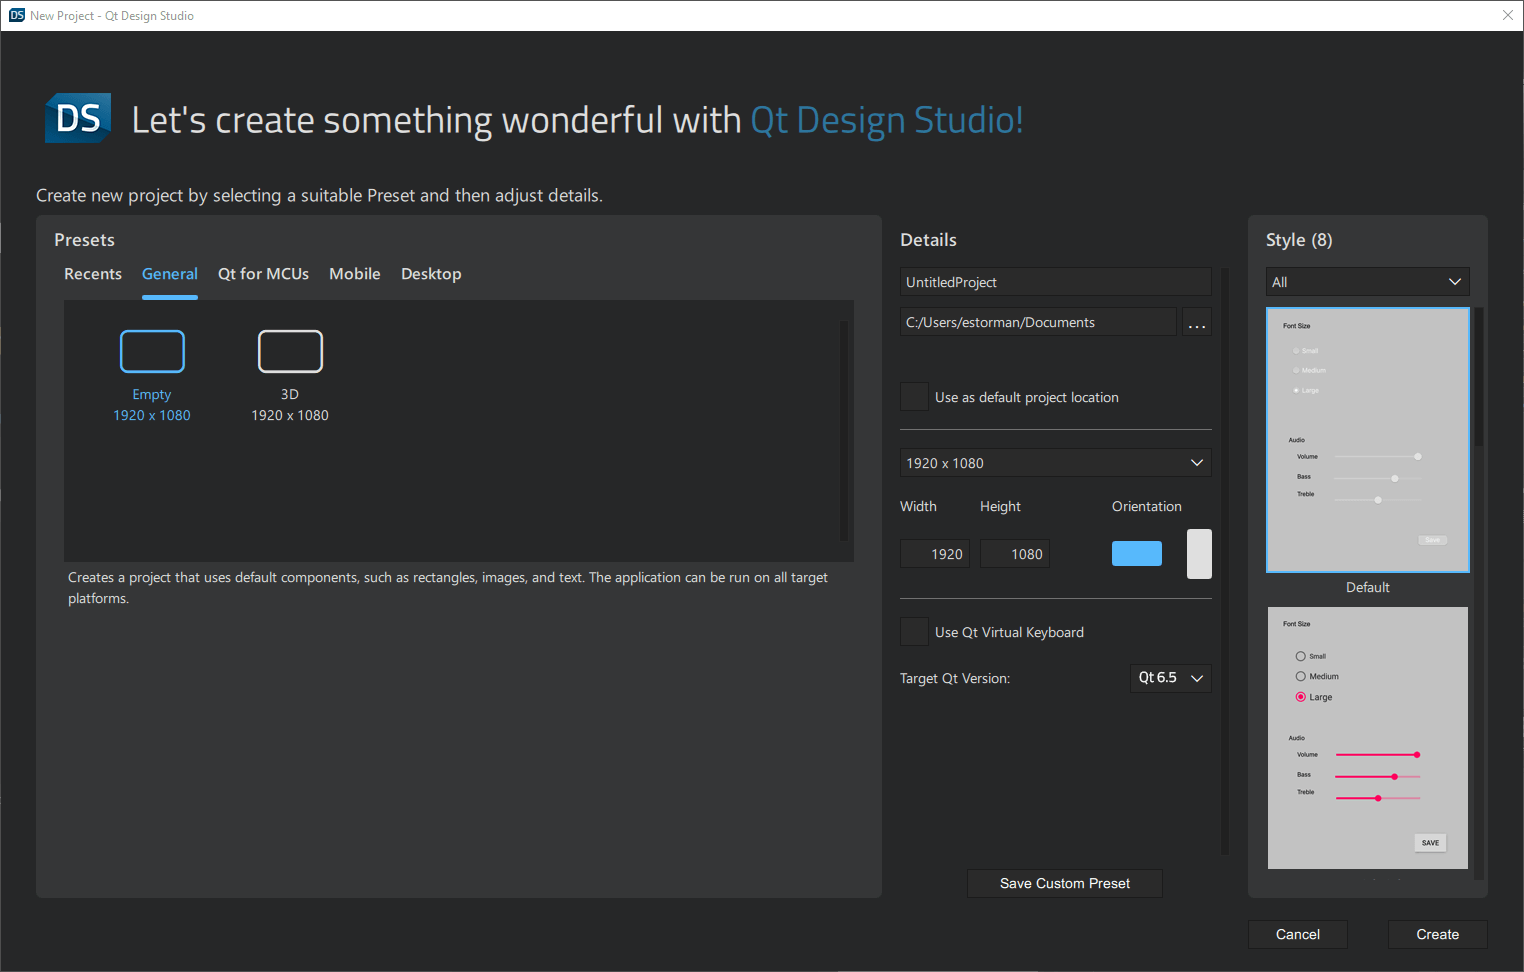
- Select Create Project.
- In Presets, select General.
- Name your project (also notice the project path to open it with Qt Creator).
- Adjust display resolution and orientation to suit your display.
- Make sure your Target Qt Version matches the version of Qt installed on your machine.
- Select Create.
Now you can modify your UI as you wish. Once it is ready, select Save All to make sure that you can open your UI project in Qt Creator.
Installing Boot to Qt on the Target Device
Before you can test your Qt applications on the target device, you must flash the target device with an image containing the Boot to Qt Software Stack. After you have successfully flashed your device, \B2QDL appears on the screen when you power on the device.
Flashing Boot to Qt Image to a microSD Card
The Boot to Qt image contains the Boot to Qt Software Stack for the TI SK device. Flash the image to a microSD card as follows:
- Insert a microSD card into your host PC.
- Open Qt Creator.
- Select Tools > Flash Boot to Qt Device.
- Select Next.

After you have flashed the image to a microSD card, insert the card into your target HW and turn on your device.
The TI AM62x device starts with Boot to Qt application by default and if it is connected to the Ethernet network, the application shows the IP address of the device.
Note: If your target hardware does not start, check that microSD card is defined as the Boot mode.
Setting Up a Device
- Open Qt Creator.
- Select Edit > Preferences.
- In the Preferences window:
- Select Devices.
- Select Add > Boot2Qt Device > Start Wizard.
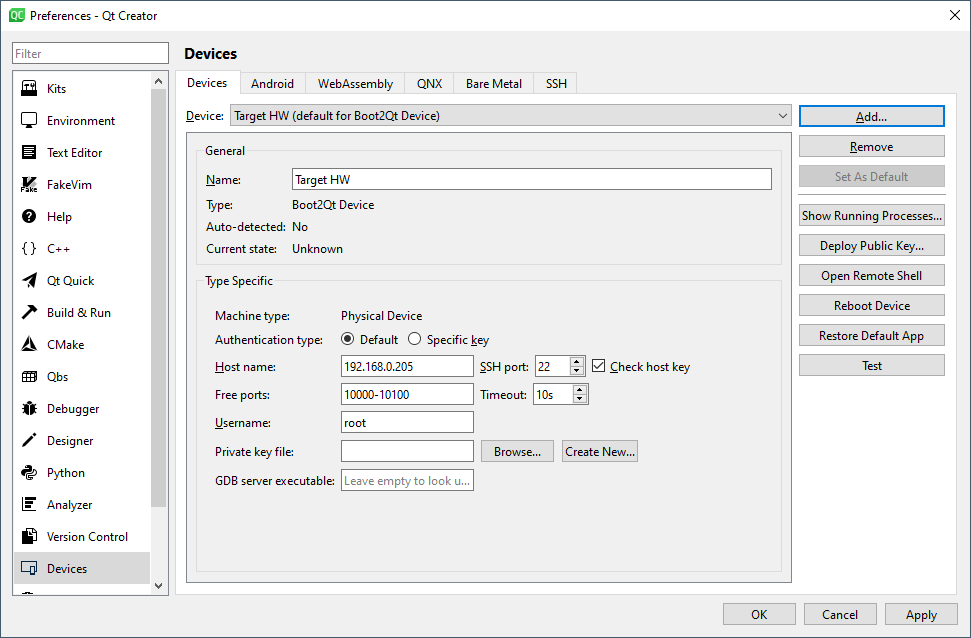
- In the Boot2Qt Network Device Setup window:
- Enter the Device name.
- Enter the Device address (IP address of the TI AM62x device).
- Select Finish.
- On the Devices tab:
- Select OK.
Note: Qt Creator uploads the application over the IP network, so the TI AM62x device has to be in the same network as your development host PC.
Configuring and Building an Application in Qt Creator
- Open Qt Creator.
- Navigate to the project you created with Qt Design Studio.
- Select CMakeLists.txt to open the project.
- In the Configure Project window:
- Select your TI AM62x kit.
- Select Configure Project.

Finally, select Build > Build Project to build the project you configured.
Running an Application on a Device
After setting up your device, you can upload and start your application on the TI AM62x device.
- Open Qt Creator.
- Select File > Open File or Project.
- Navigate to the project you configured earlier and select Open.
- In the Projects window:
- Edit the Run Settings if necessary.
- Select Run.

Note: To make changes to your application, you can update it on the device simply by running it again.
Debugging an Application
For more information on using Qt Creator to debug an application, see Debugging.
Using a TI AM62x Device With QBSP
You can use the Qt Maintenance Tool to install the latest Qt and QBSP releases for your TI AM62x device.
Note: You can also download a QBSP from your Qt Account page.
For details on how to customize and build QBSPs from sources, see How to Customize a Boot to Qt Image.
For more information on how to add QBSP support for new hardware, see How to Add Support for New Device.
Troubleshooting
If you have any issues with your TI AM62x device, such as how to setup boot switches or connect the debug terminal, turn to TI E2E support forum for more information.
For more information on troubleshooting Boot to Qt, see Troubleshooting.
Available under certain Qt licenses.
Find out more.
