KNX Editor Example
A KNX client for handling KNX local device management and tunneling.
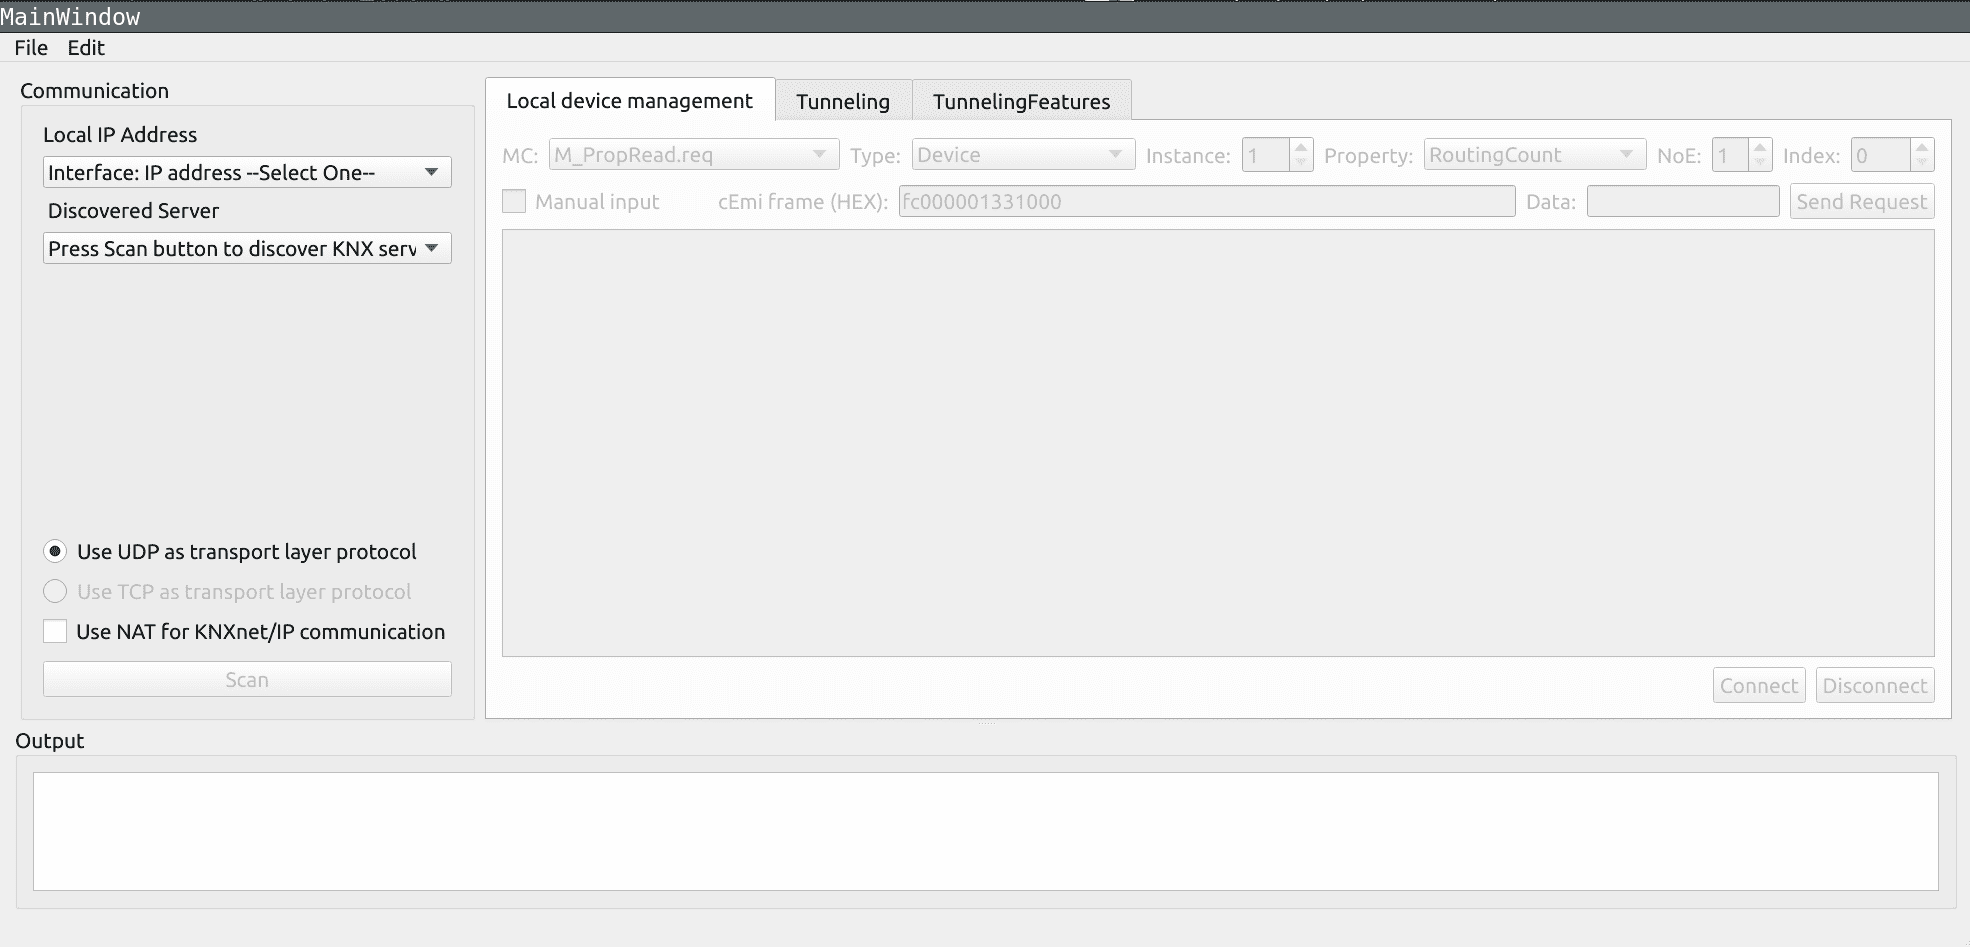
The KNX Editor user interface contains a Communication group, tabs for different KNX functionalities, and an Output panel.
To get started, users select one of the network interfaces on their machine in the Local IP Address field, and then select Scan to find any neighbouring KNX routers.
Once the client discovers KNX routers, information about them is displayed in the Output panel. Users must select a router to enable the tab views.
In the Local Device Management tab, users can customize the KNX frame and some parameters. They can choose the local management service type request to send and attach data values to it. The request is sent after the users select Connect. The received response is displayed in the tab. The following image shows an M_PropRead.req request that was sent and the response that was received.

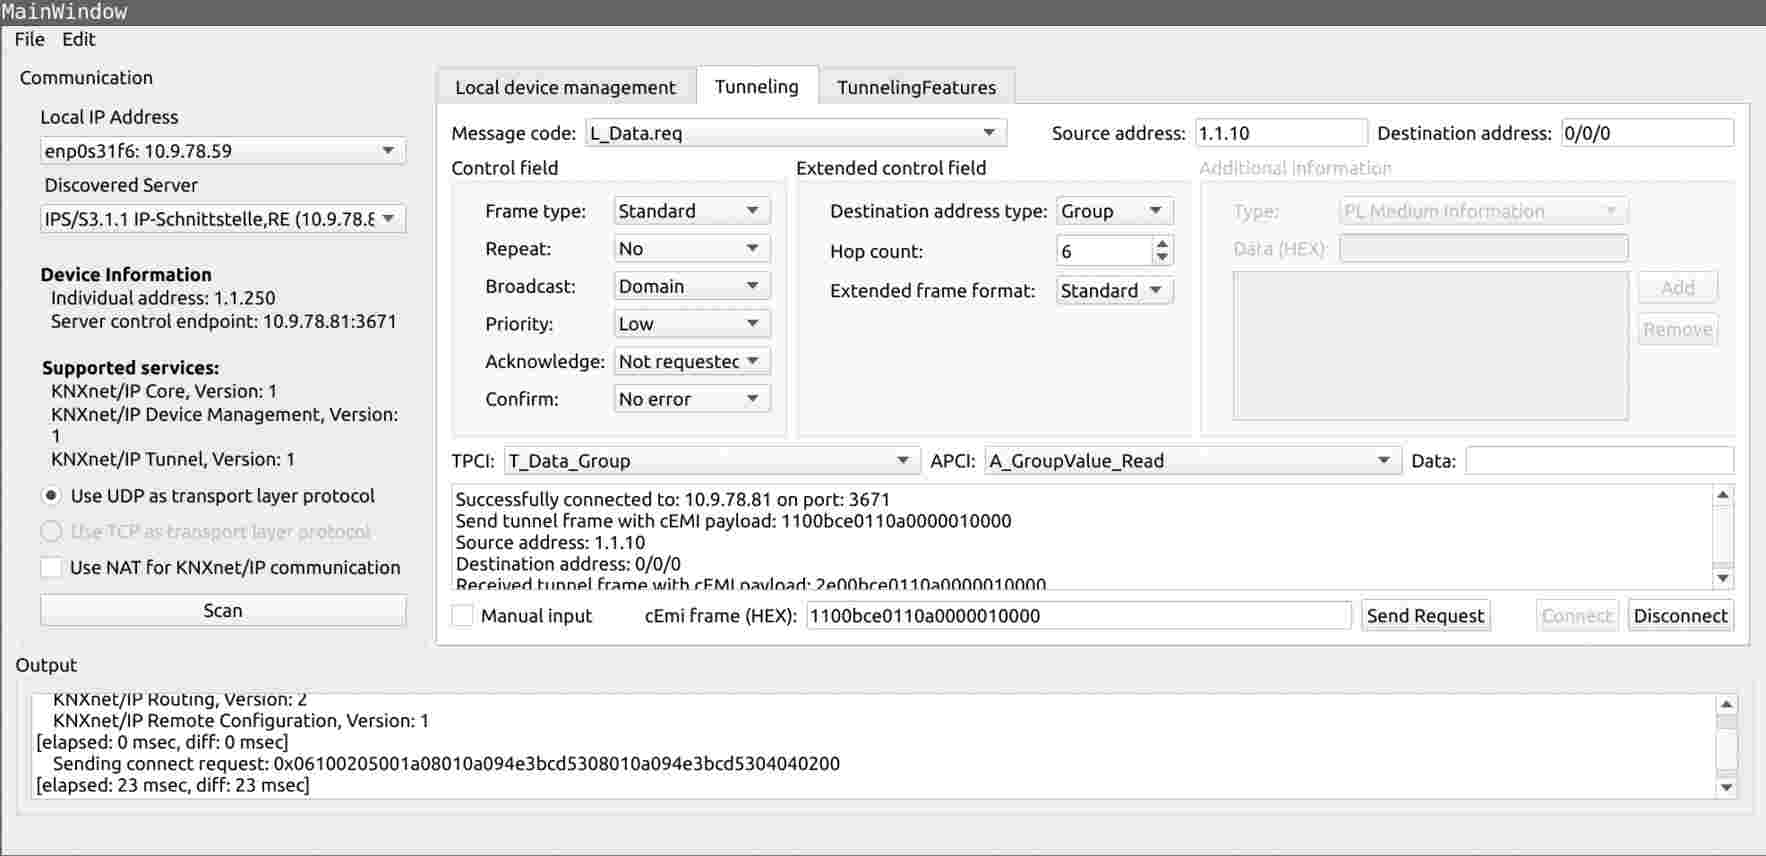
The Tunneling tab allows establishing a KNXnet/IP tunnel connection to a KNX router. The tunnel is established by selecting Connect. It is then possible to send data link layer service requests and customize the parameters contained in the requests. The following image shows an example of sending an L_Data.req request.
The Tunneling Features tab requires a KNX router that supports tunneling version 2. It allows accessing information such as the device descriptor of the host device and other properties. It is an extension that enables users to access the required management information over their authorized tunneling connection only.
The Output panel shows the traffic moving over the connection between the client and the server.
The application consists of four classes:
MainWindowis a QMainWindow that renders the general layout of the application.LocalDeviceManagementis a QWidget connected to the Local Device Management tab.Tunnelingis a QWidget asociated with the Tunneling tab.TunnelingFeaturesis a QWidget linked to the Tunneling Features tab.
Each of the above classes stores a reference to the class definition generated by qmake for every designer UI file. Through that reference, the above classes can interact with the graphical components of the application.
Main Window Class Definition and Implementation
class MainWindow : public QMainWindow
{
    Q_OBJECT

public:
    explicit MainWindow(QWidget *parent = 0);
    ~MainWindow();

signals:
    void keyringChanged(const QString &fileName, const QString &password);

private slots:
    void newServerSelected(int serverBoxIndex);
    void newIPAddressSelected(int localIpBoxIndex);
    void showServerAndServices(const QKnxNetIpServerInfo &info);
    void on_radioButtonTCP_toggled(bool checked);
    void on_actionEtsKeyringImport_triggered();

private:
    void fillLocalIpBox();
    static void messageHandler(QtMsgType type, const QMessageLogContext &ctx, const QString &msg);

private:
    static Ui::MainWindow *s_ui;
    Ui::MainWindow *ui { nullptr };

    QKnxNetIpServerInfo m_server;
    QKnxNetIpServerDiscoveryAgent m_discoveryAgent;
};
The MainWindow class uses a QKnxNetIpServerDiscoveryAgent instance that allows discovering KNXnet/IP servers by sending a search request in the network that the client is connected to. It also saves an instance of QKnxNetIpServerInfo for storing information about the current KNXnet/IP server (router) selected by the user.
The QKnxNetIpServerDiscoveryAgent is initiated when the Scan button is clicked. Here is the code snippet doing it:
MainWindow::MainWindow(QWidget *parent)
    : QMainWindow(parent),
    ui(new Ui::MainWindow)
{
    ...
    connect(ui->scanButton, &QPushButton::clicked, &m_discoveryAgent,
        QOverload<>::of(&QKnxNetIpServerDiscoveryAgent::start));
    ...
There are signal handlers installed for every signal emitted by the discovery agent. Here is an example of one of the setups capturing the QKnxNetIpServerDiscoveryAgent::deviceDiscovered signal emitted when a server is found:
MainWindow::MainWindow(QWidget *parent)
    : QMainWindow(parent),
    ui(new Ui::MainWindow)
{
    ...
    connect(&m_discoveryAgent, &QKnxNetIpServerDiscoveryAgent::deviceDiscovered, this,
        &MainWindow::showServerAndServices);
    ...
In this last example, when QKnxNetIpServerDiscoveryAgent::deviceDiscovered is triggered, the function MainWindow::showServerAndServices() is called. It displays information about the routers in the Output panel.
At this point, users can select one of the available routers to establish a connection, and send the different types of frames using the different features available in the tabs:
MainWindow::MainWindow(QWidget *parent)
    : QMainWindow(parent),
    ui(new Ui::MainWindow)
{
    ...
    connect(&m_discoveryAgent, &QKnxNetIpServerDiscoveryAgent::finished, this, [&] {
        if (!ui)
            return;

        ui->scanButton->setEnabled(true);
        ui->checkboxNat->setEnabled(true);

        if (ui->serverBox->count() <= 1)
            ui->serverBox->setItemText(0, tr("Press Scan button to discover KNX server(s)"));
        else if (ui->serverBox->count() == 2)
            ui->serverBox->setCurrentIndex(1);

        ui->serverBox->setEnabled(true);
        newServerSelected(ui->serverBox->currentIndex());
    });
    ...
}

void MainWindow::newServerSelected(int serverBoxIndex)
{
    if (serverBoxIndex < 1)
        return;

    auto info = ui->serverBox->itemData(serverBoxIndex).value<QKnxNetIpServerInfo>();
    ...
    const auto &hpai = info.endpoint();
    const QKnxNetIpHpaiProxy endpoint(hpai);
    if (endpoint.isValid() && m_server != info) {
        m_server = info;

        ui->tunneling->setEnabled(true);
        ui->tunneling->setKnxNetIpServer(m_server);

        ui->deviceManagement->setEnabled(true);
        ui->deviceManagement->setKnxNetIpServer(m_server);

        ui->tunnelingFeatures->setEnabled(true);
        ui->tunnelingFeatures->setKnxNetIpServer(m_server);
    }
    ui->radioButtonTCP->setEnabled(version2Supported);
}
The MainWindow::newServerSelected method saves the selected server in the MainWindow instance.
Local Device Management Class Definition and Implementation
class LocalDeviceManagement : public QWidget
{
    Q_OBJECT
    Q_DISABLE_COPY(LocalDeviceManagement)

public:
    explicit LocalDeviceManagement(QWidget* parent = nullptr);
    ~LocalDeviceManagement();

    void setNatAware(bool isNatAware);
    void setLocalAddress(const QHostAddress &address);
    void setKnxNetIpServer(const QKnxNetIpServerInfo &server);
    void setTcpEnable(bool value);
    void onKeyringChanged(const QVector<QKnxNetIpSecureConfiguration> &configs);

public slots:
    void clearLogging();

private slots:
    void on_mc_currentIndexChanged(int index);
    void on_objectType_currentTextChanged(const QString &type);
    void on_property_currentTextChanged(const QString &property);

    void on_noe_valueChanged(int value);
    void on_startIndex_valueChanged(int value);
    void on_objectInstance_valueChanged(int value);

    void on_manualInput_clicked(bool checked);

private:
    void setupMessageCodeComboBox();
    void updatePropertyTypeCombobox(const QString &type);
    void handleIoListResponse(const QKnxDeviceManagementFrame &frame);
    int keyToValue(const QMetaObject &object, const QString &key, bool *ok);
    void setupComboBox(QComboBox *comboBox, const QMetaObject &object, const QSet<int> &values = {});
    void selectFirstSubitem(QTreeWidget *treeView, QTreeWidgetItem *rootItem, QComboBox *comboBox);
    void updateSecureConfigCombo();

private:
    Ui::LocalDeviceManagement *ui { nullptr };

    QString m_fullCemiFrame;
    bool m_awaitIoListResponse { true };

    QKnxNetIpServerInfo m_server;
    QKnxNetIpDeviceManagement m_management;
    QKnxNetIp::HostProtocol m_proto { QKnxNetIp::HostProtocol::UDP_IPv4 };
    QVector<QKnxNetIpSecureConfiguration> m_configs;
};
Local device management uses an instance of QKnxNetIpDeviceManagement for the opening and handling of a device management connection to a KNXnet/IP router. The tunnel is created when the Connect button is clicked.
LocalDeviceManagement::LocalDeviceManagement(QWidget* parent)
    : QWidget(parent)
    , ui(new Ui::LocalDeviceManagement)
{
    ...
    connect(ui->connectRequestDeviceManagement, &QPushButton::clicked, this, [&]() {
        m_management.setLocalPort(0);
        if (ui->secureSessionCheckBox->isChecked()) {
            auto config = m_configs.value(ui->secureSessionCb->currentIndex());
            config.setKeepSecureSessionAlive(true);
            m_management.setSecureConfiguration(config);
            m_management.connectToHostEncrypted(m_server.controlEndpointAddress(),
                m_server.controlEndpointPort());
        } else {
            m_management.connectToHost(m_server.controlEndpointAddress(),
                m_server.controlEndpointPort(), m_proto);
        }
    });
    ...
}
The QKnxNetIpDeviceManagement instance is instructed to connect to the server host that was previously selected.
Once the QKnxNetIpDeviceManagement::connected signal is triggered, the Send Request button gets enabled and the client can begin sending customized device management service requests. The code snippet below shows the handler set up for the clicked signal of the Send Request button (deviceManagementSendRequest):
LocalDeviceManagement::LocalDeviceManagement(QWidget* parent)
    : QWidget(parent)
    , ui(new Ui::LocalDeviceManagement)
{
    ...
    connect(&m_management, &QKnxNetIpDeviceManagement::connected, this, [&] {
        ui->deviceManagementSendRequest->setEnabled(true);
        ui->connectRequestDeviceManagement->setEnabled(false);
        ui->disconnectRequestDeviceManagement->setEnabled(true);
        ui->textOuputDeviceManagement->append(tr("Successfully connected to: %1 on port: %2")
            .arg(m_server.controlEndpointAddress().toString()).arg(m_server.controlEndpointPort()));

        m_management.sendFrame(QKnxDeviceManagementFrame::propertyReadBuilder()
            .setObjectType(QKnxInterfaceObjectType::System::Device)
            .setObjectInstance(1)
            .setProperty(QKnxInterfaceObjectProperty::Device::IoList)
            .setNumberOfElements(1)
            .setStartIndex(0).createRequest());
    });
    ...
    connect(ui->deviceManagementSendRequest, &QPushButton::clicked, this, [&]() {
        ui->textOuputDeviceManagement->append(tr("Send device management frame with cEMI payload: ")
            + ui->cemiFrame->text());
        auto data = QKnxByteArray::fromHex(ui->cemiFrame->text().toUtf8());
        if (ui->cemiData->isEnabled())
            data.append(QKnxByteArray::fromHex(ui->cemiData->text().toUtf8()));
        m_management.sendFrame(QKnxDeviceManagementFrame::fromBytes(data, 0,
            data.size()));
    });
    ...
}
Tunneling Class Definition and Implementation
class Tunneling : public QWidget
{
    Q_OBJECT
    Q_DISABLE_COPY(Tunneling)

public:
    explicit Tunneling(QWidget* parent = nullptr);
    ~Tunneling();

    void setNatAware(bool isNatAware);
    void setLocalAddress(const QHostAddress &address);
    void setKnxNetIpServer(const QKnxNetIpServerInfo &server);
    void setTcpEnable(bool value);
    void onKeyringChanged(const QVector<QKnxNetIpSecureConfiguration> &configs);

public slots:
    void clearLogging();

private slots:
    void updateFrame();
    void updateControlField();
    void updateExtendedControlField();
    void on_manualInput_clicked(bool checked);

private:
    void setupApciTpciComboBox();
    void setupMessageCodeComboBox();
    void updateAdditionalInfoTypesComboBox();
    void updateSecureConfigCombo();

private:
    Ui::Tunneling *ui { nullptr };

    QKnxControlField m_ctrl;
    QKnxExtendedControlField m_extCtrl;

    QKnxLinkLayerFrame m_frame;
    QKnxNetIpTunnel m_tunnel;
    QKnxNetIpServerInfo m_server;
    QKnxNetIp::HostProtocol m_proto { QKnxNetIp::HostProtocol::UDP_IPv4 };
    QVector<QKnxNetIpSecureConfiguration> m_configs;

};
The Tunneling class holds a QKnxNetIpTunnel that enables the opening and handling of a KNXnet/IP client connection to a KNXnet/IP server. Once the class is instantiated, the client establishes the connection when the Connect button is clicked:
Tunneling::Tunneling(QWidget* parent)
    : QWidget(parent)
    , ui(new Ui::Tunneling)
{
    ...
    connect(ui->connectTunneling, &QPushButton::clicked, this, [&]() {
        m_tunnel.setLocalPort(0);
        if (ui->secureSessionCheckBox->isChecked()) {
            auto config = m_configs.value(ui->secureSessionCb->currentIndex());
            config.setKeepSecureSessionAlive(true);
            m_tunnel.setSecureConfiguration(config);
            m_tunnel.connectToHostEncrypted(m_server.controlEndpointAddress(),
                m_server.controlEndpointPort());
        } else {
            m_tunnel.connectToHost(m_server.controlEndpointAddress(),
                m_server.controlEndpointPort(), m_proto);
        }
    });
    ...
}
The received KNX frames are decoded and handled here:
Tunneling::Tunneling(QWidget* parent)
    : QWidget(parent)
    , ui(new Ui::Tunneling)
{
    ...
    connect(&m_tunnel, &QKnxNetIpTunnel::frameReceived, this,
        [&](QKnxLinkLayerFrame frame) {
        ui->textOuputTunneling->append(tr("Source address: %1").arg(frame.sourceAddress()
            .toString()));
        ui->textOuputTunneling->append(tr("Destination address: %1").arg(frame.destinationAddress()
            .toString()));
        ui->textOuputTunneling->append(tr("Received tunnel frame with cEMI payload: "
            + frame.bytes().toHex().toByteArray()));
    });
    ...
}
TunnelingFeatures Class Definition and Implementation
class TunnelingFeatures : public QWidget
{
    Q_OBJECT

public:
    explicit TunnelingFeatures(QWidget *parent = nullptr);
    ~TunnelingFeatures();

    void setNatAware(bool isNatAware);
    void setLocalAddress(const QHostAddress &address);
    void setKnxNetIpServer(const QKnxNetIpServerInfo &server);
    void setTcpEnable(bool value);
    void onKeyringChanged(const QVector<QKnxNetIpSecureConfiguration> &configs);

private:
    void checkFeatureValue();
    void updateSecureConfigCombo();

private:
    Ui::TunnelingFeatures *ui { nullptr };

    QKnxNetIpServerInfo m_server;
    QKnxNetIpTunnel m_tunnel;

    QKnxNetIp::HostProtocol m_protocol = { QKnxNetIp::HostProtocol::UDP_IPv4 };
    QVector<QKnxNetIpSecureConfiguration> m_configs;
};
Similarly to the Tunneling class, the TunnelingFeatures class uses a QKnxNetIpTunnel for opening and handling a KNXnet/IP client connection. However, it makes use of some additional methods for sending the tunneling feature version 2 frames: QKnxNetIpTunnel::sendTunnelingFeatureGet and QKnxNetIpTunnel::sendTunnelingFeatureSet. Here is the handler for the clicked singal of the Send Message button (tunnelingSend):
    connect(ui->tunnelingSend, &QPushButton::clicked, this, [&]() {
        using ServType = QKnx::NetIp::ServiceType;
        ServType type = ServType(quint16(ServType::TunnelingFeatureGet));
        if (ui->tunnelServiceType->currentIndex() == 1)
            type = ServType(quint16(ServType::TunnelingFeatureSet));

        using FeatureType = QKnx::InterfaceFeature;
        FeatureType featureType = FeatureType(quint8(FeatureType::SupportedEmiType)
            + ui->featureIdentifier->currentIndex());

        QKnxByteArray bytes = QKnxByteArray::fromHex(ui->featureValue->text().toUtf8());
        QKnxNetIpFrame frame;

        if (type == ServType::TunnelingFeatureGet)
            m_tunnel.sendTunnelingFeatureGet(featureType);
        else if (type == ServType::TunnelingFeatureSet)
            m_tunnel.sendTunnelingFeatureSet(featureType, bytes);

        ui->textOuputTunneling->append(tr("Status: (%1) Messages sent.").arg(m_tunnel
            .sequenceCount(QKnxNetIpEndpointConnection::SequenceType::Send) + 1));
    });
The Main Function
The KNX editor main() function does not have any special handling. It looks like the main function for any Qt app:
#include "mainwindow.h"
#include <QApplication>

int main(int argc, char *argv[])
{
    QApplication a(argc, argv);
    MainWindow w;
    w.show();

    return a.exec();
}
Files:
- knxeditor/knxeditor.pro
- knxeditor/localdevicemanagement.cpp
- knxeditor/localdevicemanagement.h
- knxeditor/localdevicemanagement.ui
- knxeditor/main.cpp
- knxeditor/mainwindow.cpp
- knxeditor/mainwindow.h
- knxeditor/mainwindow.ui
- knxeditor/tunneling.cpp
- knxeditor/tunneling.h
- knxeditor/tunneling.ui
- knxeditor/tunnelingfeatures.cpp
- knxeditor/tunnelingfeatures.h
- knxeditor/tunnelingfeatures.ui
© 2025 The Qt Company Ltd. Documentation contributions included herein are the copyrights of their respective owners. The documentation provided herein is licensed under the terms of the GNU Free Documentation License version 1.3 as published by the Free Software Foundation. Qt and respective logos are trademarks of The Qt Company Ltd. in Finland and/or other countries worldwide. All other trademarks are property of their respective owners.
