
페인터 경로 예제
'페인터 경로' 예제는 페인터 경로를 사용하여 렌더링할 복잡한 도형을 만드는 방법을 보여줍니다.
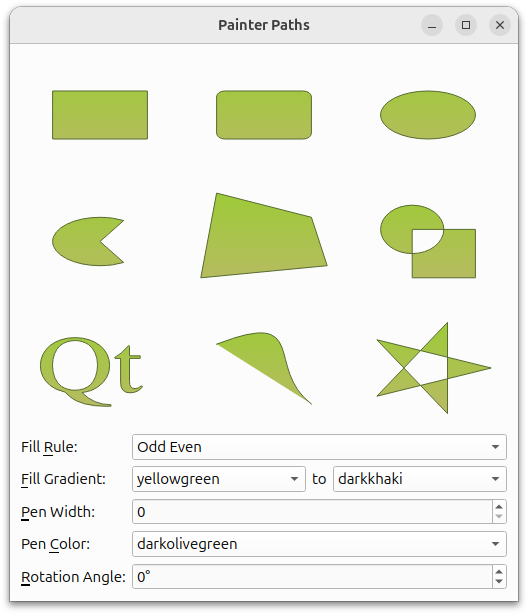
QPainterPath 클래스는 페인팅 작업을 위한 컨테이너를 제공하여 그래픽 도형을 구성하고 재사용할 수 있게 해줍니다.
페인터 경로는 여러 그래픽 구성 요소(사각형, 타원, 선, 곡선 등)로 구성된 객체이며, 채우기, 윤곽 그리기 및 잘라내기에 사용할 수 있습니다. 일반적인 그리기 작업에 비해 페인터 경로의 주요 장점은 복잡한 도형을 한 번만 생성해도 되며, QPainter::drawPath() 호출만으로 여러 번 그릴 수 있다는 점입니다.
이 예제는 다음 두 개의 클래스로 구성됩니다:
RenderArea클래스는 단일 페인터 경로를 표시하는 사용자 정의 위젯입니다.- 여러 개의 `
RenderArea` 위젯을 표시하고, 사용자가 페인터 경로의 채우기, 펜, 색상 및 회전 각도를 조작할 수 있도록 하는 애플리케이션의 메인 창인 `Window` 클래스.
먼저 ` Window ` 클래스를 살펴본 다음, ` RenderArea ` 클래스를 살펴보겠습니다.
Window 클래스 정의
Window 클래스는 QWidget 을 상속받으며, 여러 개의 RenderArea 위젯을 표시하고 사용자가 페인터 경로의 채우기, 펜, 색상 및 회전 각도를 조작할 수 있게 해주는 애플리케이션의 메인 창입니다.
class Window : public QWidget
{
    Q_OBJECT

public:
    Window();

private slots:
    void fillRuleChanged();
    void fillGradientChanged();
    void penColorChanged();
채우기와 색상에 관한 사용자 입력에 대응하기 위해 세 개의 비공개 슬롯( fillRuleChanged(), fillGradientChanged(), penColorChanged())을 선언합니다.
사용자가 펜 너비와 회전 각도를 변경하면, QSpinBox::valueChanged() 신호를 통해 새로운 값이 RenderArea 위젯으로 직접 전달됩니다. 채우기 및 색상을 업데이트하기 위해 슬롯을 구현해야 하는 이유는, QComboBox 가 새로운 값을 인자로 전달하는 유사한 신호를 제공하지 않기 때문입니다. 따라서 RenderArea 위젯을 업데이트하기 전에 새로운 값(들)을 가져와야 합니다.
private:
    void populateWithColors(QComboBox *comboBox);
    QVariant currentItemData(QComboBox *comboBox);
또한 몇 가지 비공개 편의 함수를 선언합니다. ` populateWithColors() `는 주어진 ` QComboBox `에 Qt가 인식하는 색상 이름에 해당하는 항목들을 채우고, ` currentItemData() `는 주어진 ` QComboBox`에 대한 현재 항목을 반환합니다.
    QList<RenderArea*> renderAreas;
    QLabel *fillRuleLabel;
    QLabel *fillGradientLabel;
    QLabel *fillToLabel;
    QLabel *penWidthLabel;
    QLabel *penColorLabel;
    QLabel *rotationAngleLabel;
    QComboBox *fillRuleComboBox;
    QComboBox *fillColor1ComboBox;
    QComboBox *fillColor2ComboBox;
    QSpinBox *penWidthSpinBox;
    QComboBox *penColorComboBox;
    QSpinBox *rotationAngleSpinBox;
};
그런 다음 메인 윈도우 위젯의 다양한 구성 요소를 선언합니다. 또한 RenderArea 위젯의 개수를 지정하는 편의 상수도 선언합니다.
Window 클래스 구현
Window 생성자에서 다양한 페인터 경로를 정의하고, 그래픽 도형을 렌더링할 해당 RenderArea 위젯을 생성합니다:
Window::Window()
{
    QPainterPath rectPath;
    rectPath.moveTo(20.0, 30.0);
    rectPath.lineTo(80.0, 30.0);
    rectPath.lineTo(80.0, 70.0);
    rectPath.lineTo(20.0, 70.0);
rectPath.closeSubpath();QPainterPath::moveTo() 및 QPainterPath::lineTo() 함수를 사용하여 모서리가 뾰족한 사각형을 생성합니다.
QPainterPath::moveTo()는 현재 점을 인수로 전달된 점으로 이동시킵니다. 페인터 경로는 여러 그래픽 구성 요소, 즉 하위 경로로 구성된 객체입니다. 현재 점을 이동하면 새로운 하위 경로가 시작되며(새로운 경로가 시작되면 이전의 현재 경로는 암시적으로 닫힙니다). QPainterPath::lineTo() 함수는 현재 지점에서 주어진 끝점까지 직선을 추가합니다. 선이 그려진 후, 현재 지점은 선의 끝점으로 업데이트됩니다.
먼저 현재 점을 이동하여 새로운 하위 경로를 시작한 다음, 사각형의 세 변을 그립니다. 그런 다음 QPainterPath::closeSubpath() 함수를 호출하여 현재 하위 경로의 시작점으로 향하는 선을 그립니다. 현재 하위 경로가 닫히면 새로운 하위 경로가 자동으로 시작됩니다. 새로운 경로의 현재 점은 (0, 0)입니다. QPainterPath::lineTo()를 호출하여 마지막 선도 함께 그린 다음, QPainterPath::moveTo() 함수를 사용하여 명시적으로 새로운 서브패스를 시작할 수도 있습니다.
QPainterPath 또한 ` QPainterPath::addRect()` 편의 함수를 제공하며, 이 함수는 주어진 사각형을 닫힌 서브패스로 경로에 추가합니다. 사각형은 시계 방향으로 이어지는 선들의 집합으로 추가됩니다. `rect`가 추가된 후 페인터 경로의 현재 위치는 사각형의 왼쪽 상단 모서리에 있습니다.
    QPainterPath roundRectPath;
    roundRectPath.moveTo(80.0, 35.0);
    roundRectPath.arcTo(70.0, 30.0, 10.0, 10.0, 0.0, 90.0);
    roundRectPath.lineTo(25.0, 30.0);
    roundRectPath.arcTo(20.0, 30.0, 10.0, 10.0, 90.0, 90.0);
    roundRectPath.lineTo(20.0, 65.0);
    roundRectPath.arcTo(20.0, 60.0, 10.0, 10.0, 180.0, 90.0);
    roundRectPath.lineTo(75.0, 70.0);
    roundRectPath.arcTo(70.0, 60.0, 10.0, 10.0, 270.0, 90.0);
    roundRectPath.closeSubpath();
그런 다음 모서리가 둥근 사각형을 생성합니다. 앞서와 마찬가지로 QPainterPath::moveTo() 및 QPainterPath::lineTo() 함수를 사용하여 사각형의 변을 그립니다. 둥근 모서리를 만들기 위해 QPainterPath::arcTo() 함수를 사용합니다.
QPainterPath::arcTo()는 주어진 사각형( QRect 로 지정되거나 사각형의 좌표로 지정됨)을 차지하는 호를 생성하며, 주어진 시작 각도에서 시작하여 시계 반대 방향으로 주어진 각도만큼 뻗어 나갑니다. 각도는 도(°) 단위로 지정됩니다. 시계 방향 호는 음의 각도를 사용하여 지정할 수 있습니다. 이 함수는 현재 점과 호의 시작점이 아직 연결되어 있지 않은 경우, 두 점을 연결합니다.
    QPainterPath ellipsePath;
    ellipsePath.moveTo(80.0, 50.0);
    ellipsePath.arcTo(20.0, 30.0, 60.0, 40.0, 0.0, 360.0);
또한 QPainterPath::arcTo() 함수를 사용하여 타원 경로를 생성합니다. 먼저 현재 점을 이동시켜 새로운 경로를 시작합니다. 그런 다음 시작 각도를 0.0으로, 마지막 인수를 360.0도로 지정하여 QPainterPath::arcTo()를 호출함으로써 타원을 생성합니다.
여기서도 QPainterPath 은 주어진 경계 사각형 내에 타원을 생성하고 이를 페인터 경로에 추가하는 편리한 함수( QPainterPath::addEllipse())를 제공합니다. 현재 하위 경로가 닫혀 있으면 새로운 하위 경로가 시작됩니다. 타원은 0도(3시 방향)에서 시작하여 0도로 끝나는 시계 방향 곡선으로 구성됩니다.
    QPainterPath piePath;
    piePath.moveTo(50.0, 50.0);
    piePath.arcTo(20.0, 30.0, 60.0, 40.0, 60.0, 240.0);
    piePath.closeSubpath();
파이 차트 경로를 생성할 때는 앞서 언급한 함수들을 조합하여 계속 사용합니다. 먼저 현재 점을 이동하여 새로운 하위 경로를 시작합니다. 그런 다음 차트의 중심에서 호까지 이어지는 선과 호 자체를 생성합니다. 하위 경로를 닫으면, 차트의 중심으로 돌아가는 마지막 선이 암시적으로 생성됩니다.
    QPainterPath polygonPath;
    polygonPath.moveTo(10.0, 80.0);
    polygonPath.lineTo(20.0, 10.0);
    polygonPath.lineTo(80.0, 30.0);
    polygonPath.lineTo(90.0, 70.0);
    polygonPath.closeSubpath();
다각형을 그리는 것은 직사각형을 그리는 것과 동일합니다.
QPainterPath 또한 ` QPainterPath::addPolygon()` 편의 함수를 제공하며, 이 함수는 주어진 다각형을 새로운 하위 경로로 경로에 추가합니다. 다각형이 추가된 후의 현재 위치는 다각형의 마지막 점입니다.
    QPainterPath groupPath;
    groupPath.moveTo(60.0, 40.0);
    groupPath.arcTo(20.0, 20.0, 40.0, 40.0, 0.0, 360.0);
    groupPath.moveTo(40.0, 40.0);
    groupPath.lineTo(40.0, 80.0);
    groupPath.lineTo(80.0, 80.0);
    groupPath.lineTo(80.0, 40.0);
groupPath.closeSubpath();QPainterPath::lineTo그런 다음, 여러 서브패스로 구성된 경로를 만듭니다. 먼저 현재 지점을 이동하고, 타원 경로를 만들 때와 마찬가지로 시작 각도를 0.0으로, 마지막 인자를 360도로 설정하여 QPainterPath::arcTo() 함수를 사용하여 원을 만듭니다. 그런 다음 현재 점을 다시 이동하여 새로운 하위 경로를 시작하고, ` ()` 함수를 사용하여 정사각형의 세 변을 그립니다.
이제 QPainterPath::closeSubpath() 함수를 호출하면 마지막 변이 생성됩니다. QPainterPath::closeSubpath() 함수는 현재 하위 경로의 시작점, 즉 정사각형의 시작점까지 선을 그리는 것임을 기억하십시오.
QPainterPath QPainterPath::addPath()라는 편의 함수를 제공하여, 주어진 경로를 함수를 호출한 경로에 추가합니다.
    QPainterPath textPath;
    QFont timesFont("Times", 50);
    timesFont.setStyleStrategy(QFont::ForceOutline);
    textPath.addText(10, 70, timesFont, tr("Qt"));
텍스트 경로를 생성할 때, 먼저 글꼴을 생성합니다. 그런 다음 글꼴 매칭 알고리즘에 적절한 기본 글꼴 패밀리를 찾기 위해 어떤 유형의 글꼴을 사용해야 하는지 알려주는 글꼴 스타일 전략을 설정합니다. ` QFont::ForceOutline `는 아웃라인 글꼴 사용을 강제합니다.
텍스트를 구성하기 위해 ` QPainterPath::addText()` 함수를 사용하며, 이 함수는 주어진 텍스트를 제공된 글꼴로 생성된 닫힌 하위 경로 집합으로 경로에 추가합니다. 하위 경로들은 텍스트 베이스라인의 왼쪽 끝이 지정된 지점에 오도록 배치됩니다.
    QPainterPath bezierPath;
    bezierPath.moveTo(20, 30);
    bezierPath.cubicTo(80, 0, 50, 50, 80, 80);
베지어 경로를 생성하기 위해 QPainterPath::cubicTo() 함수를 사용하는데, 이 함수는 현재 점과 주어진 끝점 사이에 주어진 제어점을 사용하여 베지어 곡선을 추가합니다. 곡선이 추가된 후, 현재 점은 곡선의 끝점에 위치하도록 업데이트됩니다.
이 경우, 단순한 곡선만 남기도록 서브패스를 닫지 않습니다. 하지만 곡선의 끝점에서 서브패스의 시작점으로 이어지는 논리적 선이 여전히 존재하며, 애플리케이션의 메인 창에서 볼 수 있듯이 패스를 채울 때 이 선이 표시됩니다.
    QPainterPath starPath;
    starPath.moveTo(90, 50);
    for (int i = 1; i < 5; ++i) {
        starPath.lineTo(50 + 40 * std::cos(0.8 * i * M_PI),
                        50 + 40 * std::sin(0.8 * i * M_PI));
    }
    starPath.closeSubpath();
우리가 구성한 최종 경로는 앞서 언급한 QPainterPath::moveTo(), QPainterPath::lineTo() 및 QPainterPath::closeSubpath() 함수만을 사용하여 QPainterPath 로 상당히 복잡한 도형을 만들 수 있음을 보여줍니다.
    renderAreas.push_back(new RenderArea(rectPath));
    renderAreas.push_back(new RenderArea(roundRectPath));
    renderAreas.push_back(new RenderArea(ellipsePath));
    renderAreas.push_back(new RenderArea(piePath));
    renderAreas.push_back(new RenderArea(polygonPath));
    renderAreas.push_back(new RenderArea(groupPath));
    renderAreas.push_back(new RenderArea(textPath));
    renderAreas.push_back(new RenderArea(bezierPath));
    renderAreas.push_back(new RenderArea(starPath));
이제 필요한 모든 페인터 경로를 생성했으므로, 각 경로에 해당하는 RenderArea 위젯을 생성합니다. 마지막으로 Q_ASSERT() 매크로를 사용하여 렌더링 영역의 수가 올바른지 확인합니다.
    fillRuleComboBox = new QComboBox;
    fillRuleComboBox->addItem(tr("Odd Even"), Qt::OddEvenFill);
    fillRuleComboBox->addItem(tr("Winding"), Qt::WindingFill);

    fillRuleLabel = new QLabel(tr("Fill &Rule:"));
    fillRuleLabel->setBuddy(fillRuleComboBox);
그런 다음 페인터 경로의 채우기 규칙과 연관된 위젯을 생성합니다.
Qt에는 두 가지 채우기 규칙이 있습니다: ‘ Qt::OddEvenFill ’ 규칙은 점에서 도형 바깥쪽 위치까지 수평선을 그려 교차점의 수를 세어, 점이 도형 내부에 있는지 여부를 판단합니다. 교차점의 수가 홀수라면 점은 도형 내부에 있는 것입니다. 이 규칙이 기본값입니다.
Qt::WindingFill 규칙은 점에서 도형 바깥쪽 지점까지 수평선을 그어 점이 도형 내부에 있는지 여부를 판단합니다. 그런 다음 각 교차점에서 선의 방향이 위쪽인지 아래쪽인지 확인합니다. 와인딩 수는 각 교차점의 방향을 합산하여 결정됩니다. 이 수가 0이 아니면 점은 도형 내부에 있는 것입니다.
Qt::WindingFill 규칙은 대부분의 경우 닫힌 도형 간의 교차로 간주할 수 있습니다.
    fillColor1ComboBox = new QComboBox;
    populateWithColors(fillColor1ComboBox);
    fillColor1ComboBox->setCurrentIndex(fillColor1ComboBox->findText("mediumslateblue"));

    fillColor2ComboBox = new QComboBox;
    populateWithColors(fillColor2ComboBox);
    fillColor2ComboBox->setCurrentIndex(fillColor2ComboBox->findText("cornsilk"));

    fillGradientLabel = new QLabel(tr("&Fill Gradient:"));
    fillGradientLabel->setBuddy(fillColor1ComboBox);

    fillToLabel = new QLabel(tr("to"));
    fillToLabel->setSizePolicy(QSizePolicy::Fixed, QSizePolicy::Fixed);

    penWidthSpinBox = new QSpinBox;
    penWidthSpinBox->setRange(0, 20);

    penWidthLabel = new QLabel(tr("&Pen Width:"));
    penWidthLabel->setBuddy(penWidthSpinBox);

    penColorComboBox = new QComboBox;
    populateWithColors(penColorComboBox);
    penColorComboBox->setCurrentIndex(penColorComboBox->findText("darkslateblue"));

    penColorLabel = new QLabel(tr("Pen &Color:"));
    penColorLabel->setBuddy(penColorComboBox);

    rotationAngleSpinBox = new QSpinBox;
    rotationAngleSpinBox->setRange(0, 359);
    rotationAngleSpinBox->setWrapping(true);
    rotationAngleSpinBox->setSuffix(QLatin1String("\xB0"));

    rotationAngleLabel = new QLabel(tr("&Rotation Angle:"));
    rotationAngleLabel->setBuddy(rotationAngleSpinBox);
또한 채우기, 펜, 회전 각도와 관련된 다른 위젯들도 생성합니다.
    connect(fillRuleComboBox, &QComboBox::activated,
            this, &Window::fillRuleChanged);
    connect(fillColor1ComboBox, &QComboBox::activated,
            this, &Window::fillGradientChanged);
    connect(fillColor2ComboBox, &QComboBox::activated,
            this, &Window::fillGradientChanged);
    connect(penColorComboBox, &QComboBox::activated,
            this, &Window::penColorChanged);

    for (RenderArea *area : std::as_const(renderAreas)) {
        connect(penWidthSpinBox, &QSpinBox::valueChanged,
                area, &RenderArea::setPenWidth);
        connect(rotationAngleSpinBox, &QSpinBox::valueChanged,
                area, &RenderArea::setRotationAngle);
    }
콤보박스의 activated() 신호를 Window 클래스의 관련 슬롯에 연결하고, 스핀 박스의 valueChanged() 신호는 RenderArea 위젯의 각 슬롯에 직접 연결합니다.
    QGridLayout *topLayout = new QGridLayout;

    int i = 0;
    for (RenderArea *area : std::as_const(renderAreas)) {
        topLayout->addWidget(area, i / 3, i % 3);
        ++i;
    }

    QGridLayout *mainLayout = new QGridLayout;
    mainLayout->addLayout(topLayout, 0, 0, 1, 4);
    mainLayout->addWidget(fillRuleLabel, 1, 0);
    mainLayout->addWidget(fillRuleComboBox, 1, 1, 1, 3);
    mainLayout->addWidget(fillGradientLabel, 2, 0);
    mainLayout->addWidget(fillColor1ComboBox, 2, 1);
    mainLayout->addWidget(fillToLabel, 2, 2);
    mainLayout->addWidget(fillColor2ComboBox, 2, 3);
    mainLayout->addWidget(penWidthLabel, 3, 0);
    mainLayout->addWidget(penWidthSpinBox, 3, 1, 1, 3);
    mainLayout->addWidget(penColorLabel, 4, 0);
    mainLayout->addWidget(penColorComboBox, 4, 1, 1, 3);
    mainLayout->addWidget(rotationAngleLabel, 5, 0);
    mainLayout->addWidget(rotationAngleSpinBox, 5, 1, 1, 3);
    setLayout(mainLayout);
RenderArea 위젯들을 별도의 레이아웃에 추가한 다음, 나머지 위젯들과 함께 메인 레이아웃에 추가합니다.
    fillRuleChanged();
    fillGradientChanged();
    penColorChanged();
    penWidthSpinBox->setValue(2);

    setWindowTitle(tr("Painter Paths"));
}
마지막으로, fillRuleChanged(), fillGradientChanged() 및 penColorChanged() 슬롯을 호출하여 RenderArea 위젯을 초기화하고, 초기 펜 너비와 창 제목을 설정합니다.
void Window::fillRuleChanged()
{
    Qt::FillRule rule = (Qt::FillRule)currentItemData(fillRuleComboBox).toInt();

    for (RenderArea *area : std::as_const(renderAreas))
        area->setFillRule(rule);
}

void Window::fillGradientChanged()
{
    QColor color1 = qvariant_cast<QColor>(currentItemData(fillColor1ComboBox));
    QColor color2 = qvariant_cast<QColor>(currentItemData(fillColor2ComboBox));

    for (RenderArea *area : std::as_const(renderAreas))
        area->setFillGradient(color1, color2);
}

void Window::penColorChanged()
{
    QColor color = qvariant_cast<QColor>(currentItemData(penColorComboBox));

    for (RenderArea *area : std::as_const(renderAreas))
        area->setPenColor(color);
}
비공개 슬롯은 관련 콤보박스에서 새로운 값(하나 또는 여러 개)을 가져와 RenderArea 위젯을 업데이트하기 위해 구현되었습니다.
먼저, 비공개 함수 ` currentItemData() `와 템플릿 함수 ` qvariant_cast()`를 사용하여 새 값(하나 또는 여러 개)을 결정합니다. 그런 다음 각 ` RenderArea ` 위젯에 대해 관련 슬롯을 호출하여 페인터 경로를 업데이트합니다.
void Window::populateWithColors(QComboBox *comboBox)
{
    const QStringList colorNames = QColor::colorNames();
    for (const QString &name : colorNames)
        comboBox->addItem(name, QColor(name));
}
populateWithColors() 함수는 정적 함수 QColor::colorNames()이 제공하는 Qt가 인식하는 색상 이름에 해당하는 항목들로 지정된 콤보박스를 채웁니다.
QVariant Window::currentItemData(QComboBox *comboBox)
{
    return comboBox->itemData(comboBox->currentIndex());
}
currentItemData() 함수는 지정된 콤보박스의 현재 항목을 반환할 뿐입니다.
RenderArea 클래스 정의
RenderArea 클래스는 QWidget 를 상속받으며, 단일 페인터 경로를 표시하는 사용자 정의 위젯입니다.
class RenderArea : public QWidget
{
    Q_OBJECT

public:
    explicit RenderArea(const QPainterPath &path, QWidget *parent = nullptr);

    QSize minimumSizeHint() const override;
    QSize sizeHint() const override;

public slots:
    void setFillRule(Qt::FillRule rule);
    void setFillGradient(const QColor &color1, const QColor &color2);
    void setPenWidth(int width);
    void setPenColor(const QColor &color);
    void setRotationAngle(int degrees);

protected:
    void paintEvent(QPaintEvent *event) override;
RenderArea 위젯에 연결된 페인터 경로를 업데이트하는 여러 개의 공용 슬롯을 선언합니다. 또한, 애플리케이션 내에서 RenderArea 위젯에 적절한 크기를 부여하기 위해 QWidget::minimumSizeHint() 및 QWidget::sizeHint() 함수를 재구현하고, 페인터 경로를 그리기 위해 QWidget::paintEvent() 이벤트 핸들러를 재구현합니다.
private:
    QPainterPath path;
    QColor fillColor1;
    QColor fillColor2;
    int penWidth;
    QColor penColor;
    int rotationAngle;
};
RenderArea 클래스의 각 인스턴스는 QPainterPath, 몇 가지 채우기 색상, 펜 너비, 펜 색상 및 회전 각도를 갖습니다.
RenderArea 클래스 구현
생성자는 (선택 사항인 QWidget 부모 객체 외에도) QPainterPath 객체를 인수로 받습니다:
RenderArea::RenderArea(const QPainterPath &path, QWidget *parent)
    : QWidget(parent), path(path)
{
    penWidth = 1;
    rotationAngle = 0;
    setBackgroundRole(QPalette::Base);
}
생성자에서 QPainterPath 매개변수를 사용하여 RenderArea 위젯을 초기화하고, 펜 너비와 회전 각도도 초기화합니다. 또한 위젯의 background role 을 설정하며, QPalette::Base 은 일반적으로 흰색입니다.
QSize RenderArea::minimumSizeHint() const
{
    return QSize(50, 50);
}

QSize RenderArea::sizeHint() const
{
    return QSize(100, 100);
}
그런 다음 ` QWidget::minimumSizeHint()` 및 ` QWidget::sizeHint()` 함수를 재구현하여 ` RenderArea ` 위젯이 애플리케이션 내에서 적절한 크기를 갖도록 합니다.
void RenderArea::setFillRule(Qt::FillRule rule)
{
    path.setFillRule(rule);
    update();
}

void RenderArea::setFillGradient(const QColor &color1, const QColor &color2)
{
    fillColor1 = color1;
    fillColor2 = color2;
    update();
}

void RenderArea::setPenWidth(int width)
{
    penWidth = width;
    update();
}

void RenderArea::setPenColor(const QColor &color)
{
    penColor = color;
    update();
}

void RenderArea::setRotationAngle(int degrees)
{
    rotationAngle = degrees;
    update();
}
다양한 공용 슬롯은 관련 속성을 설정하여 RenderArea 위젯의 페인터 경로를 업데이트하고, QWidget::update() 함수를 호출하여 새로운 렌더링 기본 설정으로 위젯을 강제 다시 그리게 합니다.
QWidget::update() 슬롯은 즉시 다시 그리기를 유발하지 않고, 대신 Qt가 메인 이벤트 루프로 돌아왔을 때 처리될 페인트 이벤트를 예약합니다.
void RenderArea::paintEvent(QPaintEvent *)
{
    QPainter painter(this);
    painter.setRenderHint(QPainter::Antialiasing);
페인트 이벤트는 위젯의 전체 또는 일부를 다시 그리도록 요청하는 것입니다. paintEvent() 함수는 위젯의 페인트 이벤트를 수신하도록 재구현할 수 있는 이벤트 핸들러입니다. 우리는 RenderArea 위젯의 페인터 경로를 렌더링하기 위해 이 이벤트 핸들러를 재구현합니다.
먼저, ` RenderArea ` 인스턴스에 대한 ` QPainter `를 생성하고, 페인터의 렌더링 힌트(render hints)를 설정합니다. ` QPainter::RenderHints `는 ` QPainter `에 전달되는 플래그를 지정하는 데 사용되며, 이는 특정 엔진에 따라 적용되거나 적용되지 않을 수 있습니다. ` QPainter::Antialiasing `는 엔진이 가능하면 프리미티브의 가장자리에 안티앨리어싱을 적용해야 함을 나타냅니다. 즉, 가장자리를 부드럽게 만들기 위해 원래 픽셀 주위에 추가 픽셀을 배치해야 함을 의미합니다.
    painter.scale(width() / 100.0, height() / 100.0);
    painter.translate(50.0, 50.0);
    painter.rotate(-rotationAngle);
    painter.translate(-50.0, -50.0);
그런 다음 QPainter 의 좌표계를 조정하여 페인터 경로가 올바른 크기로 렌더링되도록 합니다. 즉, 애플리케이션 크기가 조정될 때 RenderArea 위젯과 함께 경로의 크기도 함께 커지도록 합니다. 다양한 페인터 경로를 생성했을 때, 이 경로들은 모두 RenderArea::sizeHint() 에 해당하는 100픽셀 너비의 정사각형 내에서 렌더링되었습니다. QPainter::scale() 함수는 RenderArea 위젯의 현재 너비와 높이를 100으로 나눈 값을 기준으로 좌표계를 스케일링합니다.
이제 페인터 경로의 크기가 올바른지 확인했으므로, 좌표계를 변환하여 페인터 경로가 RenderArea 위젯의 중심을 기준으로 회전하도록 할 수 있습니다. 회전을 수행한 후에는 좌표계를 다시 원래 위치로 되돌려야 한다는 점을 명심해야 합니다.
    painter.setPen(QPen(penColor, penWidth, Qt::SolidLine, Qt::RoundCap, Qt::RoundJoin));
    QLinearGradient gradient(0, 0, 0, 100);
    gradient.setColorAt(0.0, fillColor1);
    gradient.setColorAt(1.0, fillColor2);
    painter.setBrush(gradient);
    painter.drawPath(path);
}
그런 다음 QPainter 의 펜을 인스턴스의 렌더링 기본값으로 설정합니다. QLinearGradient 를 생성하고, RenderArea 위젯의 채우기 색상에 맞춰 색상을 설정합니다. 마지막으로, QPainter 의 브러시를 설정하고(그라데이션은 자동으로 QBrush 로 변환됨), QPainter::drawPath() 함수를 사용하여 RenderArea 위젯의 페인터 경로를 그립니다.
© 2026 The Qt Company Ltd. Documentation contributions included herein are the copyrights of their respective owners. The documentation provided herein is licensed under the terms of the GNU Free Documentation License version 1.3 as published by the Free Software Foundation. Qt and respective logos are trademarks of The Qt Company Ltd. in Finland and/or other countries worldwide. All other trademarks are property of their respective owners.
