Qt Quick 在 Android Studio 项目中使用 QtAbstractItemModel
Qt Quick Android API 示例为 Android Studio 项目
Qt Quick for Android API 示例以 Android Studio 项目的形式提供。项目文件夹位于 Qt 安装位置。
例如,在默认的 Windows 安装路径下,可在此处找到:
C:\Qt\Examples\Qt-<patch-release-number>\platforms\android\<example-name>
这些项目已配置为使用与此 Qt 版本兼容的Qt Gradle Plugin版本。
概述
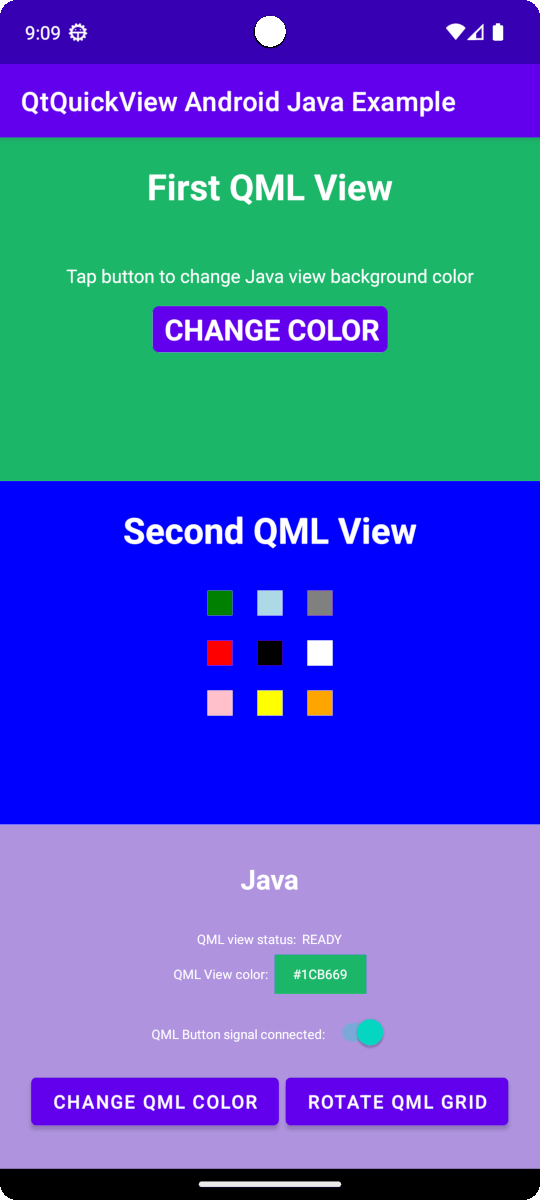
本示例包含一个 QML 项目,您可以使用Qt Tools forAndroid Studio 插件将其导入 AndroidStudio。有一些 Java 和 Kotlin 项目可利用QtQuickViewAPI 将 QML 项目用作视图。
有关 QML 工作原理的更多信息,请参阅 Qt Qml.本文档重点介绍如何将 QML 组件嵌入到使用 Java 或 Kotlin 的 Android 应用程序中。
Qt Quick for Android API 要求更改main()
一个典型的Qt Quick 应用程序的 main.cpp 是这样的:
#include <QGuiApplication>
#include <QQmlApplicationEngine>

int main(int argc, char *argv[])
{
    QGuiApplication app(argc, argv);

    QQmlApplicationEngine engine;
    QObject::connect(
        &engine,
        &QQmlApplicationEngine::objectCreationFailed,
        &app,
        []() { QCoreApplication::exit(-1); },
        Qt::QueuedConnection);
    engine.loadFromModule("MyQtQuickProject", "Main");

    return app.exec();
}
在main() 中,我们不需要创建 QML 引擎,也不需要加载任何稍后将由Qt Quick View API 处理的 QML。我们所需的一切都在main() 中:
#include <QGuiApplication>

int main(int argc, char *argv[])
{
    QGuiApplication app(argc, argv);

    return app.exec();
}
设置布局
对于 Java 和 Kotlin 项目,我们都需要在app/src/main/res/layout/activity_main.xml 中为QtQuickViews设置布局。
在LinearLayout 中,我们为每个QtQuickView 设置了两个 FrameLayouts。
 <FrameLayout
    android:id="@+id/firstQmlFrame"
    android:layout_width="match_parent"
    android:layout_height="0dp"
    android:layout_weight="1">
</FrameLayout>

<FrameLayout
    android:id="@+id/secondQmlFrame"
    android:layout_width="match_parent"
    android:layout_height="0dp"
    android:layout_weight="1">
</FrameLayout>
id 是 Kotlin 或 Java 编码的 MainActivity 所引用的内容。
导入自动生成的 QML 类型 Java 类
Qt Quick 项目构建时会生成 QML 类型的 Java 类。我们必须先导入这些类,才能在 MainActivity 中使用它们。
import org.qtproject.example.qtquickview.QmlModule.Main;
import org.qtproject.example.qtquickview.QmlModule.Second;
import org.qtproject.example.qtquickview.QmlModule.Main
import org.qtproject.example.qtquickview.QmlModule.Second
注: 请参阅QT_ANDROID_GENERATE_JAVA_QTQUICKVIEW_CONTENTSCMake 变量,了解有关 QML 组件 Java 代码生成的更多信息。
MainActivity 的 onCreate() 方法
首先,我们查看 Java 和 Kotlin 项目的MainActivity 的 onCreate() 方法。
@Override
protected void onCreate(Bundle savedInstanceState) {
    super.onCreate(savedInstanceState);
    setContentView(R.layout.activity_main);

    m_qmlViewBackgroundText = findViewById(R.id.qmlViewBackgroundText);
    m_qmlStatus = findViewById(R.id.qmlStatusText);
    m_androidControlsLayout = findViewById(R.id.javaRelative);
    m_colorBox = findViewById(R.id.qmlColorBox);
    m_switch = findViewById(R.id.disconnectQmlListenerSwitch);
    m_switch.setOnClickListener(view -> switchListener());
    QtQuickView m_firstQuickView = new QtQuickView(this);
    QtQuickView m_secondQuickView = new QtQuickView(this);

    // Set status change listener for m_qmlView
    // listener implemented below in OnStatusChanged
    m_firstQmlContent.setStatusChangeListener(this);
    m_secondQmlContent.setStatusChangeListener(this);
    final ViewGroup.LayoutParams params = new FrameLayout.LayoutParams(
            ViewGroup.LayoutParams.MATCH_PARENT, ViewGroup.LayoutParams.MATCH_PARENT);
    FrameLayout m_firstQmlFrameLayout = findViewById(R.id.firstQmlFrame);
    m_firstQmlFrameLayout.addView(m_firstQuickView, params);
    FrameLayout m_secondQmlFrameLayout = findViewById(R.id.secondQmlFrame);
    m_secondQmlFrameLayout.addView(m_secondQuickView, params);
    m_firstQuickView.loadContent(m_firstQmlContent);
    m_secondQuickView.loadContent(m_secondQmlContent);

    Button m_changeColorButton = findViewById(R.id.changeQmlColorButton);
    m_changeColorButton.setOnClickListener(view -> onClickListener());
    Button m_rotateQmlGridButton = findViewById(R.id.rotateQmlGridButton);
    m_rotateQmlGridButton.setOnClickListener(view -> rotateQmlGrid());
}
override fun onCreate(savedInstanceState: Bundle?) {
super.onCreate(savedInstanceState)
m_binding = ActivityMainBinding.inflate(layoutInflater)
val view = m_binding.root
setContentView(view)
m_binding.disconnectQmlListenerSwitch.setOnCheckedChangeListener { button, checked ->
switchListener(
button,
checked
)
}
val firstQtQuickView = QtQuickView(this)
val secondQtQuickView = QtQuickView(this)
// Set status change listener for m_qmlView
// listener implemented below in OnStatusChanged
m_firstQmlContent.setStatusChangeListener(this)
m_secondQmlContent.setStatusChangeListener(this)
val params: ViewGroup.LayoutParams = FrameLayout.LayoutParams(
ViewGroup.LayoutParams.MATCH_PARENT, ViewGroup.LayoutParams.MATCH_PARENT
)
m_binding.firstQmlFrame.addView(firstQtQuickView, params)
m_binding.secondQmlFrame.addView(secondQtQuickView, params)
firstQtQuickView.loadContent(m_firstQmlContent)
secondQtQuickView.loadContent(m_secondQmlContent)
m_binding.changeQmlColorButton.setOnClickListener { onClickListener() }
m_binding.rotateQmlGridButton.setOnClickListener { rotateQmlGrid() }
}注: 在 Kotlin 项目中,我们使用视图绑定来访问应用程序的 UI 组件:
m_binding = ActivityMainBinding.inflate(layoutInflater) val view = m_binding.root setContentView(view)
在onCreate() 方法中,先前声明的变量将使用新的QtQuickView实例进行初始化。这些实例将 Java/Kotlin Activity 的Context 作为参数。
QtQuickView m_firstQuickView = new QtQuickView(this);
QtQuickView m_secondQuickView = new QtQuickView(this);
val firstQtQuickView = QtQuickView(this)
val secondQtQuickView = QtQuickView(this)
QtQuickView实例会被添加到带有适当布局参数的 Android 布局中。
final ViewGroup.LayoutParams params = new FrameLayout.LayoutParams(
        ViewGroup.LayoutParams.MATCH_PARENT, ViewGroup.LayoutParams.MATCH_PARENT);
FrameLayout m_firstQmlFrameLayout = findViewById(R.id.firstQmlFrame);
m_firstQmlFrameLayout.addView(m_firstQuickView, params);
FrameLayout m_secondQmlFrameLayout = findViewById(R.id.secondQmlFrame);
m_secondQmlFrameLayout.addView(m_secondQuickView, params);
val params: ViewGroup.LayoutParams = FrameLayout.LayoutParams(
ViewGroup.LayoutParams.MATCH_PARENT, ViewGroup.LayoutParams.MATCH_PARENT
)
m_binding.firstQmlFrame.addView(firstQtQuickView, params)
m_binding.secondQmlFrame.addView(secondQtQuickView, params)Main 和Second Java 类继承自QtQuickViewContent类。这些类是从我们导入的 QML 项目中生成的。
private final Main m_firstQmlContent = new Main();
private final Second m_secondQmlContent = new Second();
private val m_firstQmlContent: Main = Main()
private val m_secondQmlContent: Second = Second()
Qt Quick 内容通过QtQuickView.loadContent() 方法加载,该方法将QtQuickViewContent作为参数。
m_firstQuickView.loadContent(m_firstQmlContent);
m_secondQuickView.loadContent(m_secondQmlContent);
firstQtQuickView.loadContent(m_firstQmlContent)
secondQtQuickView.loadContent(m_secondQmlContent)
与 QML 组件交互
为了与嵌入式 QML 组件交互,我们实现了QtQmlStatusChangeListener接口,并覆盖了onStatusChanged 方法,以获取当前加载到QtQuickView 中的 QtQuickViewContent的加载状态。
public class MainActivity extends AppCompatActivity implements
QtQmlStatusChangeListener {
    ...
}
class MainActivity : AppCompatActivity(), QtQmlStatusChangeListener {
    ...
}
onStatusChanged 实施:
@Override
public void onStatusChanged(QtQmlStatus qtQmlStatus, QtQuickViewContent content) {
    Log.i(TAG, "Status of QtQuickView: " + qtQmlStatus);

    // Show current QML View status in a textview
    m_qmlStatus.setText(getString(R.string.qml_view_status, m_statusNames.get(qtQmlStatus)));
    updateColorDisplay();

    if (content == m_firstQmlContent) {
        // Connect signal listener to "onClicked" signal from main.qml
        // addSignalListener returns int which can be used later to identify the listener
        if (qtQmlStatus == QtQmlStatus.READY && m_switch.isChecked()) {
            m_qmlButtonSignalListenerId = m_firstQmlContent.connectOnClickedListener(
                    (String name, Void v) -> {
                        Log.i(TAG, "QML button clicked");
                        m_androidControlsLayout.setBackgroundColor(Color.parseColor(
                                m_colors.getColor()
                        ));
                    });
        }
    }
}
override fun onStatusChanged(status: QtQmlStatus?, content: QtQuickViewContent?) {
Log.v(TAG, "Status of QtQuickView: $status")
// Show current QML View status in a textview
m_binding.qmlStatusText.text = getString(R.string.qml_view_status, m_statusNames[status])
updateColorDisplay()
if (content == m_firstQmlContent) {
// Connect signal listener to "onClicked" signal from main.qml
// addSignalListener returns int which can be used later to identify the listener
if (status == QtQmlStatus.READY && m_binding.disconnectQmlListenerSwitch.isChecked) {
m_qmlButtonSignalListenerId =
m_firstQmlContent.connectOnClickedListener { _: String, _: Void? ->
Log.i(TAG, "QML button clicked")
m_binding.kotlinRelative.setBackgroundColor(
Color.parseColor(
m_colors.getColor()
)
)
}
}
}
}通过QtQuickViewContent.setStatusChangeListener 方法,将MainActivity 设置为m_mainQmlContent 和m_secondQmlContent 的statusChangeListener 。
m_firstQmlContent.setStatusChangeListener(this);
m_secondQmlContent.setStatusChangeListener(this);
m_firstQmlContent.setStatusChangeListener(this)
m_secondQmlContent.setStatusChangeListener(this)
重载的回调函数onStatusChanged() 接收StatusChanged() 信号,其中包含当前加载到QtQuickView 的QtQuickViewContent 的当前状态(QtQmlStatusEnum)。如果QtQmlStatus 被确认为QtQmlStatus.READY ,我们就可以开始与 QML 视图交互了。
获取和设置 QML 组件属性值
获取和设置 QML 组件属性值通过Main.java 类中描述的方法进行。在这种情况下,我们使用m_mainQmlContent.setColorStringProperty() 和m_mainQmlContent.getColorStringProperty() 方法。这些方法是根据 QML 组件包含的属性生成的。
public void onClickListener() {
    // Set the QML view root object property "colorStringFormat" value to
    // color from Colors.getColor()
    m_firstQmlContent.setColorStringFormat(m_colors.getColor());
    updateColorDisplay();
}
private void updateColorDisplay() {
    String qmlBackgroundColor = m_firstQmlContent.getColorStringFormat();
    // Display the QML View background color code
    m_qmlViewBackgroundText.setText(qmlBackgroundColor);

    // Display the QML View background color in a view
    // if qmlBackGroundColor is not null
    if (qmlBackgroundColor != null) {
        m_colorBox.setBackgroundColor(Color.parseColor(qmlBackgroundColor));
    }
}
private fun onClickListener() {
// Set the QML view root object property "colorStringFormat" value to
// color from Colors.getColor()
m_firstQmlContent.colorStringFormat = m_colors.getColor()
updateColorDisplay()
}
private fun updateColorDisplay() {
val qmlBackgroundColor = m_firstQmlContent.colorStringFormat
// Display the QML View background color code
m_binding.qmlViewBackgroundText.text = qmlBackgroundColor
// Display the QML View background color in a view
// if qmlBackgroundColor is not null
if (qmlBackgroundColor != null) {
m_binding.qmlColorBox.setBackgroundColor(Color.parseColor(qmlBackgroundColor))
}
}通过m_mainQmlContent.setColorStringProperty() 方法,我们将m_mainQmlContent 的colorStringFormat 属性值设置为从Colors.java (或Colors.kt )类获取的随机颜色值。
m_mainQmlContent.getColorStringProperty() 方法用于获取 m_mainQmlContent 根对象的当前背景颜色,然后在应用程序的 Java/Kotlin Android 端向用户显示。
m_secondQmlContent Grid QML 组件,我们可以使用生成的 方法从 Java 端旋转该组件。m_secondQmlContent.setGridRotation()
private void rotateQmlGrid() {
    Integer previousGridRotation = m_secondQmlContent.getGridRotation();
    if (previousGridRotation != null) {
        m_secondQmlContent.setGridRotation(previousGridRotation + 45);
    }
}
private fun rotateQmlGrid() {
val previousGridRotation = m_secondQmlContent.gridRotation
if (previousGridRotation != null) {
m_secondQmlContent.gridRotation = previousGridRotation + 45
}
}信号侦听器
QtQuickViewContent 类提供了connectSignalListener() 和disconnectSignalListener() 方法,用于连接和断开 QML 组件根对象中声明的信号之间的信号监听器。QtQuickViewContent.connectSignalListener() 返回一个唯一的信号监听器 ID,我们将其存储起来,以后用来识别和断开监听器。
在这里,我们将信号监听器连接到 QML 组件的onClicked() 信号:
if (qtQmlStatus == QtQmlStatus.READY && m_switch.isChecked()) {
    m_qmlButtonSignalListenerId = m_firstQmlContent.connectOnClickedListener(
            (String name, Void v) -> {
                Log.i(TAG, "QML button clicked");
                m_androidControlsLayout.setBackgroundColor(Color.parseColor(
                        m_colors.getColor()
                ));
            });
}
if (status == QtQmlStatus.READY && m_binding.disconnectQmlListenerSwitch.isChecked) {
m_qmlButtonSignalListenerId =
m_firstQmlContent.connectOnClickedListener { _: String, _: Void? ->
Log.i(TAG, "QML button clicked")
m_binding.kotlinRelative.setBackgroundColor(
Color.parseColor(
m_colors.getColor()
)
)
}
}每次点击 QML 组件上的按钮时,都会发出onClicked() 信号。该监听器接收到信号后,应用程序 Android 端布局的背景颜色就会设置为从Colors.java 类中获取的随机颜色值。
接下来,使用QtQuickViewContent.disconnectSignalListener() 方法断开信号监听器的连接,给它唯一的信号监听器 ID。
m_firstQmlContent.disconnectSignalListener(m_qmlButtonSignalListenerId);
m_firstQmlContent.disconnectSignalListener(m_qmlButtonSignalListenerId)
如果还没有,请查看Qt 学院:在 Android 应用程序中嵌入Qt Quick 3D 内容课程,该课程介绍了本示例中引用的工具和 API。
© 2026 The Qt Company Ltd. Documentation contributions included herein are the copyrights of their respective owners. The documentation provided herein is licensed under the terms of the GNU Free Documentation License version 1.3 as published by the Free Software Foundation. Qt and respective logos are trademarks of The Qt Company Ltd. in Finland and/or other countries worldwide. All other trademarks are property of their respective owners.
