
将 Shadertoy 特效移植到Qt Quick Effect Maker
您可以在Qt Quick Effect Maker 中使用在Shadertoy中创建的效果。使用Shadertoy效果时,请注意以下几点:
- Qt Quick Effect Maker 不支持以下 Shadertoy 功能:
- 多通道效果(缓冲区选项卡)
- 音频
- 立方体贴图
- 3D 纹理
- Shadertoy 仅支持片段着色器和内置纹理。为了在Qt Quick Effect Maker 中提升特效性能,请将部分计算转移到顶点着色器,并使用自定义图片来简化着色器代码。
- Shadertoy与Qt Quick Effect Maker 的坐标系存在差异。在Shadertoy中,原点(0,0)位于左下角,而Qt Quick Effect Maker 的原点位于左上角。
在Qt Quick Effect Maker
在Qt Quick Effect Maker 中使用 Shadertoy 效果:
- 在Qt Quick Effect Maker 中,创建一个新效果。
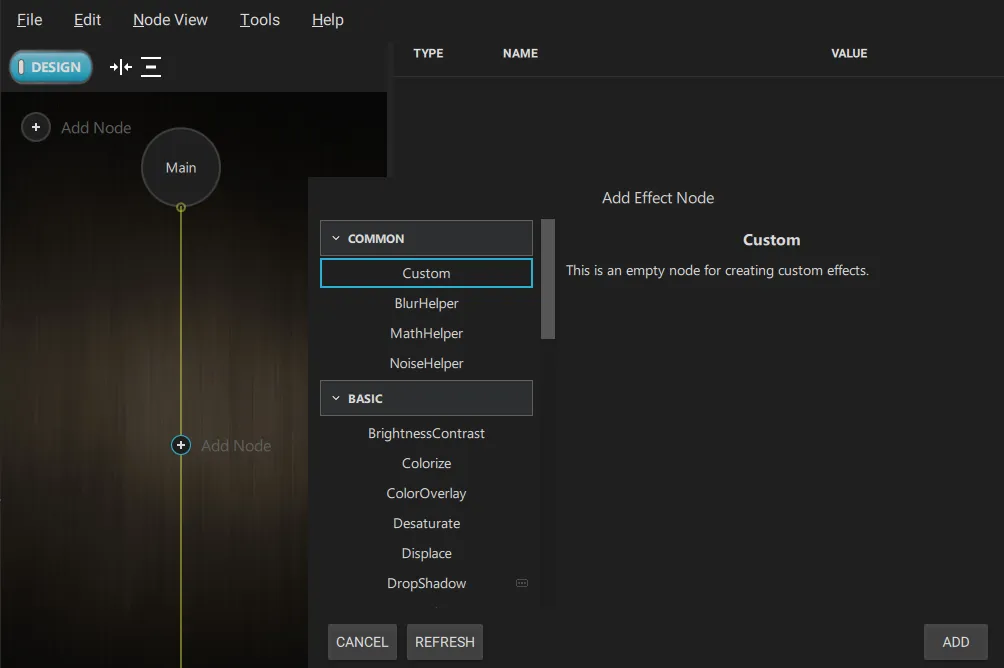
- 在节点编辑器中,选择“Add node ”,然后在“Common ”下选择“Custom ”。这将创建一个空节点。
- 在 Shadertoy 中,复制“Image ”选项卡中的所有代码。
- 在“Qt Quick Effect Maker ”中,双击节点编辑器中的“Custom ”节点。这将打开代码编辑器。
- 将 Shadertoy 代码粘贴到“Frag ”选项卡中。
- 在代码中找到
Main函数,其形式大致如下:void mainImage( out vec4 fragColor, in vec2 fragCoord ) - 将此行替换为:
@main注意:
@main及其后面的 {不能 出现在同一行。 - 可选。如果效果取决于坐标系,则会显示为上下颠倒。要解决此问题,您需要翻转 y 坐标:
- 转到“Vert ”选项卡。
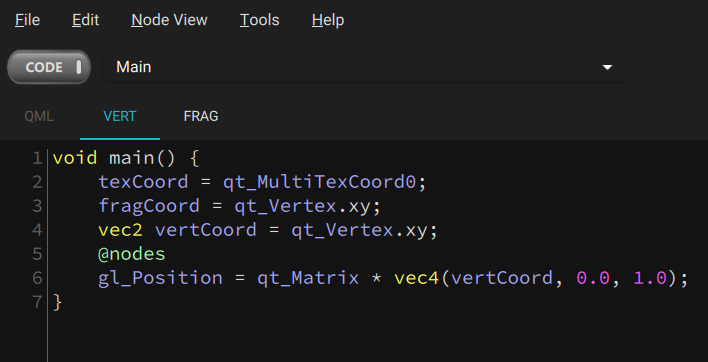
- 在下拉菜单中,选择“Main ”。
- 找到
fragCoord这一行,其内容应类似于:fragCoord = qt_Vertex.xy; - 将此行替换为:
fragCoord = vec2(qt_Vertex.x, iResolution.y - qt_Vertex.y); - 同样地,您可能还需要调整
texCoord和iMouse。
- 转到“Vert ”选项卡。
现在,该效果可以运行了,且外观与 Shadertoy 中的效果完全一致。
© 2026 The Qt Company Ltd. Documentation contributions included herein are the copyrights of their respective owners. The documentation provided herein is licensed under the terms of the GNU Free Documentation License version 1.3 as published by the Free Software Foundation. Qt and respective logos are trademarks of The Qt Company Ltd. in Finland and/or other countries worldwide. All other trademarks are property of their respective owners.
