
Qt 3D:多视口 QML 示例
一个展示如何从多个视口渲染场景图的 QML 示例。
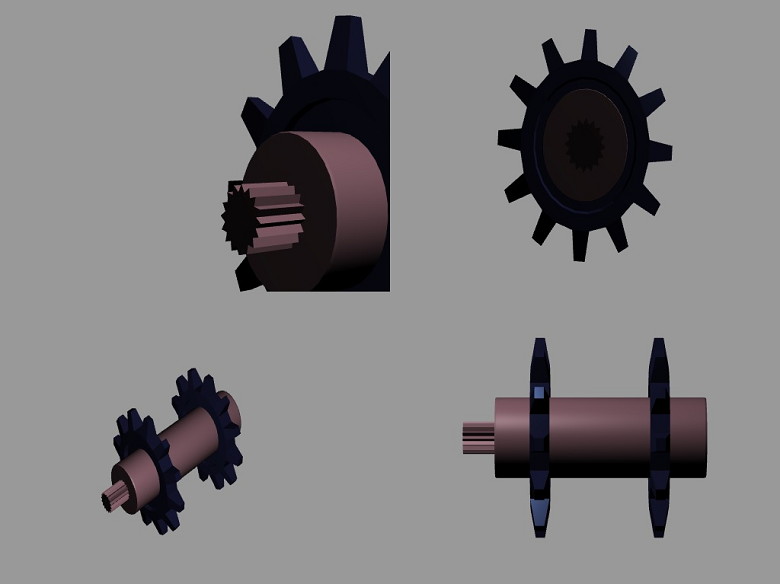
多视口功能会从四个虚拟摄像机的视角渲染场景图,并将结果显示在窗口的四个象限中。这是 3D CAD 或建模工具中常见的配置,也可进行调整,用于渲染赛车游戏中的后视镜或闭路电视摄像头的显示画面。
有关更多信息,请参阅《多视口 FrameGraph》。
运行示例
您可以通过以下方式运行该示例:
- Qt Creator
打开Welcome 模式,并从Examples 中选择该示例。有关更多信息,请参阅Qt Creator :教程:构建与运行。
- Qt Extension for Visual Studio Code
在Command Palette 中执行Qt: Open Qt examples 命令,并从列表中选择该示例。有关更多信息,请参阅Qt Extension for Visual Studio Code :教程:构建和运行。
创建多个 RenderView
利用在“帧图规则”中定义的规则,我们从帧图中构建了五个 RenderView 对象:
Viewport {
    id: mainViewport
    normalizedRect: Qt.rect(0, 0, 1, 1)

    ClearBuffers {
        buffers: ClearBuffers.ColorDepthBuffer
        clearColor: Qt.rgba(0.6, 0.6, 0.6, 1.0)
    }

    Viewport {
        id: topLeftViewport
        normalizedRect: Qt.rect(0, 0, 0.5, 0.5)
        CameraSelector { id: cameraSelectorTopLeftViewport }
    }

    Viewport {
        id: topRightViewport
        normalizedRect: Qt.rect(0.5, 0, 0.5, 0.5)
        CameraSelector { id: cameraSelectorTopRightViewport }
    }

    Viewport {
        id: bottomLeftViewport
        normalizedRect: Qt.rect(0, 0.5, 0.5, 0.5)
        CameraSelector { id: cameraSelectorBottomLeftViewport }
    }

    Viewport {
        id: bottomRightViewport
        normalizedRect: Qt.rect(0.5, 0.5, 0.5, 0.5)
        CameraSelector { id: cameraSelectorBottomRightViewport }
    }
}顺序至关重要。如果将 ClearBuffers 节点放在最后而不是最前面,将会导致屏幕变黑——原因很简单:所有内容在经过精心渲染后,随即会被清空。 出于类似的原因,它也不能用作 FrameGraph 的根节点,因为那样会导致每个视口都会触发清空整个屏幕的调用。
尽管 FrameGraph 的声明顺序很重要,但Qt 3D 能够并行处理每个 RenderView,因为在生成一组待提交的 RenderCommands 时,每个 RenderView 都是相互独立的,且该操作仅在 RenderView 的状态有效期间进行。
Qt 3D 采用基于任务的并行处理方式,该方式会随着可用核心数量的增加而自然扩展。RenderView 的 RenderCommands 可以在多个核心上并行生成,只要我们注意在专用的 OpenGL 提交线程上按正确顺序提交 RenderView,生成的场景就会被正确渲染。
© 2026 The Qt Company Ltd. Documentation contributions included herein are the copyrights of their respective owners. The documentation provided herein is licensed under the terms of the GNU Free Documentation License version 1.3 as published by the Free Software Foundation. Qt and respective logos are trademarks of The Qt Company Ltd. in Finland and/or other countries worldwide. All other trademarks are property of their respective owners.
