快速安全 CoAP 客户端
确保 CoAP 客户端的安全并将其用于Qt Quick 用户界面。

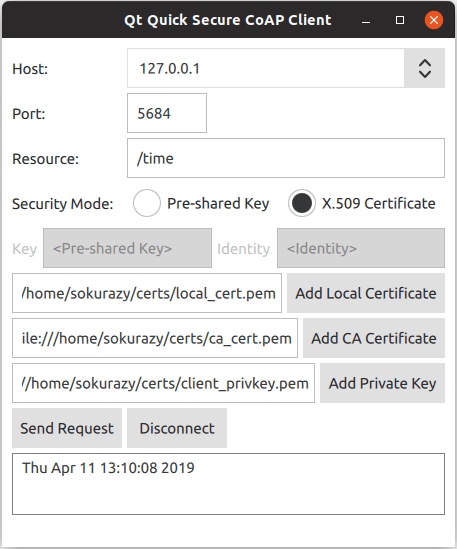
快速安全 CoAP 客户端演示了如何创建安全 CoAP 客户端并将其用于Qt Quick 应用程序。
注意: Qt CoAP 当前版本不提供 QML API。不过,您可以将模块的 C++ 类提供给 QML,如示例所示。
运行示例
要从 Qt Creator,打开Welcome 模式,从Examples 选择示例。更多信息,请参阅Qt Creator: Tutorial:构建并运行。
要运行示例应用程序,首先需要设置安全 CoAP 服务器。您可以使用任何支持预共享密钥 (PSK)或证书身份验证模式的安全 CoAP 服务器运行示例。有关设置安全 CoAP 服务器的更多信息,请参阅设置安全 CoAP 服务器。
向 QML 公开 C++ 类
在本例中,您需要将QCoapClient 类和QtCoap 命名空间公开给 QML。为此,创建一个自定义封装类并使用特殊注册宏。
创建QmlCoapSecureClient 类作为QCoapClient 的封装类。该类还保存所选的安全模式和安全配置参数。使用Q_INVOKABLE 宏向 QML 公开几个方法。还可使用QML_NAMED_ELEMENT 宏将该类在 QML 中注册为CoapSecureClient 。
class QmlCoapSecureClient : public QObject
{
    Q_OBJECT
    QML_NAMED_ELEMENT(CoapSecureClient)

public:
    QmlCoapSecureClient(QObject *parent = nullptr);
    ~QmlCoapSecureClient() override;

    Q_INVOKABLE void setSecurityMode(QtCoap::SecurityMode mode);
    Q_INVOKABLE void sendGetRequest(const QString &host, const QString &path, int port);
    Q_INVOKABLE void setSecurityConfiguration(const QString &preSharedKey, const QString &identity);
    Q_INVOKABLE void setSecurityConfiguration(const QString &localCertificatePath,
                                              const QString &caCertificatePath,
                                              const QString &privateKeyPath);
    Q_INVOKABLE void disconnect();

Q_SIGNALS:
    void finished(const QString &result);

private:
    QCoapClient *m_coapClient;
    QCoapSecurityConfiguration m_configuration;
    QtCoap::SecurityMode m_securityMode;
};
然后,注册QtCoap 命名空间,这样就可以使用那里提供的枚举:
namespace QCoapForeignNamespace
{
    Q_NAMESPACE
    QML_FOREIGN_NAMESPACE(QtCoap)
    QML_NAMED_ELEMENT(QtCoap)
}
调整构建文件
为使 QML 提供自定义类型,请相应更新构建系统文件。
CMake
对于基于 CMake 的联编,请在CMakeLists.txt 中添加以下内容:
qt_add_qml_module(quicksecureclient
    URI CoapSecureClientModule
    SOURCES
        qmlcoapsecureclient.cpp qmlcoapsecureclient.h
    QML_FILES
        FilePicker.qml
        Main.qml
)
qmake
对于 qmake 联编,按以下方式修改quicksecureclient.pro 文件:
CONFIG += qmltypes
QML_IMPORT_NAME = CoapSecureClientModule
QML_IMPORT_MAJOR_VERSION = 1
    ...
qml_resources.files = \
    qmldir \
    FilePicker.qml \
    Main.qml

qml_resources.prefix = /qt/qml/CoapSecureClientModule

RESOURCES += qml_resources
使用新的 QML 类型
现在,当 C++ 类正确暴露于 QML 时,你就可以使用新类型了。
创建客户端
CoapSecureClient 是由Main.qml 文件实例化的。它处理QmlCoapSecureClient::finished() 信号并相应地更新用户界面:
CoapSecureClient {
    id: client
    onFinished: (result) => {
        outputView.text = result;
        statusLabel.text = "";
        disconnectButton.enabled = true;
    }
}
当用户在用户界面中选择或更改安全模式时,就会创建QCoapClient 的实例。当选择其中一种安全模式时,QML 代码会调用QmlCoapSecureClient::setSecurityMode() 方法:
ButtonGroup {
    id: securityModeGroup
    onClicked: {
        if ((securityModeGroup.checkedButton as RadioButton) === preSharedMode)
            client.setSecurityMode(QtCoap.SecurityMode.PreSharedKey);
        else
            client.setSecurityMode(QtCoap.SecurityMode.Certificate);
    }
}
在 C++ 端,该方法会创建一个QCoapClient 并连接到finished() 和error() 信号。该类在内部处理这两个信号,并将它们转发到新的finished() 信号。
void QmlCoapSecureClient::setSecurityMode(QtCoap::SecurityMode mode)
{
    // Create a new client, if the security mode has changed
    if (m_coapClient && mode != m_securityMode) {
        delete m_coapClient;
        m_coapClient = nullptr;
    }

    if (!m_coapClient) {
        m_coapClient = new QCoapClient(mode);
        m_securityMode = mode;

        connect(m_coapClient, &QCoapClient::finished, this,
                [this](QCoapReply *reply) {
                    if (!reply)
                        emit finished(tr("Something went wrong, received a null reply"));
                    else if (reply->errorReceived() != QtCoap::Error::Ok)
                        emit finished(errorMessage(reply->errorReceived()));
                    else
                        emit finished(reply->message().payload());
                });

        connect(m_coapClient, &QCoapClient::error, this,
                [this](QCoapReply *, QtCoap::Error errorCode) {
                    emit finished(errorMessage(errorCode));
                });
    }
}
发送请求
单击Send Request 按钮,根据所选安全模式设置安全配置,并发送GET 请求:
Button {
    id: requestButton
    text: qsTr("Send Request")
    enabled: securityModeGroup.checkState !== Qt.Unchecked

    onClicked: {
        outputView.text = "";
        if ((securityModeGroup.checkedButton as RadioButton) === preSharedMode)
            client.setSecurityConfiguration(pskField.text, identityField.text);
        else
            client.setSecurityConfiguration(localCertificatePicker.selectedFile,
                                            caCertificatePicker.selectedFile,
                                            privateKeyPicker.selectedFile);

        client.sendGetRequest(hostComboBox.editText, resourceField.text,
                              parseInt(portField.text));

        statusLabel.text = qsTr("Sending request to %1%2...").arg(hostComboBox.editText)
                                                             .arg(resourceField.text);
    }
}
setSecurityConfiguration 方法有两种重载。
PSK 模式的重载只需设置客户端身份和预共享密钥:
void
QmlCoapSecureClient::setSecurityConfiguration(const QString &preSharedKey, const QString &identity)
{
    QCoapSecurityConfiguration configuration;
    configuration.setPreSharedKey(preSharedKey.toUtf8());
    configuration.setPreSharedKeyIdentity(identity.toUtf8());
    m_configuration = configuration;
}
而 X.509 证书的重载会读取证书文件和私钥,并设置安全配置:
void QmlCoapSecureClient::setSecurityConfiguration(const QString &localCertificatePath,
                                                   const QString &caCertificatePath,
                                                   const QString &privateKeyPath)
{
    QCoapSecurityConfiguration configuration;

    const auto localCerts =
            QSslCertificate::fromPath(QUrl(localCertificatePath).toLocalFile(), QSsl::Pem,
                                      QSslCertificate::PatternSyntax::FixedString);
    if (localCerts.isEmpty())
        qCWarning(lcCoapClient, "The specified local certificate file is not valid.");
    else
        configuration.setLocalCertificateChain(localCerts.toVector());

    const auto caCerts = QSslCertificate::fromPath(QUrl(caCertificatePath).toLocalFile(), QSsl::Pem,
                                                   QSslCertificate::PatternSyntax::FixedString);
    if (caCerts.isEmpty())
        qCWarning(lcCoapClient, "The specified CA certificate file is not valid.");
    else
        configuration.setCaCertificates(caCerts.toVector());

    QFile privateKey(QUrl(privateKeyPath).toLocalFile());
    if (privateKey.open(QIODevice::ReadOnly)) {
        QCoapPrivateKey key(privateKey.readAll(), QSsl::Ec);
        configuration.setPrivateKey(key);
    } else {
        qCWarning(lcCoapClient) << "Unable to read the specified private key file"
                                << privateKeyPath;
    }
    m_configuration = configuration;
}
设置安全配置后,sendGetRequest 方法会设置请求 URL 并发送GET 请求:
void QmlCoapSecureClient::sendGetRequest(const QString &host, const QString &path, int port)
{
    if (!m_coapClient)
        return;

    m_coapClient->setSecurityConfiguration(m_configuration);

    QUrl url;
    url.setHost(host);
    url.setPath(path);
    url.setPort(port);
    m_coapClient->get(url);
}
发送第一个请求时,要与 CoAP 服务器握手。握手成功后,所有后续信息都会加密,因此在握手成功后更改安全配置不会有任何影响。如果要更改或更换主机,需要先断开连接。
void QmlCoapSecureClient::disconnect()
{
    if (m_coapClient)
        m_coapClient->disconnect();
}
这将中止握手并关闭打开的套接字。
使用 X.509 证书进行身份验证时,需要指定证书文件。为此,需要使用FilePicker 组件。该组件由一个文本字段和一个按钮组成,按下按钮即可打开文件对话框:
Item {
    id: filePicker

    property string dialogText
    property alias selectedFile: filePathField.text

    height: addFileButton.height

    FileDialog {
        id: fileDialog
        title: qsTr("Please Choose %1").arg(filePicker.dialogText)
        currentFolder: StandardPaths.writableLocation(StandardPaths.HomeLocation)
        fileMode: FileDialog.OpenFile
        onAccepted: filePathField.text = fileDialog.selectedFile
    }

    RowLayout {
        anchors.fill: parent
        TextField {
            id: filePathField
            placeholderText: qsTr("<%1>").arg(filePicker.dialogText)
            inputMethodHints: Qt.ImhUrlCharactersOnly
            selectByMouse: true
            Layout.fillWidth: true
        }

        Button {
            id: addFileButton
            text: qsTr("Add %1").arg(filePicker.dialogText)
            onClicked: fileDialog.open()
        }
    }
}
FilePicker 该组件在Main.qml 文件中被多次实例化,用于创建证书和私钥的输入字段:
FilePicker {
    id: localCertificatePicker
    dialogText: qsTr("Local Certificate")
    enabled: (securityModeGroup.checkedButton as RadioButton) === certificateMode
    Layout.columnSpan: 2
    Layout.fillWidth: true
}

FilePicker {
    id: caCertificatePicker
    dialogText: qsTr("CA Certificate")
    enabled: (securityModeGroup.checkedButton as RadioButton) === certificateMode
    Layout.columnSpan: 2
    Layout.fillWidth: true
}

FilePicker {
    id: privateKeyPicker
    dialogText: qsTr("Private Key")
    enabled: (securityModeGroup.checkedButton as RadioButton) === certificateMode
    Layout.columnSpan: 2
    Layout.fillWidth: true
}
设置安全 CoAP 服务器
要运行此示例,需要有一个支持 PSK 或证书模式(或两者)的安全 CoAP 服务器。您有以下选项:
- 使用libcoap、Californium、FreeCoAP 或任何其他支持 DTLS 的 CoAP 库,手动构建并运行安全 CoAP 服务器。
- 使用 Docker Hub 上现成的 Docker 镜像,这些镜像可构建并运行适合我们示例的安全 CoAP 服务器。使用基于 Docker 的 CoAP 服务器所需的步骤如下。
为 PSK 模式设置服务器
下面的命令会从 Docker Hub 中提取基于Californium plugtest的安全 CoAP 服务器(默认情况下不安全)的 docker 容器并启动它:
docker run --name coap-test-server -d --rm -p 5683:5683/udp -p 5684:5684/udp tqtc/coap-californium-test-server:3.8.0
CoAP 测试服务器的端口为5683(非安全)和5684(安全)。有关获取 IP 地址的说明,请参阅获取 IP 地址。
要使用此服务器运行示例,需要将预共享密钥设置为secretPSK ,将身份设置为Client_identity 。
为证书模式设置服务器
使用 X.509 证书进行身份验证的安全服务器的 docker 镜像基于 FreeCoAP 库中的时间服务器示例。以下命令会从 Docker Hub 中提取容器并启动它:
docker run --name coap-time-server -d --rm -p 5684:5684/udp tqtc/coap-secure-time-server:freecoap
有关获取 IP 地址的说明,请参阅获取 IP 地址。通过检索到的 IP 地址,可以通过端口5684和资源路径/time 访问 CoAP 测试服务器。
要使用该服务器运行示例,需要指定服务器所需的证书文件。它们位于 docker 容器的/root/certs 目录下。要将它们复制到本地目录,请使用以下命令:
docker cp <container_id>:/root/certs <local_directory_path>
例如
$ docker cp 5e46502df88f:/root/certs ~/
获取容器 ID 的说明如下。
获取 IP 地址
要找出一个 docker 容器的 IP 地址,首先要运行docker ps 命令来获取容器 ID,其输出结果如下:
$ docker ps
CONTAINER ID        IMAGE
5e46502df88f        tqtc/coap-californium-test-server:3.8.0
然后,你可以用下面的命令获取 IP 地址:
docker inspect <container_id> | grep IPAddress
例如
$ docker inspect 5e46502df88f | grep IPAddress
...
"IPAddress": "172.17.0.2",
...
终止 Docker 容器
要在使用后终止一个 docker 容器,请使用以下命令:
docker stop <container_id>
这里的<container_id> 与docker ps 命令获取的相同。
文件:
© 2025 The Qt Company Ltd. Documentation contributions included herein are the copyrights of their respective owners. The documentation provided herein is licensed under the terms of the GNU Free Documentation License version 1.3 as published by the Free Software Foundation. Qt and respective logos are trademarks of The Qt Company Ltd. in Finland and/or other countries worldwide. All other trademarks are property of their respective owners.

