地图查看器(QML)
地图查看器示例展示了如何显示地图并与之交互、搜索地址以及查找行车路线。
这是一个大型示例,涵盖了Qt Location 中地图、定位和导航服务的许多基本用途。本页分为几个部分,通过代码片段介绍了这些功能的各个领域。
运行示例
运行示例 Qt Creator,打开Welcome 模式,然后从Examples 中选择示例。更多信息,请参阅Qt Creator: 教程:构建和运行。
该示例可与任何可用的地理服务插件配合使用。不过,某些插件可能需要额外的plugin parameters 才能正常运行。Plugin parameters 可以通过--plugin 参数在命令行中传递,参数的形式如下:
--plugin.<parameter name> <parameter value>
有关每个地理服务插件支持哪些插件参数的详细信息,请参阅每个插件的文档。本示例使用的默认插件是Qt Location Open Street Map Plugin,它不需要任何参数。
概述
本例中显示的 QML 类型:
- 显示地图
- 查找地址
- 方向和旅行路线
显示地图
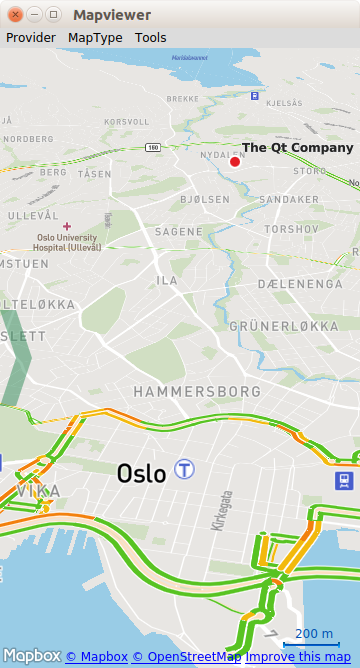
在屏幕上绘制地图是通过MapView 类型实现的,如下图所示。
MapView {
    id: view
    map.zoomLevel: (maximumZoomLevel - minimumZoomLevel)/2
    map.center {
        // The Qt Company in Oslo
        latitude: 59.9485
        longitude: 10.7686
    }
}
MapView 由map 组成,并扩展了基本导航功能。在本例中,我们给地图设定了一个初始中心坐标,并设定了经纬度。我们还将初始缩放级别设置为 50%(最大值和最小值的中间)。
查找地址(地理编码)
要在地图上找到某个地址或地点,需要经过一个称为地理编码的过程。为了执行地理编码操作,我们首先需要调整地图对象,以便能够接收结果。
接收地理编码结果是通过GeocodeModel 实现的:
GeocodeModel {
    id: geocodeModel
    plugin: view.map.plugin
    onStatusChanged: {
        if ((status == GeocodeModel.Ready) || (status == GeocodeModel.Error))
            view.geocodeFinished()
    }
    onLocationsChanged:
    {
        if (count === 1) {
            view.map.center.latitude = get(0).coordinate.latitude
            view.map.center.longitude = get(0).coordinate.longitude
        }
    }
}
为了显示GeocodeModel 的内容,我们使用了MapItemView :
MapItemView {
    parent: view.map
    model: geocodeModel
    delegate: pointDelegate
}
MapItemView 地图对象使用一个名为delegate 的对象作为其创建项目的模板。它可以包含任何想要的地图对象,但在本例中,我们显示的是一个包含标记图像的MapQuickItem :
Component {
    id: pointDelegate

    MapQuickItem {
        id: point
        parent: view.map
        coordinate: locationData.coordinate

        sourceItem: Image {
            id: pointMarker
            source: "../resources/marker_blue.png"
        }
    }
}
有了这三个对象,我们就有足够的能力接收地理编码响应并将其显示在地图上。最后一个步骤是发送实际的地理编码请求。
要发送地理编码请求,我们首先要创建一个Address 对象,并在其中填入所需的参数。
Address {
    id :fromAddress
    street: "Sandakerveien 116"
    city: "Oslo"
    country: "Norway"
    state : ""
    postalCode: "0484"
}
然后,我们将geocodeModel.query 设置为所填写的Address ,并在GeocodeModel 上调用 update() 。
// send the geocode request
geocodeModel.query = fromAddress
geocodeModel.update()
方向和旅行路线
与GeocodeModel 类似,Qt Location 也具有RouteModel 类型,它允许接收两点或多点之间的路线信息(例如行车路线),并与Map 一起使用。
在此,我们再次将RouteModel 实例化为地图的一个属性:
RouteModel {
    id: routeModel
    plugin : view.map.plugin
    query:  RouteQuery {
        id: routeQuery
    }
    onStatusChanged: {
        if (status == RouteModel.Ready) {
            switch (count) {
            case 0:
                // technically not an error
                view.routeError()
                break
            case 1:
                view.showRouteList()
                break
            }
        } else if (status == RouteModel.Error) {
            view.routeError()
        }
    }
}
要向用户显示模型的内容,我们需要一个视图。我们将再次使用MapItemView ,将路线作为对象显示在地图上:
MapItemView {
    parent: view.map
    model: routeModel
    delegate: routeDelegate
为了充当我们希望视图创建的对象的模板,我们创建了一个委托组件:
Component {
    id: routeDelegate

    MapRoute {
        id: route
        route: routeData
        line.color: "#46a2da"
        line.width: 5
        smooth: true
        opacity: 0.8
现在模型、视图和委托都已完成,唯一缺少的组件就是对模型的某种控制,以开始路由请求过程。在最简单的情况下,我们可以使用两个已有的坐标来填写路由请求:
property variant fromCoordinate: QtPositioning.coordinate(59.9483, 10.7695)
property variant toCoordinate: QtPositioning.coordinate(59.9645, 10.671)
在下一个片段中,我们将展示如何设置请求对象并指示模型更新。我们还指示地图以路由请求的起始坐标为中心。
// clear away any old data in the query
routeQuery.clearWaypoints();
// add the start and end coords as waypoints on the route
routeQuery.addWaypoint(startCoordinate)
routeQuery.addWaypoint(endCoordinate)
routeQuery.travelModes = RouteQuery.CarTravel
routeQuery.routeOptimizations = RouteQuery.FastestRoute
routeModel.update();
// center the map on the start coord
view.map.center = startCoordinate;
这就是在地图上显示路线的全部要求。不过,能够检索旅行路线的书面指示和说明也很有用。在示例中,这些内容显示在ListView 元素中。为了创建这些内容,我们使用了标准的ListModel和ListView 对。ListModel中的数据是根据 routeModel 的输出建立的:
ListView {
    interactive: true
    model: ListModel { id: routeInfoModel }
    header: RouteListHeader {}
    delegate:  RouteListDelegate{
        routeIndex.text: index + 1
        routeInstruction.text: instruction
        routeDistance.text: distance
    }
}
在RouteModel 中,如上图所示,我们添加了一个onStatusChanged 处理程序,它调用showRouteList() 更新routeInfoModel :
routeInfoModel.clear()
if (routeModel.count > 0) {
    for (var i = 0; i < routeModel.get(0).segments.length; i++) {
        routeInfoModel.append({
            "instruction": routeModel.get(0).segments[i].maneuver.instructionText,
             "distance": Helper.formatDistance(routeModel.get(0).segments[i].maneuver.distanceToNextInstruction)
        });
    }
}
© 2026 The Qt Company Ltd. Documentation contributions included herein are the copyrights of their respective owners. The documentation provided herein is licensed under the terms of the GNU Free Documentation License version 1.3 as published by the Free Software Foundation. Qt and respective logos are trademarks of The Qt Company Ltd. in Finland and/or other countries worldwide. All other trademarks are property of their respective owners.
