Qt Quick 3D - 级联阴影贴图示例
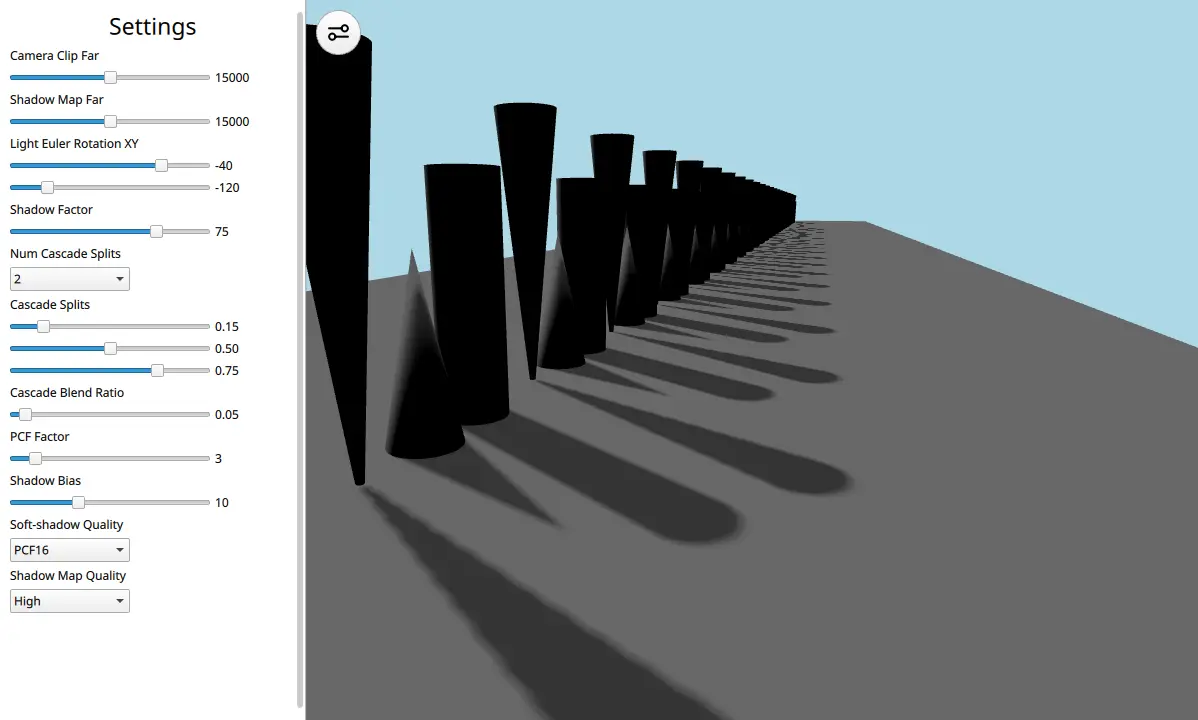
演示级联阴影贴图。

此示例演示了如何使用带有级联阴影贴图的DirectionalLight 。
让我们来看看场景的 QML 代码:
View3D {
    id: view
    x: settings.viewX
    y: 0
    width: parent.width - settings.viewX
    height: parent.height
    camera: camera
    environment: SceneEnvironment {
        clearColor: "lightblue"
        backgroundMode: SceneEnvironment.Color
        antialiasingMode: SceneEnvironment.MSAA
        antialiasingQuality: SceneEnvironment.High
    }

    PerspectiveCamera {
        id: camera
        position: Qt.vector3d(458, 300, 515)
        eulerRotation: Qt.vector3d(-14, 19, 0)
        clipFar: settings.clipFar
    }

    DirectionalLight {
        visible: true
        castsShadow: true
        shadowFactor: settings.shadowFactor
        eulerRotation: settings.eulerRotation
        csmSplit1: settings.csmSplit1
        csmSplit2: settings.csmSplit2
        csmSplit3: settings.csmSplit3
        csmNumSplits: settings.csmNumSplits
        shadowMapQuality: settings.shadowMapQuality
        csmBlendRatio: settings.csmBlendRatio
        shadowBias: settings.shadowBias
        pcfFactor: settings.pcfFactor
        softShadowQuality: settings.softShadowQuality
        shadowMapFar: settings.shadowMapFar
        lockShadowmapTexels: settings.lockShadowmapTexels
    }

    Model {
        id: ground
        source: "#Cube"
        scale: Qt.vector3d(25, 0.01, 135)
        z: -5500
        materials: PrincipledMaterial {
            baseColor: "gray"
        }
        castsShadows: false
    }

    Node {
        id: shapeSpawner
        Component.onCompleted: {
            var conesAndCylinderTrio = Qt.createComponent("ConesAndCylinderTrio.qml")
            var z_pos = 0
            for (var i = 0; i < 25; i++) {
                conesAndCylinderTrio.incubateObject(shapeSpawner, {
                                                    "z_positions": [
                                                            z_pos,
                                                            z_pos - 125,
                                                            z_pos - 250
                                                        ]})
                z_pos -= 450
            }
        }
    }
}
该场景由一个DirectionalLight 、一个PerspectiveCamera 、一个地面Model 以及一个锥体和圆柱体的长数组Models 组成。这个长数组是这样布局的,以展示级联如何帮助提高场景的图形逼真度。仅使用一个阴影贴图会造成伪影,但使用级联则可以解决这个问题。DirectionalLight 包含大量可通过用户界面设置窗格进行调整的属性。
建议读者参阅阴影贴图文章,了解有关不同属性的更多信息,并尝试使用示例查看它们是如何交互的。
© 2025 The Qt Company Ltd. Documentation contributions included herein are the copyrights of their respective owners. The documentation provided herein is licensed under the terms of the GNU Free Documentation License version 1.3 as published by the Free Software Foundation. Qt and respective logos are trademarks of The Qt Company Ltd. in Finland and/or other countries worldwide. All other trademarks are property of their respective owners.

