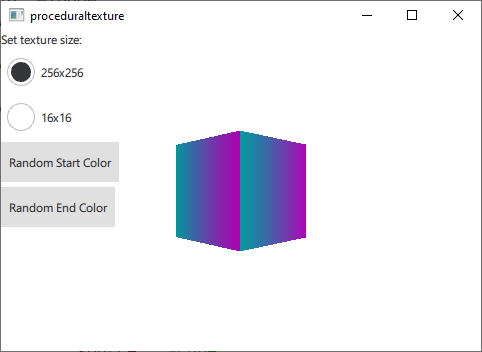
Qt Quick 3D - 程序纹理示例
演示如何通过 C++ 或 QML 提供自定义纹理数据。

本示例利用QQuick3DTextureData 和the textureData property of Texture 来提供运行时动态生成的纹理数据,而不是从静态资产中加载。为演示起见,本例分别用 C++ 和 QML 生成两种渐变纹理。
首先,我们为纹理数据定义一个 C++ 类。我们将其定义为QQuick3DTextureData 的子类。严格来说,这并不是必须的,因为没有虚拟函数,但将所有内容都放在一个类中会更方便。我们定义要使用的属性,并添加QML_NAMED_ELEMENT ,使其可从 QML 中使用:
class GradientTexture : public QQuick3DTextureData
{
    Q_OBJECT
    Q_PROPERTY(int height READ height WRITE setHeight NOTIFY heightChanged)
    Q_PROPERTY(int width READ width WRITE setWidth NOTIFY widthChanged)
    Q_PROPERTY(QColor startColor READ startColor WRITE setStartColor NOTIFY startColorChanged)
    Q_PROPERTY(QColor endColor READ endColor WRITE setEndColor NOTIFY endColorChanged)
    QML_NAMED_ELEMENT(GradientTexture)
    ...
我们添加一个更新纹理的函数。它使用 setSize 和 setFormat 来配置纹理,并使用 setTextureData 来设置图像数据:
void GradientTexture::updateTexture()
{
    setSize(QSize(m_width, m_height));
    setFormat(QQuick3DTextureData::RGBA8);
    setHasTransparency(false);
    setTextureData(generateTexture());
}
函数generateTexture 会创建一个大小正确的QByteArray ,并填充图像数据:
QByteArray GradientTexture::generateTexture()
{
    QByteArray imageData;
    // Create a horizontal gradient between startColor and endColor

    // Create a single scanline and reuse that data for each
    QByteArray gradientScanline;
    gradientScanline.resize(m_width * 4); // RGBA8

    for (int x = 0; x < m_width; ++x) {
        QColor color = linearInterpolate(m_startColor, m_endColor, x / float(m_width));
        int offset = x * 4;
        gradientScanline.data()[offset + 0] = char(color.red());
        gradientScanline.data()[offset + 1] = char(color.green());
        gradientScanline.data()[offset + 2] = char(color.blue());
        gradientScanline.data()[offset + 3] = char(255);
    }

    for (int y = 0; y < m_height; ++y)
        imageData += gradientScanline;

    return imageData;
}
每次更改属性时,我们都会调用updateTexture :
void GradientTexture::setStartColor(QColor startColor)
{
    if (m_startColor == startColor)
        return;

    m_startColor = startColor;
    emit startColorChanged(m_startColor);
    updateTexture();
}
最后,我们就可以使用 QML 中的新纹理了:
Texture {
    id: textureFromCpp

    minFilter: applicationState.filterMode
    magFilter: applicationState.filterMode
    textureData: gradientTexture

    GradientTexture {
        id: gradientTexture
        startColor: applicationState.startColor
        endColor: applicationState.endColor
        width: applicationState.size
        height: width
    }
}
也可以在 QML 中生成相同的纹理数据。在这种情况下,我们使用ProceduralTextureData 组件:
Texture {
    id: textureFromQML
    minFilter: applicationState.filterMode
    magFilter: applicationState.filterMode
    textureData: gradientTextureDataQML

    ProceduralTextureData {
        id: gradientTextureDataQML

        property color startColor: applicationState.startColor
        property color endColor: applicationState.endColor
        width: applicationState.size
        height: width
        textureData: generateTextureData()

        function linearInterpolate(startColor : color, endColor : color, fraction : real) : color{
            return Qt.rgba(
                        startColor.r + (endColor.r - startColor.r) * fraction,
                        startColor.g + (endColor.g - startColor.g) * fraction,
                        startColor.b + (endColor.b - startColor.b) * fraction,
                        startColor.a + (endColor.a - startColor.a) * fraction
                        );
        }

        function generateTextureData() {
            let dataBuffer = new ArrayBuffer(width * height * 4)
            let data = new Uint8Array(dataBuffer)

            let gradientScanline = new Uint8Array(width * 4);

            for (let x = 0; x < width; ++x) {
                let color = linearInterpolate(startColor, endColor, x / width);
                let offset = x * 4;
                gradientScanline[offset + 0] = color.r * 255;
                gradientScanline[offset + 1] = color.g * 255;
                gradientScanline[offset + 2] = color.b * 255;
                gradientScanline[offset + 3] = color.a * 255;
            }

            for (let y = 0; y < height; ++y) {
                data.set(gradientScanline, y * width * 4);
            }

            return dataBuffer;
        }
    }
}
就像在 C++ 中一样,我们用反映纹理大小和格式的图像数据填充QByteArray 。在 QML 中执行此操作时,使用 ArrayBuffer 类型以避免不必要的类型转换。
© 2025 The Qt Company Ltd. Documentation contributions included herein are the copyrights of their respective owners. The documentation provided herein is licensed under the terms of the GNU Free Documentation License version 1.3 as published by the Free Software Foundation. Qt and respective logos are trademarks of The Qt Company Ltd. in Finland and/or other countries worldwide. All other trademarks are property of their respective owners.

