Qt Quick 三维物理--复合形状示例
演示如何使用复合碰撞形状。

此示例演示了如何使用多个碰撞形状来创建用于碰撞检测的复杂对象。场景由一个绿色静态平面和一系列相互连接的链接组成。开始时,模拟是关闭的。一段时间后或当用户按下空格键时,模拟将启动。动画开始时,最左边和最右边的链接会水平前后移动。
设置
像往常一样,我们需要添加PhysicsWorld :
PhysicsWorld {
    id: physicsWorld
    enableCCD: true
    maximumTimestep: 20
    scene: viewport.scene
}
我们进行常规设置,包括环境、摄像机和灯光:
environment: SceneEnvironment {
    antialiasingMode: SceneEnvironment.MSAA
    backgroundMode: SceneEnvironment.Color
    clearColor: "lightblue"
}

focus: true

PerspectiveCamera {
    id: camera
    position: Qt.vector3d(0, 900, 1500)
    eulerRotation: Qt.vector3d(-10, 0, 0)
    clipFar: 15500
    clipNear: 1
}

DirectionalLight {
    eulerRotation.x: -45
    eulerRotation.y: 45
    castsShadow: true
    brightness: 1.5
    shadowMapQuality: Light.ShadowMapQualityHigh
}
物理对象
我们有常规的静态平面:
StaticRigidBody {
    position: Qt.vector3d(0, -100, 0)
    eulerRotation: Qt.vector3d(-90, 0, 0)
    collisionShapes: PlaneShape {}
    Model {
        source: "#Rectangle"
        scale: Qt.vector3d(500, 500, 1)
        materials: PrincipledMaterial {
            baseColor: "green"
        }
        castsShadows: false
        receivesShadows: true
    }
}
然后我们创建链接实例。
MeshLink {
    id: leftLink
    isKinematic: true
    property vector3d startPos: Qt.vector3d(-6 * viewport.ringDistance,
                                            viewport.ringY,
                                            0)
    property vector3d startRot: Qt.vector3d(90, 0, 0)
    kinematicPosition: startPos
    position: startPos
    kinematicEulerRotation: startRot
    eulerRotation: startRot
    color: "red"
}

CapsuleLink {
    position: Qt.vector3d(-5 * viewport.ringDistance, viewport.ringY, 0)
    eulerRotation: Qt.vector3d(90, 0, 0)
}

MeshLink {
    position: Qt.vector3d(-4 * viewport.ringDistance, viewport.ringY, 0)
    eulerRotation: Qt.vector3d(90, 0, 0)
}

MeshLink {
    position: Qt.vector3d(-3 * viewport.ringDistance, viewport.ringY, 0)
    eulerRotation: Qt.vector3d(0, 90, 0)
}

MeshLink {
    position: Qt.vector3d(-2 * viewport.ringDistance, viewport.ringY, 0)
    eulerRotation: Qt.vector3d(90, 0, 0)
}

MeshLink {
    position: Qt.vector3d(-1 * viewport.ringDistance, viewport.ringY, 0)
    eulerRotation: Qt.vector3d(0, 90, 0)
}

CapsuleLink {
    position: Qt.vector3d(0, viewport.ringY, 0)
}

MeshLink {
    position: Qt.vector3d(1 * viewport.ringDistance, viewport.ringY, 0)
    eulerRotation: Qt.vector3d(0, 90, 0)
}

MeshLink {
    position: Qt.vector3d(2 * viewport.ringDistance, viewport.ringY, 0)
    eulerRotation: Qt.vector3d(90, 0, 0)
}

MeshLink {
    position: Qt.vector3d(3 * viewport.ringDistance, viewport.ringY, 0)
    eulerRotation: Qt.vector3d(0, 90, 0)
}

MeshLink {
    position: Qt.vector3d(4 * viewport.ringDistance, viewport.ringY, 0)
    eulerRotation: Qt.vector3d(90, 0, 0)
}

CapsuleLink {
    position: Qt.vector3d(5 * viewport.ringDistance, viewport.ringY, 0)
    eulerRotation: Qt.vector3d(90, 0, 0)
}

MeshLink {
    id: rightLink
    isKinematic: true
    property vector3d startPos: Qt.vector3d(6 * viewport.ringDistance,
                                            viewport.ringY,
                                            0)
    property vector3d startRot: Qt.vector3d(90, 0, 0)
    kinematicPosition: startPos
    position: startPos
    kinematicEulerRotation: startRot
    eulerRotation: startRot
    color: "red"
}
左边的第一个链接的isKinematic 属性设置为true ,这样我们就可以通过动画来控制它。由于它是一个运动对象,我们需要设置kinematicPosition 和kinematicRotation 属性。我们通过动画kinematicPosition 属性来制作动画。其他链接是实例化的,它们之间有一定的间距。
为了获得与物理仿真完全一致的流畅动画,我们使用了一个AnimationController ,并将其连接到PhysicsWorld 上的onFrameDone 信号。这样,如果有任何帧丢失导致仿真速度减慢,动画也会相应减慢。我们使用带有四个NumberAnimation 的SequentialAnimation 来前后移动最左和最右的圆环。这是动画的 QML 代码:
Connections {
    target: physicsWorld
    property real totalAnimationTime: 12000
    function onFrameDone(timeStep) {
        let progressStep = timeStep / totalAnimationTime
        animationController.progress += progressStep
        if (animationController.progress >= 1) {
            animationController.completeToEnd()
            animationController.reload()
            animationController.progress = 0
        }
    }
}

AnimationController {
    id: animationController
    animation: SequentialAnimation {
        NumberAnimation {
            target: leftLink
            property: "kinematicPosition.x"
            to: 3 * viewport.ringDistance
            from: -6 * viewport.ringDistance
            easing.type: Easing.InOutCubic
            duration: 1000
        }
        NumberAnimation {
            target: leftLink
            property: "kinematicPosition.x"
            from: 3 * viewport.ringDistance
            to: -6 * viewport.ringDistance
            easing.type: Easing.InOutCubic
            duration: 1000
        }
        NumberAnimation {
            target: rightLink
            property: "kinematicPosition.x"
            to: -3 * viewport.ringDistance
            from: 6 * viewport.ringDistance
            easing.type: Easing.InOutCubic
            duration: 1000
        }
        NumberAnimation {
            target: rightLink
            property: "kinematicPosition.x"
            from: -3 * viewport.ringDistance
            to: 6 * viewport.ringDistance
            easing.type: Easing.InOutCubic
            duration: 1000
        }
    }
}
有趣的是网格和胶囊链接文件中的内容。让我们逐一查看。
网格链接
DynamicRigidBody {
    scale: Qt.vector3d(100, 100, 100)
    property color color: "white"
    PrincipledMaterial {
        id: _material
        baseColor: color
        metalness: 1.0
        roughness: 0.5
    }

    Model {
        source: "meshes/ring.mesh"
        materials: [_material]
    }

    collisionShapes: [
        ConvexMeshShape {
            source: "meshes/segmentedRing_001.mesh"
        },
        ConvexMeshShape {
            source: "meshes/segmentedRing_002.mesh"
        },
        ConvexMeshShape {
            source: "meshes/segmentedRing_003.mesh"
        },
        ConvexMeshShape {
            source: "meshes/segmentedRing_004.mesh"
        },
        ConvexMeshShape {
            source: "meshes/segmentedRing_005.mesh"
        },
        ConvexMeshShape {
            source: "meshes/segmentedRing_006.mesh"
        },
        ConvexMeshShape {
            source: "meshes/segmentedRing_007.mesh"
        },
        ConvexMeshShape {
            source: "meshes/segmentedRing_008.mesh"
        },
        ConvexMeshShape {
            source: "meshes/segmentedRing_009.mesh"
        },
        ConvexMeshShape {
            source: "meshes/segmentedRing_010.mesh"
        },
        ConvexMeshShape {
            source: "meshes/segmentedRing_011.mesh"
        },
        ConvexMeshShape {
            source: "meshes/segmentedRing_012.mesh"
        }
    ]
}
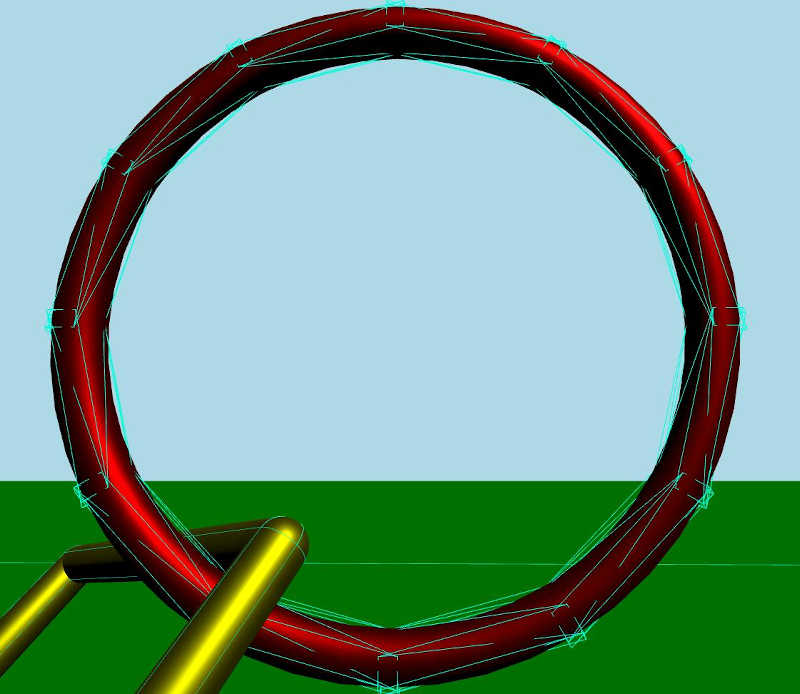
网格链接是一个具有模型和材质的动态刚体。模型从网格文件中加载网格。我们还有一个碰撞形状列表,这些形状组合在一起形成一个复合形状,用于碰撞检测。每个形状都是从源文件中加载网格的凸面网格形状。凸面形状基本上是指形状内任意两点之间的连线始终位于形状内部的形状。
如果我们在调试模式下仔细观察,就会发现碰撞形状是如何形成复合碰撞形状的:
胶囊链接
DynamicRigidBody {
    property real len: 170
    property real w: 17
    PrincipledMaterial {
        id: material3
        baseColor: "yellow"
        metalness: 1.0
        roughness: 0.5
    }
    Node {
        opacity: 1
        Model {
            materials: material3
            source: "#Cylinder"
            scale: Qt.vector3d(w / 100, len / 100, w / 100)
            eulerRotation.z: 90
            y: -len / 2
        }
        Model {
            materials: material3
            source: "#Cylinder"
            scale: Qt.vector3d(w / 100, len / 100, w / 100)
            eulerRotation.z: 90
            y: len / 2
        }
        Model {
            materials: material3
            source: "#Cylinder"
            scale: Qt.vector3d(w / 100, len / 100, w / 100)
            x: len / 2
        }
        Model {
            materials: material3
            source: "#Cylinder"
            scale: Qt.vector3d(w / 100, len / 100, w / 100)
            x: -len / 2
        }
        Model {
            materials: material3
            source: "#Sphere"
            scale: Qt.vector3d(w / 100, w / 100, w / 100)
            x: -len / 2
            y: -len / 2
        }
        Model {
            materials: material3
            source: "#Sphere"
            scale: Qt.vector3d(w / 100, w / 100, w / 100)
            x: -len / 2
            y: len / 2
        }
        Model {
            materials: material3
            source: "#Sphere"
            scale: Qt.vector3d(w / 100, w / 100, w / 100)
            x: len / 2
            y: -len / 2
        }
        Model {
            materials: material3
            source: "#Sphere"
            scale: Qt.vector3d(w / 100, w / 100, w / 100)
            x: len / 2
            y: len / 2
        }
    }
    collisionShapes: [
        CapsuleShape {
            y: -len / 2
            height: len
            diameter: w
        },
        CapsuleShape {
            y: len / 2
            height: len
            diameter: w
        },
        CapsuleShape {
            x: -len / 2
            eulerRotation.z: 90
            height: len
            diameter: w
        },
        CapsuleShape {
            x: len / 2
            eulerRotation.z: 90
            height: len
            diameter: w
        }
    ]
}
胶囊连接体是一种动态刚体,有些模型采用相同的材料。该链接由多个圆柱体和球体组成。与网格链接一样,我们也有一个碰撞形状列表。这次,每个形状都是一个胶囊形状。
如果我们在调试模式下仔细观察,就会发现碰撞形状是如何形成复合碰撞形状的。

文件:
© 2026 The Qt Company Ltd. Documentation contributions included herein are the copyrights of their respective owners. The documentation provided herein is licensed under the terms of the GNU Free Documentation License version 1.3 as published by the Free Software Foundation. Qt and respective logos are trademarks of The Qt Company Ltd. in Finland and/or other countries worldwide. All other trademarks are property of their respective owners.
