WebEngine 推送通知示例
演示如何订阅和取消订阅推送通知。
在本示例中,我们将从网络推送服务向用户发送推送通知。这是一种典型的情况,信息从应用服务器(即网站后端)通过第三方推送服务发送,最后以通知的形式到达用户的浏览器。为了演示这一流程,我们将实现一个简单的推送服务服务器应用程序,用户可以订阅该程序以接收ping消息。
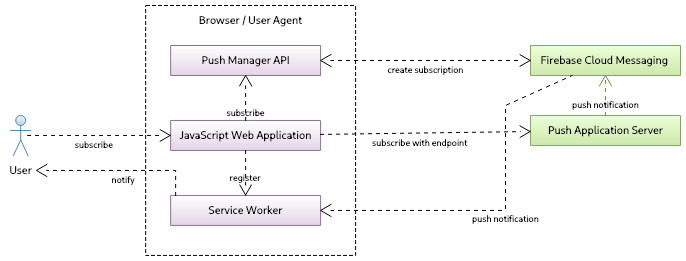
如前所述,在这样一个工作流程中,有三个不同的参与方:
- 用户接收推送通知的网络浏览器
- 第三方推送服务,由订阅端点定义,是浏览器推送服务实现的一部分
- 应用服务器,它将存储用户的订阅,并使用订阅端点启动推送消息
用户访问网站,JavaScript 网络应用程序使用 JavaScript Push API 创建推送通知订阅。然后要求用户授予接收和显示推送通知的权限。一旦用户同意,推送 API 就会与第三方推送服务建立推送通道,在QtWebEngine 的情况下,第三方推送服务就是Firebase Cloud Messaging(FCM)。创建的唯一推送订阅包含订阅端点 URL。然后,浏览器向应用服务器发送订阅消息,转发端点设置。应用服务器现在可以使用订阅端点向浏览器发送通知。浏览器推送服务实现将发送推送消息。不过,要显示它,必须注册一个服务工作者。由于服务工作者在后台运行,因此即使安装了服务工作者的网站不再打开,也能显示通知。

让我们进一步了解实施细节。我们首先使用 NodeJS 的两个模块实现自定义推送服务:
让我们初始化一个新项目,并在本示例的根目录下安装所需的模块:
npm init -y
npm install web-push express
这些命令将创建 package.js,其中定义了启动命令:
"start": "node server.js"
现在,让我们继续在 server.js 中实现推送服务的后端功能。
首先,我们将包含所需的模块,并进行基本的express框架设置,然后使用它创建自定义推送服务器。为简单起见,我们一次只处理一个订阅。为此,我们需要创建VAPID密钥,并使用web-push库生成。公钥将用于前端和验证服务。
const express = require('express');
const webpush = require('web-push');

// setup server
const port = 5000;
const server = express();
server.use(express.json());
server.use(express.static('content'));

// we support only one subscription at the time
var subscription = null;

// setup vapid keys
const vapidKeys = {
    publicKey :
            "BNO4fIv439RpvbReeABNlDNiiBD2Maykn7EVnwsPseH7-P5hjnzZLEfnejXVP7Zt6MFoKqKeHm4nV9BHvbgoRPg",
    privateKey : "HqhrzsRfG5-SB3j45lyUmV7cYZuy-71r2Bb0tgaOefk"
};

// set vapid keys for webpush libs
webpush.setVapidDetails('mailto:push@qt.io', vapidKeys.publicKey, vapidKeys.privateKey);
注: 在本例中,我们不会涉及信息加密。
要生成密钥,我们可以使用web-push库附带的工具,该工具已通过npm 安装在示例的根目录中。
./node_modules/.bin/web-push generate-vapid-keys
现在,我们向推送服务器添加两个routes 。一个指向subscribe ,一个指向unsubscribe ,这样我们的前端就可以发送 HTTP POST 请求来处理推送订阅。在订阅请求中,我们将在请求正文中获取subscription ,还将获取自定义头ping-time ,该头定义了向用户推送 ping 消息的频率。我们保留subscription ,以便以后发送推送通知。作为确认,我们发送 201 状态代码,并根据ping-time 值安排第一次推送通知。unsubscribe 请求只是删除订阅。
// add subscribe route
server.post('/subscribe', (req, res) => {

    // subscription request
    subscription = req.body;
    const delay = req.headers['ping-time'];
    console.log('Got subscription with endpoint: ' + subscription.endpoint);
    console.log('Ping delay is at: ' + delay);

    // confirm resource created
    res.status(201).json({});

    // schedule notification
    setTimeout(() => { sendNotification(delay) }, delay * 1000);
});

// add unsubscribe route
server.post('/unsubscribe', (req, res) => {
    console.log('Got unsubscribe with endpoint: ' + req.body.endpoint);
    subscription = null;
    res.status(201).json({});
});
sendNotication() 函数使用 web-push lib 发送推送消息。我们用要向用户发送的信息创建有效载荷,并安排下一条推送信息。
function sendNotification(delay)
{
    if (!subscription)
        return;

    // create payload text
    const payload = JSON.stringify({ title : 'Ping !', text : 'Visit qt.io', url : 'www.qt.io' });

    // send notification
    console.log('Sending notification !');
    webpush.sendNotification(subscription, payload).catch(err => console.error(err));

    // schedule next notification
    setTimeout(() => { sendNotification(delay) }, delay * 1000);
}
最后,我们启动服务器,在指定端口监听。
server.listen(port, () => console.log(`Push server started at port ${port}`));现在让我们进入前端。我们创建一个简单的页面 index.html,用户可以在这里输入他们希望接收 ping 通知消息的频率。我们将有两个按钮:Ping Me用于订阅推送通知,Clear用于取消订阅。最后,我们将加载 ping.js,接下来我们将介绍它。
<body>
  <h1>Push Notification Using NodeJS and QtWebEngine</h1>
  <div id="app">
    <div id="ping-setup">
      <form>
        <div>
          Ping Me Every [sec]:
        </div>
        <div class="ping-input">
          <input type="number" name="seconds" min="0" max="3600" required="">
        </div><button>Ping Me</button>
      </form>
    </div>
    <div id="ping-clear">
      <div id="ping-text"></div><button id="ping-clear-button">Clear</button>
    </div>
  </div>
  <script src="ping.js"></script>
</body>最后一部分是在前端创建推送订阅的逻辑。这里我们有两个函数setup 和clear 来处理订阅。当用户点击Ping Me按钮时,setup 将被调用。为了能够接收通知,需要使用服务 Worker。这样,用户就可以离开网站,但仍能收到通知,因为服务 Worker 会在后台工作并处理传入的消息。为此,我们必须首先注册一个服务 Worker:
const register = await navigator.serviceWorker.register('/worker.js', { scope : '/' });调用cpushManager.subscribe() 会触发权限提示,并显示给用户。如果权限被授予,就会返回推送订阅。它包括一个允许向浏览器发送通知的 URL 端点,已注册的服务工作者会在浏览器中等待推送消息。
    var subscription = await register.pushManager.subscribe(
            { userVisibleOnly : true, applicationServerKey : publicVapidKey });
如前所述,订阅是为 FCM 创建的,现在应通过 HTTP POST 请求发送到我们的自定义服务器。此外,我们还将 HTTP 标头添加到后置请求中,标头中包含用户在我们网站上输入的ping-time 。
    await fetch('/subscribe', {
        method : 'POST',
        body : JSON.stringify(subscription),
        headers : { 'content-type' : 'application/json', 'ping-time' : delay }
    });
clear 调用函数首先通过发送 HTTP POST 请求从我们的推送服务器退订,然后再从第三方推送服务(FCM)退订。
    const register = await navigator.serviceWorker.getRegistration();
    var subscription = await register.pushManager.getSubscription();
    ...
    await fetch('/unsubscribe', {
        method : 'POST',
        body : JSON.stringify(subscription),
        headers : { 'content-type' : 'application/json' }
    });
    ...
    await subscription.unsubscribe();
ping.js 中的其他代码只是模板代码,用于读取用户提供的值并调用setup() 或clear() 。
前端的最后一部分是服务 Worker 脚本,我们只需在其中注册一个推送事件监听器即可。
self.addEventListener('push', event => {
    const data = event.data.json();
    self.registration.showNotification(data.title, { body : data.text });
});
当推送事件发生时,我们只需使用通知 JavaScript API 来显示通知。
注: QtWebEngine Notification 示例展示了如何提供自己的处理程序并自定义通知消息的外观和感觉。
实施到位后,我们就可以启动端口为 5000 的 localhost 服务器。为此,我们只需进入项目根目录下的控制台即可:
npm start
现在我们可以查看基于WebEngine Notifications Example 的推送通知浏览器应用程序:
int main(int argc, char *argv[])
{
    QCoreApplication::setOrganizationName("QtExamples");
    QApplication app(argc, argv);

    const QString name =
            QString::fromLatin1("push-notifications.%1").arg(qWebEngineChromiumVersion());

    QWebEngineProfileBuilder profileBuilder;
    QScopedPointer<QWebEngineProfile> profile(profileBuilder.createProfile(name));
    QWebEngineView view(profile.data());
    auto popup = new NotificationPopup(&view);

    QObject::connect(view.page(), &QWebEnginePage::permissionRequested,
                     [&](QWebEnginePermission permission) {
                         if (permission.permissionType() != QWebEnginePermission::PermissionType::Notifications)
                             return;

                         permission.grant();
                     });

    profile->setPushServiceEnabled(true);
    profile->setNotificationPresenter([&](std::unique_ptr<QWebEngineNotification> notification) {
        popup->present(notification);
    });

    view.resize(640, 480);
    view.setUrl(QUrl("http://localhost:5000"));
    view.show();
    return app.exec();
}
该应用程序只需打开http:\\localhost:5000 页面即可。我们将不再详细介绍如何打开通知,因为这里有相关文档。不过,您需要从两个方面修改应用程序。首先,QWebEngineProfile 不能设置为非记录状态,因为推送消息将被禁用。因此,如上图所示,QWebEngineProfile 被初始化为名称。其次,您需要为已创建的profile 调用QWebEngineProfile::setPushServiceEnabled 来启用推送消息功能。
当应用程序运行时就会显示:

授予权限后,我们就可以发送 ping 请求了:

我们应该能看到即将到来的推送通知:

© 2025 The Qt Company Ltd. Documentation contributions included herein are the copyrights of their respective owners. The documentation provided herein is licensed under the terms of the GNU Free Documentation License version 1.3 as published by the Free Software Foundation. Qt and respective logos are trademarks of The Qt Company Ltd. in Finland and/or other countries worldwide. All other trademarks are property of their respective owners.

