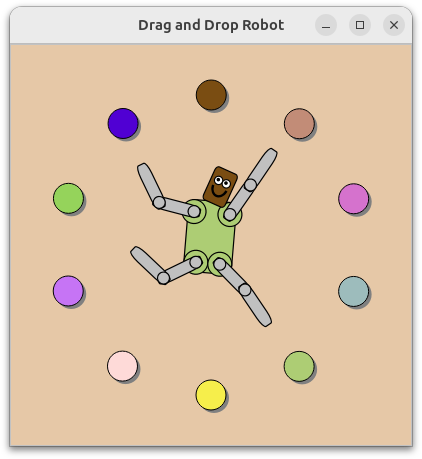
拖放机器人示例
演示如何在图形视图中拖放项目。
拖放机器人示例演示了如何在QGraphicsItem 子类中实现拖放功能,以及如何使用 Qt 的动画框架为项目制作动画。

图形视图提供了QGraphicsScene 类,用于管理从QGraphicsItem 类派生的大量自定义 2D 图形项并与之交互,还提供了QGraphicsView 部件,用于可视化这些项,并支持缩放和旋转。
本示例由一个Robot 类、一个ColorItem 类和一个主函数组成:Robot 类描述了一个简单的机器人,由多个RobotPart 派生肢体组成,包括RobotHead 和RobotLimb ,ColorItem 类提供了一个可拖动的彩色椭圆,而main() 函数提供了主应用程序窗口。
我们将首先回顾Robot 类,了解如何组装不同的部件,以便使用QPropertyAnimation 对它们进行单独旋转和动画,然后我们将回顾ColorItem 类,演示如何实现项目间的拖放。最后,我们将复习 main() 函数,了解如何将所有部件组装在一起,形成最终的应用程序。
机器人类定义
机器人由三个主要类组成:RobotHead 、RobotTorso 和RobotLimb ,后者用于上下臂和腿。所有部件都源自RobotPart 类,而 类又继承了QGraphicsObject 类。Robot 类本身没有视觉外观,只是作为机器人的根节点。
让我们从RobotPart 类的声明开始。
class RobotPart : public QGraphicsObject
{
public:
    RobotPart(QGraphicsItem *parent = nullptr);

protected:
    void dragEnterEvent(QGraphicsSceneDragDropEvent *event) override;
    void dragLeaveEvent(QGraphicsSceneDragDropEvent *event) override;
    void dropEvent(QGraphicsSceneDragDropEvent *event) override;

    QColor color = Qt::lightGray;
    bool dragOver = false;
};
这个基类继承了QGraphicsObject 。QGraphicsObject 通过继承QObject 来提供信号和插槽,它还使用Q_PROPERTY 声明QGraphicsItem 的属性,这使得QPropertyAnimation 可以访问这些属性。
RobotPart 还实现了三个最重要的事件处理程序,用于接受下拉事件:dragEnterEvent()、dragLeaveEvent()和dropEvent()。
颜色与dragOver 变量一起存储为一个成员变量,我们稍后将用它来直观地表示肢体可以接受拖拽到其上的颜色。
RobotPart::RobotPart(QGraphicsItem *parent)
    : QGraphicsObject(parent), color(Qt::lightGray)
{
    setAcceptDrops(true);
}
RobotPart该类的构造函数初始化了 dragOver 成员,并将颜色设置为Qt::lightGray 。在构造函数主体中,我们调用setAcceptDrops(true),以启用对接受拖放事件的支持。
该类的其他实现都是为了支持拖放。
void RobotPart::dragEnterEvent(QGraphicsSceneDragDropEvent *event)
{
    if (event->mimeData()->hasColor()) {
        event->setAccepted(true);
        dragOver = true;
        update();
    } else {
        event->setAccepted(false);
    }
}
当拖拽元素进入机器人部件区域时,将调用dragEnterEvent() 处理程序。
RobotPart 为所有部件提供了一个接受颜色拖放的基本行为。因此,如果传入的拖动对象包含一种颜色,事件就会被接受,我们就会将dragOver 设置为true 并调用 update() 来帮助向用户提供积极的视觉反馈;否则,事件就会被忽略,进而允许事件传播到父元素。
void RobotPart::dragLeaveEvent(QGraphicsSceneDragDropEvent *event)
{
    Q_UNUSED(event);
    dragOver = false;
    update();
}
当拖放元素被拖离机器人部件区域时,我们会调用dragLeaveEvent() 处理程序。我们的实现方法只是将dragOver重置为 false,并调用update() 来帮助提供拖动已离开此项目的视觉反馈。
void RobotPart::dropEvent(QGraphicsSceneDragDropEvent *event)
{
    dragOver = false;
    if (event->mimeData()->hasColor())
        color = qvariant_cast<QColor>(event->mimeData()->colorData());
    update();
}
当拖放元素掉落到一个项目上时(即拖动时鼠标按钮在项目上释放),dropEvent() 处理程序将被调用。
我们将dragOver 重置为 false,分配项目的新颜色,然后调用update() 。
RobotHead 、RobotTorso 和RobotLimb 的声明和实现几乎完全相同。我们将详细回顾RobotHead ,因为该类有一个细微差别,其他类留给读者练习。
class RobotHead : public RobotPart
{
public:
    RobotHead(QGraphicsItem *parent = nullptr);

    QRectF boundingRect() const override;
    void paint(QPainter *painter, const QStyleOptionGraphicsItem *option, QWidget *widget = nullptr) override;

protected:
    void dragEnterEvent(QGraphicsSceneDragDropEvent *event) override;
    void dropEvent(QGraphicsSceneDragDropEvent *event) override;

private:
    QPixmap pixmap;
};
RobotHead 类继承了RobotPart ,并提供了boundingRect() 和paint() 的必要实现。它还重新实现了dragEnterEvent() 和 dropEvent(),以提供图像下拉的特殊处理。
该类包含一个私有 pixmap 成员,我们可以用它来实现对接受图像下拉的支持。
RobotHead::RobotHead(QGraphicsItem *parent)
    : RobotPart(parent)
{
}
RobotHead 该类的构造函数非常简单,只需转发给RobotPart 的构造函数即可。
boundingRect() 重新实现后会返回头部的外延。由于我们希望旋转中心是项目的底部中心,因此我们选择了一个以 (-15, -50) 为起点、宽 30 个单位、高 50 个单位的边界矩形。旋转头部时,"颈部 "将保持不动,而头顶则左右倾斜。
void RobotHead::paint(QPainter *painter,
           const QStyleOptionGraphicsItem *option, QWidget *widget)
{
    Q_UNUSED(option);
    Q_UNUSED(widget);
    if (pixmap.isNull()) {
        painter->setBrush(dragOver ? color.lighter(130) : color);
        painter->drawRoundedRect(-10, -30, 20, 30, 25, 25, Qt::RelativeSize);
        painter->setBrush(Qt::white);
        painter->drawEllipse(-7, -3 - 20, 7, 7);
        painter->drawEllipse(0, -3 - 20, 7, 7);
        painter->setBrush(Qt::black);
        painter->drawEllipse(-5, -1 - 20, 2, 2);
        painter->drawEllipse(2, -1 - 20, 2, 2);
        painter->setPen(QPen(Qt::black, 2));
        painter->setBrush(Qt::NoBrush);
        painter->drawArc(-6, -2 - 20, 12, 15, 190 * 16, 160 * 16);
    } else {
        painter->scale(.2272, .2824);
        painter->drawPixmap(QPointF(-15 * 4.4, -50 * 3.54), pixmap);
    }
}
在paint() 中,我们将绘制实际的头部。实现过程分为两部分:如果在头部投放了图像,我们就绘制图像,否则我们就用简单的矢量图形绘制圆形矩形机器人头部。
出于性能考虑,根据绘制内容的复杂程度,绘制头部图像往往比使用一系列矢量操作更快。
void RobotHead::dragEnterEvent(QGraphicsSceneDragDropEvent *event)
{
    if (event->mimeData()->hasImage()) {
        event->setAccepted(true);
        dragOver = true;
        update();
    } else {
        RobotPart::dragEnterEvent(event);
    }
}
机器人头部可以接受图像投放。为了支持这一点,它对dragEnterEvent() 的重新实现会检查拖动对象是否包含图像数据,如果包含,则接受该事件。否则,我们将退回到基本的RobotPart 实现。
void RobotHead::dropEvent(QGraphicsSceneDragDropEvent *event)
{
    if (event->mimeData()->hasImage()) {
        dragOver = false;
        pixmap = qvariant_cast<QPixmap>(event->mimeData()->imageData());
        update();
    } else {
        RobotPart::dropEvent(event);
    }
}
为了跟进图像支持,我们还必须实现dropEvent()。我们将检查拖动对象是否包含图像数据,如果包含,则将该数据存储为成员像素图,并调用update()。该像素图将在我们之前回顾过的paint() 实现中使用。
RobotTorso RobotHead 和 与 类似,因此我们直接跳到 类。RobotLimb Robot
class Robot : public RobotPart
{
public:
    Robot(QGraphicsItem *parent = nullptr);

    QRectF boundingRect() const override;
    void paint(QPainter *painter, const QStyleOptionGraphicsItem *option, QWidget *widget = nullptr) override;
};
Robot 类也继承于RobotPart ,并且与其他部分一样,它也实现了boundingRect() 和paint()。不过,它提供了一种相当特殊的实现方式:
QRectF Robot::boundingRect() const
{
    return QRectF();
}

void Robot::paint(QPainter *painter,
                  const QStyleOptionGraphicsItem *option, QWidget *widget)
{
    Q_UNUSED(painter);
    Q_UNUSED(option);
    Q_UNUSED(widget);
}
由于Robot 类只用作机器人其他部分的基础节点,因此没有可视化表示。因此,它的boundingRect() 实现可以返回一个空QRectF ,而它的 paint() 函数则什么也不做。
Robot::Robot(QGraphicsItem *parent)
    : RobotPart(parent)
{
    setFlag(ItemHasNoContents);

    QGraphicsObject *torsoItem = new RobotTorso(this);
    QGraphicsObject *headItem = new RobotHead(torsoItem);
    QGraphicsObject *upperLeftArmItem = new RobotLimb(torsoItem);
    QGraphicsObject *lowerLeftArmItem = new RobotLimb(upperLeftArmItem);
    QGraphicsObject *upperRightArmItem = new RobotLimb(torsoItem);
    QGraphicsObject *lowerRightArmItem = new RobotLimb(upperRightArmItem);
    QGraphicsObject *upperRightLegItem = new RobotLimb(torsoItem);
    QGraphicsObject *lowerRightLegItem = new RobotLimb(upperRightLegItem);
    QGraphicsObject *upperLeftLegItem = new RobotLimb(torsoItem);
    QGraphicsObject *lowerLeftLegItem = new RobotLimb(upperLeftLegItem);
构造函数首先会设置标志ItemHasNoContents ,这是对没有视觉外观的项目的一个小优化。
然后,我们构建机器人的所有部件(头部、躯干、上/下臂和腿)。堆叠顺序非常重要,我们使用父子层次结构来确保元素的旋转和移动正常。我们首先构建躯干,因为它是根元素。然后我们构建头部,并将躯干传递给HeadItem 的构建器。这将使头部成为躯干的子元素;如果旋转躯干,头部也会跟着旋转。同样的模式也适用于四肢的其他部分。
    headItem->setPos(0, -18);
    upperLeftArmItem->setPos(-15, -10);
    lowerLeftArmItem->setPos(30, 0);
    upperRightArmItem->setPos(15, -10);
    lowerRightArmItem->setPos(30, 0);
    upperRightLegItem->setPos(10, 32);
    lowerRightLegItem->setPos(30, 0);
    upperLeftLegItem->setPos(-10, 32);
    lowerLeftLegItem->setPos(30, 0);
每个机器人部件都经过精心定位。例如,左上臂被精确地移动到躯干的左上方,而右上臂则被移动到右上方。
    QParallelAnimationGroup *animation = new QParallelAnimationGroup(this);

    QPropertyAnimation *headAnimation = new QPropertyAnimation(headItem, "rotation");
    headAnimation->setStartValue(20);
    headAnimation->setEndValue(-20);
    QPropertyAnimation *headScaleAnimation = new QPropertyAnimation(headItem, "scale");
    headScaleAnimation->setEndValue(1.1);
    animation->addAnimation(headAnimation);
    animation->addAnimation(headScaleAnimation);
下一部分将创建所有动画对象。该代码段显示了两个对头部缩放和旋转进行操作的动画。这两个QPropertyAnimation 实例只需设置对象、属性以及各自的开始和结束值。
所有动画都由一个顶级并行动画组控制。缩放和旋转动画被添加到该组中。
其余动画的定义方法与此类似。
    for (int i = 0; i < animation->animationCount(); ++i) {
        QPropertyAnimation *anim = qobject_cast<QPropertyAnimation *>(animation->animationAt(i));
        anim->setEasingCurve(QEasingCurve::SineCurve);
        anim->setDuration(2000);
    }

    animation->setLoopCount(-1);
    animation->start();
最后,我们为每个动画设置缓和曲线和持续时间,确保顶层动画组永久循环,并启动顶层动画。
ColorItem 类定义
ColorItem 类表示一个圆形项目,按下该项目可将颜色拖到机器人部件上。
class ColorItem : public QGraphicsItem
{
public:
    ColorItem();

    QRectF boundingRect() const override;
    void paint(QPainter *painter, const QStyleOptionGraphicsItem *option, QWidget *widget) override;

protected:
    void mousePressEvent(QGraphicsSceneMouseEvent *event) override;
    void mouseMoveEvent(QGraphicsSceneMouseEvent *event) override;
    void mouseReleaseEvent(QGraphicsSceneMouseEvent *event) override;

private:
    QColor color;
};
该类非常简单。它不使用动画,也不需要属性、信号和插槽,因此为了节省资源,它很自然地继承了QGraphicsItem (而不是QGraphicsObject )。
它声明了必须使用的boundingRect() 和paint() 函数,并添加了对mousePressEvent(),mouseMoveEvent() 和mouseReleaseEvent() 的重新实现。它包含一个私有 color 成员。
让我们来看看它的实现。
ColorItem::ColorItem()
    : color(QRandomGenerator::global()->bounded(256), QRandomGenerator::global()->bounded(256), QRandomGenerator::global()->bounded(256))
{
    setToolTip(QString("QColor(%1, %2, %3)\n%4")
              .arg(color.red()).arg(color.green()).arg(color.blue())
              .arg("Click and drag this color onto the robot!"));
    setCursor(Qt::OpenHandCursor);
    setAcceptedMouseButtons(Qt::LeftButton);
}
ColorItem该程序的构造函数通过使用QRandomGenerator 为其颜色成员分配了一种不透明的随机颜色。为了提高可用性,它还分配了一个工具提示,为用户提供有用的提示,并设置了一个合适的光标。这样,当鼠标指针悬停在项目上时,光标将有机会出现在Qt::OpenHandCursor 上。
最后,我们调用setAcceptedMouseButtons() 来确保该项目只能处理Qt::LeftButton 。这大大简化了鼠标事件处理程序,因为我们可以始终假设只有鼠标左键被按下和释放。
项目的边界矩形是一个固定的 30x30 单位,以项目的原点(0,0)为中心,并在所有方向上调整 0.5 个单位,以便用可缩放的笔绘制其轮廓。为了最后的视觉效果,边界还向下和向右补偿了几个单位,以便为简单的阴影留出空间。
void ColorItem::paint(QPainter *painter, const QStyleOptionGraphicsItem *option, QWidget *widget)
{
    Q_UNUSED(option);
    Q_UNUSED(widget);
    painter->setPen(Qt::NoPen);
    painter->setBrush(Qt::darkGray);
    painter->drawEllipse(-12, -12, 30, 30);
    painter->setPen(QPen(Qt::black, 1));
    painter->setBrush(QBrush(color));
    painter->drawEllipse(-15, -15, 30, 30);
}
paint() 实现绘制的椭圆具有 1 个单位的黑色轮廓、纯色填充和深灰色阴影。
void ColorItem::mousePressEvent(QGraphicsSceneMouseEvent *)
{
    setCursor(Qt::ClosedHandCursor);
}
当您在项目区域内按下鼠标按钮时,mousePressEvent() 处理程序将被调用。我们的实现只是将光标设置为Qt::ClosedHandCursor 。
void ColorItem::mouseReleaseEvent(QGraphicsSceneMouseEvent *)
{
    setCursor(Qt::OpenHandCursor);
}
当您在项目区域内按下鼠标按钮后松开时,mouseReleaseEvent() 处理程序将被调用。我们的实现会将光标设置回Qt::OpenHandCursor 。鼠标按下和释放事件处理程序一起为用户提供了有用的视觉反馈:当鼠标指针移动到CircleItem 上时,光标会变成一只张开的手。按下该项目将显示一个闭合的手形光标。松开则会再次恢复到张开的手形光标。
void ColorItem::mouseMoveEvent(QGraphicsSceneMouseEvent *event)
{
    if (QLineF(event->screenPos(), event->buttonDownScreenPos(Qt::LeftButton))
        .length() < QApplication::startDragDistance()) {
        return;
    }

    QDrag *drag = new QDrag(event->widget());
    QMimeData *mime = new QMimeData;
    drag->setMimeData(mime);
当您在ColorItem 的区域内按下鼠标键后移动鼠标时,会调用mouseMoveEvent() 处理程序。该实现为CircleItem 提供了最重要的逻辑:启动和管理拖动的代码。
该实现首先会检查鼠标是否已拖动到足以消除鼠标抖动噪音的程度。只有当鼠标拖动距离超过应用程序的起始拖动距离时,我们才会启动拖动。
接着,我们创建一个QDrag 对象,并将事件widget (即QGraphicsView 视口)传递给它的构造函数。Qt 将确保在正确的时间删除该对象。我们还创建了一个QMimeData 实例,其中可包含颜色或图像数据,并将其分配给拖动对象。
    static int n = 0;
    if (n++ > 2 && QRandomGenerator::global()->bounded(3) == 0) {
        QImage image(":/images/head.png");
        mime->setImageData(image);

        drag->setPixmap(QPixmap::fromImage(image).scaled(30, 40));
        drag->setHotSpot(QPoint(15, 30));
这个代码段的结果有些随机:偶尔会有一张特殊的图片被分配给拖动对象的 mime 数据。该像素图也被指定为拖动对象的像素图。这将确保您可以在鼠标光标下看到作为像素图拖动的图像。
    } else {
        mime->setColorData(color);
        mime->setText(QString("#%1%2%3")
                      .arg(color.red(), 2, 16, QLatin1Char('0'))
                      .arg(color.green(), 2, 16, QLatin1Char('0'))
                      .arg(color.blue(), 2, 16, QLatin1Char('0')));

        QPixmap pixmap(34, 34);
        pixmap.fill(Qt::white);

        QPainter painter(&pixmap);
        painter.translate(15, 15);
        painter.setRenderHint(QPainter::Antialiasing);
        paint(&painter, nullptr, nullptr);
        painter.end();

        pixmap.setMask(pixmap.createHeuristicMask());

        drag->setPixmap(pixmap);
        drag->setHotSpot(QPoint(15, 20));
    }
否则,也是最常见的结果,就是为拖动对象的 mime 数据指定一种简单的颜色。我们将ColorItem 渲染成一个新的像素图,让用户直观地感受到颜色正在被 "拖动"。
    drag->exec();
    setCursor(Qt::OpenHandCursor);
}
最后,我们执行拖动。QDrag::exec() 将重新进入事件循环,只有在拖动被放弃或取消时才会退出。无论如何,我们都会将光标重置为Qt::OpenHandCursor 。
main() 函数
现在,Robot 和ColorItem 类都已完成,我们可以将所有部分整合到 main() 函数中。
int main(int argc, char **argv)
{
    QApplication app(argc, argv);
首先,我们构建QApplication ,并初始化随机数生成器。这样可以确保每次启动应用程序时,颜色项都有不同的颜色。
    QGraphicsScene scene(-200, -200, 400, 400);

    for (int i = 0; i < 10; ++i) {
        ColorItem *item = new ColorItem;
        item->setPos(::sin((i * 6.28) / 10.0) * 150,
                     ::cos((i * 6.28) / 10.0) * 150);

        scene.addItem(item);
    }

    Robot *robot = new Robot;
    robot->setTransform(QTransform::fromScale(1.2, 1.2), true);
    robot->setPos(0, -20);
    scene.addItem(robot);
我们构建了一个固定大小的场景,并创建了 10 个ColorItem 实例,它们围成一个圆圈。每个项目都被添加到场景中。
在这个圆的中心,我们创建了一个Robot 实例。机器人被缩放并向上移动了几个单位。然后将其添加到场景中。
    GraphicsView view(&scene);
    view.setRenderHint(QPainter::Antialiasing);
    view.setViewportUpdateMode(QGraphicsView::BoundingRectViewportUpdate);
    view.setBackgroundBrush(QColor(230, 200, 167));
    view.setWindowTitle("Drag and Drop Robot");
    view.show();

    return app.exec();
}
最后,我们创建一个QGraphicsView 窗口,并将场景分配给它。
为了提高视觉质量,我们启用了抗锯齿功能。我们还选择使用边界矩形更新来简化视觉更新处理。视图有一个固定的沙色背景和一个窗口标题。
然后我们显示视图。动画在控件进入事件循环后立即开始。
© 2025 The Qt Company Ltd. Documentation contributions included herein are the copyrights of their respective owners. The documentation provided herein is licensed under the terms of the GNU Free Documentation License version 1.3 as published by the Free Software Foundation. Qt and respective logos are trademarks of The Qt Company Ltd. in Finland and/or other countries worldwide. All other trademarks are property of their respective owners.

