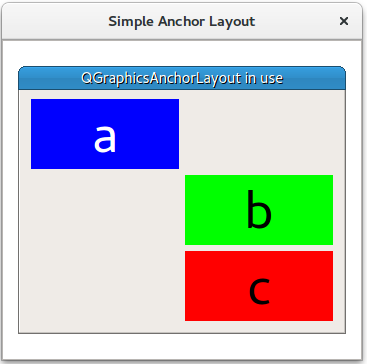
简单锚点布局示例
演示图形视图场景中的锚点布局。
简单锚点布局示例展示了QGraphicsAnchorLayout 类的基本用法。

该示例首先创建了一个QGraphicsScene (scene)、3 个部件 (a 、b 和c) 以及一个 QGraphicsAnchorlayout (layout)。
    QGraphicsScene scene;

    Widget *a = new Widget(Qt::blue, Qt::white, "a");
    a->setPreferredSize(100, 100);
    Widget *b = new Widget(Qt::green, Qt::black, "b");
    b->setPreferredSize(100, 100);
    Widget *c = new Widget(Qt::red, Qt::black, "c");
    c->setPreferredSize(100, 100);

    QGraphicsAnchorLayout *layout = new QGraphicsAnchorLayout;
首先,它将项目a 的左上角锚定到layout 的左上角。这可以分两步完成:
    layout->addAnchor(a, Qt::AnchorTop, layout, Qt::AnchorTop);
    layout->addAnchor(a, Qt::AnchorLeft, layout, Qt::AnchorLeft);
或一步完成:
然后,将a 的右侧锚点锚定到b 的左侧锚点,并将项目b 的顶部锚定到a 的底部。
    layout->addAnchor(b, Qt::AnchorLeft, a, Qt::AnchorRight);
    layout->addAnchor(b, Qt::AnchorTop, a, Qt::AnchorBottom);
在小部件b 下放置第三个小部件c :
项目b 和c 水平锚定在一起:
layout->addAnchors(b, c, Qt::Horizontal);
项目 c 被锚定到 的右下角。layout
最后,QGraphicsWidget w 显示在QGraphicsView view 中。
    auto w = new QGraphicsWidget(nullptr, Qt::Window | Qt::CustomizeWindowHint | Qt::WindowTitleHint);
    w->setPos(20, 20);
    w->setMinimumSize(100, 100);
    w->setPreferredSize(320, 240);
    w->setLayout(layout);
    w->setWindowTitle(QApplication::translate("simpleanchorlayout", "QGraphicsAnchorLayout in use"));
    scene.addItem(w);

    QGraphicsView view;
    view.setScene(&scene);
    view.setWindowTitle(QApplication::translate("simpleanchorlayout", "Simple Anchor Layout"));

    view.resize(360, 320);
    view.show();

    return app.exec();
© 2025 The Qt Company Ltd. Documentation contributions included herein are the copyrights of their respective owners. The documentation provided herein is licensed under the terms of the GNU Free Documentation License version 1.3 as published by the Free Software Foundation. Qt and respective logos are trademarks of The Qt Company Ltd. in Finland and/or other countries worldwide. All other trademarks are property of their respective owners.

