示例 1:使用静态源直接连接
- 创建源对象
要创建源代码对象,首先要创建定义文件
simpleswitch.rep。该文件描述了对象的属性和方法,是Qt Remote Objects 编译器repc 的输入文件。该文件仅定义了向Replicas 公开所需的接口。simpleswitch.repclass SimpleSwitch { PROP(bool currState=false); SLOT(server_slot(bool clientState)); };
在
simpleswitch.rep中、currState表示开关的当前状态。server_slot()允许我们与信号源交互 - 它将连接到echoSwitchState(bool newstate)信号。
要让 repc 处理该文件,请在
cmake文件中添加以下一行:qt6_add_repc_sources(directconnectserver simpleswitch.rep )如果您使用的是
qmake:REPC_SOURCE = simpleswitch.rep
这些说明仅适用于 Qt Remote Objects 模块,因此您也需要将其添加到您的项目中。如果使用 CMake,请添加
find_package(Qt6 REQUIRED COMPONENTS RemoteObjects)
target_link_libraries(directconnectserver PRIVATE Qt6::RemoteObjects)
如果使用
qmake:QT += remoteobjects
repc 会在您指定的编译目录中创建
rep_SimpleSwitch_source.h头文件。更多信息,请参阅源代码。repc 创建了三个与 QtRO 配合使用的辅助类。在本例中,我们使用的是基本类:
SimpleSwitchSimpleSource。这是一个抽象类,定义于rep_SimpleSwitch_source.h。我们从它派生定义 SimpleSwitch 实现类,如下所示:simpleswitch.h#ifndef SIMPLESWITCH_H #define SIMPLESWITCH_H #include "rep_simpleswitch_source.h" class SimpleSwitch : public SimpleSwitchSimpleSource { Q_OBJECT public: SimpleSwitch(QObject *parent = nullptr); ~SimpleSwitch(); void server_slot(bool clientState) override; public Q_SLOTS: void timeout_slot(); private: QTimer *stateChangeTimer; }; #endif
在
simpleswitch.h、stateChangeTimer是QTimer ,用于切换 SimpleSwitch 的状态。timeout_slot()连接到stateChangeTimer的 timeout() 信号。server_slot()- 每当有副本调用其版本的槽时,源会自动调用该信号 - 输出接收到的值。currStateChanged(bool)每当currState切换时,在repc 生成的rep_SimpleSwitch_source.h中定义的 timeout() 信号就会发出。在本例中,我们在源端忽略了该信号,稍后在副本端进行处理。
SwitchState类的定义如下所示:simpleswitch.cpp#include "simpleswitch.h"// 构造函数SimpleSwitch::SimpleSwitch(QObject*父类):SimpleSwitchSimpleSource(parent) { stateChangeTimer= newQTimer(this);// 初始化定时器 QObject连接(stateChangeTimer, &QTimerstateChangeTimer->start(2000);// 启动计时器并将超时时间设置为 2 秒。 qDebug() << "Source Node Started"; }//destructorSimpleSwitch::~SimpleSwitch() { stateChangeTimer->stop(); }voidSimpleSwitch::server_slot(boolclientState){ qDebug() << "Replica state is " << clientState; // print switch state echoed back by client voidSimpleSwitch::timeout_slot() {// 定时器超时时调用的槽 if(currState())// 检查当前状态是否为 true,currState() 在 repc 生成的 rep_simpleswitch_source.h 中定义setCurrState(false);// 将状态设置为 false elsesetCurrState(true);// 将状态设置为 true qDebug() << "Source State is "<<currState(); }
- 创建注册表由于
本示例使用节点间的直接连接,因此我们可以省略这一步。
- 创建主机
节点主机节点的创建如下所示:
QRemoteObjectHost srcNode(QUrl(QStringLiteral("local:replica")));
- 主机源对象和远程
下面的语句实例化了源对象,并将其传递给主机以启用 "远程",即让 QtRO 网络看到对象的过程:
SimpleSwitch srcSwitch; // create simple switch
srcNode.enableRemoting(&srcSwitch); // enable remoting
实现上述步骤的
main.cpp文件内容如下:main.cpp#include <QCoreApplication> #include "simpleswitch.h" int main(int argc, char *argv[]) { QCoreApplication a(argc, argv); SimpleSwitch srcSwitch; // create simple switch // Create host node without Registry: QRemoteObjectHost srcNode(QUrl(QStringLiteral("local:replica"))); srcNode.enableRemoting(&srcSwitch); // enable remoting/sharing return a.exec(); }
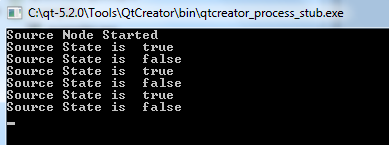
编译并运行这个源端项目。在未创建任何副本的情况下,输出结果应如下所示,开关状态每两秒在
true和false之间切换一次。
随后的步骤是创建网络的副本端,在本例中,副本端从源端获取交换机状态并回传。
副本代码
- 使用 repc 将副本添加到项目中我们
使用与源端相同的 API 定义文件
,,请SimpleSwitch.rep在客户端
cmake文件中包含以下行,指定.rep文件输入:qt6_add_repc_replicas(directconnectclient simpleswitch.rep )如果使用
qmake,请在客户端.pro文件中添加以下行:REPC_REPLICA = simpleswitch.rep
repc工具会在构建目录中生成
rep_SimpleSwitch_replica.h文件。有关更多信息,请参阅Replica。 - 创建节点以连接源主机节点
以下代码实例化了网络上的第二个节点,并将其连接
到源 主机节点:
QRemoteObjectNode repNode; // create remote object node
repNode.connectToNode(QUrl(QStringLiteral("local:replica"))); // connect with remote host node
- 调用节点的acquire() 创建指向副本的指针
首先,我们实例化一个副本:
QSharedPointer<SimpleSwitchReplica> ptr;
ptr.reset(repNode.acquire<SimpleSwitchReplica>()); // acquire replica of source from host node
注意: acquire() 返回一个指向副本的指针,但不管理其生命周期。本示例展示了将返回指针封装在QSharedPointer 或QScopedPointer 中的推荐过程,以确保指针始终被正确删除。
main.cpp实现上述步骤并实例化我们的对象:main.cpp#include <QCoreApplication> #include "client.h" int main(int argc, char *argv[]) { QCoreApplication a(argc, argv); QSharedPointer<SimpleSwitchReplica> ptr; // shared pointer to hold source replica QRemoteObjectNode repNode; // create remote object node repNode.connectToNode(QUrl(QStringLiteral("local:replica"))); // connect with remote host node ptr.reset(repNode.acquire<SimpleSwitchReplica>()); // acquire replica of source from host node Client rswitch(ptr); // create client switch object and pass reference of replica to it return a.exec(); }
Client类的完整声明和定义如下:client.h#ifndef _CLIENT_H #define _CLIENT_H #include <QObject> #include <QSharedPointer> #include "rep_simpleswitch_replica.h" class Client : public QObject { Q_OBJECT public: Client(QSharedPointer<SimpleSwitchReplica> ptr); ~Client() override = default; void initConnections();// Function to connect signals and slots of source and client Q_SIGNALS: void echoSwitchState(bool switchState);// this signal is connected with server_slot(..) on the source object and echoes back switch state received from source public Q_SLOTS: void recSwitchState_slot(bool); // slot to receive source state private: bool clientSwitchState; // holds received server switch state QSharedPointer<SimpleSwitchReplica> reptr;// holds reference to replica }; #endif
client.cpp#include "client.h"// 构造函数Client::Client(QSharedPointer<SimpleSwitchReplica>ptr) : QObject(nullptr),reptr(ptr) {// Connect signal for replica initialized with initialization slot.initConnections();// We can connect to SimpleSwitchReplica Signals/Slots // directly because our Replica was generated by repc.}voidClient::initConnections() {// initialize connections between signals and slots // connect source replica signal currStateChanged() with client's recSwitchState() slot to receive source's current state. QObject::connect(reptr.data(), &SimpleSwitchReplica::currStateChanged, this, &Client::recSwitchState_slot);// 将客户端的 echoSwitchState(..) 信号与副本的 server_slot(..) 连接,以回传接收到的状态 QObject::connect(this, &Client::echoSwitchState,reptr.data(), &SimpleSwitchReplica::server_slot); }voidClient::recSwitchState_slot(boolvalue){ qDebug() << "Received source state "<< value << reptr.data()->currState(); clientSwitchState=reptr.data()->currState(); Q_EMIT echoSwitchState(clientSwitchState);// 发射信号将接收到的状态回传给服务器}
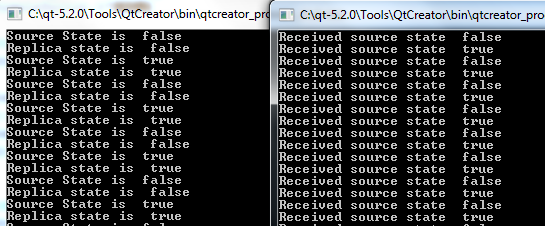
将此示例与源代码示例一起编译并运行,会产生以下输出:

© 2025 The Qt Company Ltd. Documentation contributions included herein are the copyrights of their respective owners. The documentation provided herein is licensed under the terms of the GNU Free Documentation License version 1.3 as published by the Free Software Foundation. Qt and respective logos are trademarks of The Qt Company Ltd. in Finland and/or other countries worldwide. All other trademarks are property of their respective owners.

