
Qt Quick Layouts Overview
A set of APIs for arranging QML items in a user interface.
Qt Quick Layouts are items that are used to arrange items in a user interface. Since Qt Quick Layouts also resize their items, they are well suited for resizable user interfaces.
Getting Started
The QML types can be imported into your application using the following import statement in your
.qmlfile.import QtQuick.Layouts 1.11
Key Features
Some of the key features are:
Alignment of items can be specified with the Layout.alignment property
Resizable items can be specified with the Layout.fillWidth and Layout.fillHeight properties.
Size constraints can be specified with Layout.minimumWidth , Layout.preferredWidth , and Layout.maximumWidth properties (“Width” can be replaced with “Height” for specifying similar constraints to the height).
Spacings can be specified with spacing , rowSpacing or columnSpacing
In addition to the above features, GridLayout adds these features:
Grid coordinates can be specified with the Layout.row and Layout.column properties.
Automatic grid coordinates used together with the flow , rows , and columns properties.
Spans across rows or columns can be specified with the Layout.rowSpan and Layout.columnSpan properties.
A Simple Layout
Window {
    RowLayout {
        anchors.fill: parent

        spacing: 6

        Rectangle {
            color: 'azure'
            Layout.preferredWidth: 100
            Layout.preferredHeight: 150
        }
        Rectangle {
            color: "plum"
            Layout.fillWidth: true
            Layout.fillHeight: true
        }
    }
}
As the intention of using a layout is to rearrange its children whenever the layout changes size, the application should make sure that the layout gets resized. In the above snippet the RowLayout ensures that by specifying
anchors.fill: parent. However, it can also be by other means, such as directly specifying width and height properties. In the same snippet, theazureRectangle has a fixed size of(100, 150)pixels, and theplumRectangle will expand to occupy all the space it gets allocated.Note
A layout is responsible for its children’s geometry. You should therefore not specify width , height , x , y or any other properties that might influence those properties (such as anchors ) on those items. Otherwise there would be a conflict of interest, and the result is undefined. This is also the case if the child item is a layout. Therefore, only layouts with no parent layout can have
anchors.fill: parent.All items in the layout will have 6 pixels of spacing between them:
spacing: 6
Size Constraints
Since an item can be resized by its layout, the layout needs to know the minimum , preferred , and maximum sizes of all items where Layout.fillWidth or Layout.fillHeight is set to
true. For instance, the following will produce a layout with two rectangles lying side-by-side that stretches horizontally. The azure rectangle can be resized from 50x150 to 300x150, and the plum rectangle can be resized from 100x100 to ∞x100.RowLayout { id: layout anchors.fill: parent spacing: 6 Rectangle { color: 'azure' Layout.fillWidth: true Layout.minimumWidth: 50 Layout.preferredWidth: 100 Layout.maximumWidth: 300 Layout.minimumHeight: 150 Text { anchors.centerIn: parent text: parent.width + 'x' + parent.height } } Rectangle { color: 'plum' Layout.fillWidth: true Layout.minimumWidth: 100 Layout.preferredWidth: 200 Layout.preferredHeight: 100 Text { anchors.centerIn: parent text: parent.width + 'x' + parent.height } } }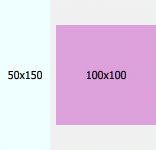
Combining each item’s constraints will give these implicit constraints to the layout element:
minimum
preferred
maximum
implicit constraints (width)
156
306
∞ (
Number.POSITIVE_INFINITY)implicit constraints (heights)
150
150
150
Thus, the layout cannot be narrower than 156 or be taller or shorter than 150 without breaking any of the constraints of its child items.
Specifying Preferred Size
For each item, the effective preferred size may come from one of several candidate properties. For determining the effective preferred size, it will query these candidate properties in the following order, and use the first candidate with a valid width or height.
Candidate properties
Description
Layout.preferredWidth or Layout.preferredHeight
These properties are supposed to be modified by the application if the default implicit size does not give the optimal arrangement.
implicitWidth or implicitHeight
These properties are supposed to be supplied by each item to give a meaningful ideal size, for example the size needed to display all the contents of a Text type. An implicit width or height of
0is interpreted as invalid.width and height
If none of the above properties are valid, the layout will resort to the width and height properties.
An item can specify Layout.preferredWidth without having to specify Layout.preferredHeight . In this case, the effective preferred height will be determined from the implicitHeight (or ultimately height ).
Note
Resorting to width or height properties is only provided as a final fallback. If you want to override the preferred size, it is recommended to use Layout.preferredWidth or Layout.preferredHeight . Relying on the width or height properties for specifying the preferred size might give some unexpected behavior. For instance, changing the width or height properties won’t trigger a layout rearrangement. Also, when the layout is forced to do a full rebuild it might use the actual width and height, and not the width and height specified in the QML file.
Connecting Windows and Layouts
You can just use normal anchoring concepts to ensure that the layout will follow the window resizing.
RowLayout {
    id: layout
    anchors.fill: parent
The size constraints of layouts can be used to ensure that the window cannot be resized beyond the layout constraints. You can take the size constraints from the layout and set these constraints on the minimumWidth, minimumHeight, maximumWidth, and maximumHeight of the Window element. The following code ensures that the window cannot be resized beyond the constraints of the layout:
minimumWidth: layout.Layout.minimumWidth
minimumHeight: layout.Layout.minimumHeight
maximumWidth: 1000
maximumHeight: layout.Layout.maximumHeight
Note
Since layout.Layout.maximumWidth is infinite in this case, we cannot bind that to the maximumWidth property of Window, since that is an integer number. We therefore set a fixed maximum width to 1000.
Finally, you usually want the initial size of the window to be the layout’s implicit size:
width: layout.implicitWidth
height: layout.implicitHeight
© 2022 The Qt Company Ltd. Documentation contributions included herein are the copyrights of their respective owners. The documentation provided herein is licensed under the terms of the GNU Free Documentation License version 1.3 as published by the Free Software Foundation. Qt and respective logos are trademarks of The Qt Company Ltd. in Finland and/or other countries worldwide. All other trademarks are property of their respective owners.