
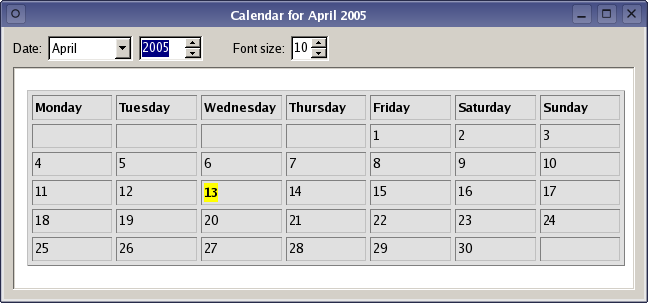
Calendar Example
The Calendar example shows how to create rich text content and display it using a rich text editor.
The Calendar example shows how to create rich text content and display it using a rich text editor.
Specifically, the example demonstrates the following:
Use of a text editor with a text document
Insertion of tables and frames into a document
Navigation within a table
Insert text in different styles
The rich text editor used to display the document is used within a main window application.
MainWindow Class Definition
The MainWindow class provides a text editor widget and some controls to allow the user to change the month and year shown. The font size used for the text can also be adjusted.
class MainWindow(QMainWindow):

    Q_OBJECT
# public
    MainWindow()
slots: = public()
    def setFontSize(size):
    def setMonth(month):
    def setYear(date):
# private
    def insertCalendar():
    fontSize = int()
    selectedDate = QDate()
    editor = QTextBrowser()
The private insertCalendar() function performs most of the work, relying on the fontSize and selectedDate variables to write useful information to the editor.
MainWindow Class Implementation
The MainWindow constructor sets up the user interface and initializes variables used to generate a calendar for each month.
def __init__(self):

    selectedDate = QDate.currentDate()
    fontSize = 10
    centralWidget = QWidget()
We begin by setting default values for the selected date that will be highlighted in the calendar and the font size to be used. Since we are using a QMainWindow for the user interface, we construct a widget for use as the central widget.
The user interface will include a line of controls above the generated calendar; we construct a label and a combobox to allow the month to be selected, and a spin box for the year. These widgets are configured to provide a reasonable range of values for the user to try:
dateLabel = QLabel(tr("Date:"))
monthCombo = QComboBox()
for month in range(1, 13):
    monthCombo.addItem(QLocale.system().monthName(month))
yearEdit = QDateTimeEdit()
yearEdit.setDisplayFormat("yyyy")
yearEdit.setDateRange(QDate(1753, 1, 1), QDate(8000, 1, 1))
We use the selectedDate object to obtain the current month and year, and we set these in the combobox and spin box:
The font size is displayed in a spin box which we restrict to a sensible range of values:
fontSizeLabel = QLabel(tr("Font size:"))
fontSizeSpinBox = QSpinBox()
fontSizeSpinBox.setRange(1, 64)
editor = QTextBrowser
insertCalendar()
We construct an editor and use the insertCalendar() function to create a calendar for it. Each calendar is displayed in the same text editor; in this example we use a QTextBrowser since we do not allow the calendar to be edited.
The controls used to set the month, year, and font size will not have any effect on the appearance of the calendar unless we make some signal-slot connections:
connect(monthCombo, QComboBox.activated,
        self, MainWindow::setMonth)
connect(yearEdit, QDateTimeEdit.dateChanged,
        self, MainWindow::setYear)
connect(fontSizeSpinBox, QSpinBox.valueChanged,
        self, MainWindow::setFontSize)
The signals are connected to some simple slots in the MainWindow class which we will describe later.
We create layouts to manage the widgets we constructed:
controlsLayout = QHBoxLayout()
controlsLayout.addWidget(dateLabel)
controlsLayout.addWidget(monthCombo)
controlsLayout.addWidget(yearEdit)
controlsLayout.addSpacing(24)
controlsLayout.addWidget(fontSizeLabel)
controlsLayout.addWidget(fontSizeSpinBox)
controlsLayout.addStretch(1)
centralLayout = QVBoxLayout()
centralLayout.addLayout(controlsLayout)
centralLayout.addWidget(editor, 1)
centralWidget.setLayout(centralLayout)
setCentralWidget(centralWidget)
Finally, the central widget is set for the window.
Each calendar is created for the editor by the insertCalendar() function which uses the date and font size, defined by the private selectedDate and fontSize variables, to produce a suitable plan for the specified month and year.
def insertCalendar(self):

    editor.clear()
    cursor = editor.textCursor()
    cursor.beginEditBlock()
    date = QDate(selectedDate.year(), selectedDate.month(), 1)
We begin by clearing the editor’s rich text document, and obtain a text cursor from the editor that we will use to add content. We also create a QDate object based on the currently selected date.
The calendar is made up of a table with a gray background color that contains seven columns: one for each day of the week. It is placed in the center of the page with equal space to the left and right of it. All of these properties are set in a QTextTableFormat object:
tableFormat = QTextTableFormat()
tableFormat.setAlignment(Qt.AlignHCenter)
tableFormat.setBackground(QColor("#e0e0e0"))
tableFormat.setCellPadding(2)
tableFormat.setCellSpacing(4)
Each cell in the table will be padded and spaced to make the text easier to read.
We want the columns to have equal widths, so we provide a list containing percentage widths for each of them and set the constraints in the QTextTableFormat :
 QList<QTextLength>raints
raints << QTextLength(QTextLength.PercentageLength, 14)
             << QTextLength(QTextLength.PercentageLength, 14)
             << QTextLength(QTextLength.PercentageLength, 14)
             << QTextLength(QTextLength.PercentageLength, 14)
             << QTextLength(QTextLength.PercentageLength, 14)
             << QTextLength(QTextLength.PercentageLength, 14)
             << QTextLength(QTextLength.PercentageLength, 14)
 tableFormat.setColumnWidthConstraints(constraints)
The constraints used for the column widths are only useful if the table has an appropriate number of columns. With the format for the table defined, we construct a new table with one row and seven columns at the current cursor position:
table = cursor.insertTable(1, 7, tableFormat)
We only need one row to start with; more can be added as we need them. Using this approach means that we do not need to perform any date calculations until we add cells to the table.
When inserting objects into a document with the cursor’s insertion functions, the cursor is automatically moved inside the newly inserted object. This means that we can immediately start modifying the table from within:
frame = cursor.currentFrame()
frameFormat = frame.frameFormat()
frameFormat.setBorder(1)
frame.setFrameFormat(frameFormat)
Since the table has an outer frame, we obtain the frame and its format so that we can customize it. After making the changes we want, we set the frame’s format using the modified format object. We have given the table an outer border one pixel wide.
format = cursor.charFormat()
format.setFontPointSize(fontSize)
boldFormat = format
boldFormat.setFontWeight(QFont.Bold)
highlightedFormat = boldFormat
highlightedFormat.setBackground(Qt.yellow)
In a similar way, we obtain the cursor’s current character format and create customized formats based on it.
We do not set the format on the cursor because this would change the default character format; instead, we use the customized formats explicitly when we insert text. The following loop inserts the days of the week into the table as bold text:
for weekDay in range(1, 8):
    cell = table.cellAt(0, weekDay-1)
For each day of the week, we obtain an existing table cell in the first row (row 0) using the table’s cellAt() function. Since we start counting the days of the week at day 1 (Monday), we subtract 1 from weekDay to ensure that we obtain the cell for the correct column of the table.
Before text can be inserted into a cell, we must obtain a cursor with the correct position in the document. The cell provides a function for this purpose, and we use this cursor to insert text using the boldFormat character format that we created earlier:
cellCursor = cell.firstCursorPosition()
cellCursor.insertText(QLocale.system().dayName(weekDay), boldFormat)
Inserting text into document objects usually follows the same pattern. Each object can provide a new cursor that corresponds to the first valid position within itself, and this can be used to insert new content. We continue to use this pattern as we insert the days of the month into the table.
Since every month has more than seven days, we insert a single row to begin and add days until we reach the end of the month. If the current date is encountered, it is inserted with a special format (created earlier) that makes it stand out:
table.insertRows(table.rows(), 1)
We add a new row to the table at the end of each week only if the next week falls within the currently selected month.
For each calendar that we create, we change the window title to reflect the currently selected month and year:
setWindowTitle(tr("Calendar for %1 %2"
    ).arg(QLocale.system().monthName(selectedDate.month())
    ).arg(selectedDate.year()))
The insertCalendar() function relies on up-to-date values for the month, year, and font size. These are set in the following slots:
def setFontSize(self, size):

    fontSize = size
    insertCalendar()
The setFontSize() function simply changes the private fontSize variable before updating the calendar.
def setMonth(self, month):

    selectedDate = QDate(selectedDate.year(), month + 1, selectedDate.day())
    insertCalendar()
The setMonth slot is called when the QComboBox used to select the month is updated. The value supplied is the currently selected row in the combobox. We add 1 to this value to obtain a valid month number, and create a new QDate based on the existing one. The calendar is then updated to use this new date.
def setYear(self, date):

    selectedDate = QDate(date.year(), selectedDate.month(), selectedDate.day())
    insertCalendar()
The setYear() slot is called when the QDateTimeEdit used to select the year is updated. The value supplied is a QDate object; this makes the construction of a new value for selectedDate simple. We update the calendar afterwards to use this new date.
© 2022 The Qt Company Ltd. Documentation contributions included herein are the copyrights of their respective owners. The documentation provided herein is licensed under the terms of the GNU Free Documentation License version 1.3 as published by the Free Software Foundation. Qt and respective logos are trademarks of The Qt Company Ltd. in Finland and/or other countries worldwide. All other trademarks are property of their respective owners.