Order Form Example
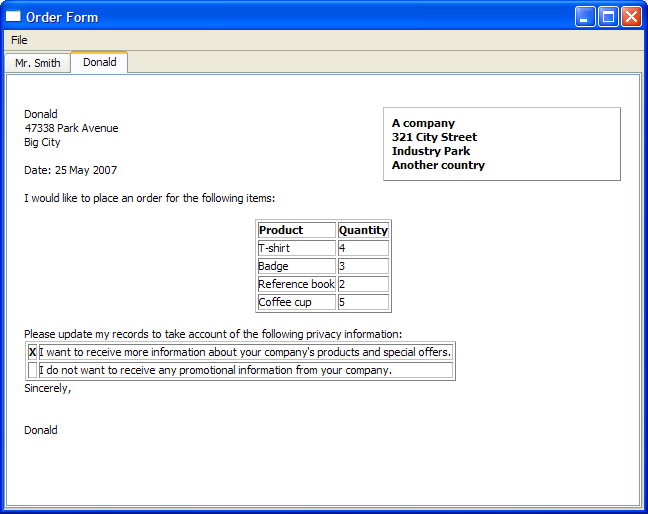
The Order Form example shows how to generate rich text documents by combining a simple template with data input by the user in a dialog.
The Order Form example shows how to generate rich text documents by combining a simple template with data input by the user in a dialog. Data is extracted from a DetailsDialog object and displayed on a QTextEdit with a QTextCursor , using various formats. Each form generated is added to a QTabWidget for easy access.
DetailsDialog Definition
The DetailsDialog class is a subclass of QDialog , implementing a slot verify() to allow contents of the DetailsDialog to be verified later. This is further explained in DetailsDialog Implementation.
class DetailsDialog(QDialog):

    Q_OBJECT
# public
    DetailsDialog(QString title, QWidget parent)
slots: = public()
    def verify():
# public
int> = QList<QPair<QString,()
    senderName = QString()
    senderAddress = QString()
    sendOffers = bool()
# private
    def setupItemsTable():
    nameLabel = QLabel()
    addressLabel = QLabel()
    offersCheckBox = QCheckBox()
    nameEdit = QLineEdit()
    items = QStringList()
    itemsTable = QTableWidget()
    addressEdit = QTextEdit()
    buttonBox = QDialogButtonBox()
The constructor of DetailsDialog accepts parameters title and parent. The class defines four getter functions: orderItems(), senderName(), senderAddress(), and sendOffers() to allow data to be accessed externally.
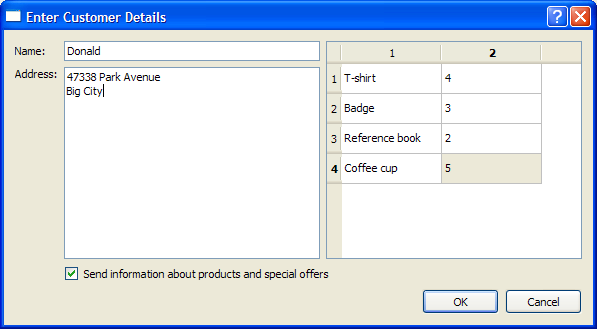
The class definition includes input widgets for the required fields, nameEdit and addressEdit. Also, a QCheckBox and a QDialogButtonBox are defined; the former to provide the user with the option to receive information on products and offers, and the latter to ensure that buttons used are arranged according to the user’s native platform. In addition, a QTableWidget , itemsTable, is used to hold order details.
The screenshot below shows the DetailsDialog we intend to create.
DetailsDialog Implementation
The constructor of DetailsDialog instantiates the earlier defined fields and their respective labels. The label for offersCheckBox is set and the setupItemsTable() function is invoked to setup and populate itemsTable. The QDialogButtonBox object, buttonBox, is instantiated with OK and Cancel buttons. This buttonBox's accepted() and rejected() signals are connected to the verify() and reject() slots in DetailsDialog.
def __init__(self, title, parent):
    QDialog.__init__(self, parent)

    nameLabel = QLabel(tr("Name:"))
    addressLabel = QLabel(tr("Address:"))
    addressLabel.setAlignment(Qt.AlignLeft | Qt.AlignTop)
    nameEdit = QLineEdit
    addressEdit = QTextEdit
    offersCheckBox = QCheckBox(tr("Send information about products and "
                                      "special offers"))
    setupItemsTable()
    buttonBox = QDialogButtonBox(QDialogButtonBox.Ok
                                     | QDialogButtonBox.Cancel)
    connect(buttonBox, QDialogButtonBox.accepted, self, DetailsDialog.verify)
    connect(buttonBox, QDialogButtonBox.rejected, self, DetailsDialog.reject)
A QGridLayout is used to place all the objects on the DetailsDialog.
mainLayout = QGridLayout()
mainLayout.addWidget(nameLabel, 0, 0)
mainLayout.addWidget(nameEdit, 0, 1)
mainLayout.addWidget(addressLabel, 1, 0)
mainLayout.addWidget(addressEdit, 1, 1)
mainLayout.addWidget(itemsTable, 0, 2, 2, 1)
mainLayout.addWidget(offersCheckBox, 2, 1, 1, 2)
mainLayout.addWidget(buttonBox, 3, 0, 1, 3)
setLayout(mainLayout)
setWindowTitle(title)
The setupItemsTable() function instantiates the QTableWidget object, itemsTable, and sets the number of rows based on the QStringList object, items, which holds the type of items ordered. The number of columns is set to 2, providing a “name” and “quantity” layout. A for loop is used to populate the itemsTable and the name item’s flag is set to ItemIsEnabled or ItemIsSelectable . For demonstration purposes, the quantity item is set to a 1 and all items in the itemsTable have this value for quantity; but this can be modified by editing the contents of the cells at run time.
def setupItemsTable(self):

    items << tr("T-shirt") << tr("Badge") << tr("Reference book")
          << tr("Coffee cup")
    itemsTable = QTableWidget(items.count(), 2)
    for row in range(0, items.count()):
        name = QTableWidgetItem(items[row])
        name.setFlags(Qt.ItemIsEnabled | Qt.ItemIsSelectable)
        itemsTable.setItem(row, 0, name)
        quantity = QTableWidgetItem("1")
        itemsTable.setItem(row, 1, quantity)
The orderItems() function extracts data from the itemsTable and returns it in the form of a QList <QPair< QString ,int>> where each QPair corresponds to an item and the quantity ordered.
QList<QPair<QString, int> > DetailsDialog::orderItems()

int> = QList<QPair<QString,()
    for row in range(0, items.count()):
int> = QPair<QString,()
        item.first = itemsTable.item(row, 0).text()
        quantity = itemsTable.item(row, 1).data(Qt.DisplayRole).toInt()
        item.second = qMax(0, quantity)
        orderList.append(item)

    return orderList
The senderName() function is used to return the value of the QLineEdit used to store the name field for the order form.
def senderName(self):

    return nameEdit.text()
The senderAddress() function is used to return the value of the QTextEdit containing the address for the order form.
def senderAddress(self):

    return addressEdit.toPlainText()
The sendOffers() function is used to return a true or false value that is used to determine if the customer in the order form wishes to receive more information on the company’s offers and promotions.
def sendOffers(self):

    return offersCheckBox.isChecked()
The verify() function is an additionally implemented slot used to verify the details entered by the user into the DetailsDialog. If the details entered are incomplete, a QMessageBox is displayed providing the user the option to discard the DetailsDialog. Otherwise, the details are accepted and the accept() function is invoked.
def verify(self):

    if (not nameEdit.text().isEmpty() and not addressEdit.toPlainText().isEmpty()) {
        accept()
        return

    QMessageBox.StandardButton answer
    answer = QMessageBox.warning(self, tr("Incomplete Form"),
        tr("The form does not contain all the necessary information.\n"
           "Do you want to discard it?"),
        QMessageBox.Yes | QMessageBox.No)
    if (answer == QMessageBox.Yes)
        reject()
MainWindow Definition
The MainWindow class is a subclass of QMainWindow , implementing two slots - openDialog() and printFile(). It also contains a private instance of QTabWidget , letters.
class MainWindow(QMainWindow):

    Q_OBJECT
# public
    MainWindow()
    def createSample():
slots: = public()
    def openDialog():
    def printFile():
# private
    def createLetter(name, address,):
> = QList()
                      sendOffers) = bool()
    printAction = QAction()
    letters = QTabWidget()
MainWindow Implementation
The MainWindow constructor sets up the fileMenu and the required actions, newAction and printAction. These actions’ triggered() signals are connected to the additionally implemented openDialog() slot and the default close() slot. The QTabWidget , letters, is instantiated and set as the window’s central widget.
def __init__(self):

    fileMenu = QMenu(tr("File"), self)
    newAction = fileMenu.addAction(tr("New..."))
    newAction.setShortcuts(QKeySequence.New)
    printAction = fileMenu.addAction(tr("Print..."), self, MainWindow::printFile)
    printAction.setShortcuts(QKeySequence.Print)
    printAction.setEnabled(False)
    quitAction = fileMenu.addAction(tr("Exit"))
    quitAction.setShortcuts(QKeySequence.Quit)
    menuBar().addMenu(fileMenu)
    letters = QTabWidget
    connect(newAction, QAction.triggered, self, MainWindow.openDialog)
    connect(quitAction, QAction.triggered, self, MainWindow.close)
    setCentralWidget(letters)
    setWindowTitle(tr("Order Form"))
The createLetter() function creates a new QTabWidget with a QTextEdit , editor, as the parent. This function accepts four parameters that correspond to we obtained through DetailsDialog, in order to “fill” the editor.
def createLetter(self, name, address,):
> = QList()
                              sendOffers) = bool()

    editor = QTextEdit()
    tabIndex = letters.addTab(editor, name)
    letters.setCurrentIndex(tabIndex)
We then obtain the cursor for the editor using textCursor() . The cursor is then moved to the start of the document using Start .
cursor = QTextCursor(editor.textCursor())
cursor.movePosition(QTextCursor.Start)
Recall the structure of a Rich Text Document , where sequences of frames and tables are always separated by text blocks, some of which may contain no information.
In the case of the Order Form Example, the document structure for this portion is described by the table below:
frame with referenceFrameFormat
This is accomplished with the following code:
topFrame = cursor.currentFrame()
topFrameFormat = topFrame.frameFormat()
topFrameFormat.setPadding(16)
topFrame.setFrameFormat(topFrameFormat)
textFormat = QTextCharFormat()
boldFormat = QTextCharFormat()
boldFormat.setFontWeight(QFont.Bold)
referenceFrameFormat = QTextFrameFormat()
referenceFrameFormat.setBorder(1)
referenceFrameFormat.setPadding(8)
referenceFrameFormat.setPosition(QTextFrameFormat.FloatRight)
referenceFrameFormat.setWidth(QTextLength(QTextLength.PercentageLength, 40))
cursor.insertFrame(referenceFrameFormat)
cursor.insertText("A company", boldFormat)
cursor.insertBlock()
cursor.insertText("321 City Street")
cursor.insertBlock()
cursor.insertText("Industry Park")
cursor.insertBlock()
cursor.insertText("Another country")
Note that topFrame is the editor's top-level frame and is not shown in the document structure.
We then set the cursor's position back to its last position in topFrame and fill in the customer’s name (provided by the constructor) and address - using a range-based for loop to traverse the QString , address.
cursor.setPosition(topFrame.lastPosition())
cursor.insertText(name, textFormat)
lines = address.split('\n')
for line in lines:
    cursor.insertBlock()
    cursor.insertText(line)
The cursor is now back in topFrame and the document structure for the above portion of code is:
block
Donaldblock
47338 Park Avenueblock
Big City
For spacing purposes, we invoke insertBlock() twice. The currentDate() is obtained and displayed. We use setWidth() to increase the width of bodyFrameFormat and we insert a new frame with that width.
cursor.insertBlock()
cursor.insertBlock()
date = QDate.currentDate()
cursor.insertText(tr("Date: %1").arg(date.toString("d MMMM yyyy")),
                  textFormat)
cursor.insertBlock()
bodyFrameFormat = QTextFrameFormat()
bodyFrameFormat.setWidth(QTextLength(QTextLength.PercentageLength, 100))
cursor.insertFrame(bodyFrameFormat)
The following code inserts standard text into the order form.
cursor.insertText(tr("I would like to place an order for the following "
                     "items:"), textFormat)
cursor.insertBlock()        cursor.insertBlock()
This part of the document structure now contains the date, a frame with bodyFrameFormat, as well as the standard text.
block
block
block
block
frame with bodyFrameFormat
A QTextTableFormat object, orderTableFormat, is used to hold the type of item and the quantity ordered.
orderTableFormat = QTextTableFormat()
orderTableFormat.setAlignment(Qt.AlignHCenter)
orderTable = cursor.insertTable(1, 2, orderTableFormat)
orderFrameFormat = cursor.currentFrame().frameFormat()
orderFrameFormat.setBorder(1)
cursor.currentFrame().setFrameFormat(orderFrameFormat)
We use cellAt() to set the headers for the orderTable.
cursor = orderTable.cellAt(0, 0).firstCursorPosition()
cursor.insertText(tr("Product"), boldFormat)
cursor = orderTable.cellAt(0, 1).firstCursorPosition()
cursor.insertText(tr("Quantity"), boldFormat)
Then, we iterate through the QList of QPair objects to populate orderTable.
for i in range(0, orderItems.count()):
    item = orderItems[i]
    row = orderTable.rows()
    orderTable.insertRows(row, 1)
    cursor = orderTable.cellAt(row, 0).firstCursorPosition()
    cursor.insertText(item.first, textFormat)
    cursor = orderTable.cellAt(row, 1).firstCursorPosition()
    cursor.insertText(QString("%1").arg(item.second), textFormat)
The resulting document structure for this section is:
orderTablewith orderTableFormat
The cursor is then moved back to topFrame's lastPosition() and more standard text is inserted.
cursor.setPosition(topFrame.lastPosition())
cursor.insertBlock()        cursor.insertText(tr("Please update my records to take account of the "
                     "following privacy information:"))
cursor.insertBlock()
Another QTextTable is inserted, to display the customer’s preference regarding offers.
    offersTable = cursor.insertTable(2, 2)
    cursor = offersTable.cellAt(0, 1).firstCursorPosition()
    cursor.insertText(tr("I want to receive more information about your "
                         "company's products and special offers."), textFormat)
    cursor = offersTable.cellAt(1, 1).firstCursorPosition()
    cursor.insertText(tr("I do not want to receive any promotional information "
                         "from your company."), textFormat)
    if (sendOffers)
        cursor = offersTable.cellAt(0, 0).firstCursorPosition()
else:
        cursor = offersTable.cellAt(1, 0).firstCursorPosition()
    cursor.insertText("X", boldFormat)
The document structure for this portion is:
block
block
block
The cursor is moved to insert “Sincerely” along with the customer’s name. More blocks are inserted for spacing purposes. The printAction is enabled to indicate that an order form can now be printed.
cursor.setPosition(topFrame.lastPosition())
cursor.insertBlock()
cursor.insertText(tr("Sincerely,"), textFormat)
cursor.insertBlock()
cursor.insertBlock()
cursor.insertBlock()
cursor.insertText(name)
printAction.setEnabled(True)
The bottom portion of the document structure is:
block
block
The createSample() function is used for illustration purposes, to create a sample order form.
def createSample(self):

    dialog = DetailsDialog("Dialog with default values", self)
    createLetter("Mr. Smith", "12 High Street\nSmall Town\nThis country",
                 dialog.orderItems(), True)
The openDialog() function opens a DetailsDialog object. If the details in dialog are accepted, the createLetter() function is invoked using the parameters extracted from dialog.
def openDialog(self):

    dialog = DetailsDialog(tr("Enter Customer Details"), self)
    if (dialog.exec() == QDialog.Accepted) {
        createLetter(dialog.senderName(), dialog.senderAddress(),
                     dialog.orderItems(), dialog.sendOffers())
In order to print out the order form, a printFile() function is included, as shown below:
def printFile(self):

#if defined(QT_PRINTSUPPORT_LIB) and QT_CONFIG(printdialog)
    editor = QTextEdit(letters.currentWidget())

    printer = QPrinter()
    dialog = QPrintDialog(printer, self)
    dialog.setWindowTitle(tr("Print Document"))
    if (editor.textCursor().hasSelection())
        dialog.setOption(QAbstractPrintDialog.PrintSelection)
    if (dialog.exec() != QDialog.Accepted) {
        return


    editor.print(printer)
#endif
This function also allows the user to print a selected area with hasSelection() , instead of printing the entire document.
`` main()``
Function
The main() function instantiates MainWindow and sets its size to 640x480 pixels before invoking the show() function and createSample() function.
if __name__ == "__main__":

    app = QApplication([])
    window = MainWindow()
    window.resize(640, 480)
    window.show()
    window.createSample()
    sys.exit(app.exec())
© 2022 The Qt Company Ltd. Documentation contributions included herein are the copyrights of their respective owners. The documentation provided herein is licensed under the terms of the GNU Free Documentation License version 1.3 as published by the Free Software Foundation. Qt and respective logos are trademarks of The Qt Company Ltd. in Finland and/or other countries worldwide. All other trademarks are property of their respective owners.


