
Develop a Parking App
Provides step-by-step instructions on how to develop a parking app for Neptune 3 UI.
Introduction
This tutorial shows you how to build a Parking App step-by-step with some static data to display the number of parking lots available in a particular area.
The tutorial is split into a few chapters:
- Design and implement the basic app
- Extend the app and integrate it with Qt Application Manager's intent and notification features
- Extend the app with a Middleware API and provide some simulation
Chapter1: Design and Implement the App
We start with our Main.qml file, where we import the modules that we need. Apart from Qt Quick, we require some mandatory imports:
application.windows- is necessary for the ApplicationCCWindowshared.Sizes- is an attached property that holds some size values for Neptune 3 UIshared.animations- is necessary for some animations in Neptune 3 UI
import application.windows 1.0
import shared.Sizes 1.0
import shared.Style 1.0
import shared.controls 1.0

ApplicationCCWindow {
    id: root

    property bool parkingStarted: false

    Item {
        x: root.exposedRect.x
        y: root.exposedRect.y
        width: root.exposedRect.width
        height: root.exposedRect.height
We use ApplicationCCWindow as the Parking app's root element, because the app is shown in the Center Console. On top of the ApplicationCCWindow, there's an Item that holds the content. When the app is launched, we use some dedicated APIs to a reserve a rectangular area in the Center Console.
The exposedRect property holds the area of the window that is exposed to the user. This is the area that is not occupied by other UI elements.
Once the application has reserved this area, let's start working on the UI.
Set up the UI
There are some properties that you can use from the existing ones attached, as well as Neptune 3 UI animations. Among them are:
| Property | Description |
|---|---|
| Sizes | Sizes.dp() is a function to retain the UI pixel density when Neptune 3 UI's windows are being resized. This function converts pixel values from the reference pixel density to the current density. Additionally, Sizes.dp() applies the current scale factor to the given pixel value, effectively converting it into device pixels (dp). Sometimes, this function can also round up the pixels to the nearest integer, to minimize aliasing artifacts.Note: Some font sizes, such as |
| Style | Style is an attached property that provides values related to the UI style, such as the currently selected theme, colors, and opacity levels. |
| Animations | There are a few default animations and smoothed animations that you can use when you need to apply this behavior to the UI. They hold predefined values to keep a uniform animation for any moving objects in Neptune 3 UI. |
Typically, Neptune 3 UI applications are divided into two parts: top content and bottom content. This is the same design philosophy we use for the Music App and Calendar App. Now, for the Parking App:
- the top content is for the parking ticket
- the bottom content is to display details
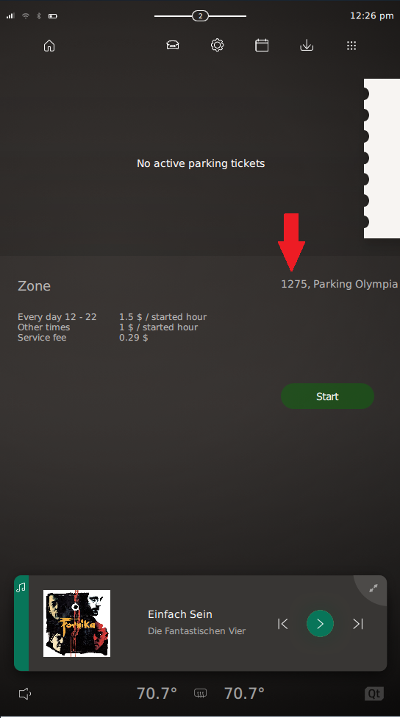
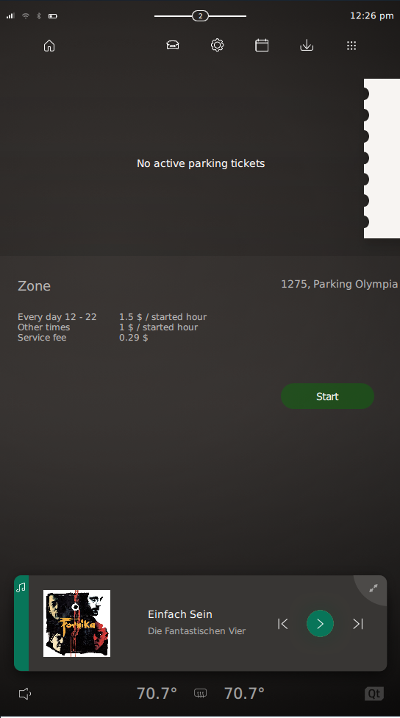
Fill in the Top Content
Since the top content has a background, we use Image as its root and set the background source. To return the correct image source, we use Style.image("app-fullscreen-top-bg", Style.theme). Style.image() is a function that requires an image file name and current selected theme. In Neptune 3 UI, we support two themes: dark (the default) and light. For each asset we use, we have to provide two files; one for each theme.
        Image {
            id: topContent
            width: parent.width
            height: Sizes.dp(500)
            source: Style.image("app-fullscreen-top-bg", Style.theme)

            Label {
                text: qsTr("No active parking tickets")
                anchors.centerIn: parent
                font.weight: Font.Light
                opacity: !root.parkingStarted ? 1.0 : 0.0
                Behavior on opacity { DefaultNumberAnimation {} }
            }

            Image {
                width: root.width * 0.8
                height: topContent.height
                source: "assets/ticket_bg.png"
                anchors.top: parent.top
                anchors.right: parent.right

                anchors.rightMargin: root.parkingStarted ? 0 : - width * 0.85
                Behavior on anchors.rightMargin { DefaultNumberAnimation {} }

                Column {
                    anchors.left: parent.left
                    anchors.leftMargin: Sizes.dp(130)
                    anchors.verticalCenter: parent.verticalCenter
                    spacing: Sizes.dp(80)
                    opacity: root.parkingStarted ? 1.0 : 0.0
                    Behavior on opacity { DefaultNumberAnimation {} }

                    Label {
                        text: qsTr("Zone \nParking Olympia")
                        font.weight: Font.Light
                        color: "black"
                    }

                    Label {
                        text: "1275"
                        opacity: Style.opacityLow
                        font.weight: Font.Bold
                        font.pixelSize: Sizes.fontSizeXXL
                        color: "black"
                    }
                }

                Rectangle {
                    id: ticketContent
                    property date currentTime: new Date()

                    width: parent.width / 2
                    height: Sizes.dp(425)
                    anchors.right: parent.right
                    anchors.verticalCenter: parent.verticalCenter
                    anchors.verticalCenterOffset: Sizes.dp(-12)
                    color: Style.accentColor
                    opacity: root.parkingStarted ? 1.0 : 0.0
                    Behavior on opacity { DefaultNumberAnimation {} }

                    onOpacityChanged: {
                        if (opacity === 1.0) {
                            ticketContent.currentTime = new Date()
                        }
                    }

                    Column {
                        anchors.left: parent.left
                        anchors.leftMargin: Sizes.dp(60)
                        anchors.top: parent.top
                        anchors.topMargin: Sizes.dp(80)
                        spacing: Sizes.dp(45)

                        Label {

                            text: "Started: \ntoday " + Qt.formatDateTime(ticketContent.currentTime, "hh:mm")
                            font.weight: Font.Light
                            opacity: Style.opacityHigh
                            color: "black"
                        }

                        Label {
                            text: qsTr("2h, 14 minutes")
                            font.weight: Font.Light
                            opacity: Style.opacityHigh
                            color: "black"
                        }

                        Label {
                            text: "2.29 $"
                            font.weight: Font.Light
                            opacity: Style.opacityHigh
                            color: "black"
                        }
                    }
                }
            }
        }
Then, we add some details to indicate when there's no active parking ticket purchased. If there's an active ticket available, we display that ticket asset. Based on Neptune 3 UI's design, we need to animate the ticket, when it becomes active, by moving it from right to left. This is achieved via the following lines:
anchors.rightMargin: root.parkingStarted ? 0 : - width * 0.85
Behavior on anchors.rightMargin { DefaultNumberAnimation {} }
We use the DefaultNumberAnimation{}, which is a predefined animation to support our requirement. The parkingStarted property is enabled when the parking ticket is active. This property applies the ticket margins to the ticket and its behavior, that we also define in that component.
Fill in the Bottom Content
The bottom content displays details on the parking ticket, such as parking zone, price, location, as well as the start button to start the parking ticket. We use Row and Column component to place all the required labels.
        Item {
            width: parent.width
            height: parent.height - topContent.height
            anchors.top: topContent.bottom

            Row {
                anchors.top: parent.top
                anchors.topMargin: Sizes.dp(60)
                anchors.left: parent.left
                anchors.leftMargin: Sizes.dp(50)
                spacing: Sizes.dp(200)

                Column {
                    spacing: Sizes.dp(50)

                    Label {
                        text: qsTr("Zone")
                        font.weight: Font.Light
                        opacity: Style.opacityMedium
                        font.pixelSize: Sizes.fontSizeL
                    }

                    Row {
                        spacing: Sizes.dp(60)

                        Column {
                            Label {
                                text: qsTr("Every day 12 - 22")
                                font.weight: Font.Light
                                font.pixelSize: Sizes.fontSizeS
                                opacity: Style.opacityMedium
                            }

                            Label {
                                text: qsTr("Other times")
                                font.weight: Font.Light
                                font.pixelSize: Sizes.fontSizeS
                                opacity: Style.opacityMedium
                            }

                            Label {
                                text: qsTr("Service fee")
                                font.weight: Font.Light
                                font.pixelSize: Sizes.fontSizeS
                                opacity: Style.opacityMedium
                            }
                        }

                        Column {
                            Label {
                                text: qsTr("1.5 $ / started hour")
                                font.weight: Font.Light
                                font.pixelSize: Sizes.fontSizeS
                                opacity: Style.opacityMedium
                            }

                            Label {
                                text: qsTr("1 $ / started hour")
                                font.weight: Font.Light
                                font.pixelSize: Sizes.fontSizeS
                                opacity: Style.opacityMedium
                            }

                            Label {
                                text: "0.29 $"
                                font.weight: Font.Light
                                font.pixelSize: Sizes.fontSizeS
                                opacity: Style.opacityMedium
                            }
                        }
                    }
                }

                Column {
                    spacing: Sizes.dp(250)

                    Label {
                        anchors.right: parent.right
                        text: qsTr("1275, Parking Olympia")
                        font.weight: Font.Light
                        opacity: Style.opacityMedium
                    }

                    Button {
                        id: startButton
                        implicitWidth: Sizes.dp(250)
                        implicitHeight: Sizes.dp(70)
                        font.pixelSize: Sizes.fontSizeM
                        checkable: true
                        checked: root.parkingStarted
                        text: !root.parkingStarted ? qsTr("Start") : qsTr("End (2.29 $)")

                        background: Rectangle {
                            color: {
                                if (startButton.checked) {
                                    return "red";
                                } else {
                                    return "green";
                                }
                            }
                            opacity: {
                                if (startButton.pressed) {
                                    return 0.1;
                                } else if (startButton.checked) {
                                    return 0.3;
                                } else {
                                    return 0.3;
                                }
                            }
                            Behavior on opacity { DefaultNumberAnimation {} }
                            Behavior on color { ColorAnimation { duration: 200 } }

                            radius: width / 2
                        }

                        onClicked: root.parkingStarted = !root.parkingStarted
                    }
                }
            }
        }
In the code snippet above, the start button is an interesting part. Since Neptune 3 UI mostly uses QtQuickControls 2, we can predefine a default style for all of the buttons. However, in this Parking App, we customize our button and use a background that has different colors and behavior.
Note: To view the types of buttons available, run Neptune 3 UI and start the Sheets App.
Add a Manifest File
When we're ready to run the app, we need to add an info.yaml manifest file that contains the lines below:
formatVersion: 1
formatType: am-application
---
id:      'chapter1-basics'
icon:    'icon.png'
code:    'Main.qml'
runtime: 'qml'
name:
  en: 'Parking'
We need to specify an icon for the Parking App, to display in the App Launcher, together with the other apps, once it's installed in the System UI. For more information on info.yaml, see Neptune 3 UI - App Development and Manifest Definition.
Add a Project File
Next, we also need to create a project file, .pro, that speciifies the Parking App project as follows:
TEMPLATE = aux

FILES += info.yaml \
         icon.png \
         Main.qml

assets.files += assets/*
assets.path = $$[QT_INSTALL_EXAMPLES]/neptune3-ui/chapter1-basics/assets

app.files = $$FILES
app.path = $$[QT_INSTALL_EXAMPLES]/neptune3-ui/chapter1-basics

INSTALLS += app assets

AM_MANIFEST = info.yaml
AM_PACKAGE_DIR = $$app.path

load(am-app)
If you use Qt Creator and have the Qt Creator Plugin for Qt Application Manager installed, you can deploy and run your app directly in Neptune 3 UI's System UI. To do that, follow these steps:
- Open your
.profile in Qt Creator. - In the Projects view, under Build & Run, select Run. Verify that your configuration values match the values shown below:
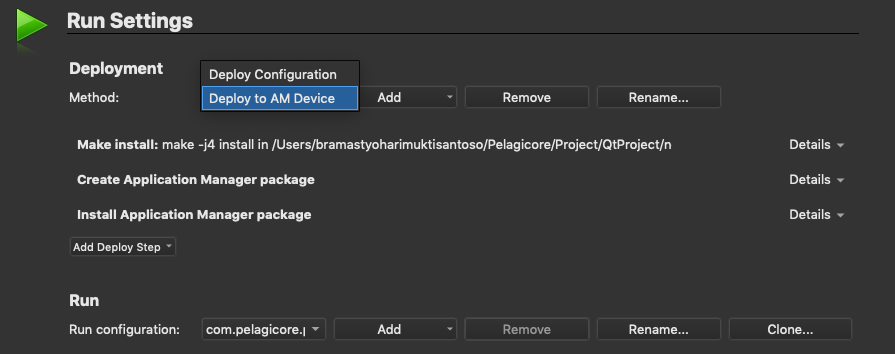
When the project is prepared, press Ctrl+R to run the Parking App in Neptune 3 UI.
Note: Before you can deploy and run the Parking App, make sure that Neptune 3 UI is running.
Chapter 2: Extend the Parking App and Integrate with Intent and Notification
In this chapter, we learn how to extend our Parking App and integrate it with Intent and Notification. Currently, this app shows static data only, and lets you start and stop the parking session with minimal animation.
Integrate Intent from Qt Application Manager
Qt Application Manager makes it possible for an app to talk to another app or to the System UI by sending a signal and then expecting a return value (information) in response.
Suppose we need to be able to make a call to a fictitious Neptune Support Team that manages the Parking Ticket Service. We can add button to make such a call. Remember that in Neptune 3 UI, there is a built-in Phone App. We can send a command to the Phone App and make this call.
Let's start by adding a new Call button:
            Button {
                implicitWidth: Sizes.dp(250)
                implicitHeight: Sizes.dp(70)

                anchors.left: parent.left
                anchors.leftMargin: Sizes.dp(100)
                anchors.top: parent.top
                anchors.topMargin: Sizes.dp(340)

                font.pixelSize: Sizes.fontSizeM
                text: qsTr("Call for support")

                onClicked: sendIntent();

                function sendIntent() {
                    var appId = "com.pelagicore.phone";
                    var request = IntentClient.sendIntentRequest("call-support", appId, {});
                    request.onReplyReceived.connect(function() {
                        if (request.succeeded) {
                            var result = request.result
                            console.log(Logging.apps, "Intent result: " + result.done)
                        } else {
                            console.log(Logging.apps, "Intent request failed: " + request.errorMessage)
                        }
                    });
                }
            }
When this button is clicked, it sends a call-support request to the Phone App and calls the Neptune Support Team. Since we expect to get a reply message, Phone App sends a reply indicating whether the command was received successfully.
For the Phone App to receive the intent request, it needs to have an intent handler available.
Additionally, this "call-support" intent must be registered in the info.yaml file.
formatVersion: 1
formatType: am-package
---
id:      'com.pelagicore.phone'
icon:    'icon.png'
name:
  en: 'Phone'
  de: 'Telefon'
  cs: 'Telefon'
  ru: 'Телефон'
  zh: '电话'
  ja: '電話'
  ko: '전화'

applications:
- id:      'com.pelagicore.phone'
  code:    'Main.qml'
  runtime: 'qml'
  applicationProperties: { private: { squishPort: 7728 } }

intents:
- id: call-support
- id: activate-app

categories: [ 'phone', 'widget' ]
As shown in the above info.yaml file of phone app, the "call-support" is registered. Then you need to add the Intent Handler in its Store.
    readonly property IntentHandler intentHandler: IntentHandler {
        intentIds: ["call-support", "activate-app"]
        onRequestReceived: {
            switch (request.intentId) {
            case "call-support":
                root.startCall("neptunesupport");
                request.sendReply({ "done": true });
                break;
            case "activate-app":
                root.requestRaiseAppReceived()
                request.sendReply({ "done": true })
                break;
            }
        }
    }
The code above runs the startCall() function and calls the Neptune Support Team when it receives the intent from our Parking App. This function also sends a reply indicating whether the requested action is done. Also, make sure you import QtApplicationManager.Application 2.0 to use the IntentHandler.
Create a Notification
Qt Application Manager lets apps create notifications to be sent and shown in the System UI. Usually, System UI has a notification center that stores all notifications that are created. In Neptune 3 UI, there are two kinds of notifications: sticky and non-sticky. When a notification is created, it's shown for a few seconds on top of the UI. If that notification is sticky, it's stored in the notification center afterwards. The user can then decide to keep these notifications or remove each of them.
To create a notification, first, you need to import QtApplicationManager 2.0. Then, you can create a Notification object as part of the Parking App. Suppose you want to inform the user that the parking duration ends in 5 minutes. You can create the Notification object with some information, as follows:
        Notification {
            id: parkingNotification
            summary: qsTr("Your parking period is about to end")
            body: qsTr("Your parking period will be ended in 5 minutes.
                         Please extend your parking ticket or move your car.")
            sticky: true
        }
Once this notification object is created, you need to add a condition for when the parking duration expires after 5 minutes. Since we only have static data for now, you can create a Timer to simulate this behavior.
        Timer {
            interval: 10000; running: root.parkingStarted;
            onTriggered: {
                   root.parkingStarted = false;
                   parkingNotification.show();
            }
        }
When the user presses the Start button, this timer simulates the parking ticket duration. After 10 seconds, the timer is triggered and the notification is shown. It will also reset the parkingStarted property.
Chapter 3: Extend the Parking App with Middleware API and Simulation
In the previous chapters we've already gone through the UI and the components that are necessary to integrate well with Neptune 3 UI.
In this chapter, we learn how to extend the Parking App with a Middleware API and provide a simulation which shows the number of parking lots currently available.
While this chapter does introduce the Middleware integration, how it works, and what needs to be done to package it correctly, a full deep dive is out of scope. For more in-depth details on how to develop Middleware APIs, refer to the Qt IVI Generator Tutorial.
Note: This application requires a multi-process environment.
Define the Middleware API
To define our Middleware API, we use the IVI Generator from the QtIvi module. This generator uses an Interface Definition Language (IDL) to generate code, significantly reducing the amount of code we need to write.
QFace
QtIvi uses the QFace IDL to describe what needs to be generated. For this example, we define a simple interface, ParkingInfo, that provides a readonly property called freeLots, inside a Parking module.
@config_simulator: { simulationFile: "qrc:/simulation.qml" }
module Example.Parking 1.0;

interface ParkingInfo {
    @config_simulator: { default: 42 }
    readonly int freeLots
}
Autogeneration
Now that the first version of our IDL file is ready, it's time to autogenerate API from it with the IVI Generator tool. Similar to moc, this autogeneration process is integrated into the qmake Build System and is done at compile time.
In the following .pro file, we build a C++ library based on our IDL file:
TARGET = $$qtLibraryTarget(Parking)
TEMPLATE = lib
DESTDIR = ..

QT += ivicore ivicore-private qml quick
CONFIG += unversioned_libname unversioned_soname

DEFINES += QT_BUILD_EXAMPLE_PARKING_LIB
CONFIG += ivigenerator
QFACE_SOURCES = ../parking.qface

macos: QMAKE_SONAME_PREFIX = @rpath

target.path = $$[QT_INSTALL_EXAMPLES]/neptune3-ui/chapter3-middleware/
INSTALLS += target
By adding ivigenerator to the CONFIG variable, qmake's IVI Generator integration is loaded and it expects a QFace IDL file in the \C QFACE_SOURCES variable. The set DEFINE makes sure that the library exports its symbols, which is necessary for Windows systems.
Which Files are Autogenerated
The IVI Generator works based on generation templates -- these define what content should be generated from a QFace file. If no QFACE_FORMAT is defined, then the default template, frontend is used. For more details on these templates, see Use the Generator.
This frontend template generates:
- a C++ class derived from QIviAbstractFeature for every interface in the QFace file
- one module class that helps to register all interfaces to QML and stores global types and functions
These files are available in your library's build folder, should you wish to inspect the C++ code.
QML Plugin
In addition to the library that contains our Middleware API, we also need a QML plugin to be able to use the API from within QML.
The IVI Generator can help us generate such a plugin with a different generation template. The following .pro file generates a QML plugin that exports the API to QML:
TEMPLATE = lib
CONFIG += plugin
QT += ivicore

LIBS += -L$$OUT_PWD/../ -l$$qtLibraryTarget(Parking)
INCLUDEPATH += $$OUT_PWD/../frontend
QMAKE_RPATHDIR += $$QMAKE_REL_RPATH_BASE/../../../

QFACE_FORMAT = qmlplugin
QFACE_SOURCES = ../parking.qface

load(ivigenerator)

DESTDIR = $$OUT_PWD/$$replace(URI, \\., /)

exists($$OUT_PWD/qmldir) {
    cpqmldir.files = $$OUT_PWD/qmldir \
                     $$OUT_PWD/plugins.qmltypes
    cpqmldir.path = $$DESTDIR
    cpqmldir.CONFIG = no_check_exist
    COPIES += cpqmldir

    installPath = $$[QT_INSTALL_EXAMPLES]/neptune3-ui/chapter3-middleware/imports/$$replace(URI, \\., /)
    qmldir.files = $$OUT_PWD/qmldir \
                   $$OUT_PWD/plugins.qmltypes
    qmldir.path = $$installPath
    target.path = $$installPath
    INSTALLS += target qmldir
}
We use CONFIG to build a plugin, then define the settings for the linker to link against our frontend library. Next, we use QFACE_FORMAT to choose qmlplugin as the generation template. Instead of adding ivigenerator to the CONFIG, this time we use qmake's load() function to explicitly load the feature. This way, we can use the URI variable, that's part of the qmlplugin generation template. This variable can define a DESTDIR by repliacing all dots with slashes.
In addition to the folder structure, the QmlEngine also needs a qmldir file which indicates what files are part of the plugin, and under which URI. For more information, see Module Definition qmldir Files.
Both -- the qmldir file and the plugins.qmltypes file -- are autogenerated by the IVI Generator and provide information about code-completion; but they need to be placed next to the library. To do so, we add these files to a scope similar to an INSTALL target, but add it to the COPIES variable instead. This makes sure that the files are copied when the plugin is built.
QML Integration
After we've generated our Middleware API and the accompanying QML plugin, it's time to integrate our new API into the Parking App.
For the QML plugin, the module name in our IDL file is used as the import URI; the default import version is 1.0. The import statement for our main.qml file looks like this:
import Example.Parking 1.0
The QML API, by default, uses the same name as the interface in our IDL file. For more information on how to use a custom name or import URI, see Use the Generator.
Our interface can now be instantiated and we set an ID, like with any other QML element:
        ParkingInfo {
            id: parkingInfo
        }
To show the parking lots currently available, we need to create a QML binding using the freeLots property in our newly added ParkingInfo QML element:
text: parkingInfo.freeLots + qsTr(", Parking Olympia")
Necessary Adaptations for Packaging
With a normal Qt QML application, these steps would be enough to start the application now and see that the number of free lots is 0, because it's initialized to the default value. But, because we're developing an app for Neptune 3 UI and intend to package it and install it while Neptune 3 UI is running, some additional steps are necessary.
Don't Create Library Symbolic Links
Usually when we build a library, two symbolic links are created to allow for version upgrades without the need to recompile other applications. But in an ApplicationManager package, symbolic links aren't allowed for security reasons. Consequently, the following qmake CONFIG needs to be set to not create those symbolic links; and not sure them when linking to the library:
CONFIG += unversioned_libname unversioned_soname
Define Import Paths and Related Settings in the Manifest File
For our QML plugin to work correctly, we need to set one additional import path to the qmlengine. Usually, this is done using the QML2_IMPORT_PATH environment variable, passing it to the qmlscene or using the QQmlEngine::addImportPath() in your main.cpp. But, because the ApplicationManager starts the app after the installation, and we don't package our own main.cpp file, we need to define those settings in the package manifest, info.yaml. For the import path, we add the following line:
runtimeParameters:
    importPaths: [ 'imports' ]
With those settings in place, the app can be deployed. It should show 0 free parking lots:
Define a Simulation Behavior
To simulate some values for our Middleware API, first we need to understand QtIvi's architecture a little bit better. As we learned when generating the library, the IVI Generator used a template called frontend. To define some simulation values or to connect to a real API, we also need corresponding backend. This backend is provided in the form of a plugin, and QtIvi takes care to load and connect the frontend to the backend. For more information on this concept, see Dynamic Backend Architecture.
Backend Plugin with Static Values
The next step is to generate such a backend using the IVI Generator and use Annotations to define what the simulation should do.
Let's start with the .pro to generate and build our backend:
TEMPLATE = lib
TARGET = $$qtLibraryTarget(parking_simulation)
DESTDIR = ../qtivi

QT += core ivicore
CONFIG += ivigenerator plugin

LIBS += -L$$OUT_PWD/../ -l$$qtLibraryTarget(Parking)
INCLUDEPATH += $$OUT_PWD/../frontend
QMAKE_RPATHDIR += $$QMAKE_REL_RPATH_BASE/../

QFACE_FORMAT = backend_simulator
QFACE_SOURCES = ../parking.qface
PLUGIN_TYPE = qtivi

# Additional import path used to resolve QML modules in Qt Creator's code model
QML_IMPORT_PATH = $$OUT_PWD/../frontend/qml

target.path = $$[QT_INSTALL_EXAMPLES]/neptune3-ui/chapter3-middleware/qtivi
INSTALLS += target

RESOURCES += \
    simulation.qrc
To build a plugin, we need to add plugin to the CONFIG variable as well as change the QFACE_FORMAT to use the backend_simulator generation template. Similar to the QML plugin, the backend also needs to link to our frontend library, since it uses the types defined there.
TO ensure that QtIvi can find the backend, it needs to be placed in a qtivi folder. In turn, this folder needs to be part of the Qt plugin search path.
Just like with the import path, the additional plugin path needs to be setup in the package manifest:
runtimeParameters:
    pluginPaths: [ '.' ]
Now, we have created a simulation backend, but without additional information, the IVI Generator can't create something really useful.
First, we define a static default value which the simulation backend should provide. The easiest way to is to use an annotation in our QFace IDL file. An annotation is a special type of comment which gives the generation template additional information on what should be generated. To define a default value we change the IDL file like this:
module Example.Parking 1.0;

interface ParkingInfo {
    @config_simulator: { default: 42 }
    readonly int freeLots
}
Because of the change to the IDL file, the IVI Generator now recreates the backend plugin. Now, when we run the updated application, we should see 42 free parking lots.
Simulation QML
While it's useful to have the annotation define a default value and provide a static simulation, having a generated simulation backend can do more. It would also allow you to define a simulation behavior that's more dynamic.
To achieve this, we add another annotation to our QFace IDL file and define a simulationFile. This file contains our simulation behavior and QIviSimulationEngine loads it. Similar to other QML files, the best way to serve this file is to embed it inside a Qt resource.
Our simulation.qml looks like this:
import QtQuick 2.10
import Example.Parking.simulation 1.0

QtObject {
    property var settings : IviSimulator.findData(IviSimulator.simulationData, "ParkingInfo")
    property bool defaultInitialized: false
    property LoggingCategory qLcParkingInfo: LoggingCategory {
        name: "example.parking.simulation.parkinginfobackend"
    }
    property var backend : ParkingInfoBackend {

        function initialize() {
            console.log(qLcParkingInfo, "INITIALIZE")
            if (!defaultInitialized) {
                IviSimulator.initializeDefault(settings, backend)
                defaultInitialized = true
            }
            Base.initialize()
        }

        property var timer: Timer {
            interval: 5000
            running: true
            repeat: true
            onTriggered: {
                var min = Math.ceil(-5)
                var max = Math.floor(5)
                var delta = Math.floor(Math.random() * (max - min +1)) + min;

                var newValue = Math.max(0, backend.freeLots + delta);

                backend.freeLots = newValue;
            }
        }
    }
}
First, there's a settings property, that's initialized with the return value from the IviSimulator.findData method, which takes the IviSimulator.simulationData and a string as input. The simulationData is the JSON file represented as a JavaScript object.
The findData method helps us to extract only data that is of interest for this interface, InstrumentCluster. The properties that follow help the interface to know whether the default values are set. The LoggingCategory is used to identify the log output from this simulation file.
Afterwards, the actual behavior is defined by instantiating an InstrumentClusterBackend Item and extending it with more functions. The InstrumentClusterBackend is the interface towards our InstrumentCluster QML frontend class. But, apart from the frontend, these properties are also writable to make it possible to change them to provide a useful simulation.
Each time a frontend instance connects to a backend, the initialize() function is called. The same applies to the QML simulation: as the initialize() C++ function forwards this to the QML insitance. This behavior also applies to all other functions, like getters and setters. For more details, see QIviSimulationEngine.
Inside the QML initialize() function, we call IviSimulator.initializeDefault(), to read the default values from the simulationData object and iniitialize all properties. This is done only once, as we don't want the properties to be reset to default when the next frontend instance connects to the backend. Lastly, the base implementation is called to make sure that the initializeationDone signal is sent to the frontend.
Next, we define the actual simulation behavior by creating a Timer element that triggers every 5 seconds. In the binding to the trigger signal, we use the Math.random() function to get a random value between -5 and 5 and add this to the parking lots available, using the freeLots property in our backend. The change in this value gets automatically populated to the frontend and simulates a real car park.
Files:
- neptune3ui/parking-app-tutorial/chapter1-basics/Main.qml
- neptune3ui/parking-app-tutorial/chapter1-basics/chapter1-basics.pro
- neptune3ui/parking-app-tutorial/chapter1-basics/info.yaml
- neptune3ui/parking-app-tutorial/chapter2-extend/Main.qml
- neptune3ui/parking-app-tutorial/chapter2-extend/chapter2-extend.pro
- neptune3ui/parking-app-tutorial/chapter2-extend/info.yaml
- neptune3ui/parking-app-tutorial/chapter3-middleware/app/Main.qml
- neptune3ui/parking-app-tutorial/chapter3-middleware/app/app.pro
- neptune3ui/parking-app-tutorial/chapter3-middleware/app/info.yaml
- neptune3ui/parking-app-tutorial/chapter3-middleware/backend_simulator/backend_simulator.pro
- neptune3ui/parking-app-tutorial/chapter3-middleware/backend_simulator/simulation.qml
- neptune3ui/parking-app-tutorial/chapter3-middleware/backend_simulator/simulation.qrc
- neptune3ui/parking-app-tutorial/chapter3-middleware/chapter3-middleware.pro
- neptune3ui/parking-app-tutorial/chapter3-middleware/frontend/frontend.pro
- neptune3ui/parking-app-tutorial/chapter3-middleware/imports/imports.pro
- neptune3ui/parking-app-tutorial/parking-app-tutorial.pro
Images:
- neptune3ui/parking-app-tutorial/chapter1-basics/assets/ticket_bg.png
- neptune3ui/parking-app-tutorial/chapter1-basics/icon.png
- neptune3ui/parking-app-tutorial/chapter2-extend/assets/ticket_bg.png
- neptune3ui/parking-app-tutorial/chapter2-extend/icon.png
- neptune3ui/parking-app-tutorial/chapter3-middleware/app/assets/ticket_bg.png
- neptune3ui/parking-app-tutorial/chapter3-middleware/app/icon.png
© 2019 Luxoft Sweden AB.
Documentation contributions included herein are the copyrights of
their respective owners.
The documentation provided herein is licensed under the terms of the GNU Free Documentation License version 1.3 as published by the Free Software Foundation.
Qt and respective logos are trademarks of The Qt Company Ltd. in Finland and/or other countries worldwide. All other trademarks are property
of their respective owners.