Qt Interface Framework Generator Tutorial
Demonstrates step-by-step how to generate a Middleware API based on a QML application.
This tutorial demonstrates how you can extend a QML application with your own auto-generated Middleware API. We use an existing QML Instrument Cluster application and proceed through the following steps:
- Integrate a basic interface without a back end
- Extend the interface and add annotations
- Add a simulation back end and corresponding simulation annotations; with a QML plugin
- Add a custom simulation behavior
- Add a simulation server and use it from a Qt Remote Objects back end
- Develop a production back end that connects to a DBus interface
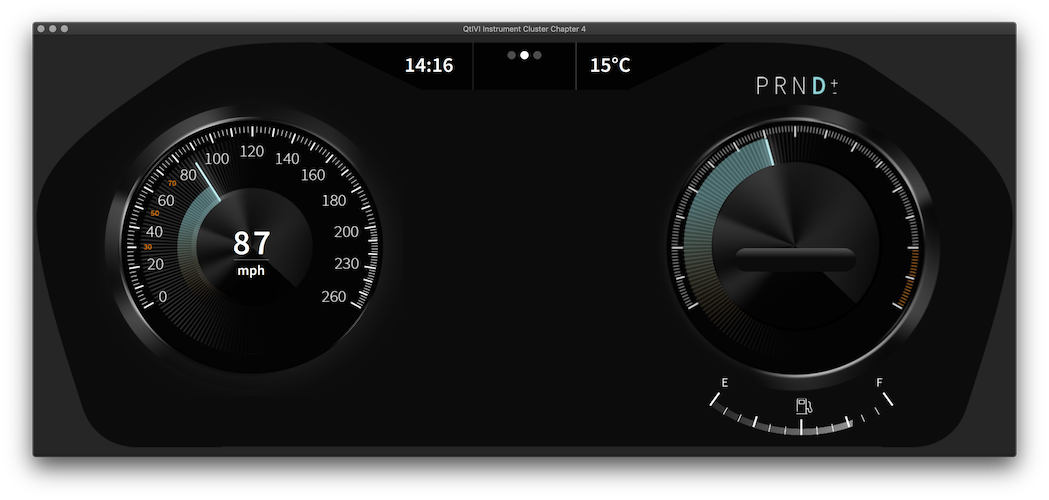
Before we start the actual middleware integration, let's take a look at the existing Instrument Cluster QML code and all the features it supports:
images– This folder contains all images used in the QML code.Cluster.qml– The main QML file that assembles all other QML components together.Dial.qml– The base component to show values like speed or Revolutions per Minute (RPM), using a needle.Fuel.qml– The component to show the actual fuel level.Label.qml– A small helper component which sets all common settings used to display text.LeftDial.qml– Shows the current speed using the Dial component and as text, as well as the current metric in miles per hour (mph) or kilometers per hour (km/h).RightDial.qml– Shows the current RPM and offers a way to show warning indicators.Top.qml– The top bar that shows the current date and the current temperature.
Next, we use our Middleware API to add support for the following features:
- Show the current speed in the left dial.
- Show the current RPM in the right dial.
- Change between different metrics.
- Show the current temperature in the top bar.
- Show different warnings on the right dial.
- Indicate whether the instrument cluster is connected and show real data.
The ultimate goal is to connect all of these features together to simulate a real-time driving experience like this:
Chapter 1: Basic Middleware API with the Interface Framework Generator
In this chapter we integrate a Middleware API into the existing Instrument Cluster QML code. Instead of manually writing all of these parts ourselves, which is done in most basic QML examples, we'll use the Interface Framework Generator to auto-generate the required parts.
Interface Definition Language
To be able to auto-generate the Middleware API, the Interface Framework Generator needs some input on what to generate. This input is given in form of an Interface Definition Language (IDL), QFace, which describes the API in a very simple way.
Let's start to define a very simple interface which provides us with a speed property:
ch1-basics/instrument-cluster.qface:
module Example.If.InstrumentClusterModule 1.0

interface InstrumentCluster {
    int speed;
}
First, we need to define which module we want to describe. The module acts as a namespace, because the IDL file can contain multiple interfaces.
ch1-basics/instrument-cluster.qface:
module Example.If.InstrumentClusterModule 1.0
The most important part of the module is its interface definition.
ch1-basics/instrument-cluster.qface:
interface InstrumentCluster {
    int speed;
}
In this case, we define an interface named InstrumentCluster that consists of one property. Each property definition must contain at least a type and a name. Most of the basic types are built-in and can be found in the QFace IDL Syntax.
Auto-generation
Now that our first version of the IDL file is ready, it's time to auto-generate an API from it, using the Interface Framework Generator tool. Using qmake this auto-generation process is integrated into the build system and is done at compile time. similar to moc. With CMake, the generation happens at configuration time.
In the following snippets we build a C++ library based on our IDL file:
CMake:
ch1-basics/frontend/CMakeLists.txt:
qt_add_library(libIc_ch1)
set_target_properties(libIc_ch1 PROPERTIES OUTPUT_NAME "InstrumentCluster")
set_target_properties(libIc_ch1 PROPERTIES RUNTIME_OUTPUT_DIRECTORY ../)

# Interface Framework Generator:
qt_ifcodegen_extend_target(libIc_ch1
    IDL_FILES ../instrument-cluster.qface
    TEMPLATE frontend
)

set(import_path "${CMAKE_CURRENT_BINARY_DIR}/frontend/qml")
if (NOT ${import_path} IN_LIST QML_IMPORT_PATH)
    list (APPEND QML_IMPORT_PATH "${import_path}")
    set(QML_IMPORT_PATH ${QML_IMPORT_PATH} CACHE INTERNAL "" FORCE)
endif()
A new library is defined with qt_add_library and, using CMake target_properties, the output name, as well as the output directory are set. As we need to link to this library in the future, it is easier to put the file into the upper directory.
By calling the qt_ifcodegen_extend_target function, the autogenerator is called and the previously defined library is extended with the generated files. The input file is specified using the IDL_FILES argument. See Build System Integration for more information.
qmake:
ch1-basics/frontend/frontend.pro:
TARGET = $$qtLibraryTarget(QtIfInstrumentCluster)
TEMPLATE = lib
DESTDIR = ..

QT += interfaceframework qml quick

CONFIG += ifcodegen
IFCODEGEN_SOURCES = ../instrument-cluster.qface
Most of the .pro file is a standard setup to define a C++ library, using "lib" TEMPLATE and defining the required file name in the TARGET variable. The qtLibraryTarget function that we use helps to append the "d" postfix on the filename correctly, for a library that provides debugging information. In the future, we need to link this file, so we set the DESTDIR to the upper directory to simplify this.
Note: Windows searches for libraries in the same directory automatically.
Activating the Interface Framework Generator integration requires the CONFIG variable to specify the ifcodegen option. This makes sure the Interface Framework Generator is called during the build process, using the QFace file that we specify in IFCODEGEN_SOURCES. For more information, see Build System Integration.
Which Files are Auto-generated
The Interface Framework Generator works based on generation templates. These templates define what content should be generated from a QFace file. Using qmake, the template needs to be defined by the IFCODEGEN_TEMPLATE variable. If it is not defined, it defaults to the "frontend" template. In CMake the template needs to be specified using the TEMPLATE argument of qt_ifcodegen_extend_target and friends. For more details on these templates, see Use the Generator.
In short, the "frontend" template generates:
- a C++ class derived from QIfAbstractFeature for every interface in the QFace file
- one module class that helps to register all interfaces to QML and stores global types and functions.
To inspect the C++ code yourself, you can view these files in the library's build folder.
Right now, the most important auto-generated file for us, is the resulting C++ class for our defined interface. It looks like this:
ch1-basics/frontend/frontend/instrumentcluster.h:
/****************************************************************************
** Generated from 'instrument-cluster.qface': module Example.If.InstrumentClusterModule
**
** Created by: The Qt Interface Framework Generator (6.10.0)
**
** WARNING! All changes made in this file will be lost!
*****************************************************************************/

#ifndef INSTRUMENTCLUSTERMODULE_INSTRUMENTCLUSTER_H_
#define INSTRUMENTCLUSTERMODULE_INSTRUMENTCLUSTER_H_

#include "instrumentclustermodule.h"

#include <QtInterfaceFramework/QIfAbstractFeature>
#include <QtInterfaceFramework/QIfPendingReply>
#include <QtInterfaceFramework/QIfPagingModel>

class InstrumentClusterPrivate;
class InstrumentClusterBackendInterface;

class Q_EXAMPLE_IF_INSTRUMENTCLUSTERMODULE_EXPORT InstrumentCluster : public QIfAbstractFeature
{
    Q_OBJECT
    QML_NAMED_ELEMENT(InstrumentCluster)
    Q_PROPERTY(int speed READ speed WRITE setSpeed NOTIFY speedChanged FINAL)

public:
    explicit InstrumentCluster(QObject *parent = nullptr);
    ~InstrumentCluster() override;

    static void registerQmlTypes(const QString& uri, int majorVersion=1, int minorVersion=0);

    int speed() const;

public Q_SLOTS:
    void setSpeed(int speed);

Q_SIGNALS:
    void speedChanged(int speed);

protected:
    InstrumentClusterBackendInterface *instrumentclusterBackend() const;

    void connectToServiceObject(QIfServiceObject *service) Q_DECL_OVERRIDE;
    void clearServiceObject() Q_DECL_OVERRIDE;

private:
    Q_PRIVATE_SLOT(d_func(), void onSpeedChanged(int speed))
    Q_DECLARE_PRIVATE(InstrumentCluster)
};

#endif // INSTRUMENTCLUSTERMODULE_INSTRUMENTCLUSTER_H_
As you can see, the auto-generated C++ class implements a speed property, that we previously defined in the QFace file. By using the Q_OBJECT and Q_PROPERTY macros, the class is now ready for use directly in your QML code.
Integrate the Front End Library with the QML Code
For this integration, we use the auto-generated front-end library from the QML code. For the sake of simplicity, we follow the standard Qt example pattern and use a small C++ main function which registers our auto-generated types to QML and loads the Instrument Cluster QML code into the QQmlApplicationEngine:
ch1-basics/instrument-cluster/main.cpp:
#include "instrumentclustermodule.h"

using namespace Qt::StringLiterals;

int main(int argc, char *argv[])
{
    QGuiApplication app(argc, argv);

    QQmlApplicationEngine engine;
    InstrumentClusterModule::registerQmlTypes();
    engine.load(QUrl(u"qrc:///Cluster.qml"_s));

    return app.exec();
}
Note: Since Qt6 the recommended way is to use the new QML Type Registration mechanism instead and use the qt_add_qml_module API. For now this example uses simple resource files for all QML files and images and only introduces the declarative type registration in a following chapter.
All we need now is the actual integration of the InstrumentCluster QML element and connecting the speed property to the leftDial. This is done by instantiating the element first with the instrumentCluster ID.
ch1-basics/instrument-cluster/Cluster.qml:
import QtQuick
import QtQuick.Window
import Example.If.InstrumentClusterModule

Window {
    id: root

    width: 1920
    height: 720
    title: qsTr("QtIF Instrument Cluster Chapter 1")
    visible: true
    color: "#0c0c0c"

    InstrumentCluster {
        id: instrumentCluster
    }
Lastly, we can create a Binding for the LeftDial Item's value property to our InstrumentCluster API's speed property.
    LeftDial {
        id: leftDial
        anchors.left: parent.left
        anchors.leftMargin: 0.1 * width

        value: instrumentCluster.speed
    }
Chapter 2: Extend the Interface and add Annotations
In this chapter we extend our Middleware API with more properties via enums and by defining our own structure.
Define Speed as a Read-only Property
Previously, we defined the speed property in our QFace file in the following way:
ch1-basics/instrument-cluster.qface:
module Example.If.InstrumentClusterModule 1.0

interface InstrumentCluster {
    int speed;
}
This property is defined as readable and writable, as we didn't use any extra specifiers. However, it's not necessary for our Instrument Cluster example to have a writable speed property because it's not used to accelerate the car, but just to visualize the current state.
To define the property as read-only, use the readonly keyword.
ch2-enums-structs/instrument-cluster.qface:
module Example.If.InstrumentClusterModule 1.0

interface InstrumentCluster {
    readonly int speed;
}
When we build our app again, the build system recognizes this change and runs the Interface Framework Generator to generate an updated version of the C++ code. After the Interface Framework Generator is done, open the instrumentcluster.h from the build folder and notice that the generated speed property changed – it no longer has a setter anymore and is now read-only.
ch2-enums-structs/frontend/frontend/instrumentcluster.h:
class Q_EXAMPLE_IF_INSTRUMENTCLUSTERMODULE_EXPORT InstrumentCluster : public QIfAbstractFeature
{
    Q_OBJECT
    QML_NAMED_ELEMENT(InstrumentCluster)
    Q_PROPERTY(int speed READ speed NOTIFY speedChanged FINAL)
    ...
};
Extend the Interface
To reach our goal to provide a full simulation for the Instrument Cluster, we need to add more properties to our QFace file: rpm, fuel and temperature:
ch2-enums-structs/instrument-cluster.qface:
module Example.If.InstrumentClusterModule 1.0

interface InstrumentCluster {
    readonly int speed;
    readonly int rpm;
    readonly real fuel;
    readonly real temperature;
}
You might have noticed that we use a different type for the fuel and temperature properties. We use real here, as we would like to show the temperature as a floating point number, and the current fuel level as a value between 0 and 1.
Define a New Enum Type
One useful feature is to be able to switch between the metric and the imperial system, so we need to define a property for the system we currently use. Using a boolean property would work, but doesn't offer a nice API, so we define a new enum type in the QFace file and use it as the type for our new system property:
ch2-enums-structs/instrument-cluster.qface:
module Example.If.InstrumentClusterModule 1.0

interface InstrumentCluster {
    readonly int speed;
    readonly int rpm;
    readonly real fuel;
    readonly real temperature;
    readonly SystemType systemType;
}

enum SystemType {
    Imperial,
    Metric
}
In the auto-generated code, this results in an enum which is part of the module class, making it possible for the same enum to be used by multiple classes which are part of the same module:
ch2-enums-structs/frontend/frontend/instrumentclustermodule.h:
/****************************************************************************
** Generated from 'instrument-cluster.qface': module Example.If.InstrumentClusterModule
**
** Created by: The Qt Interface Framework Generator (6.10.0)
**
** WARNING! All changes made in this file will be lost!
*****************************************************************************/

#ifndef INSTRUMENTCLUSTERMODULE_H_
#define INSTRUMENTCLUSTERMODULE_H_

#include "instrumentclustermoduleglobal.h"

#include <QtCore/QObject>
#include <QtInterfaceFramework/QIfPendingReply>

class Q_EXAMPLE_IF_INSTRUMENTCLUSTERMODULE_EXPORT InstrumentClusterModule : public QObject
{
    Q_OBJECT

public:
    InstrumentClusterModule(QObject *parent=nullptr);

    enum SystemType {
        Imperial = 0,
        Metric = 1,
    };
    Q_ENUM(SystemType)
    static SystemType toSystemType(quint32 v, bool *ok);

    static void registerTypes();
    static void registerQmlTypes(const QString& uri = QStringLiteral("Example.If.InstrumentClusterModule"), int majorVersion = 1, int minorVersion = 0);
};

Q_EXAMPLE_IF_INSTRUMENTCLUSTERMODULE_EXPORT QDataStream &operator<<(QDataStream &out, InstrumentClusterModule::SystemType var);
Q_EXAMPLE_IF_INSTRUMENTCLUSTERMODULE_EXPORT QDataStream &operator>>(QDataStream &in, InstrumentClusterModule::SystemType &var);

QIF_DECLARE_PENDINGREPLY_WITH_NAME(SystemType, InstrumentClusterModule::SystemType)

#endif // INSTRUMENTCLUSTERMODULE_H_
Add a New Structure
To display warnings on the Instrument Cluster's right dial, we'd like to use a structure that stores color, icon, and text for the warning; instead of using 3 independent properties. Similar to defining an interface, we can use the struct keyword in our QFace file:
ch2-enums-structs/instrument-cluster.qface:
struct Warning {
    string color
    string text
    string icon
}
Using this new structure as a type for a property, works in the same way as when using an enum. The QFace file should now look like this:
ch2-enums-structs/instrument-cluster.qface:
module Example.If.InstrumentClusterModule 1.0

interface InstrumentCluster {
    readonly int speed;
    readonly int rpm;
    readonly real fuel;
    readonly real temperature;
    readonly SystemType systemType;
    readonly Warning currentWarning;
}

enum SystemType {
    Imperial,
    Metric
}

struct Warning {
    string color
    string text
    string icon
}
Integrate the New Properties
Like in the previous chapter, actually integrating the newly introduced properties involves creating Bindings. The rpm property can be directly connected to the rightDial Item's value property; the same is done for the top Item's temperature property. To control which unit is displayed in the left Dial, the leftDial Item provides metricSystem, a bool property. As we used an enum in our QFace file, we need to convert the value first by testing the sytemType property for the "Metric" value.
ch2-enums-structs/instrument-cluster/Cluster.qml:
    LeftDial {
        id: leftDial
        anchors.left: parent.left
        anchors.leftMargin: 0.1 * width

        value: instrumentCluster.speed
        metricSystem: instrumentCluster.systemType === InstrumentClusterModule.Metric
    }
These enums are part of the module class, which is also exported to QML as InstrumentClusterModule. To trigger a warning in the rightDial Item, we use 3 bindings to connect to the 3 member variables in the structure:
    RightDial {
        id: rightDial
        anchors.right: parent.right
        anchors.rightMargin: 0.1 * width

        value: instrumentCluster.rpm
        warningColor: instrumentCluster.currentWarning.color
        warningText: instrumentCluster.currentWarning.text
        warningIcon: instrumentCluster.currentWarning.icon
        fuelLevel: instrumentCluster.fuel
    }
Chapter 3: Add a Simulation Back End and Annotations with a QML plugin
In the previous two chapters, we wrote a Middleware API using a QFace file and used the Interface Framework Generator to auto-generate a C++ API in the form of a library. Now, in this chapter, we extend this further by introducing a simulation back end and using annotations to define default values for our simulation.
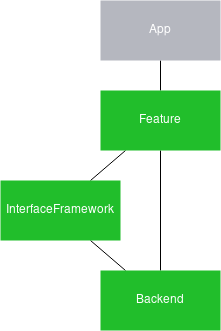
Separation between the Front End and Back End
Both QtInterfaceFramework and the Interface Framework Generator enable you to write code that separates the front end from the back end. This allows you to split an API from its actual implementation. Already, Qt uses this concept in a lot of areas, most prominently in the underlying window system technology on various Qt platforms like XCB on Linux and Cocoa on macOS.
The same separation is done for our Middleware API, where the front end provides the API as a library; the back end provides an implementation of this API. This implementation is based on QtInterfaceFramework's Dynamic Backend System which enables us to switch between such back ends at runtime.
Add a Simulation Back End
For our Instrument Cluster, we'd like to add such a back end to provide actual values. For now, we'd like to just have some simulation behavior as we can't connect it easily to a real car. This is why such back ends are called "simulation backend". To add this type of back end, once again, we use the Interface Framework Generator to do the heavy lifting for us and generate one. This work is done in a similar way to when we generated a library with the "frontend" template. But now, we are using the "backend_simulator" template:
CMake:
ch3-simulation-backend/backend_simulator/CMakeLists.txt
qt_ifcodegen_add_plugin(ic_ch3_simulation
    IDL_FILES ../instrument-cluster.qface
    TEMPLATE backend_simulator
)

set_target_properties(ic_ch3_simulation PROPERTIES LIBRARY_OUTPUT_DIRECTORY ../interfaceframework)
As we want to build a plugin (dynamic library) which is loaded at runtime instead of linking against it, we use the qt_ifcodegen_add_plugin function. One important aspect here is that the library name ends with "_simulation", which is a way to tell QtInterfaceFramework that this is a simulation back end. When a "production" back end is available, it is preferred over the "simulation" one. For more information, see Dynamic Backend System.
The qt_ifcodegen_add_plugin uses the same IDL_FILES and TEMPLATE arguments as the qt_ifcodegen_extend_target function we used previously, but instead of creating a plugin first and extending it, the plugin is created in a single call.
qmake:
ch3-simulation-backend/backend_simulator/backend_simulator.pro:
TEMPLATE = lib
TARGET = $$qtLibraryTarget(instrumentcluster_simulation)
QT += core interfaceframework
CONFIG += ifcodegen plugin

IFCODEGEN_TEMPLATE = backend_simulator
IFCODEGEN_SOURCES = ../instrument-cluster.qface
PLUGIN_TYPE = interfaceframework

# Additional import path used to resolve QML modules in Qt Creator's code model
QML_IMPORT_PATH = $$OUT_PWD/../frontend/qml
Just like for the front-end library, the project file builds a lib and defines the library name using qtLibraryTarget to also support the Windows debug postfix. One important aspect here is that the library name ends with "_simulation", which is a way to tell QtInterfaceFramework that this is a simulation back end. When a "production" back end is available, it is preferred over the "simulation" one. For more information, see Dynamic Backend System.
Enabling the Interface Framework Generator is also done in the same way as we did earlier: by using the same IFCODEGEN_SOURCES variable, but defining IFCODEGEN_TEMPLATE to "backend_simulator", to use the correct generation template. In addition, we need to add 'plugin' to the CONFIG variable, to make this library a Qt plugin which can be easily loaded at runtime.
Link Settings and Locating Plugins
Trying to build the project file just as it is, right now, would result in compilation and linking errors. This is because: to do the front end and back-end separation, we need to have the back end implement a defined interface class, that is known to the front end. This interface is aptly called "backend interface" and is automatically generated as part of the front-end library. Because this class provides signals and slots and uses QObject for its base class, you need to link to the front-end library when you inherit from it. As this is needed for the back-end plugin, we need to add the following lines in addition:
CMake:
ch3-simulation-backend/backend_simulator/CMakeLists.txt:
target_link_libraries(ic_ch3_simulation PUBLIC
By defining the front-end library named libIc_ch3 as a target link library the include path gets updated accordingly.
qmake:
ch3-simulation-backend/backend_simulator/backend_simulator.pro:
LIBS += -L$$OUT_PWD/../ -l$$qtLibraryTarget(QtIfInstrumentCluster)
INCLUDEPATH += $$OUT_PWD/../frontend
Now the project should build fine and create the plugin in your build folder; or the plugin folder if you don't use a shadow build. When you start the Instrument Cluster again, you should see the following message:
There is no production backend implementing "Example.If.InstrumentCluster.InstrumentCluster" .
There is no simulation backend implementing "Example.If.InstrumentCluster.InstrumentCluster" .
No suitable ServiceObject found.
This message indicates that QtInterfaceFramework is still unable to find the simulation plugin we just created. Here, you need to know a little bit more about Qt's Plugin System, especially how it finds plugins.
Qt searches for it's plugins in multiple directories, the first one is the plugin folder, plugins, which comes with your Qt installation. Within the plugins folder, every plugin type has it's own sub-folder, such as platforms, for the platform plugins used to talk to the underlying platform API and the windowing system.
Similarly, QtInterfaceFramework searches for its back-end plugins in the interfaceframework folder.
To make sure our simulation back end ends up in such a folder, we add the following changes in our build system file:
CMake:
ch3-simulation-backend/backend_simulator/CMakeLists.txt:
set_target_properties(ic_ch3_simulation PROPERTIES LIBRARY_OUTPUT_DIRECTORY ../interfaceframework)
qmake:
ch3-simulation-backend/backend_simulator/backend_simulator.pro:
DESTDIR = ../interfaceframework
You might wonder how creating an interfaceframework folder in the upper directory solves the problem of finding the plugin as it's not part of the system plugins folder. But Qt supports searching in multiple folders for such plugins and one of those folders is the path to where the executable itself is located.
Alternatively, we could add an additional plugin path using the QCoreApplication::addLibraryPath() function or using the QT_PLUGIN_PATH environment variable. For more information, see How to create Qt Plugins.
Now everything is in place, but because our plugin links against the front-end library, we need to make sure the library can be found by the dynamic linker. This can be achieved by setting the LD_LIBRARY_PATH environment variable to our library folder. But this results in the problem, that every user would need to set this variable to be able to use our application.
CMake:
Using CMake, the location of our front-end library is automatically added as a RUNPATH to the the binary and no further steps are needed.
qmake:
In qmake we can ease the setup by using a relative RPATH instead of the LD_LIBRARY_PATH and annotate our plugin with the information for the linker, where it might find the needed libraries, relative to the plugin's location:
ch3-simulation-backend/backend_simulator/backend_simulator.pro:
INCLUDEPATH += $$OUT_PWD/../frontend
QMAKE_RPATHDIR += $$QMAKE_REL_RPATH_BASE/../
Export the QML Types in a QML Plugin
In the first chapter, we extended our main.cpp to register all types of our auto-generated Middleware APIs. Although this works fine, in bigger projects it's common to use a QML Plugin instead and be able to use the qml executable for development. Although the code for doing this is not complex, the Interface Framework Generator supports this as well and makes it even easier.
From the first chapter, we know that the module name is used for the QML import URI. This is important for a QML plugin as the QmlEngine expects the plugin in a specific folder to follow the module name, where every section of the module name is a sub-folder. Our build system file to generate a QML plugin looks like this:
CMake:
ch3-simulation-backend/frontend/CMakeLists.txt:
qt_ifcodegen_add_qml_module(libIc_ch3
    IDL_FILES ../instrument-cluster.qface
    TEMPLATE frontend
)
In the previous chapters we used qt_add_library and qt_ifcodegen_extend_target to generate the library. To use the new declarative type registration mechanism and also generate a QML plugin, we use qt_ifcodegen_add_qml_module instead.
This function calls the generator and export the URI and VERSION variables from the generated code and feeds it into the qt_add_qml_module function.
Before 6.8 the following snippet could be used instead:
qt_ifcodegen_extend_target(libIc_ch3
    IDL_FILES ../instrument-cluster.qface
    PREFIX CLUSTER
    TEMPLATE frontend
)
qt_add_qml_module(libIc_ch3
    OUTPUT_DIRECTORY "${CMAKE_CURRENT_BINARY_DIR}/../imports/${CLUSTER_URI_PATH}"
    URI ${CLUSTER_URI}
    VERSION ${CLUSTER_VERSION}
    RESOURCE_PREFIX "/"
    IMPORTS QtInterfaceFramework/auto
)
Please see QML Type Registration for more information.
qmake:
ch3-simulation-backend/imports/imports.pro:
TEMPLATE = lib
CONFIG += plugin
QT += interfaceframework

LIBS += -L$$OUT_PWD/../ -l$$qtLibraryTarget(QtIfInstrumentCluster)
INCLUDEPATH += $$OUT_PWD/../frontend

IFCODEGEN_TEMPLATE = qmlplugin
IFCODEGEN_SOURCES = ../instrument-cluster.qface

load(ifcodegen)

DESTDIR = $$OUT_PWD/$$replace(URI, \\., /)
QMAKE_RPATHDIR += $$QMAKE_REL_RPATH_BASE/../../../../

exists($$OUT_PWD/qmldir) {
    cpqmldir.files = $$OUT_PWD/qmldir \
                     $$OUT_PWD/plugins.qmltypes
    cpqmldir.path = $$DESTDIR
    cpqmldir.CONFIG = no_check_exist
    COPIES += cpqmldir
}
All lines until IFCODEGEN_SOURCES should be familiar. We use CONFIG to build a plugin, then define the settings for the linker to link against our front-end library. Then, we use IFCODEGEN_TEMPLATE to define "qmlplugin" as the generation template. Instead of adding ifcodegen to CONFIG, this time we use qmake's load() function to explicitly load the feature. This enables us to use the URI variable which is part of the "qmlplugin" generation template. This URI can be used to define a DESTDIR by replacing all dots with slashes.
In addition to the folder structure, the QmlEngine also needs a qmldir file which indicates what files are part of the plugin, and under which URI. For more information, see Module Definition qmldir Files. Both this qmldir file and a plugins.qmltypes file which provides information about code-completion, are auto-generated by the Interface Framework Generator; but they need to be placed next to the library. To do so, we add the files to a scope similar to an INSTALL target, but add it to the COPIES variable instead. This makes sure that the files are copied when the plugin is built.
Now the plugin is ready for use, but our Instrument Cluster application doesn't know where to search for it and is still using the old hard-coded registration. So, we can now remove the linking step in the instrument-cluster build system file and change our main file accordingly:
ch3-simulation-backend/instrument-cluster/main.cpp:
#include <QGuiApplication>
#include <QQmlApplicationEngine>

using namespace Qt::StringLiterals;

int main(int argc, char *argv[])
{
    QGuiApplication app(argc, argv);

    QQmlApplicationEngine engine;
    engine.addImportPath(app.applicationDirPath() + "/imports");
    engine.load(QUrl(u"qrc:///Cluster.qml"_s));

    return app.exec();
}
What has changed is that we've now added an additional import path with the addImportPath function, which points to the "imports" folder next to the binary's location.
Note: The additional import path is only needed when building with qmake. In CMake the QML module is linked to the application which produces more optimized code and makes the import path unnecessary.
Chapter 4: Add a Custom Simulation
So far, we've created a Middleware API and integrated it into our Instrument Cluster QML code, extended it with a QML plugin, and generated a simulation back end. In the background, quite a lot has happened to support us; but on the UI side not much has changed till now. This chapter is about bringing our simulation back end to life by defining sane default values and starting to simulate a real car ride.
Define Default Values
We start by defining default values for our properties, using annotations in our QFace file. An annotation is a special kind of comment which adds extra data to an interface, method, property, and so on. For this use case we use the config_simulator annotation. For more information, see Annotations. A reference of all supported annotations can be found here.
Currently, in our Instrument Cluster, the temperature defaults to 0. Let's change this to a temperature in spring, 15 degrees Celsius, with the following YAML fragment, which needs to be added above the property definition in the qface file.
ch4-simulation-behavior/instrument-cluster.qface:
    readonly int speed;
    readonly int rpm;
    readonly real fuel;
    @config_simulator: { default: 15 }
    readonly real temperature;
Compile the plugin again for this temperature change to be reflected in our Instrument Cluster. Let's see how this actually works: when starting the Interface Framework Generator, the config_simulator annotation was transformed into a JSON file that's now part of the "simulation backend" build folder. This JSON file looks like this:
ch4-simulation-behavior/backend_simulator/backend_simulator/instrumentclustermodule_simulation_data.json:
{
  "InstrumentCluster": {
    "temperature": {
      "default": 15
    }
  }
}
But how is this JSON file related to the actual simulation back-end code? The auto-generated simulation back-end code uses QIfSimulationEngine, that reads the JSON file and provides its data to a QML simulation file. A default QML file is also auto-generated and loaded from the QIfSimulationEngine. This default QML file provides the behavior of what should happen in the the simulation back end.
Later, in the next section, we take a look at the QML file and how we can change it. But first, let's see how we can change the default values in a more dynamic way.
The QIfSimulationEngine allows us to override which JSON file should be loaded into the engine, when we set the QTIF_SIMULATION_DATA_OVERRIDE environment variable. Since there can be multiple engines run by different back ends, we need to define which engine we're referring to. In the auto-generated code, the module name is always used as the engine specifier. For this chapter, we already prepared a second JSON file which is part of our source directory. Setting the environment variable as follows, changes the systemType to km/h instead of mph:
QTIF_SIMULATION_DATA_OVERRIDE=example.if.instrumentclustermodule=<path-to-file>/kmh.json
Define a QML Behavior
Before we define our custom behavior, let's see what's been auto-generated for us. There are two QML files: The first is instrumentcluster_simulation.qml and rather simple. It defines an entry point that instantiates the second file, an InstrumentClusterSimulation.qml file. This split is done as there can be multiple interfaces defined as part of the same module.
Note: A QML Engine can only have one entry point. While QIfSimulationEngine has this same limitation, if you have a module with multiple interfaces, you want to have multiple simulation files – one per interface. This is why the first QML file merely instantiates the QML files for all interfaces that it supports. In the case of our example, it's only one interface.
The InstrumentClusterSimulation.qml file is very interesting:
ch4-simulation-behavior/backend_simulator/backend_simulator/InstrumentClusterSimulation.qml:
/****************************************************************************
** Generated from 'instrument-cluster.qface': module Example.If.InstrumentClusterModule
**
** Created by: The Qt Interface Framework Generator (6.10.0)
**
** WARNING! All changes made in this file will be lost!
*****************************************************************************/

import QtQuick
import Example.If.InstrumentClusterModule.simulation

InstrumentClusterBackend {
    id: backend

    property QtObject d: QtObject {
        id: d
        property var settings: IfSimulator.findData(IfSimulator.simulationData, "InstrumentCluster")
        property bool defaultInitialized: false
        property LoggingCategory qLcInstrumentCluster: LoggingCategory {
            name: "example.if.instrumentclustermodule.simulation.instrumentclusterbackend"
        }
    }

    function initialize() {
        console.log(d.qLcInstrumentCluster, "INITIALIZE")
        if (!d.defaultInitialized) {
            IfSimulator.initializeDefault(d.settings, backend)
            d.defaultInitialized = true
        }
        Base.initialize()
    }

    function setSpeed(speed) {
        if ("speed" in d.settings && !IfSimulator.checkSettings(d.settings["speed"], speed)) {
            console.error(d.qLcInstrumentCluster, "SIMULATION changing speed is not possible: provided: " + speed + " constraint: " + IfSimulator.constraint(d.settings["speed"]));
            return;
        }

        console.log(d.qLcInstrumentCluster, "SIMULATION speed changed to: " + speed);
        backend.speed = speed
    }

    function setRpm(rpm) {
        if ("rpm" in d.settings && !IfSimulator.checkSettings(d.settings["rpm"], rpm)) {
            console.error(d.qLcInstrumentCluster, "SIMULATION changing rpm is not possible: provided: " + rpm + " constraint: " + IfSimulator.constraint(d.settings["rpm"]));
            return;
        }

        console.log(d.qLcInstrumentCluster, "SIMULATION rpm changed to: " + rpm);
        backend.rpm = rpm
    }

    function setFuel(fuel) {
        if ("fuel" in d.settings && !IfSimulator.checkSettings(d.settings["fuel"], fuel)) {
            console.error(d.qLcInstrumentCluster, "SIMULATION changing fuel is not possible: provided: " + fuel + " constraint: " + IfSimulator.constraint(d.settings["fuel"]));
            return;
        }

        console.log(d.qLcInstrumentCluster, "SIMULATION fuel changed to: " + fuel);
        backend.fuel = fuel
    }

    function setTemperature(temperature) {
        if ("temperature" in d.settings && !IfSimulator.checkSettings(d.settings["temperature"], temperature)) {
            console.error(d.qLcInstrumentCluster, "SIMULATION changing temperature is not possible: provided: " + temperature + " constraint: " + IfSimulator.constraint(d.settings["temperature"]));
            return;
        }

        console.log(d.qLcInstrumentCluster, "SIMULATION temperature changed to: " + temperature);
        backend.temperature = temperature
    }

    function setSystemType(systemType) {
        if ("systemType" in d.settings && !IfSimulator.checkSettings(d.settings["systemType"], systemType)) {
            console.error(d.qLcInstrumentCluster, "SIMULATION changing systemType is not possible: provided: " + systemType + " constraint: " + IfSimulator.constraint(d.settings["systemType"]));
            return;
        }

        console.log(d.qLcInstrumentCluster, "SIMULATION systemType changed to: " + systemType);
        backend.systemType = systemType
    }

    function setCurrentWarning(currentWarning) {
        if ("currentWarning" in d.settings && !IfSimulator.checkSettings(d.settings["currentWarning"], currentWarning)) {
            console.error(d.qLcInstrumentCluster, "SIMULATION changing currentWarning is not possible: provided: " + currentWarning + " constraint: " + IfSimulator.constraint(d.settings["currentWarning"]));
            return;
        }

        console.log(d.qLcInstrumentCluster, "SIMULATION currentWarning changed to: " + currentWarning);
        backend.currentWarning = currentWarning
    }
}
First, there's a settings property, that's initialized with the return value from the IfSimulator.findData method, which takes the IfSimulator.simulationData and a string as input. The simulationData is the JSON file represented as a JavaScript object.
The findData method helps us to extract only the data that is of interest for this interface, InstrumentCluster. The properties that follow help the interface to know whether the default values are set. The LoggingCategory is used to identify the log output from this simulation file.
Afterwards, the actual behavior is defined by instantiating an InstrumentClusterBackend Item and extending it with more functions. The InstrumentClusterBackend is the interface towards our InstrumentCluster QML front end class. But, apart from the front end, these properties are also writable to make it possible to change them to provide a useful simulation.
Each time a front-end instance connects to a back end, the initialize() function is called. The same applies to the QML simulation: as the initialize() C++ function forwards this to the QML instance. This also applies to all other functions, like setters and getters, for properties or methods. For more details, see QIfSimulationEngine.
Inside the QML initialize() function, we call IfSimulator.initializeDefault(), to read the default values from the simulationData object and initialize all properties. This is done only once, as we don't want the properties be reset to default when the next front-end instance connects to the back end. Lastly, the base implementation is called to make sure that the initializationDone signal is sent to the front end.
Similarly, a setter function is defined for each property; they use the IfSimulator.checkSettings() to read specific constraint settings for the property from the simulationData and check whether these constraints are valid for the new value. If these constraints aren't valid, then IfSimulator.constraint() is used to provide a meaningful error message to the user.
Define Our Own QML Simulation
As mentioned above, the InstrumentClusterBackend item provides all the properties of our QFace file. This can be used to simulate a behavior by changing the properties to the values we want. The simplest form for this would be value assignment, but this would be rather static not exactly what we'd like to achieve. Instead, we use QML Animation objects to change the values over time:
ch4-simulation-behavior/backend_simulator/simulation.qml:
                    NumberAnimation {
                        target: backend
                        property: "speed"
                        from: 0
                        to: 80
                        duration: 4000
                    }
The code snippet above changes the speed property to 80 over 4000 seconds and simulates an accelerating car. Extending this to the other properties, and combining both sequential and parallel animations, we can create a full simulation:
ch4-simulation-behavior/backend_simulator/simulation.qml:
        property var animation: SequentialAnimation {
            loops: Animation.Infinite
            running: true

            ParallelAnimation {
                SequentialAnimation {

                    NumberAnimation {
                        target: backend
                        property: "speed"
                        from: 0
                        to: 80
                        duration: 4000
                    }

                    NumberAnimation {
                        target: backend
                        property: "speed"
                        to: 50
                        duration: 2000
                    }

                    NumberAnimation {
                        target: backend
                        property: "speed"
                        to: 200
                        duration: 7000
                    }

                    ScriptAction {
                        script: {
                            backend.currentWarning = InstrumentClusterModule.warning("red","LOW FUEL", "images/fuelsymbol_orange.png")
                        }
                    }

                    NumberAnimation {
                        target: backend
                        property: "speed"
                        to: 0
                        duration: 5000
                    }

                    ScriptAction {
                        script: {
                            backend.currentWarning = InstrumentClusterModule.warning()
                        }
                    }
                }

                NumberAnimation {
                    target: backend
                    property: "fuel"
                    from: 1
                    to: 0.22
                    duration: 18000
                }
            }

            NumberAnimation {
                target: backend
                property: "fuel"
                from: 0.22
                to: 1
                duration: 4000
            }
        }
Then, to provide a nice simulation for the rpm property, we use a binding which does some calculations based on the current speed. The complete simulation file looks like this:
ch4-simulation-behavior/backend_simulator/simulation.qml:
import QtQuick
import Example.If.InstrumentClusterModule.simulation

QtObject {
    property var settings : IfSimulator.findData(IfSimulator.simulationData, "InstrumentCluster")
    property bool defaultInitialized: false
    property LoggingCategory qLcInstrumentCluster: LoggingCategory {
        name: "example.if.instrumentclustermodule.simulation.instrumentclusterbackend"
    }
    property var backend : InstrumentClusterBackend {

        function initialize() {
            console.log(qLcInstrumentCluster, "INITIALIZE")
            if (!defaultInitialized) {
                IfSimulator.initializeDefault(settings, backend)
                defaultInitialized = true
            }
            Base.initialize()
        }

        property int gearSpeed: 260 / 6
        property int currentGear: speed / gearSpeed
        rpm : currentGear >= 1 ? 3000 + (speed % gearSpeed) / gearSpeed * 2000
                               : (speed % gearSpeed) / gearSpeed * 5000

        property var animation: SequentialAnimation {
            loops: Animation.Infinite
            running: true

            ParallelAnimation {
                SequentialAnimation {

                    NumberAnimation {
                        target: backend
                        property: "speed"
                        from: 0
                        to: 80
                        duration: 4000
                    }

                    NumberAnimation {
                        target: backend
                        property: "speed"
                        to: 50
                        duration: 2000
                    }

                    NumberAnimation {
                        target: backend
                        property: "speed"
                        to: 200
                        duration: 7000
                    }

                    ScriptAction {
                        script: {
                            backend.currentWarning = InstrumentClusterModule.warning("red","LOW FUEL", "images/fuelsymbol_orange.png")
                        }
                    }

                    NumberAnimation {
                        target: backend
                        property: "speed"
                        to: 0
                        duration: 5000
                    }

                    ScriptAction {
                        script: {
                            backend.currentWarning = InstrumentClusterModule.warning()
                        }
                    }
                }

                NumberAnimation {
                    target: backend
                    property: "fuel"
                    from: 1
                    to: 0.22
                    duration: 18000
                }
            }

            NumberAnimation {
                target: backend
                property: "fuel"
                from: 0.22
                to: 1
                duration: 4000
            }
        }
    }
}
The next step is to tell the Interface Framework Generator and the QIfSimulationEngine about our new simulation file. Similar to QML files, the best approach here is to put the simulation file into a resource file. In our example, we add a new file called simulation.qrc which contains our simulation.qml using the / prefix.
In our QFace file, this location now needs to be added in the form of an annotation:
ch4-simulation-behavior/instrument-cluster.qface;
@config_simulator: { simulationFile: "qrc:/simulation.qml" }
module Example.If.InstrumentClusterModule 1.0
    ...
Now, rebuilding the simulation back end embeds the simulation file into the plugin and hands the file over to the QIfSimulationEngine, which starts the simulation when loaded.
Chapter 5: Add a Simulation Server Combined with QtRemoteObjects
In this chapter we extend our instrument cluster to use an Inter-Process Communication (IPC) mechanism and use two processes. At the moment, the simulation is loaded as a plugin that causes it to be part of the same service. Although this is good enough for a small example application, it's not how it's done in modern multi-process architectures, where multiple processes need to be able to access the same value and react to changes. We could write a second Application that uses the same Middleware API. However, we can achieve the same thing just by starting the Instrument Cluster twice and checking whether the animations are in sync. Currently, they're not.
Add a QtRemoteObjects Integration
The IPC for this example is QtRemoteObjects, because the Interface Framework Generator already supports it out of the box. To use QtRemoteObjects we generate a second plugin, a "production" back end, this time. Production back ends are automatically preferred over the simulation back end we introduced before.
This is done with the following build system files:
CMake:
ch5-ipc/backend_qtro/CMakeLists.txt:
qt_ifcodegen_add_plugin(ic_chapter5_qtro
    IDL_FILES ../instrument-cluster.qface
    TEMPLATE backend_qtro
)

set_target_properties(ic_chapter5_qtro PROPERTIES LIBRARY_OUTPUT_DIRECTORY ../interfaceframework)

target_link_libraries(ic_chapter5_qtro PUBLIC
    libIc_chapter5
)qmake:
ch5-ipc/backend_qtro/backend_qtro.pro
TEMPLATE = lib
TARGET = $$qtLibraryTarget(instrumentcluster_qtro)
DESTDIR = ../interfaceframework

QT += core interfaceframework
CONFIG += ifcodegen plugin

LIBS += -L$$OUT_PWD/../ -l$$qtLibraryTarget(QtIfInstrumentCluster)
INCLUDEPATH += $$OUT_PWD/../frontend
QMAKE_RPATHDIR += $$QMAKE_REL_RPATH_BASE/../

IFCODEGEN_TEMPLATE = backend_qtro
IFCODEGEN_SOURCES = ../instrument-cluster.qface
PLUGIN_TYPE = interfaceframework
These files are almost identical to the ones we used earlier for our simulation back end. For now we highlight what's changed.
The name of the plugin doesn't end with "_simulation" to indicate that this is a "production" back end. The template is now changed to "backend_qtro" to generate a back end that uses Qt Remote Objects Replicas to connect to a Qt Remote Objects Source that provides the values. In addition to a back end based on QtRemoteObject, we also need a server based on QtRemoteObject . This part can also be auto-generated using the Interface Framework Generator in a similar fashion:
CMake:
ch5-ipc/simulation_server/CMakeLists.txt:
qt_add_executable(chapter5-ipc-server WIN32)
set_target_properties(chapter5-ipc-server PROPERTIES RUNTIME_OUTPUT_DIRECTORY ../)

# Interface Framework Generator:
qt_ifcodegen_extend_target(chapter5-ipc-server
    IDL_FILES ../instrument-cluster.qface
    TEMPLATE server_qtro_simulator
)

target_link_libraries(chapter5-ipc-server PUBLIC
    libIc_chapter5
)qmake:
ch5-ipc/simulation_server/simulation_server.pro:
TARGET = chapter5-ipc-server
DESTDIR = ..

QT = core interfaceframework
QT -= gui
CONFIG -= app_bundle
CONFIG += ifcodegen

LIBS += -L$$OUT_PWD/../ -l$$qtLibraryTarget(QtIfInstrumentCluster)
INCLUDEPATH += $$OUT_PWD/../frontend

IFCODEGEN_TEMPLATE = server_qtro_simulator
IFCODEGEN_SOURCES = ../instrument-cluster.qface

QML_IMPORT_PATH = $$OUT_PWD/qml
Because we'd like to generate a server binary, the qmake TEMPLATE needs to be set to "app" instead of "lib", in CMake we use qt_add_executable instead. Similar to the plugin, the server also needs to link against our library to give it access to the defined enums, structures, and other types. The template we use to generate a simulation server is called "server_qtro_simulator".
Reuse the Existing Simulation Behavior
Now, if you start the server and then the Instrument Cluster, you don't see the simulation from our previous chapter anymore. The reason for this, is that the simulation code is part of our simulation back end, but this back end is no longer used as we added the QtRemoteObjects-based "production" back end.
Because we used the "server_qtro_simulator" generation template, this can easily be fixed, as the generated server code is also using the QIfSimulationEngine and supports to use the same simulation file than our simulation back end. We just need to extend the project file in the same way as we did before and are also able to use the same resource file for this.
CMake:
ch5-ipc/simulation_server/CMakeLists.txt:
qt_add_resources(chapter5-ipc-server "simulation"
    PREFIX
        "/"
    BASE
        "../backend_simulator"
    FILES
        "../backend_simulator/simulation.qml"
)qmake:
ch5-ipc/simulation_server/simulation_server.pro:
RESOURCES += ../backend_simulator/simulation.qrc
In the same way, we can also use the other simulation data JSON file that we defined in the previous chapter, by using the same environment variable. We just need to pass it to the server instead of our Instrument Cluster application.
Let's do the final test: starting two Instrument Cluster instances should now show the animations in sync:
Chapter 6: Develop a Production Back End with D-Bus
Previously, we extended our Instrument Cluster code by using QtRemoteObjects as IPC and auto-generated a back end for it, as well as a server that provides the simulation. In this chapter, we'd like to write our own back end manually using D-Bus as IPC.
We've already prepared a working D-Bus server which provides limited simulation.
First, let's look at the server code and see what's done there; then write the backend that connects to it.
D-Bus Server
As mentioned above, we use D-Bus for this chapter and we already have an XML file that describes the D-Bus interface, similar to our QFace file:
ch6-own-backend/demo_server/instrumentcluster.xml
<!DOCTYPE node PUBLIC "-//freedesktop//DTD D-BUS Object Introspection 1.0//EN" "http://www.freedesktop.org/standards/dbus/1.0/introspect.dtd">
<node>
  <interface name="Example.If.InstrumentCluster">
    <property name="speed" type="i" access="read"/>
    <property name="rpm" type="i" access="read"/>
    <property name="fuel" type="d" access="read"/>
    <property name="temperature" type="d" access="read"/>
    <property name="systemType" type="(i)" access="read">
        <annotation name="org.qtproject.QtDBus.QtTypeName" value="InstrumentClusterModule::SystemType"/>
    </property>
    <property name="currentWarning" type="(sss)" access="read">
        <annotation name="org.qtproject.QtDBus.QtTypeName" value="Warning"/>
    </property>
    <method name="speed" >
        <arg name="speed" type="i" direction="out"/>
    </method>
    <method name="rpm" >
        <arg name="rpm" type="i" direction="out"/>
    </method>
    <method name="fuel" >
        <arg name="fuel" type="d" direction="out"/>
    </method>
    <method name="temperature" >
        <arg name="temperature" type="d" direction="out"/>
    </method>
    <method name="systemType" >
        <annotation name="org.qtproject.QtDBus.QtTypeName.Out0" value="InstrumentClusterModule::SystemType"/>
        <arg name="systemType" type="(i)" direction="out"/>
    </method>
    <method name="currentWarning" >
        <annotation name="org.qtproject.QtDBus.QtTypeName.Out0" value="Warning"/>
        <arg name="currentWarning" type="(sss)" direction="out"/>
    </method>
    <signal name="speedChanged">
          <arg name="speed" type="i" direction="out"/>
    </signal>
    <signal name="rpmChanged">
          <arg name="rpm" type="i" direction="out"/>
    </signal>
    <signal name="fuelChanged">
          <arg name="fuel" type="d" direction="out"/>
    </signal>
    <signal name="temperatureChanged">
          <arg name="temperature" type="d" direction="out"/>
    </signal>
    <signal name="systemTypeChanged">
          <annotation name="org.qtproject.QtDBus.QtTypeName.Out0" value="InstrumentClusterModule::SystemType"/>
          <arg name="systemType" type="(i)" direction="out"/>
    </signal>
    <signal name="currentWarningChanged">
          <annotation name="org.qtproject.QtDBus.QtTypeName.Out0" value="Warning"/>
          <arg name="currentWarning" type="(sss)" direction="out"/>
    </signal>
  </interface>
</node>
This XML file is used to let qmake generate a base class which is extended by the server with actual functionality. For more information, see QtDBus.
Our D-Bus server starts on the session bus, on the / path, and provides an interface named "Example.If.InstrumentCluster". To simulate some values, we keep it simple and use a timer event to change the speed value every 100 milliseconds. Then, we start from 0, once the maximum of 250 is reached. Similarly, the rpm value is increased to 5000. For all other properties, we provide hard-coded values.
ch6-own-backend/demo_server/instrumentcluster.cpp:
void InstrumentCluster::timerEvent(QTimerEvent *event)
{
    Q_UNUSED(event);

    if (speed() >= 250)
        setSpeed(0);
    else
        setSpeed(speed() + 1);

    if (rpm() >= 5000)
        setRpm(0);
    else
        setRpm(rpm() + 100);
}
Write Our own D-Bus Back End
Let's start with a build system file for our back end. This is very similar to previous files, but it doesn't use the Interface Framework Generator. Instead, it uses DBUS_INTERFACES for qmake to auto-generate some client code which sends and receives messages over D-Bus. In the CMake case the qt_add_dbus_interface function is used to do the same.
Now, we need to define an entry point for our plugin. This plugin class needs to derive from QIfServiceInterface and implement two functions:
QStringList interfaces()– that returns a list of all interfaces this plugin supports.QIfFeatureInterface *interfaceInstance(const QString &interface)– that returns an instance of the requested interface.
Additionally, we also need to provide a list of interfaces we support as plugin metadata, in the form of a JSON file which looks like this:
ch6-own-backend/backend_dbus/instrumentcluster_dbus.json:
{
    "interfaces" : [
      "Example.If.InstrumentClusterModule.InstrumentCluster"
    ]
}
We need this list, as it gives QtInterfaceFramework the chance to know which interfaces a back end supports, before instantiating it and loading only the plugins which the application code needs.
Our plugin code looks like this:
ch6-own-backend/backend_dbus/instrumentclusterplugin.cpp:
#include "instrumentclusterplugin.h"

InstrumentClusterPlugin::InstrumentClusterPlugin(QObject *parent)
    : QObject(parent)
    , m_backend(new InstrumentClusterBackend)
{
}

QStringList InstrumentClusterPlugin::interfaces() const
{
    return QStringList(InstrumentClusterModule_InstrumentCluster_iid);
}

QIfFeatureInterface *InstrumentClusterPlugin::interfaceInstance(const QString &interface) const
{
    if (interface == QStringLiteral(InstrumentClusterModule_InstrumentCluster_iid))
        return m_backend;

    return nullptr;
}

#include "moc_instrumentclusterplugin.cpp"
In interfaces() we use the IID which is defined in instrumentclusterbackendinterface.h from our auto-generated library. In interfaceInstance() we check for the correct string and return an instance of the instrument cluster back-end we implemented.
This back end is defined in instrumentclusterbackend.h and derives from InstrumentClusterBackendInterface. In our InstrumentClusterBackend class, we need to implement all pure virtual functions from InstrumentClusterBackendInterface and derived classes.
For our example, this isn't complex, as we just need to implement the initialize() function. If our XML file would use writable properties or methods, then we'd need to implement those as well. We don't need to implement getters for our properties, because QtInterfaceFramework uses the changed signals during the initialization phase to get information about the current state. Although the generated D-Bus interface class would provide getters to retrieve the properties from our server, it's not recommended to use these when you develop a back-end. These getters are implemented by using synchronous calls, which means they will block the event loop until an answer is received by the client. Since this can lead to performance issues, we recommend to use asynchronous calls instead.
In our back end, we define a fetch function for each property that's implemented like this:
ch6-own-backend/backend_dbus/instrumentclusterbackend.cpp:
void InstrumentClusterBackend::fetchSpeed()
{
    m_fetchList.append(u"speed"_s);
    auto reply = m_client->asyncCall(u"speed"_s);
    auto watcher = new QDBusPendingCallWatcher(reply, this);
    connect(watcher, &QDBusPendingCallWatcher::finished, this, [this](QDBusPendingCallWatcher *watcher) {
        QDBusPendingReply<int> reply = *watcher;
        if (reply.isError()) {
            qCritical() << reply.error();
        } else {
            m_fetchList.removeAll(u"speed"_s);
            this->onSpeedChanged(reply.value());
            watcher->deleteLater();
            this->checkInitDone();
        }
    });
}
First, we add the property to a list, to know which properties have been fetched successfully. Next, we use the asyncCall() function to call the getter for the speed property and use a QDBusPendingCallWatcher to wait for the result. Once the result is ready, the lambda removes the property again from our fetchList, uses the onSpeedChanged() function to store the value and notifies the front end about it. Since we don't need the watcher anymore, we delete it in the next event loop run using deleteLater(), and call the checkInitDone() function.
The checkInitDone() function is defined as follows:
ch6-own-backend/backend_dbus/instrumentclusterbackend.cpp:
void InstrumentClusterBackend::checkInitDone()
{
    if (m_fetchList.isEmpty()) {
        qInfo() << "All properties initialized";
        emit initializationDone();
    }
}
It ensures that the initializationDone() signal is sent to the front end once all our properties are fetched from the server, and the initialization is complete.
In addition to retrieving the current state from the server, we also need to inform our front end every time a property changes. This is done by emitting the corresponding change signal when the server changes one of its properties. To handle this, we define a slot for each property. This slot saves the property in our class an emits the change signal:
ch6-own-backend/backend_dbus/instrumentclusterbackend.cpp:
void InstrumentClusterBackend::onSpeedChanged(int speed)
{
    m_speed = speed;
    emit speedChanged(speed);
}
The same slot is also used during the initialization phase to save and emit the value.
You might wonder why saving the value is needed at all, if we can just emit the signal. This is because the back-end plugin is used directly by every instance of the InstrumentCluster class and every instance calls the initialize() function to retrieve the current state. Instead of fetching all properties again, the second initialize() call just emits values that were already saved; and the slots keep them up to date.
Now, when we start the Instrument Cluster, our back end should connect to our D-Bus server and look like this:
Chapter 7: Write a Template for a Back End with D-Bus
Now as we have our own production backend ready, it's a good time to move it into an ifcodegen template. For a simple example like this, keeping the handwritten backend would be totally fine, but once you have defined multiple Modules and Interfaces it is a lot of boiler-plate code to maintain.
Create a template from scratch
The best way to start a new template, is to copy the existing code to a new folder for our template. First we create a templates folder and within that a folder called backend_dbus. This follows the template naming convention from ifcodegen, but you can also use any other name as well.
The next step is to rename the files in our template folder, to make them more generic and identify them as templates by adding an additional tpl suffix.
The template folder should now look like this:
- backend.cpp.tpl
- backend.h.tpl
- plugin.cpp.tpl
- plugin.h.tpl
- plugin.json.tpl
Convert all files to templates
Let's go over all the files in the template and use the special Jinja Template Syntax to extend them for our needs.
plugin.h.tpl
The first thing we usually want to do is to add a special comment for the autogenerated file. This will mark it as autogenerated and that it shouldn't be edited manually.
The following line includes a predefined comment file (part of ifcodegen):
ch7-own-template/templates/backend_dbus/plugin.h.tpl:
{% include "common/generated_comment.cpp.tpl" %}Note: The .cpp suffix of the included file indicates that the comments are intended to be used in C++ files.
Next we want to replace the hardcoded #ifdef names with something derived from the module name. This is done by defining some helper variables first. The first variable is named class and uses a format string which consists of the name of the module and the static text DBusPlugin.
Given that our module is named Example.If.InstrumentClusterModule the resulting string will be InstrumentClusterModuleDBusPlugin.
The second variable also uses a format string but uses the previously defined class variable followed by a pipe symbol. The pipe indicates that the variable should be given to a function that proccess the variable as input to create some new output. This is called a filter in Jinja. The filter is called upper and will make the given module name all upper-case.
The next step is to use the new defined variables to replace the hardcoded defines. In order to use a variable and print its content to the autogenerated code, double curly braces have to be used. All text that does not use the Jinja syntax is printed as is. With that in mind we can keep the include statements as they are and the template file should look like this:
ch7-own-template/templates/backend_dbus/plugin.h.tpl:
#ifndef {{oncedefine}}
#define {{oncedefine}}
    ...
#endif // {{oncedefine}}
In the same way we continue to replace all occurrences of the hardcoded class name with {class} and replace the hardcoded plugin metadata json with {module.module_name|lower}.json.
The class declaration will now look like this:
ch7-own-template/templates/backend_dbus/plugin.h.tpl:
class {{class}} : public QObject, public QIfServiceInterface
{
    Q_OBJECT
    Q_PLUGIN_METADATA(IID QIfServiceInterface_iid FILE "{{module.module_name|lower}}.json")
    Q_INTERFACES(QIfServiceInterface)

public:
    explicit {{class}}(QObject *parent = nullptr);

    QStringList interfaces() const override;
    QIfFeatureInterface* interfaceInstance(const QString &interface) const override;

private:
    QVector<QIfFeatureInterface *> m_interfaces;
};
You might have noticed that instead of using a hardcoded pointer to the InstrumentClusterBackend we now use QVector<QIfFeatureInterface *>. This is needed as a module can have multiple interfaces and the plugin needs to store instances for all of them. This can be easily achieved by using a vector instead of hardcoded values.
plugin.cpp.tpl
In a similar fashion the plugin.cpp.tpl can be extended with Jinja syntax. It also starts by including the generated comment and by defining the class variable. In addition to including the autogenerated plugin header, we also need to include the header for all backend classes. As mentioned before, a module can have multiple interfaces. To generate an include statement for every interface within a module, a Jinja for loop is used:
ch7-own-template/templates/backend_dbus/plugin.cpp.tpl:
{% for interface in module.interfaces %}
#include "{{interface|lower}}dbusbackend.h"
{% endfor %}
Afterwards we continue to define the constructor for our plugin and also use a for loop to fill the m_instances vector with backend class instances.
In addition, for the plugin to work correctly the interfaces() and interfaceInstance() methods need to be implemented. The interfaces() method needs to return a list of interfaces it provides. For this also a Jinja for loop is used. Inside the for loop, Jinja if statements are used to decide whether some extra content needs to be printed at the beginning and the end of the loop.
The full plugin definition now looks like this:
ch7-own-template/templates/backend_dbus/plugin.cpp.tpl:
{{class}}::{{class}}(QObject *parent)
    : QObject(parent)
{
{% for interface in module.interfaces %}
    m_interfaces << new {{interface}}DBusBackend(this);
{% endfor %}
}

QStringList {{class}}::interfaces() const
{
    QStringList list;
{% for iface in module.interfaces %}
{%   if loop.first %}    list{% endif %} << {{module.module_name|upperfirst}}_{{iface}}_iid{% if loop.last %};{% endif %}
{% endfor %}

    return list;
}

QIfFeatureInterface *{{class}}::interfaceInstance(const QString &interface) const
{
     int index = interfaces().indexOf(interface);
     return index < 0 ? nullptr : m_interfaces.at(index);
}
backend.h.tpl and backend.cpp.tpl
The backend class files follow the same schema as the plugin. All fetch methods are generated using a loop like this:
ch7-own-template/templates/backend_dbus/backend.h.tpl:
{% for property in interface.properties %}
    void fetch{{property|upperfirst}}();
{% endfor %}
In a similar fashion the slots for changed values are generated. But as those take the property as an argument we need to generate this part as well. This is done by using a filter called parameter_type, which takes care of that.
ch7-own-template/templates/backend_dbus/backend.h.tpl:
{% for property in interface.properties %}
    void on{{property|upperfirst}}Changed({{property|parameter_type}});
{% endfor %}
Lastly, a for loop also needs to be used to generate all the member variables. To convert the QFace IDL type of the property to the correct C++ type, we use the return_type filter.
In the source file, we register all enums and structs using qDBusRegisterMetaType and replace the hardcoded propertyChanged method calls in the initialize() function with a Jinja for loop.
ch7-own-template/templates/backend_dbus/backend.cpp.tpl:
{{class}}::{{class}}(QObject *parent)
    : {{interface}}BackendInterface(parent)
    , m_client(nullptr)
{
{% for struct in module.structs %}
    qDBusRegisterMetaType<{{struct}}>();
{% endfor %}
{% for enum in module.enums %}
    qDBusRegisterMetaType<{{module.module_name}}::{{enum|flag_type}}>();
{% endfor %}
}

void {{class}}::initialize()
{
    if (!m_client)
        setupConnection();
    if (m_fetchList.isEmpty()) {
{% for property in interface.properties %}
        emit {{property}}Changed(m_{{property}});
{% endfor %}
        emit initializationDone();
    }
}
The rest of the code is ported accordingly and looks like this:
ch7-own-template/templates/backend_dbus/backend.cpp.tpl:
void {{class}}::setupConnection()
{
    qInfo() << "Connecting to the Server";
    m_client = new {{interface.tags.config_dbus.className}}(u"{{interface.tags.config_dbus.interfaceName}}"_s, u"/"_s, QDBusConnection::sessionBus());
{% for property in interface.properties %}
    connect(m_client, &{{interface.tags.config_dbus.className}}::{{property}}Changed,
            this, &{{class}}::on{{property|upperfirst}}Changed);
{% endfor %}
{% for property in interface.properties %}
    void fetch{{property|upperfirst}}();
{% endfor %}
}

{% for property in interface.properties %}
void {{class}}::fetch{{property|upperfirst}}()
{
    m_fetchList.append(u"{{property}}"_s);
    auto reply = m_client->asyncCall(u"{{property}}"_s);
    auto watcher = new QDBusPendingCallWatcher(reply, this);
    connect(watcher, &QDBusPendingCallWatcher::finished, this, [this](QDBusPendingCallWatcher *watcher) {
        QDBusPendingReply<{{property|return_type}}> reply = *watcher;
        if (reply.isError()) {
            qCritical() << reply.error();
        } else {
            m_fetchList.removeAll(u"{{property}}"_s);
            this->on{{property|upperfirst}}Changed(reply.value());
            watcher->deleteLater();
            this->checkInitDone();
        }
    });
}
{% endfor %}

void {{class}}::checkInitDone()
{
    if (m_fetchList.isEmpty()) {
        qInfo() << "All properties initialized";
        emit initializationDone();
    }
}

{% for property in interface.properties %}
void {{class}}::on{{property|upperfirst}}Changed({{property|parameter_type}})
{
    m_{{property}} = {{property}};
    emit {{property}}Changed({{property}});
}
{% endfor %}
plugin.json
For the plugin to be loaded correctly we also need to generate the plugin.json file, which is done like this:
ch7-own-template/templates/backend_dbus/plugin.json.tpl:
{
    "interfaces" : [
{% for interface in module.interfaces %}
      "{{interface.qualified_name}}"{% if not loop.last %},{%endif%}
{% endfor%}
    ]
}
Add new Annotations
If you did the exercise to port all the files by yourself, you might have noticed that not everything in the backend code can be derived from the QFace module or interface names.
As we still want to use the DBus interface generated by qdbusxml2cpp, the class name and dbus interface name are given by the instrumentcluster.xml file and once we add an additional interface to the IDL file we also need an DBus XML for that.
That means, we need additional information for every interface in our IDL file. This can be achieved by adding a new annotation to the interface:
ch7-own-template/instrument-cluster.qface:
@config_dbus: { xml: "../demo_server/instrumentcluster.xml", interfaceName: "Example.If.InstrumentCluster", className: "ExampleIfInstrumentClusterInterface" }
interface InstrumentCluster {
    ...
Now as the information is part of the IDL file, we can also access it in the template like this:
ch7-own-template/templates/backend_dbus/backend.cpp.tpl:
m_client = new {{interface.tags.config_dbus.className}}(u"{{interface.tags.config_dbus.interfaceName}}"_s, u"/"_s, QDBusConnection::sessionBus());Finalize the template
To finalize the template we need to create some more files.
Build-system template files
Right now ifcodegen supports both QMake and CMake as build systems. For each one we need to provide additional files to let the build system know how to generate and compile our code.
For QMake we add a plugin.pri.tpl:
ch7-own-template/templates/backend_dbus/plugin.pri.tpl:
{% include "common/generated_comment.qmake.tpl" %}

HEADERS += \
{% for interface in module.interfaces %}
    $$PWD/{{interface|lower}}dbusbackend.h \
{% endfor %}
    $$PWD/{{module.module_name|lower}}dbusplugin.h

SOURCES += \
{% for interface in module.interfaces %}
    $$PWD/{{interface|lower}}dbusbackend.cpp \
{% endfor %}
    $$PWD/{{module.module_name|lower}}dbusplugin.cpp

{% for interface in module.interfaces %}
{{interface}}.files = {{interface.tags.config_dbus.xml}}
{{interface}}.header_flags += -i dbus_conversion.h

DBUS_INTERFACES += {{interface}}
{% endfor %}
There we add all the generated C++ files to the HEADERS and SOURCES variables accordingly. Afterwards we add some extra code to generate the DBus interface for every interface in our module.
You might wonder, why the actual file names differ from the template names? We will explain that after we had a look at the CMake integration:
ch7-own-template/templates/backend_dbus/CMakeLists.txt.tpl:
{% include "common/generated_comment.cmake.tpl" %}

qt6_set_ifcodegen_variable(${VAR_PREFIX}_SOURCES
{% for interface in module.interfaces %}
    ${CMAKE_CURRENT_LIST_DIR}/{{interface|lower}}dbusbackend.cpp
{% endfor %}
    ${CMAKE_CURRENT_LIST_DIR}/{{module.module_name|lower}}dbusplugin.cpp
)

qt6_set_ifcodegen_variable(${VAR_PREFIX}_LIBRARIES
    Qt6::DBus
    Qt6::InterfaceFramework
)

qt6_set_ifcodegen_variable(${VAR_PREFIX}_PLUGIN_CLASS_NAME
    {{module.module_name|upperfirst}}DBusPlugin
)

if (TARGET ${CURRENT_TARGET})
{% for interface in module.interfaces %}
    set_source_files_properties({{interface.tags.config_dbus.xml}} PROPERTIES INCLUDE dbus_conversion.h)
    qt_add_dbus_interface(${VAR_PREFIX}_SOURCES
        {{interface.tags.config_dbus.xml}}
        {{interface|lower}}_interface
    )
{% endfor %}

    target_sources(${CURRENT_TARGET}
        PRIVATE
        ${${VAR_PREFIX}_SOURCES}
    )

    target_include_directories(${CURRENT_TARGET} PRIVATE
        $<BUILD_INTERFACE:${CMAKE_CURRENT_LIST_DIR}>
    )

    target_link_libraries(${CURRENT_TARGET} PRIVATE
        ${${VAR_PREFIX}_LIBRARIES}
    )
endif()
For CMake it works a bit different, as ifcodegen provides two different mechanisms to integrate. First all the needed information is saved as ifcodegen variables using a call to qt6_set_ifcodegen_variable. All variables have to be prefixed with ${VAR_PREFIX}_. The VAR_PREFIX variable is set by CMake when importing the file and is used to import the variables using qt_ifcodegen_import_variables.
The second way to integrate with CMake is qt_ifcodegen_extend_target. In that case the ${CURRENT_TARGET} variable is set and the previous defined variables are used to call the needed cmake functions, e.g:
ch7-own-template/templates/backend_dbus/CMakeLists.txt.tpl:
    target_sources(${CURRENT_TARGET}
        PRIVATE
        ${${VAR_PREFIX}_SOURCES}
    )
Create a Generation YAML file
One important piece of information is still missing in order for ifcodegen to generate something useful. It doesn't know how the generated files should be named or whether a file should only be generated once or per module.
All this is defined within the Generation YAML file, which is named after the template and is located within the same directory:
ch7-own-template/templates/backend_dbus.yaml:
backend_dbus:
    module:
        documents:
            - "{{module.module_name|lower}}dbusplugin.h": "plugin.h.tpl"
            - "{{module.module_name|lower}}dbusplugin.cpp": "plugin.cpp.tpl"
            - "{{module.module_name|lower}}.json": "plugin.json.tpl"
            - "{{srcBase|lower}}.pri": "plugin.pri.tpl"
            - '{{srcBase|lower}}.cmake': 'CMakeLists.txt.tpl'
    interface:
        documents:
            - '{{interface|lower}}dbusbackend.h': 'backend.h.tpl'
            - '{{interface|lower}}dbusbackend.cpp': 'backend.cpp.tpl'
First the YAML defines that for every module in the IDL file some files should be generated. Every document consists of the output file name (using Jinja syntax), followed by the input template file name.
The same is done for all files which should be generated for every interface in the IDL file:
ch7-own-template/templates/backend_dbus.yaml:
    interface:
        documents:
            - '{{interface|lower}}dbusbackend.h': 'backend.h.tpl'
            - '{{interface|lower}}dbusbackend.cpp': 'backend.cpp.tpl'
Use the new template in the build system
In order to use the new template, you need to integrate it into the build system:
CMake:
ch7-own-template/backend_dbus/CMakeLists.txt:
qt_ifcodegen_add_plugin(ic_chapter7_dbus
    IDL_FILES ../instrument-cluster.qface
    TEMPLATE ../templates/backend_dbus
)QMake:
ch7-own-template/backend_dbus/backend_dbus.pro:
IFCODEGEN_TEMPLATE = $$PWD/../templates/backend_dbus
IFCODEGEN_SOURCES = ../instrument-cluster.qface
Instead of just using the template name, you need to provide the full path to the template, or add the template folder to the template search path.
© 2025 The Qt Company Ltd. Documentation contributions included herein are the copyrights of their respective owners. The documentation provided herein is licensed under the terms of the GNU Free Documentation License version 1.3 as published by the Free Software Foundation. Qt and respective logos are trademarks of The Qt Company Ltd. in Finland and/or other countries worldwide. All other trademarks are property of their respective owners.
