C
STMicroelectronics MPU quick start guide
Qt offers all the necessary tools to design, develop, build, and deploy your application onto the target.
This guide describes how to use the GUIs of Qt tools to develop Linux applications on an STMicroelectronics MPU device. It describes the overall process and provides step-by-step instructions for the following tasks:
- Designing a simple UI using Qt Design Studio.
- Creating a project in Qt Creator and utilizing the ready-made Qt Board Support Package (QBSP) for the STMicroelectronics MPU device.
- Building and debugging the project on the target device.
Note: Qt for Device Creation requires a license. If you don't have one, you can request a free trial.
Overview
The following figure illustrates the basic concept of the software development process when you're using Qt tools and Qt Onboard.

- Development Host is your development computer running Qt tools on Windows, Linux, or macOS.
- Qt tools includes development tools such as Qt Creator and Qt Design Studio, and quality assurance (QA) tools such as Squish.
- QBSP SDK contains a cross-compilation toolchain that is integrated into Qt Creator, and a device image that you can use to boot your device using Qt Onboard.
- Target Device is your development target that runs your embedded Linux application.
- Upload and debug an application (via Ethernet, Wi-Fi, or USB). Use Qt Creator to upload and debug your application on the target device.
- Flash a QBSP image represents ways (such as SD card) to install Linux on the target device.
Applicable STMicroelectronics MPU target devices
The instructions in this guide apply to the following STMicroelectronics MPU target device:
- STM32MP25 Discovery
The Qt versions you can see in the images and examples of this guide are indicative and might not represent the latest available version.
Note: For more details on the supported target devices and development hosts, see Supported Target Devices and Development Hosts.
Installing Qt Onboard
Before you start installation, check Requirements related to development host to make sure your host has all the necessary dependencies installed.
To install Qt Onboard, open the instructions that match your current situation.
I want to install Qt Onboard and I have the Extended Evaluation license
Installing Qt Onboard with the Extended Evaluation license
To develop with the Qt Onboard Extended Evaluation license, install the Qt Onboard Extended Evaluation package for your development target. The package includes the Qt development tools Qt Creator and Qt Design Studio.
Install Qt Onboard Extended Evaluation package as follows:
- Sign in to Qt Customer Portal and download Qt Online Installer. Qt Online Installer is available for the following hosts:
- Linux on Arm
- Linux x86
- macOS
- Windows
- Windows on Arm
Download the Qt Online Installer package that matches your host.
- Open Qt Online Installer.
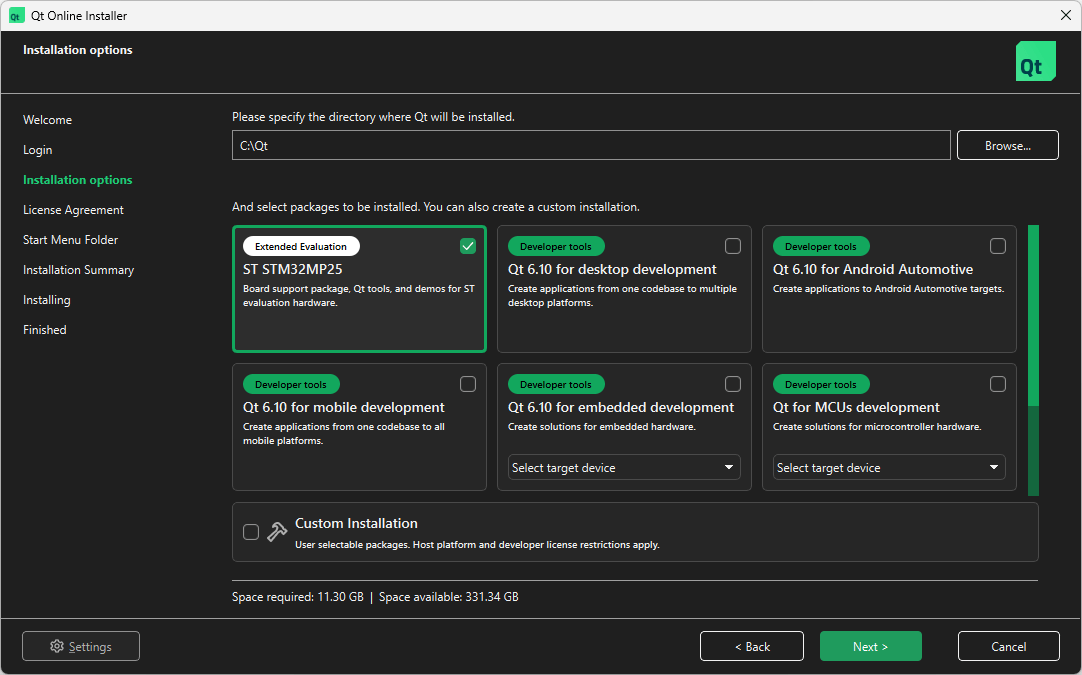
- Continue to Installation options and select the Extended Evaluation option for your development target.
- Select Next.
- Continue to Ready to Install and select Install.
You now have Qt Onboard Extended Evaluation package installed. Continue to Installing Qt Onboard on the target device.
I'm new to Qt
Installing Qt development tools
To develop with Qt Onboard, install Qt Creator and Qt Design Studio as follows:
- Sign in to Qt Customer Portal and download Qt Online Installer. Qt Online Installer is available for the following hosts:
- Linux on Arm
- Linux x86
- macOS
- Windows
- Windows on Arm
Download the Qt Online Installer package that matches your host.
- Open Qt Online Installer.
- Continue to Installation options and select Custom Installation.
- Select Next.
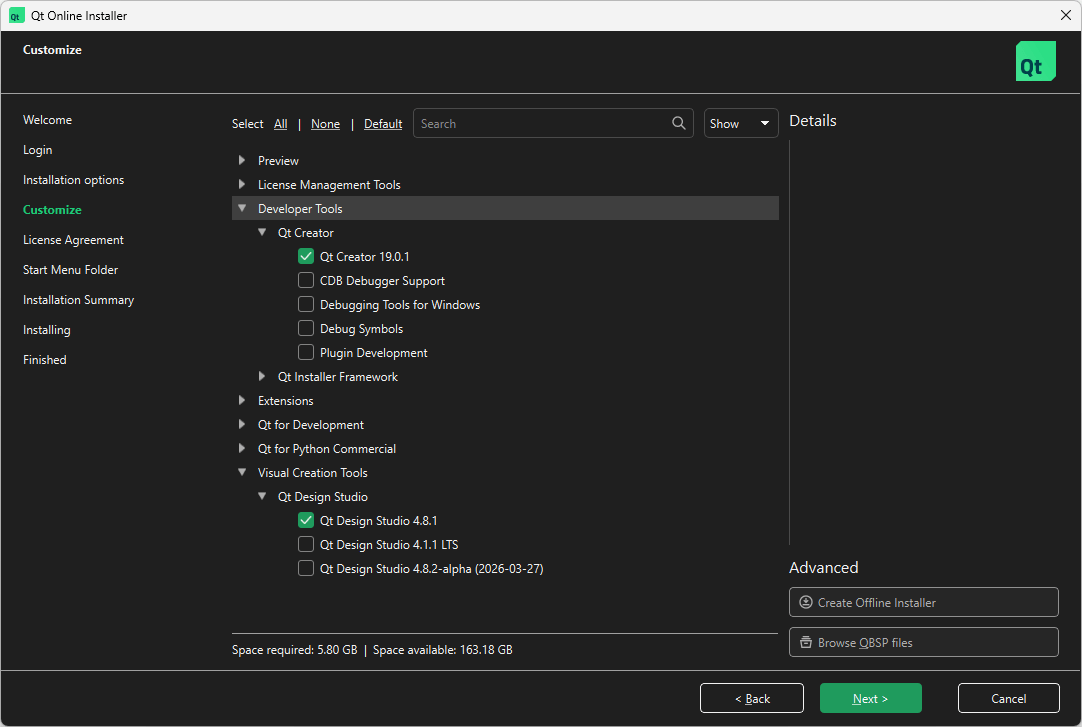
- In Customize, select the following components:
- Qt Design Studio (LTS or latest release).
- Qt Creator.
- Select Next.
- Continue to Ready to Install and select Install.
You now have Qt development tools installed. Continue to Installing Qt Onboard target package.
I already have Qt installed
Installing Qt Onboard target package
To install Qt Onboard for STM32MP25 Discovery:
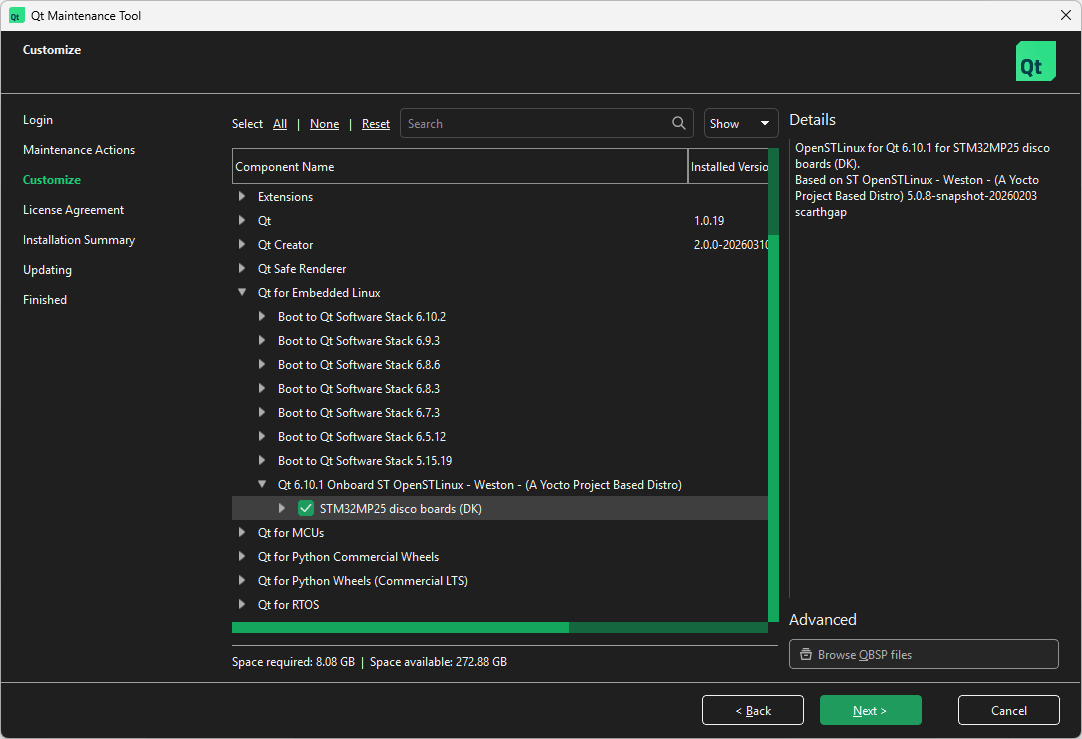
- Open Qt Maintenance Tool.
- Select Add or remove components > Next, and open the Qt for Development > Qt for Embedded Linux category to find Qt Onboard ST OpenSTLinux.
- Open the Qt Onboard ST OpenSTLinux category and select STM32MP25 Discovery.
- Continue to Ready to Update and select Update.
You now have the Qt Onboard target package installed. Continue to Installing Qt Onboard on the target device.
Installing Qt Onboard on the target device
Before you can test your Qt applications on the target device, you must flash the target device with an image containing the Qt Onboard. After you have successfully flashed your device, Qt Demo Launcher appears on the screen when you power on the device.
Flashing Qt Onboard image to a microSD card
The Qt Onboard image contains the Qt Onboard for the STMicroelectronics MPU device. Flash the image to a microSD card as follows:
- Insert a microSD card into your host PC.
- Open Qt Creator.
- Select Tools > Flash Boot to Qt Device.
- Select Next.
After you have flashed the image to a microSD card, insert the card into your target HW and turn on your device.
The STMicroelectronics MPU device starts with Qt Demo Launcher application by default. If you want to check the IP address of the device, open Get Started with Qt via Qt Demo Launcher. The IP address is shown if the device is connected to an Ethernet or Wi-Fi network, or to the host computer via USB OTG.
Note: If your target device does not start, check that microSD card is defined as the Boot mode.
Connecting the target device
Create a connection between the target device and Qt Creator to run, debug, and analyze applications on it. The sections below describe how to set up a device using either USB, Ethernet, or Wi-Fi connectivity.
Connecting the target device via USB
The target device can be connected to the host via USB On-the-Go (OTG). Once connected via a USB network, the device is automatically added to Devices in Qt Creator.
Connecting the target device via Ethernet or Wi-Fi
Connect your target device to network either via Ethernet or Wi-Fi connectivity.
To connect via Ethernet, use the Ethernet port. To connect via Wi-Fi, set up a Wi-Fi connection from Qt Demo Launcher.
After your target device is connected and has an IP address, set it up to be used in Qt Creator with the following steps:
- Open Qt Creator.
- Select Edit > Preferences.
- In the Preferences window:
- Select Devices.
- Select Add > Remote Linux Device > Start Wizard.
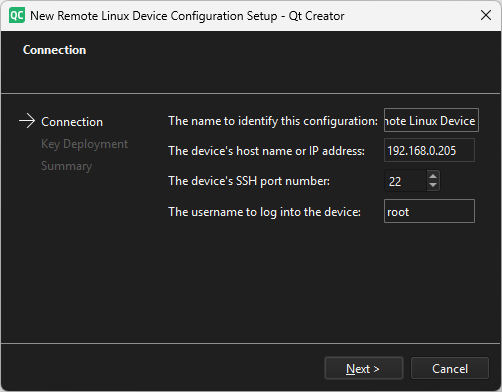
- In the New Remote Linux Device Configuration Setup window:
- Enter the name to identify this configuration.
- Enter the device's host name or IP address.
- Enter
rootas user name. - Select Next.
- On the Devices tab, select OK.
Note: Qt Creator uploads the application over the IP network, so your target device has to be in the same network as your development host.
Creating an application UI in Qt Design Studio
Create a cross-platform UI with Qt Design Studio, also for embedded Linux applications, with the following steps:
- Open Qt Design Studio.
- Select Create Project.
- In Presets, select General.
- Name your project. Pay attention to the project path—later on, you open your project from this location with Qt Creator.
- Adjust display resolution and orientation to suit your display.
- Select Enable CMake Generator. With the resulting
CMakeLists.txtfile, you can open your project in Qt Creator. - Make sure your Target Qt Version matches the version of Qt installed on your machine.
- Select Create.
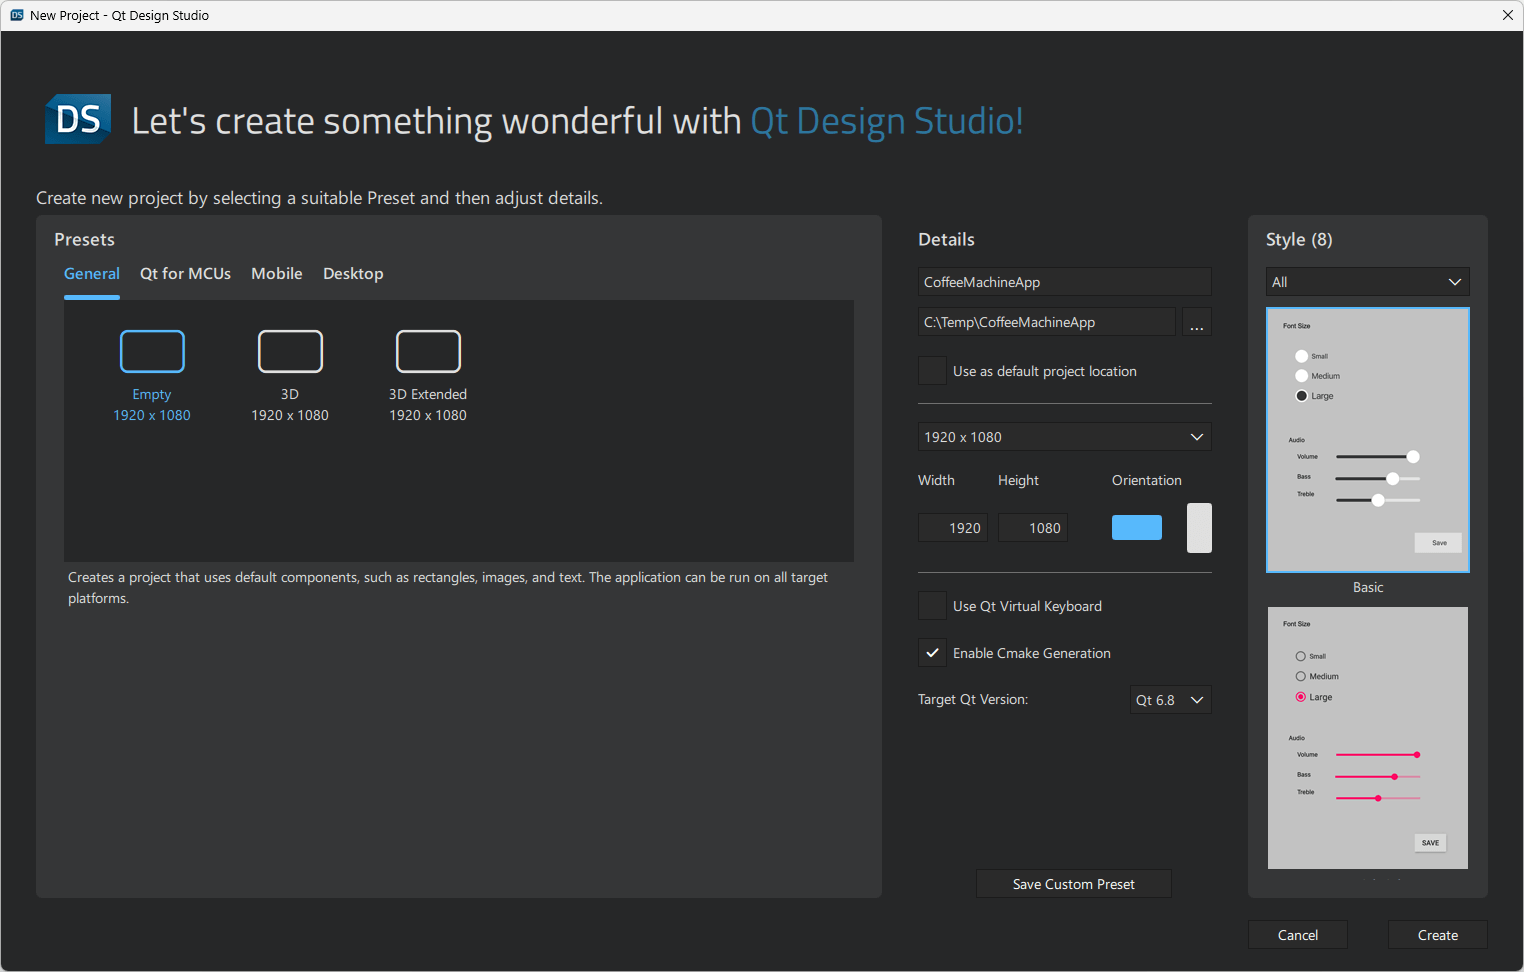
Now you can modify your UI as you wish. Once it's ready, select Save All to make sure that you can open your UI project in Qt Creator.
Configuring and building an application in Qt Creator
To configure and build an application in Qt Creator, follow these steps:
- Open Qt Creator.
- Navigate to the project you created with Qt Design Studio.
- Select CMakeLists.txt to open the project.
- In the Configure Project window:
- Select your STMicroelectronics MPU device kit.
- Select Configure Project.
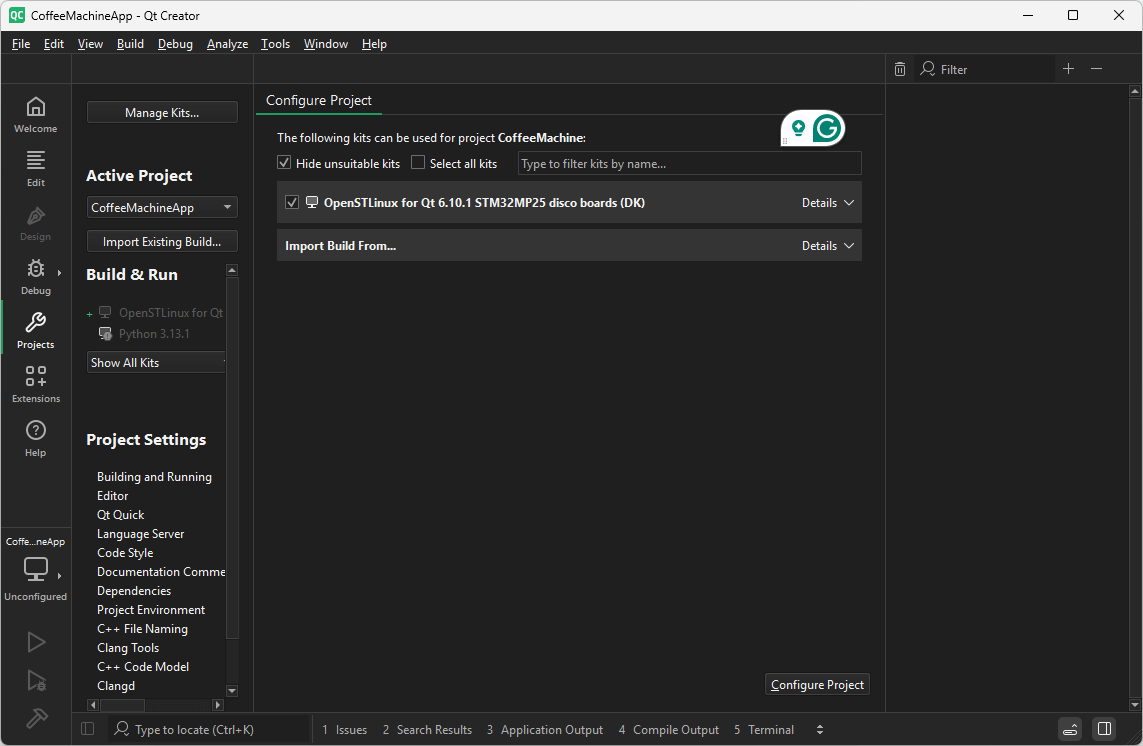
Finally, select Build > Build Project to build the project you configured.
Running an application on the target device
After setting up your device, you can upload and start your application on the STMicroelectronics MPU device as follows:
- Open Qt Creator.
- Select File > Open File or Project.
- Navigate to the project you configured earlier and select Open.
- In the Projects window:
- Edit the Run Settings if necessary.
- Select Run.
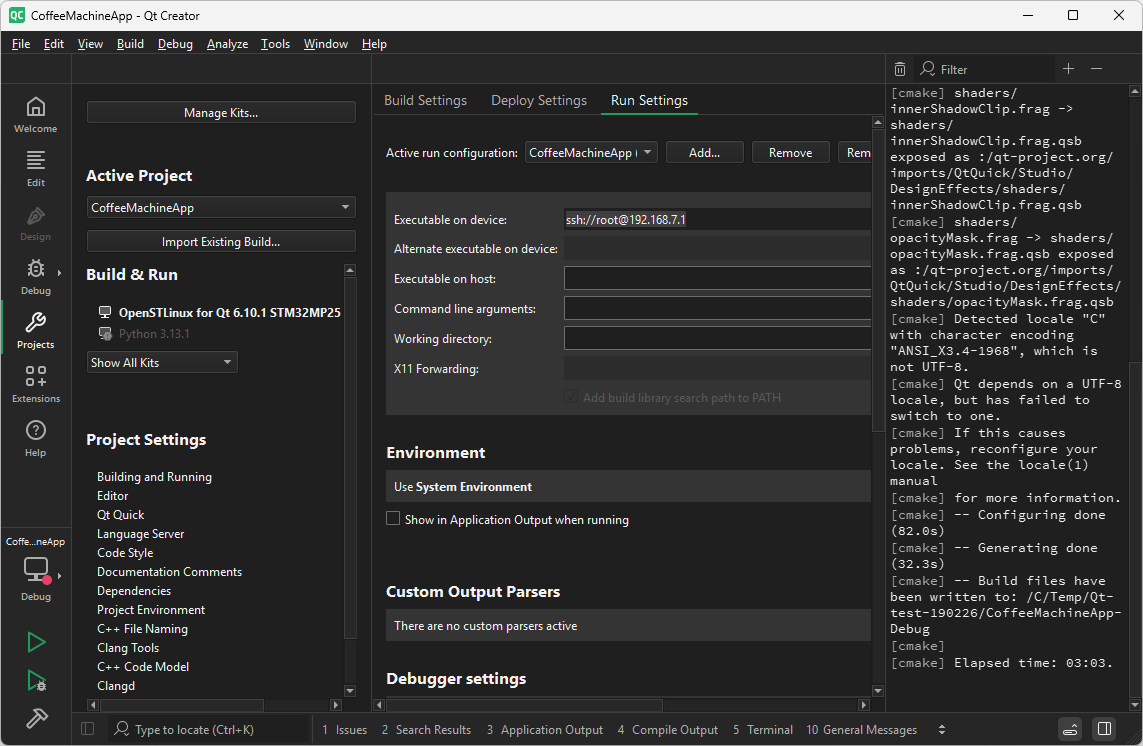
Note: To make changes to your application, you can update it on the device simply by running it again.
For more information on how to deploy Qt projects to the device, see Tutorial: Deploying your first project.
For more information on how to build applications on Docker devices, see Build on Docker devices.
Debugging an application
For more information on using Qt Creator to debug an application, see Debugging.
Customizing Qt Onboard for an STMicroelectronics MPU device
Qt Onboard for embedded Linux is built using the tools and resources from the Yocto Project. For more information on how to set up a building environment for building Qt Onboard, see Setting up environment for building Qt Onboard.
The following table lists the MACHINE values of the currently available ST devices:
| Board | MACHINE |
|---|---|
| STM32MP25 Discovery | stm32mp25-disco |
The following steps provide an example on how to build Qt Onboard for an STMicroelectronics MPU device:
- Initialize the build environment from the manifest repository.
cd <BuildDir> repo init -u https://github.com/STMicroelectronics/meta-st-x-linux-qt -b qbsp-manifest -m qbsp-ostl-qt-manifest.xml repo sync - Configure the build environment for Linux.
DISTRO=openstlinux-weston MACHINE=stm32mp25-disco BSP_DEPENDENCY="layers/meta-boot2qt/meta-boot2qt layers/meta-qt6 layers/meta-st/meta-st-x-linux-qt" source layers/meta-st/scripts/envsetup.sh - Start building a QBSP for Qt Onboard.
bitbake meta-qbsp-ostl-qtAfter the build has been completed, you can find the QBSP file at
build-openstlinuxweston-stm32mp25-disco/tmp-glibc/deploy/qbsp/meta-qbsp-ostl-qt-x86_64-stm32mp25-disco-6.8.7.qbsp.
Troubleshooting
If you have any issues with your STMicroelectronics MPU device, such as how to set up boot switches or connect the debug terminal, turn to ST Community for more information.
For more information on troubleshooting Qt Onboard, see Troubleshooting.
Available under certain Qt licenses.
Find out more.
