
2.2. Graphical Configuration Interface
The configuration GUI axivion_config offers an easy way to create and edit JSON configuration files that
set analysis options. It can also be used to inspect intermediate and final results of setting options via sequences
of JSON and Python files listed in BAUHAUS_CONFIG.
axivion_config shows a hierarchy of analysis rules that can be configured. It allows you to:
perform the initial setup of your code analysis project using a wizard-style interface
manage your configuration setup by adding, removing and re-arranging configuration files
view and edit the options of individual rules and groups of rules
read the documentation of rules and their options
activate/deactivate rules
copy rules to create multiple instances of a single rule with different names and settings
import directories with custom rules
in a few special groups: change the order in which rules are executed
There are three main ways to use axivion_config:
Edit an existing analysis configuration:
axivion_configuses the same method as the final analysis to find the configuration to be edited: By looking at the contents of theBAUHAUS_CONFIGenvironment variable. That makes it easy to runaxivion_configin an analysis environment and view/edit the same configuration thataxivion_cioraxivion_analysiswould see when invoked from there.Instead of setting
BAUHAUS_CONFIGto a single file or directory you can just launchaxivion_configand then chooseOpen...from theFilemenu to open the configuration file. If you would normally setBAUHAUS_CONFIGto a directory, then open the fileaxivion_config.jsonin that directory.Create a basic setup using the Project Wizard: Run
axivion_configwithout setting upBAUHAUS_CONFIGand use the Project Wizard to create a basic standard setup of configuration files. See the next section for more details.Create a custom setup using the Layer Management dialog: Run
axivion_configwithout setting upBAUHAUS_CONFIGand instead of entering the wizard, chooseLayer management...from theFilemenu to open theLayer Managementdialog. This allows you to create new configuration files from scratch, but also to import and re-arrange existing ones. See Layer Management for more details.
Instead of using the Layer Management dialog, you can also create
custom setups manually. See
Manual creation of custom setups.
2.2.1. The Project Wizard
If you start axivion_config without setting up BAUHAUS_CONFIG, the
Project Wizard opens automatically. It offers a simplified guided user interface for
setting up the basic configuration structure for analysing a software project.
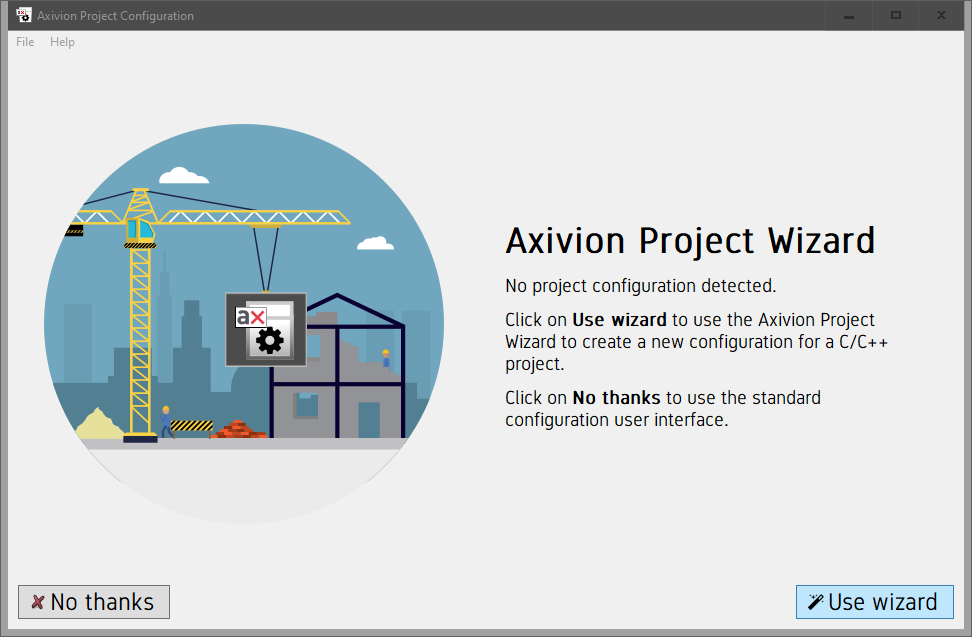
The Project Wizard.
If you do not want to use the wizard, e.g., because you want a more complex
configuration file structure, you can click on No thanks to
switch to the conventional user interface.
2.2.1.1. Common Wizard Controls
Use the following controls to navigate through the wizard steps:
Click on
Nextto confirm the entered information and advance to the next step.Click on
Backto go back to the previous step to review and amend information entered earlier.Click on
Abort wizardto leave the wizard and return to the conventional user interface.
Warning
Aborting the wizard loses the information entered so far.
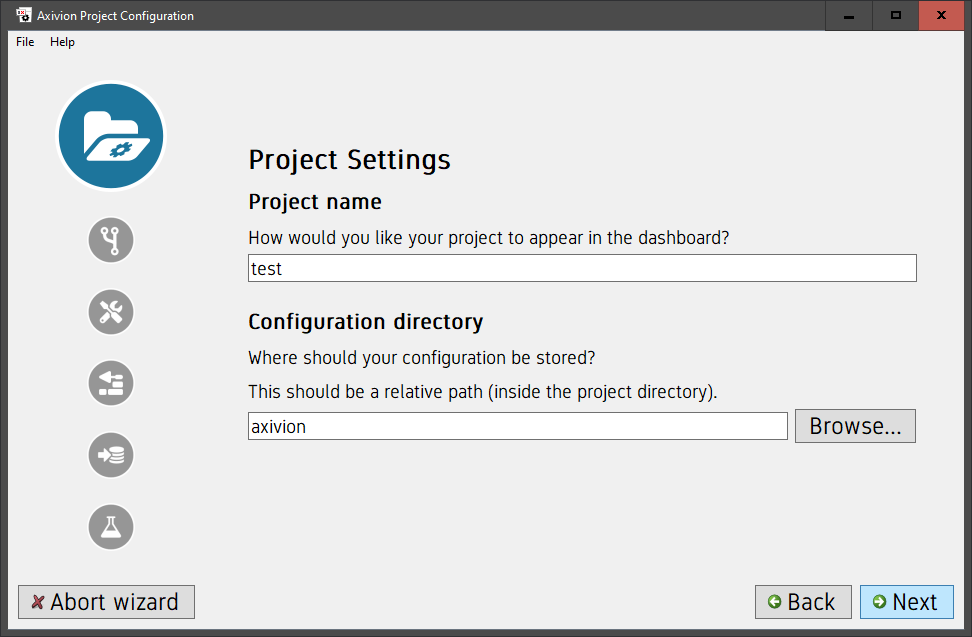
The Project Settings page of the Project Wizard.
Each wizard step asks for some information.
For instance, the Project Settings page shown above asks for the project name to
display in the dashboard and the configuration directory. This is the directory
to which the wizard will eventually write the generated configuration files.
The default is the directory axivion inside the project directory that
you entered in the previous step. You can either enter a relative path, which
is interpreted relative to the project directory or pick a directory using a file
chooser by clicking on Browse....
If the entered information is not valid, clicking on Next displays a
message next to the invalid input field instead of advancing to the next page. In that
case, please correct the input and click on Next again.
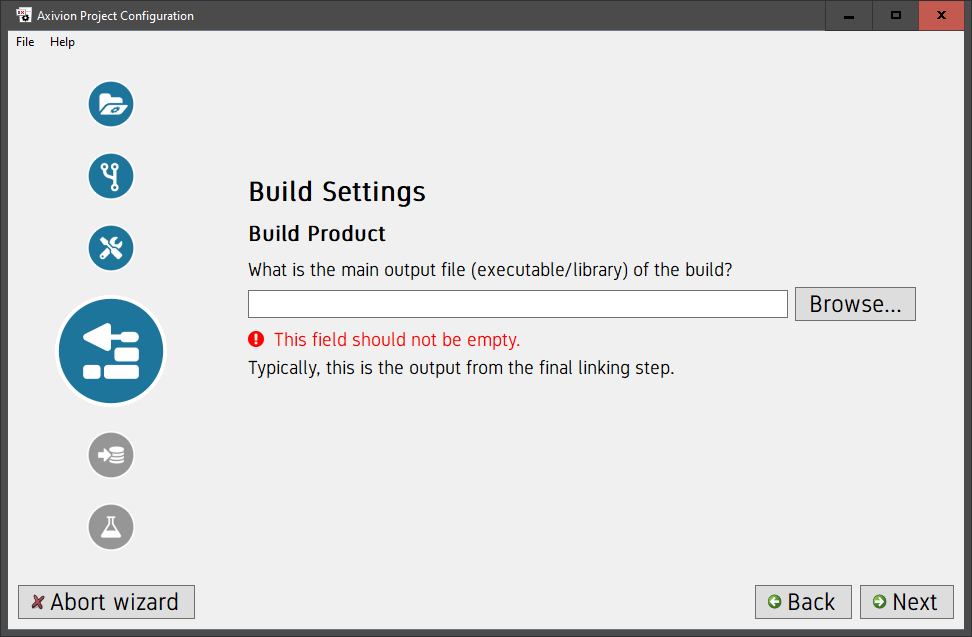
A wizard page with invalid input.
The final page of the wizard lists the files that will be created.
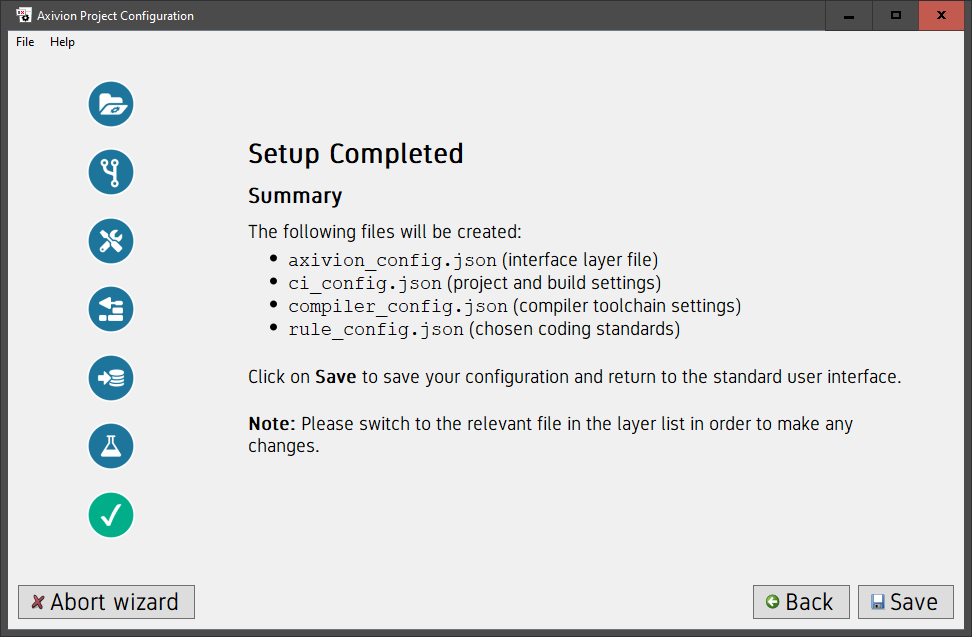
The final page of the Project Wizard.
Clicking on Save returns you to the standard user interface, with the
generated files already loaded ready for editing.
Note
After returning to the standard user interface the active layer is the generated
interface layer. Before making any changes you are advised to first switch to
the desired configuration file you want to modify. If you forget, you can still
choose the desired target layer when you click on Save.
You can start a new wizard session at any time in the standard user interface by
choosing Project wizard... from the File menu. This is
only possible while there are no unsaved changes. Please note that this creates a
new configuration from scratch (rather than editing the existing configuration using
the wizard interface).
2.2.2. General usage
The main window of axivion_config is divided into the following main parts: The Rule Hierarchy on the left-hand
side, the Options Tree on the right-hand side and the Documentation Area at the bottom. The Rule Hierarchy shows all
available analysis rules.
While a rule is selected in the Rule Hierarchy, the Rule description tab in the Documentation Area shows
its description, and the Options Tree shows its available options and their current values.
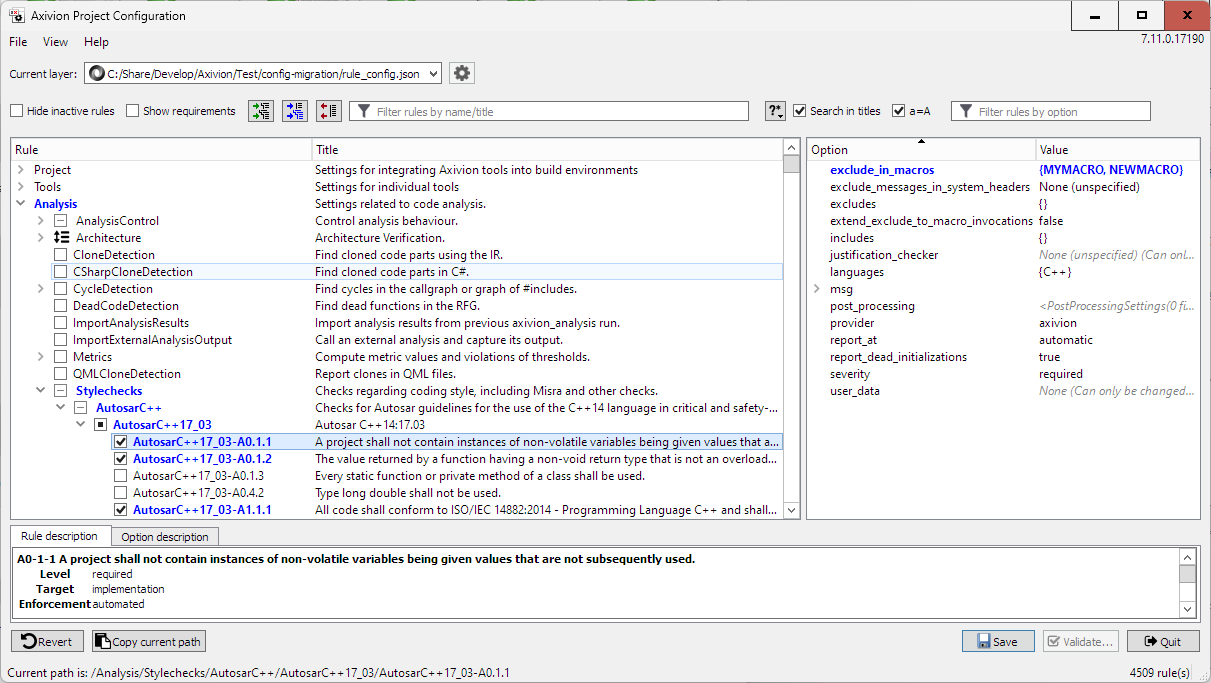
The main window of axivion_config.
The Layer Control labeled Current layer: at the top of the window displays the configuration
layer that is currently being viewed and edited. Choosing a different layer from the menu switches to the given layer.
See The Layer List for more details about switching layers.
The  cogwheel button next to the Layer Control opens the
Layer Management dialog. It allows you to add and remove configuration
files and change the way they are grouped into interface layers. See
Layer Management for more details about the Layer Management dialog.
The option values shown in the Options Tree are not only those defined in the current layer but also include the values inherited from more global layers. Entries shown in blue indicate that they are local, i.e., present in the currently edited configuration layer. Entries in black or gray are inherited from more global layers or the default settings. Entries shown in bold indicate unsaved modifications. Parent levels of local settings and unsaved modifications are highlighted in the same way. That makes it easy to find subtrees containing local/modified settings.
Selecting an option in the Options Tree shows its description in the Option description field at the
bottom of the window, and double-clicking on an option opens a dialog to edit it (provided that the option’s type
is supported by the GUI).
See Editing Option Values.
Most rules in the Rule Hierarchy have a checkbox that allows them to be activated/deactivated. If the box is ticked, the rule is active. Only active rules take part in the analysis. Settings that are changed for inactive rules are still remembered, but do not have any effect on the analysis until the rule is activated. See Activating Rules.
The amount of information shown in the Rule Hierarchy can be reduced in two ways:
By enabling the
Hide inactive rulesoption, which only shows rules that have been activated.By entering a search term in the Rule Name Filter or Rule Options Filter fields, which filter the rules as you type. See The Rule Filters.
2.2.2.1. GUI appearance
If the font size at startup is not suitable, you can reduce/enlarge it dynamically by pressing Ctrl+-/Ctrl++. You can return to the original font size at startup by pressing Ctrl+0. Using any of these shortcuts has the side effect of making all text the same size, so if due to screen and system settings the user interface elements appear at very different font sizes at startup, you can make everything the same size simply by pressing Ctrl+0.
You can also change fonts and font sizes via the configuration, see Configuring the configuration GUI or via command-line arguments, see Command-line parameters.
Hint
Making all font sizes the same can be automated by setting the configuration option
appearance.main_ui.uniform_font_sizes
2.2.2.2. Expanding and collapsing
Clicking on the 
Expand all button (or pressing Ctrl+E) expands all levels of the
Rule Hierarchy, so you can see the actual rules. This also happens when you press Return in the Rule Name Filter field.
Clicking on the 
Expand local button expands just the subtrees with local changes, i.e.,
changes in the current layer (shown in blue).
The 
Collapse all button (or Ctrl+Shift+E) collapses the entire rule hierarchy.
You can expand/collapse specific subtrees recursively by choosing 
Expand subtree/
Collapse subtree/ from the context menu over any Rule Hierarchy entry, and you can expand just the parts
of a subtree with local changes using 
Expand local subtree.
Activating the Show requirements checkbox adds a column to the
Rule Hierarchy showing some rule dependencies. Using this additional column, you
can quickly see whether a given rule requires an IR file or the RFG. It also
indicates whether a rule requires one of the
StaticSemanticAnalysis
rules to be actually executed.
Note: If you want to resize this additional column with the rule requirements,
you have to drag the right-hand side of the column.
2.2.2.3. The Rule Filters
Filtering by rule name/title
Typing into the Rule Name Filter field hides all rules that do not contain the entered search string. Pressing Return expands all levels of the Rule Hierarchy to reveal the rules, no matter how deeply they are nested in the hierarchy.
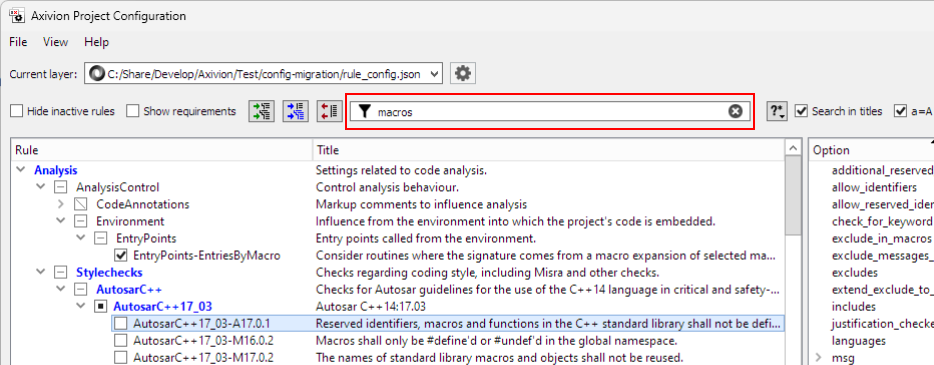
The Rule Name Filter field.
The button next to the Rule Name Filter field indicates the selected match mode. By default, rules are matched
in  wildcard mode: The question mark (
?) matches any single character and the asterisk
(*) matches any string of zero or more characters. Clicking on the button opens a menu to set the match
mode. Choosing 
String comparison switches to ordinary substring matching and choosing 
Regular expression switches to regular expression matching.
If Search in titles is ticked, both rule names and titles are searched, else rule names only.
If the a=A option is ticked, the entered search string is case insensitive, else case sensitive.
To disable the filter, simply delete the search string from the field or click on the cross at the right hand side of the field.
You can start editing the Rule Name Filter field without having to click into it using the mouse by pressing Ctrl+F.
Filtering by available options
The Rule Options Filter field at the right allows you to find rules that offer a specific option. Entering an option name (or part of an option name) hides all rules that do not offer a matching option. You can filter by rule name and option name at the same time.
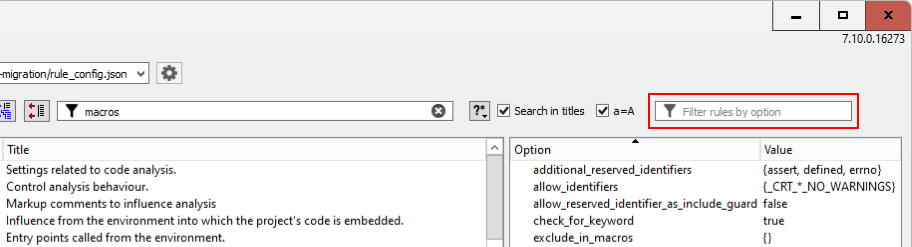
The Rule Options Filter field.
The entered name is matched against option names anywhere in the options hierarchy. You can specifically search
for structured options by entering a hierarchical name like advanced.ir_classes, but just entering
ir_classes will match the nested option as well. The matched options of the currently selected rule are
highlighted with a yellow background in the Options Tree on the right.
Pressing Return in the Options Filter field expands the options hierarchy to reveal all matched items and scrolls the first one into view.
Note
Even though the Rule Options Filter is based on option names, it is still a rule filter, so it only affects which rules are displayed in the Rule Hierarchy, not which options are displayed in the Options Tree on the right.
2.2.2.4. The Layer List
The menu obtained by clicking on the Layer Control shows all available configuration layers. The list contains
 interface layers,
  JSON layers and
  Python layers. The most
local layer (the one that is loaded last) appears at the top of the list, the most global layer (the one that
is loaded first) appears at the bottom. Interface layers are followed by the files they reference and the
filenames of the child layers are indented.
Python layers. The most
local layer (the one that is loaded last) appears at the top of the list, the most global layer (the one that
is loaded first) appears at the bottom. Interface layers are followed by the files they reference and the
filenames of the child layers are indented.
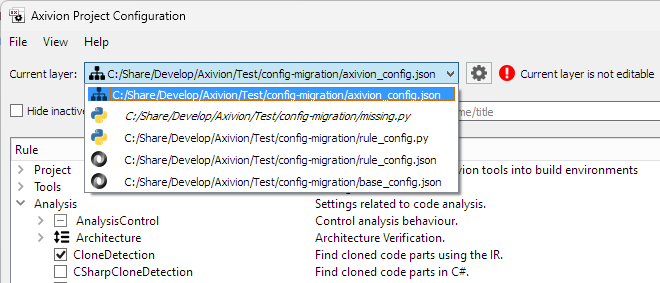
The Layer List.
If the currently chosen file is an interface layer or a Python file, then a warning message appears next to the layer control to indicate that the current layer cannot be edited. In that case, you can still make changes to options, but as soon as you try to save them, you will be asked to which other layer the changes should be saved or whether they should be saved to an entirely new configuration layer.
2.2.3. Activating Rules
The checkbox in front of a rule allows its activation status to be changed. Doing so counts as an option change and
makes the rule appear in bold and blue, even if none of its options in the Option Tree were changed.
Changing the activation state of a rule group changes the state of all the rules in its subtree. A rule group’s checkbox is shown ticked if all the rules in its subtree are active. If only some, but not all, of the rules in the subtree are active, the checkbox indicates a partial selection in a platform-dependent way, e.g., via a horizontal bar or a square in the center of the box.
Some rule group checkboxes are not clickable because it would not make sense to activate all the rules inside that
group at the same time. This applies for instance to the Stylechecks group and the Misra group inside
it. For such groups, the checkbox symbol still indicates whether all ( ), some (
 ), or
none (
), or
none ( ) of the rules in the given subtree are activated.
Note
In contrast to rule group option changes, which are stored in the configuration file, changing the activation state of a group is merely a quick way of changing the activation states of the rules in its subtree, but the group change is not stored itself. So, if a rule is added to the group later, it does not inherit the activation state from the group.
2.2.4. Editing Option Values
The Options Tree on the right shows the current value for each option of the currently selected rule. Double-clicking on an option opens a dialog to edit its value. Alternatively, an option can be edited by highlighting it using the cursor keys and pressing Return.
While using the Options Tree, pressing Ctrl+E expands all options and Ctrl+Shift+E collapses all options.
The appearance of the dialog depends on the type of the option:
2.2.4.1. Editing String Values
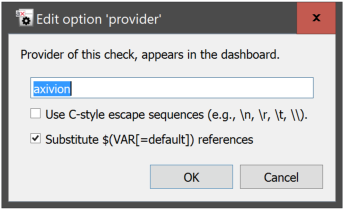
The dialog for editing string values
Some string options have special semantics. For instance, the string could be a file globbing pattern, a regular expression or a path that is relative to the location of the configuration file. For such special string values, an extra description is shown immediately above the input field.
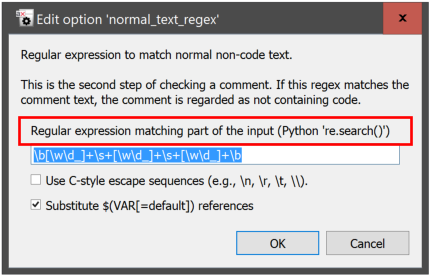
String dialog with extra description field (highlighted in red)
Enabling the Use C-style escape sequences (e.g., \n, \r, \t, \\)
option allows you to enter control characters using standard C escape sequences.
Editing Path Options
Options that refer to filesystem paths offer two buttons to set up the path in a more
convenient way: Browse for file... and Browse for
directory... open a standard file picker dialog to select a file or directory path
respectively.
Most path options have special semantics for relative paths that are described in the
extra description field. Relative paths are either interpreted relative to the current
configuration layer or to the project directory. For such options, there is an extra
option Make relative that automatically makes any entered or picked
absolute path relative to the given reference directory. The field labeled
Resulting setting shows the relative setting that will be stored in the
configuration.
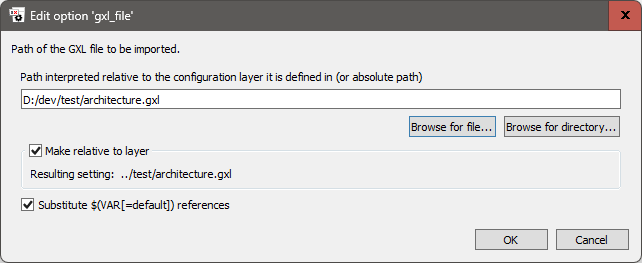
The dialog for editing a layer-relative path
In some circumstances, the reference directory cannot be established, in which case the
Make relative option is greyed out. For layer-relative options, this can
happen if the current layer has no associated filename. For project-relative options
this can happen if /Project/directory has not been set, or if it has been set to a
relative setting, but the current layer has no associated filename.
Options that refer to filesystem paths do not allow C-style escape sequences.
Variable Substitution
You can reference environment variables and a few builtin variables in string configuration values. This does not only apply to string options but also to strings in more complex option types like sets or lists of strings.
The Substitute $(VAR[=default]) references option controls whether
$(VAR) references to environment variables are substituted by the contents of
the variable when the configuration is read at the start of tool execution. If disabled,
the GUI adds the necessary escaping to make sure that the entered string is taken
literally without any substitutions. In that case, the value appears with the extra
escaping (an additional initial '$') in the Options Tree.
A variable reference can contain an optional default value via $(VAR=default).
The default is used if the variable is not defined.
If there is a variable reference without a default value and the given variable is not set, then this results in an error when the configuration is read at the start of tool execution.
Note
The variable name must not contain '=', '(' or ')', except for a single
matching pair of parentheses, e.g., $(ProgramFiles(x86)). The default value cannot
contain a closing parenthesis (which also means it cannot contain any nested variable
references).
Caution
Variables are only substituted in options loaded from JSON files, i.e., options set
via the configuration GUI. Options set in Python are always taken verbatim. If
variable expansion is required in an option set from Python, it is straightforward
to look up the variable in os.environ.
Builtin Variables
The following builtin variables are always available for substitution in string configuration values:
Variable name |
Meaning |
|---|---|
AXIVION_USERHOME |
The user configuration directory for the Axivion Suite, i.e.,
|
AXIVION_INSTALLDIR |
The installation directory of the Axivion Suite. |
AXIVION_USERNAME |
The name of the user running the tool that reads the configuration. |
AXIVION_TEMPDIR |
The OS specific directory for storing temporary information. |
AXIVION_VERSION |
The version string of the Axivion Suite installation. |
AXIVION_CONFDIR |
The directory containing the currently loaded configuration file. This is the only builtin that changes while loading the configuration, because its value depends on the current configuration layer. |
AXIVION_PARALLEL_CORES |
The number of virtual cores available. |
AXIVION_PARALLEL_IDEAL |
The number of virtual cores, capped to ensure that each core has at least a minimum amount memory available (default 2 GB, see Default Parallelism). |
If a builtin variable is also set as an environment variable, then the environment variable takes precedence and overrides the standard builtin definition.
You can force a variable substitution to only look at environment variables by prefixing
the name with env:, e.g., $(env:AXIVION_USERNAME) and to only look at builtin
definitions by prefixing the name with builtin:, e.g., $(builtin:AXIVION_USERNAME),
so the builtin: prefix stops environment variables from overriding standard builtin
definitions.
2.2.4.2. Editing Other Simple Types
Integer Values
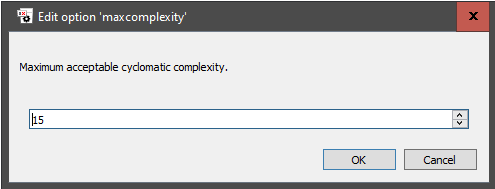
The dialog for editing integer values
Boolean values
For setting/clearing a flag:
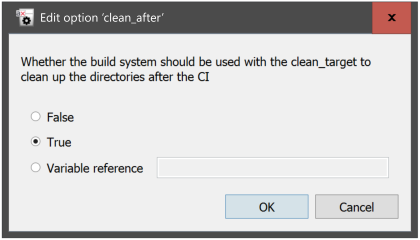
The dialog for editing boolean values
Apart from the boolean values False and True, you can choose the option
Variable reference to enter a variable reference of the format $(VAR) or $(VAR=default).
See Editing String Values for the details about using variable references. For boolean options, the
values yes, true, active, on (all case-insensitive) and 1 are considered valid
representations for True, and no, false, inactive, off (all case-insensitive)
and 0 are considered valid representations for False. The exclamation mark not operator can be used
to negate the value, e.g., !$(SKIP_PREBUILD_CLEAN) would evaluate to True if the SKIP_PREBUILD_CLEAN
variable was set to FALSE (or any of the other representations for False).
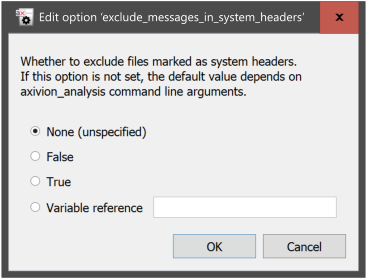
The dialog for editing optional boolean values
If the boolean value is optional, then the dialog includes an extra None (unspecified) option.
Enum Values
For selecting one of a fixed number of alternatives:
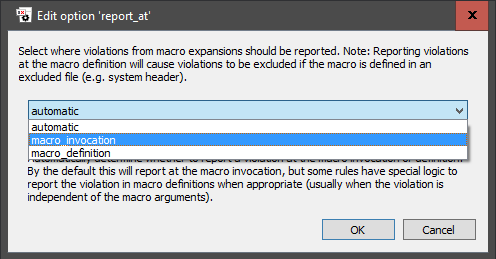
The dialog for choosing an enumeration value
The description field below the value field shows the documentation of the currently chosen value.
Hint
While the dropdown menu is open, pressing a character key on the keyboard jumps to the next value starting with that character.
Float Values
For floating-point values (the screenshot shows the “optional” variant with an additional
None option, see Optional value types):
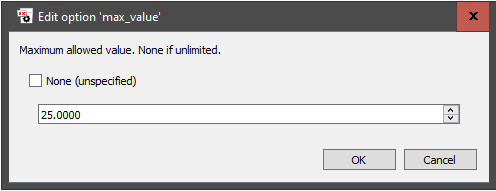
The dialog for editing floating-point values
Colors
Colors can be specified either as named SVG colors or as hex #RRGGBB values (HTML format).
The color dialog allows you to type in a color name, choose a named color from the drop-down menu or set an
arbitrary color using the custom color dialog. To open the custom color dialog, click on
Set custom color.... This dialog also allows you to pick a color from any place on the screen.
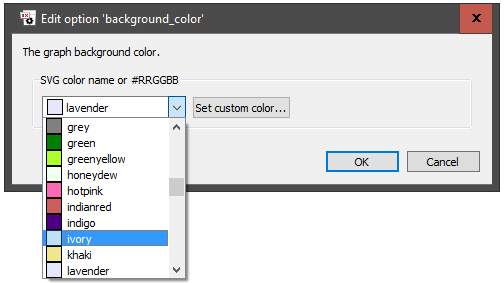
The dialog for editing colors
2.2.4.3. Sets of Enums
For specifying sets of a fixed number of alternatives (sets of enums):
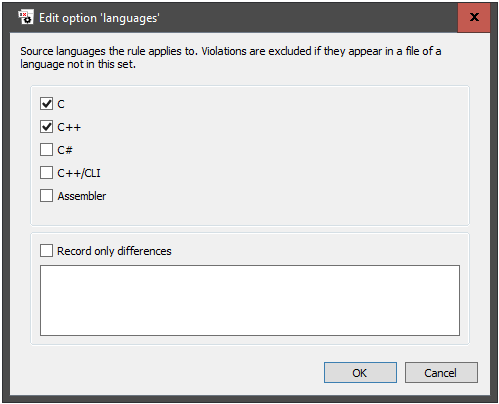
The dialog for editing sets of enums
The option Record only differences (new in version 7.2, shortcut
Alt+R) is explained in the section Delta editing below.
2.2.4.4. Sets/Lists
Sets and lists can contain any number of values.
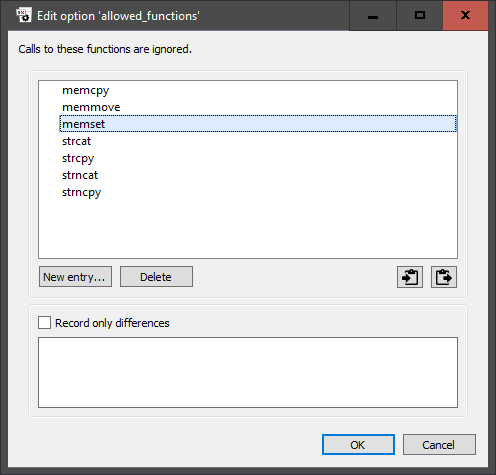
The dialog for editing sets of strings
To edit an existing entry, simply double-click on it. This opens the editor dialog for the given value. Alternatively, highlight the entry using the cursor keys and press Return. While an individual entry is highlighted, you can still commit the entire dialog using Ctrl+Return.
To add a new entry to the list/set, click on New entry... (shortcut: Alt+N).
This opens a dialog to enter a new value. To delete one or more entries, select them and
click on Delete (shortcut: Alt+D or Delete).
Selected entries can be copied as strings to the clipboard by clicking on
the copy button ( ) or by pressing Ctrl+C. To cut
entries as strings to the clipboard, press Ctrl+X. When editing sets or
lists of strings or string-like types (e.g., file system paths or patterns),
clipboard entries can be pasted by clicking on the paste button
(
) or by pressing Ctrl+C. To cut
entries as strings to the clipboard, press Ctrl+X. When editing sets or
lists of strings or string-like types (e.g., file system paths or patterns),
clipboard entries can be pasted by clicking on the paste button
( ) or by pressing Ctrl+V.
When editing a list (as opposed to a set), entries can be dragged around to change their order, and new/pasted entries are inserted after the last selected entry.
Variable substitution in sets/lists of strings
There is a special kind of variable substitution only available for set/list
values that allows several entries to be added using a single variable: A
“splitpath” reference $(splitpath:VAR) or
$(splitpath:VAR=default) splits the contents of the environment variable
VAR at the platform specific path separator and adds all non-empty
segments as individual entries to the option value.
For instance, when setting the environment variable ENTRIES=DEF;GHI on
a Windows® system (where the path separator is the semicolon) before running
the analysis, the list value [ ABC, $(splitpath:ENTRIES=) ]
will evaluate to [ ABC, DEF, GHI ]. The same will
happen when setting ENTRIES=;;DEF;GHI;. If the variable is unset, the
option will have the value [ ABC ], since the empty default does not
produce any entries.
Note
Any variable reference without a default value causes an error when running
the analysis without setting the variable, and this also applies to
$(splitpath:VAR) references. The most useful default is just the
empty string, i.e., $(splitpath:VAR=), which means that the
reference has no effect if the variable is unset. It is possible to specify
multiple entries in the default value, but not in a platform-independent way,
so this is not recommended.
Delta editing
The option Record only differences (new in version 7.2, shortcut
Alt+R) controls how the edited value is stored in the current configuration
layer. If this option is switched off, the edited set or list value is stored as a
full value that completely replaces the value inherited from the preceding (more global)
layer or from the parent group. So, any subsequent changes to the value in a preceding
layer or an ancestor group do not have any effect, because the option is overwritten.
If this option is switched on, the edited set/list is saved as a special “delta” value that describes only the differences between the inherited value and the edited value. That allows you to make incremental changes to the inherited value, e.g., just remove values from a set or a list, append new entries to a list or insert entries into a set. If the inherited value changes due to a change in a preceding configuration layer or a parent group, then the changes stored in the delta value are applied to the changed inherited value.
Note
This option is not always present in the dialog, since there are circumstances in which storing a delta value is not meaningful. For instance, when adding a new value to a dictionary (see Dictionary values below), the inherited dictionary value does not contain the new key, and therefore its associated value cannot be a delta value.
Delta value examples
The excludes option of analysis rules contains a set of filename glob patterns. Supposing
the value set up in a preceding (more global) layer A was { */defunct/*, */internal/*,
*/test/* } and the value is changed in a more local layer B to { */internal/*,
*/thirdparty/*, */test/* } with Record only differences switched on.
The recorded change saved to layer B would be a deletion of */defunct/* and an insertion of
*/thirdparty/*, as shown in the field below the Record only differences option.
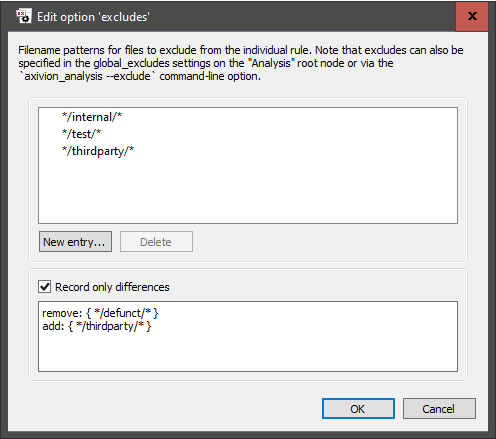
The contents of the set after editing it in layer B.
If the value in layer A was later changed to { */defunct/*, */disabled/*,
*/internal/* }, then the new resulting value after processing layers A and B would be
{ */disabled/*, */internal/*, */thirdparty/* }, so the changes made to layer A
(removal of */test/* and addition of */disabled/*) do affect the final result.
Without the use of the Record only differences option, that would not have happened, because
any change to the value in layer B would store a complete definition of the set value that would
overwrite whatever was set up in layer A.
If the value in layer A was later changed to { */disabled/*, */internal/*,
*/thirdparty/* }, which removes a value that the delta is supposed to remove and adds a value
that the delta is supposed to add, this would not cause any problems: The delta value in layer B would
try to remove */defunct/*, which is no longer there and then try to insert */thirdparty/*,
which is already there, so it would simply have no effect, but not cause any errors.
Warning
Delta values for lists track deletions anywhere in the list, but insertions are only possible at the end of the list, so if you insert a value in the middle of a list or you change the order of list elements, this can lead to unexpected results: If there is a change in the middle of the list, the change is recorded as a deletion of the remainder of the list starting from the change, plus an insertion of the remaining elements. The fact that the whole remainder of the list ends up in the delta partly defeats the purpose of the delta option.
Example:
The inherited value is [A, B, C, D]. The value is edited by inserting “X” after “B”, i.e., the new value is [A, B, X, C, D]. This is recorded as a deletion of [C, D], followed by the insertion of [X ,C, D].
Display of delta values
If an option is set using a delta value instead of a full value, the UI shows a Greek delta symbol in front of the displayed value. Please note that the displayed value is the resulting value after applying the delta, not the delta itself. To see the additions/removals of the delta, double-click on the value to open its editor dialog, which shows the details of the delta.
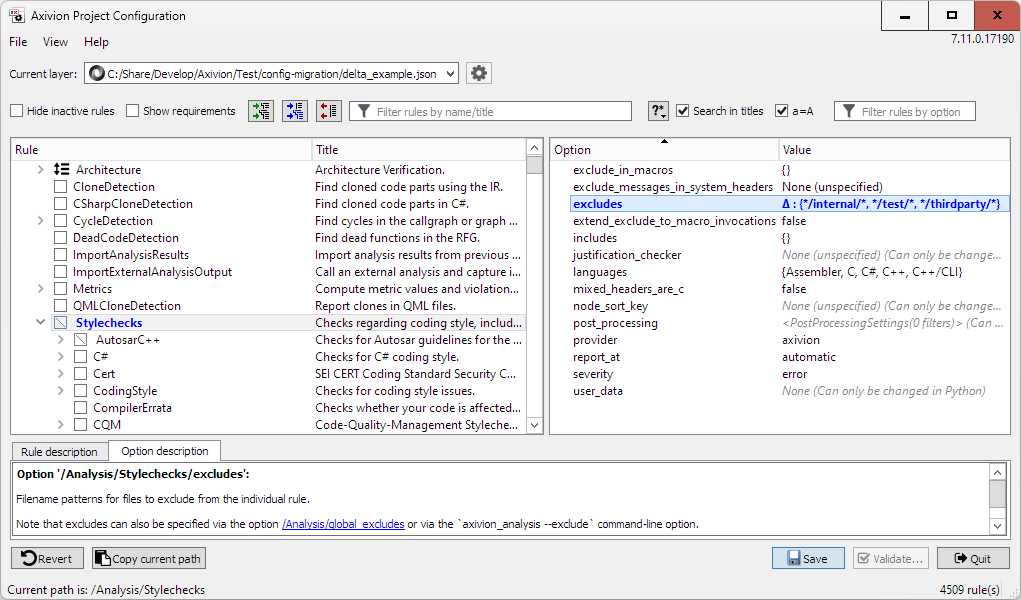
A delta value shown in the options tree.
2.2.4.5. Dictionary values
A dictionary value is a mapping between keys (strings, or string-like values like enums) and values. The
dictionary dialog shows the keys in the Key column and a string representation of the
associated value next to each key in the Value column. Dictionaries can not only map to string
values, but to arbitrary types, even to complex ones like another dictionary.
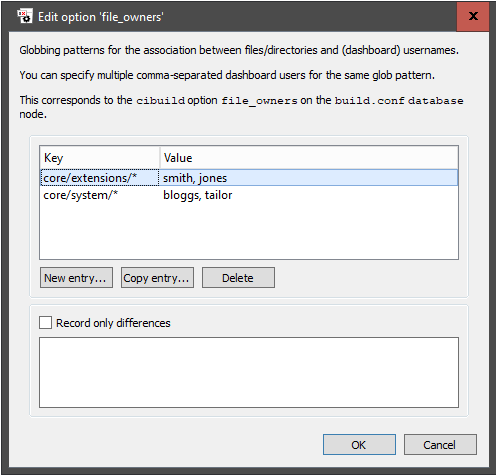
The dialog for editing dictionaries
To edit an existing entry, simply double-click on it. This opens an editor dialog for the given value. Alternatively, highlight the entry using the cursor keys and press Return. While an individual entry is highlighted, you can still commit the entire dialog using Ctrl+Return.
There is an exception for aggregate value types (Python dataclasses), for which there is no editor dialog. The individual fields of such types are shown as tree children of the key. You can expand an entry to see its children either by using the ordinary tree control expand/collapse button or by double-clicking on the entry.
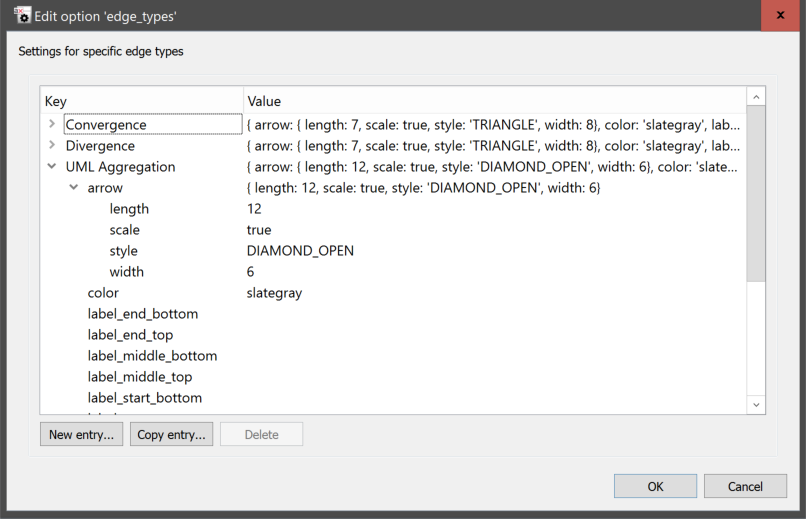
The dialog for editing dictionaries with aggregate value types
To copy an existing entry, select it and click on Copy entry...
(shortcut: Alt+C). This opens a dialog in which you can enter the key to use
for the copied entry.
To delete an entry, click on it to select it, then click on the Delete
button (shortcut: Alt+D).
To add a new entry, click on New entry... (shortcut: Alt+N),
which opens a dialog:
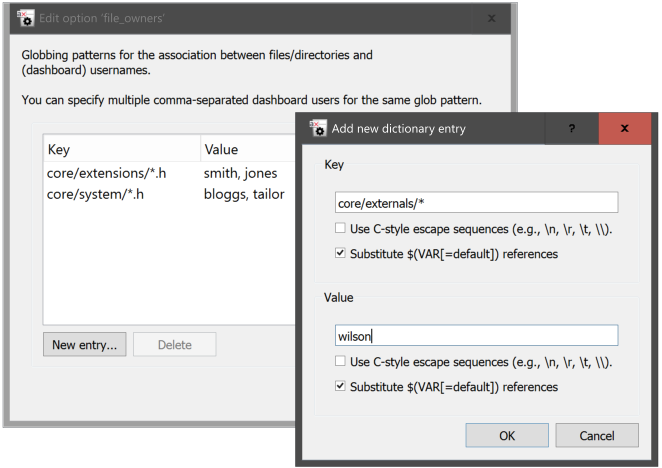
The dialog for adding a new dictionary entry
The Key group in the top half of the dialog looks like the string editing
dialog (see Editing String Values) or the enum editing dialog (see
Enum Values), depending on the key type. The
Value group below it looks like the editor dialog for the given value type
(in the screenshot: also string). Click OK after filling in both parts
to add the new key/value association to the dictionary.
Aggregate types (Python dataclasses) as value types of a dictionary are special in that they cannot
be set in this dialog. Instead, just the Key group appears and clicking on OK
inserts a new entry with default values in all fields. The fields of the type appear expanded as children
of the key, ready for editing.
To make it easier to keep track of which keys/dataclass fields have been edited in the current editing session, they are highlighted in blue and shown in a bold font.
Delta editing
The option Record only differences (new in version 7.2, shortcut
Alt+R) controls how the edited value is stored in the current configuration
layer. If this option is switched off, the edited dictionary value is stored as a full
value that completely replaces the value inherited from the preceding (more global)
layer. So, any subsequent changes to the value in the preceding layer do not have any
effect.
If this option is switched on, the edited dictionary is saved as a special “delta” value that describes only the differences between the inherited value and the edited value. That allows you to make incremental changes to the inherited value, e.g., add new entries, remove entries or edit individual entries without affecting the other inherited parts of the dictionary. If the inherited value changes due to a change in a preceding configuration layer, then the changes stored in the delta value are applied to the changed inherited value.
While Record only differences is enabled, the dictionary entries that are affected by the
stored delta value are highlighted in blue. Those shown in a bold font were edited in the current dialog
session, those in a non-bold font are part of the delta value and were edited earlier.
Note
This option is not always present in the dialog, since there are circumstances in which storing the value as a delta is not meaningful. For instance, when adding a new entry to a dictionary, the inherited dictionary value does not contain the new key, and therefore its associated value cannot be a delta value.
Nested delta values
When editing the value of an individual dictionary entry (as opposed to adding a new entry) in
delta mode (i.e., while Record only differences is enabled), the editor dialog for
the value may offer the Record only differences option, too, if the value type
supports delta editing (i.e., it is a set, list or dictionary type). This allows you to control
separately how the edited value is stored in the delta. It can be a complete value (option off)
or a nested delta (option on).
Caution
If you first edit individual dictionary entries and then switch on Record only
differences, the delta value is automatically derived as the difference between the inherited
base value and the current contents of the dialog. This approach does not create nested delta
values automatically (except for aggregate value types, see below), so each changed dictionary
entry is stored as a full value, even if it could be represented by a delta. You can turn
changed entries (highlighted in blue) into nested delta values by double-clicking on them and
enabling the Record only differences option in the editor dialog for the value.
If the value type of the dictionary is an aggregate type (Python dataclass), then only changed fields are included in the recorded delta value, and if any field of the value is an aggregate itself, then the same happens for its fields as well, so aggregate fields are represented by nested deltas automatically. Any other fields are represented as full values by default as described in the previous paragraph.
The blue highlighting in the dictionary editor dialog indicates which parts of the dictionary are part of the delta value. There you can also see which fields of an aggregate value have been modified.
2.2.4.6. Optional value types
Each of the dialogs above has a variant if the value in question is optional, i.e., there is an additional
choice of not specifying a value. In Python terms, the latter is represented by the None literal.
Usually, the description of the option explains the semantics of specifying None, e.g., using some kind
of global default.
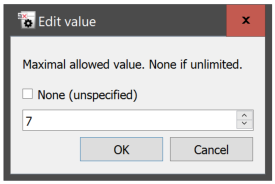
The dialog for editing an optional integer value
Ticking the None (unspecified) option disables the controls for the actual value, because ticking it
means that you do not want to supply a value.
2.2.4.7. Structured option types
Some options are structured, i.e., they do not have values themselves but suboptions that can be configured. Structured options appear as a tree structure in the Options Tree.
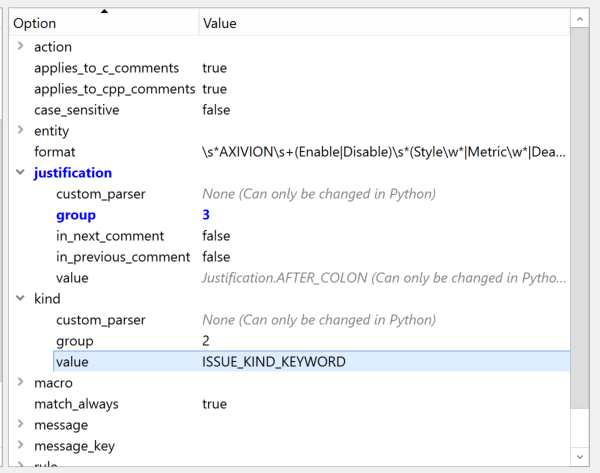
The options of rule /Analysis/AnalysisControl/CodeAnnotations/Suppressions/EnableDisable
In contrast to the Rule Hierarchy, there are no buttons or context menu entries to expand or collapse whole
subtrees in the Options Tree, but you can use the following keyboard shortcuts that are available in all tree
views in axivion_config:
Key |
Meaning |
|---|---|
|
Expand selected item |
|
Collapse selected item |
|
Expand selected item recursively (all levels) |
2.2.4.8. Unsupported types
Some option values are shown in gray and are followed by the words (can only be changed in Python).
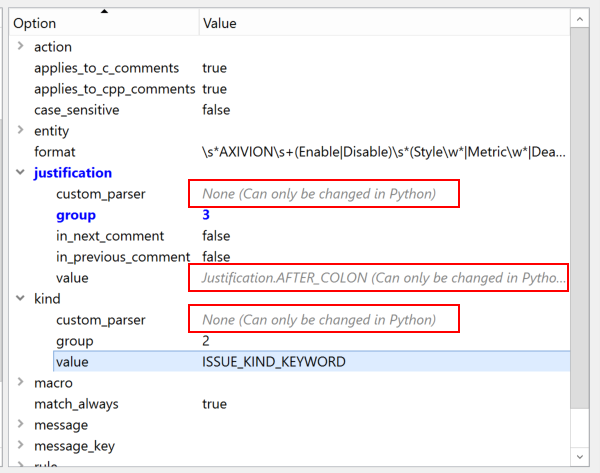
Options that can only be changed in Python (marked by red frames).
These are options with types that cannot be edited by the GUI. If you need to change such an option, you need a Python layer.
2.2.4.9. Rule group options
Not only rules, but also rule groups have options that can be edited. When you set a rule group option, it is automatically applied to all rule groups and rules inside the group. You can still override your group-level change for individual rules or rule groups inside the group.
2.2.4.10. Global Options
The top-level entries Project and Analysis have options, too. In contrast to rule group options, which
usually just represent common options of child rules, this is where many global analysis options are found.
2.2.4.11. Copying option names and values
The context menu over an option offers the entries 
Copy key to copy the option name to the clipboard
(or Copy value when right-clicking over the value column, which copies the value) and
Copy key=value, which copies both the key and the value separated by an equals sign. In case of a
structured option, the key is in A.B notation as in Python, though the value is not generally meant
to be usable directly in Python. The main purpose of this functionality is to allow individual settings to be copied
to documentation or e-mail/chat messages.
You can copy the path of the currently selected rule by clicking on the Copy current path button at the
bottom of the main window. As above, this path has no technical meaning and is mainly useful for documentation and
communication.
2.2.5. Opening, Saving, Reverting and Validating
2.2.5.1. Opening existing configurations
You can load an existing configuration file by choosing Open... from the
File menu. This replaces the entire loaded configuration, so if there are
any unsaved changes you are prompted to save or discard them first. If the opened file
is an interface layer its contents are loaded recursively, so if your configuration has
a top-level interface layer that includes everything else this allows you to load the
complete configuration.
Recently opened configuration files can be found in the Open recent
submenu of the File menu.
In more complex setups with multiple top-level configuration files, you can use the layer management feature to import the files.
2.2.5.2. Save and Save to Layer
Clicking on the Save button or choosing Save from the File menu saves all unsaved
modifications to the current layer. If there is no current layer (indicated by the text <BAUHAUS_CONFIG unset or
empty> in the layer control), or if the current layer is not editable, then clicking on Save performs
the equivalent of Save to layer... and asks for a location to save to.
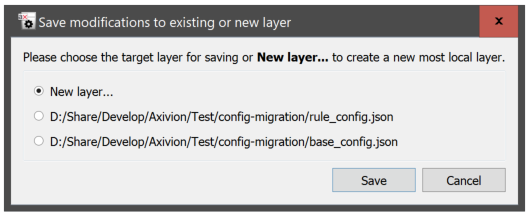
The Save to layer... dialog.
You can invoke this dialog at any time by choosing Save to layer... from the File menu.
2.2.5.3. Full Revert
You can discard all unsaved modifications by clicking on the Revert button in the main window. After asking for
confirmation this undoes all unsaved changes to options, activation states and rule order and removes unsaved rule copies and
imported rule directories, returning you to the saved state of the configuration.
2.2.5.4. Option-level Revert
You can revert individual option changes by right clicking on a modified option (shown in blue and bold) and choosing

Revert change from the context menu. This undoes just the unsaved change to the given option and
restores it to its saved state.
2.2.5.5. Reverting and deleting rule copies
If you made a mistake when copying a rule (see Copying Rules) or
you changed your mind, then you can discard the copied rule by choosing
Revert copy or 
Delete copy from the context menu
of the copied rule, depending on whether you have already saved the change. After a
confirmation dialog, the copied rule is removed.
2.2.5.6. Validating the Configuration
Option values are usually validated by the dialog in which they are edited. However, there are also some inter-rule dependencies between options, which are only found when finally running the tool that uses the configuration.
To validate the current state of the configuration click on the
Validate... button at the bottom of the main window. This opens a dialog
in which you can choose whether the current configuration is meant to be used by
axivion_ci (see tool reference) or
axivion_analysis (see tool reference).
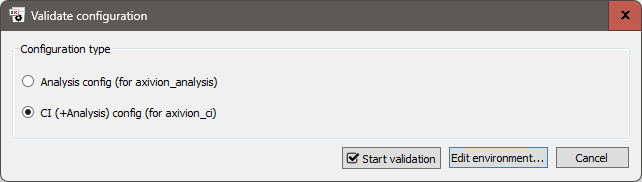
The Validate configuration window.
Note
Validation is only available while there are no unsaved changes, so if there are any,
save or revert them first to make the Validate... button available.
Setting up the Environment
If the configuration contains any variable references, then the environment for the
validation can be set up by clicking on Edit environment.... This opens
the Edit environment dialog.
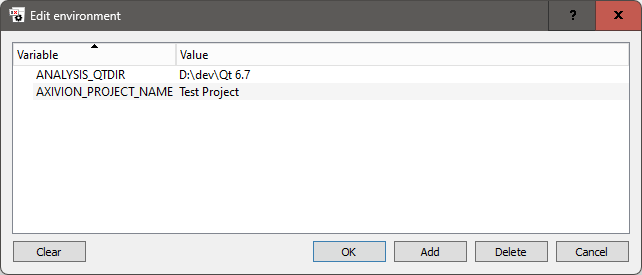
The Edit environment window.
You can add new variable definitions by clicking on Add, edit existing
entries by double-clicking on them, delete the selected entries by clicking on
Delete and clear all entries by clicking on Clear.
Note
The environment variables are remembered for the next time the validation dialog is opened, so you do not have to enter them again.
Starting the Validation
Clicking on Start validation passes the current state of the configuration
and the environment variables to the chosen tool for validation and displays any errors.
2.2.6. Managing Rules
2.2.6.1. Importing Additional Rules
The Axivion Suite can be extended by custom rules (see Additional Rule Sets). Such rules can be imported and configured in axivion_config
via the 
Additional rules... entry from the context menu over the top-level
Analysis entry.
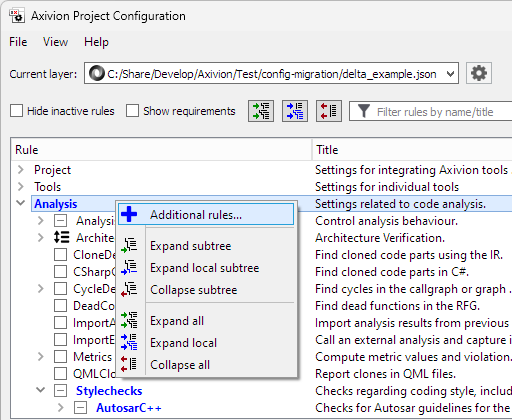
The Additional rules... context menu entry.
Choosing this menu entry opens a file dialog to select the directory containing the rules. If any rules are found in that directory, they are added to the Rule Hierarchy and can be configured like the predefined rules.
Note
axivion_config stores a relative reference to the rules directory in the saved configuration file if possible,
so the reference still works if the configuration file and the rules directory are moved to a different location
together.
See section Adding a Custom Rule for an example and a more detailed description of how to write your own custom rule.
2.2.6.2. Reordering Rules
For some rule groups the order of rules is important, most notably the Architecture group. These groups are marked with
a  symbol and the way they are presented differs from other groups. The children that are shown with a
 symbol represent a sequence of actions that are executed in the shown order. You can change the order by
dragging items around within the list.
symbol represent a sequence of actions that are executed in the shown order. You can change the order by
dragging items around within the list.
In addition, there is a group item labeled Available actions that contains a
hierarchy of actions. They do not have checkboxes, so they cannot be activated directly, and their options can be viewed but
not edited. In order to use one of these actions, you need to add it to the sequence of actions, either by dragging it there
or by using its context menu entry 
Add to active list.... To make it easier to drag an action
to the end of the list, the list is followed by an additional item labeled [Drag additional actions here...].
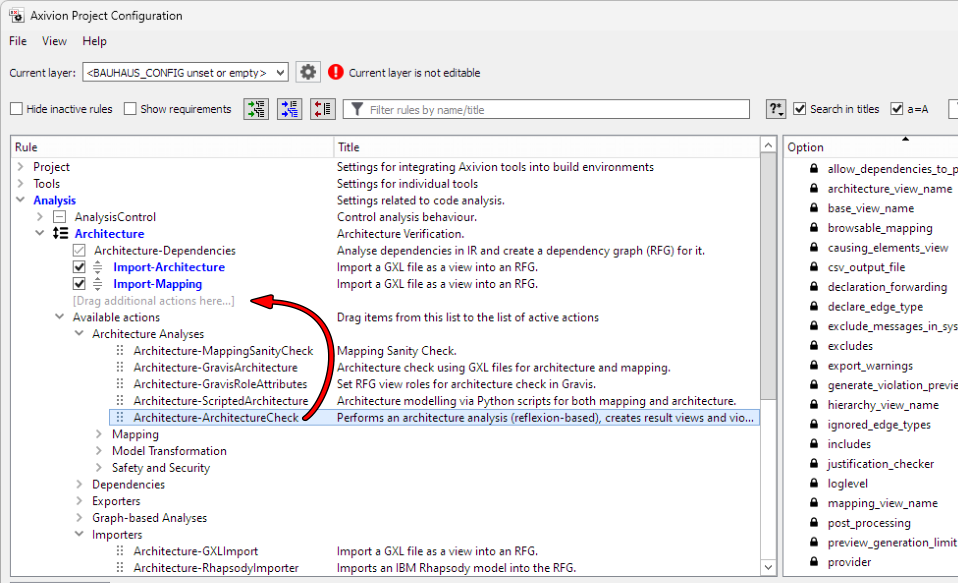
Dragging an item to the list or using the Add to active list... menu entry always creates a copy of the action
with a new name, so a dialog box appears asking you for the name this action should have in the list. It is possible to use
the same action several times in the list using different names. Each of the copies can be configured independently.
For instance, the architecture check needs two views, Architecture and Mapping that are usually imported from GXL files
via the Architecture-GXLImport action in the Importers section. That action just allows you to configure a single file name
and target view name. By dragging it to the list twice you can call the first copy Import Architecture and configure it to
import the architecture view, and the second one Import Mapping and configure it to import the mapping view.
Note
It does not make sense to reorder rules while not all of them are visible, so you cannot reorder any rules or drag any
rules from the Available actions hierarchy to the active list while there is an active rule filter (see
The Rule Filters).
Warning
At the moment, any child order changes in the UI cause the entire rule order sequence to be resaved in the current layer, so in that case, subsequent changes to the rule order in a preceding (more global) layer do not have any effect.
2.2.6.3. Copying Rules
In addition to the automatic copy operation described in the previous section, you can create manual copies of most rules.
This creates independent instances that can be configured separately. To copy a rule, open the context menu over the
rule entry in the Hierarchy Tree and choose Copy....
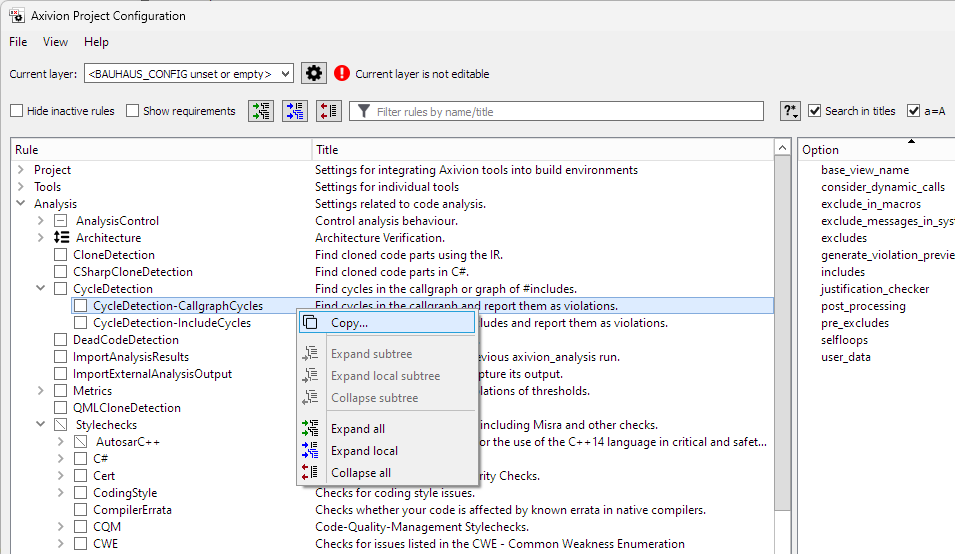
This opens a dialog asking for the new name of the copied rule. Then, the new rule appears in the list and can be configured and activated in the same way as the original rule. Copied rules take part in the layering in the same way as predefined rules, so you can change the rule’s configuration in more local layers, too, but obviously not in layers that are more global than the one in which the copy is created. The copied rule inherits subsequent changes of the original rule’s options from more global layers (i.e., it inherits the original rule’s options at the time when the copy is created), but not subsequent option changes of the original rule in the same layer.
If you made a mistake or you change your mind before saving the change, you can revert the copy operation (see Reverting and deleting rule copies) or rename the copied rule (see next section). After saving the change you can still delete the copied rule (see Reverting and deleting rule copies).
2.2.6.4. Renaming Rules
You can rename a copied rule before saving the change by choosing 
Rename... from its context menu
and entering a new name.
2.2.7. Layer Management
Choosing Layer management... from the File menu or
clicking on the cogwheel icon next to the Layer Control opens the
Layer Management dialog. This dialog is only available if there are no
unsaved changes, so you may have to save or revert any unsaved changes first.
Hint
You can save your changes to a new layer using Save to layer... and
then use the dialog to move the new layer to its desired position in the layer
structure.
Initially, the dialog shows the current layer arrangement as shown in the main window.
For layers that belong to an interface layer, the Unresolved entry column
shows how that layer is referenced in the interface layer.
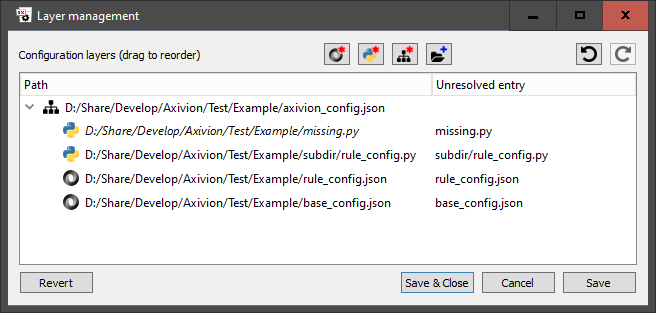
In this dialog, you can
create new empty JSON or Python configuration files
create new interface layers
import existing configuration or interface layer files, either as new top level entries or into an interface layer
reorder layers by dragging them around and move them into, out of or between interface layers
rename layers
remove layers from the setup, optionally deleting their files
The operations you perform do not affect the file system immediately. Instead, they
are all remembered and executed only when you finally click on Save or
Save & Close.
Until then, you can undo and redo your changes by clicking on the 
Undo and 
Redo buttons or by pressing Ctrl+Z
and Ctrl+Y respectively.
The Revert button undoes all your changes since the last save operation.
You can still recover these changes using Redo.
Clicking on Close or Save & Close closes the dialog and
returns to the main configuration editing UI showing the saved setup.
Clicking on Cancel discards all changes since the last save operation and
returns to the main window. If no changes were saved in the current dialog session, the
previous state of the main window is retained.
2.2.7.1. Creating new layers
The buttons at the top of the dialog allow you to create new configuration layers or import existing ones.

New JSON layer |

New Python layer |

New interface layer |

Import layer |
New JSON layer
Opens a file dialog to ask for a filename and location for the new file and then creates an empty JSON layer. The file becomes part of the configuration setup. The new layer is inserted below the currently selected layer, if there is one, else as a new top-level layer at the bottom. If the selected item is an interface layer, the new layer is added as the first child of that interface layer.
New Python layer
Opens a file dialog to ask for a filename and location for the new file and then
creates an empty Python layer. The file contains a single import instruction.
axivion_config does not offer any means of editing Python configuration files,
but it shows the effects of any changes made by them. If you edit a Python file
externally, any changes you make are reflected in the main UI when switching layers,
because that causes the configuration to be re-read.
New interface layer
Opens a file dialog to ask for a filename and location for the new file and then creates an empty interface layer. Since it is selected after being created, the next layer you create will default to becoming a child of this layer. If you want to add a layer next to the interface layer instead, deselect it first by Ctrl-clicking on it.
Interface layers can be recursive, so it is no problem to add or import an interface layer into an interface layer, as long as there are no cyclic dependencies, i.e., as long as an interface layer does not refer to itself either directly or indirectly.
Import layer
Imports an existing configuration file into the configuration setup. The insertion position depends on the currently selected layer according to the same rules as for the “New layer” buttons above.
2.2.7.2. Reordering and rearranging layers
You can change the order of layers by dragging them around. You can drag layers out of their parents and into new parents as required, which removes/adds them to the relevant interface layer files. While you drag there is a horizontal line that indicates where the item would be inserted if you released the mouse button at that time.
2.2.7.3. Context menu operations
Most of the operations are available from the context menu over a layer entry or over the empty space at the bottom.
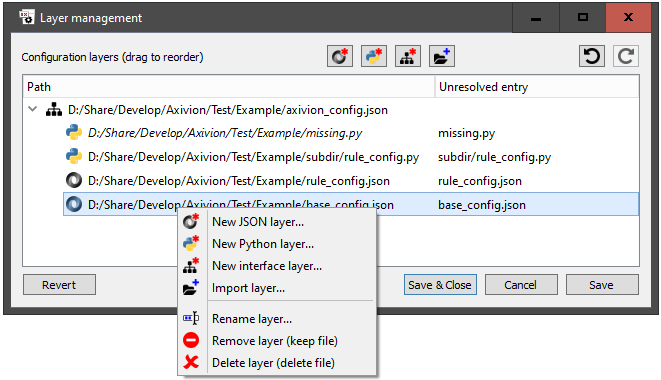
New JSON layer… / New Python layer… / New interface layer… / Import layer…
These operations work in the same way as the four buttons at the top of the dialog, except that the insertion position depends on the layer entry over which the context menu was opened. If the context menu was opened over empty space, the new layer is added as a top-level entry at the bottom.
Rename layer…
Renames the given layer. A dialog is opened to ask for the new name (without extension). The file always remains in the same directory and retains its extension.
Remove layer (keep file)
Removes the given file from the configuration setup, without deleting it. If the file is inside an interface layer, then the reference to the file is removed from the interface layer file. If the file is an interface layer itself, then all its children are removed from the setup as well, also without deleting them.
Delete layer (delete file)
As above, but the file is deleted. If the file is an interface layer, all its children are deleted, too. A confirmation dialog is shown listing all the files that will be deleted.
Note
The deletion does not take place immediately. It is only done when you finally click
on Save or Save & Close.
2.2.8. Configuring the configuration GUI
Like the other tools of the Axivion Suite, axivion_config can be configured. In
addition to reading configuration settings via the BAUHAUS_CONFIG
environment variable, it also reads an optional extra configuration file
configuration_gui.json in the .bauhaus directory inside the user’s home
directory.
The options for the configuration GUI can be found at /Tools/ConfigurationGUI.
Caution
The file name is not axivion_config.json as the name of the executable
might suggest because that file name is already used as the default filename for
directory layers.
2.2.9. Command-line parameters
Usage:
axivion_config [options] [<config-file-or-dir>]
If <config-file-or-dir> is specified and it is one of the files directly mentioned in BAUHAUS_CONFIG
or indirectly referenced by an interface layer, then this file is made the current layer on startup. If it
is a new file, it is treated as the most local layer for the editing session as if it had been added to
the front of the list in BAUHAUS_CONFIG. Specifying a directory is equivalent to specifying the file
axivion_config.json inside the directory.
Available options:
--font <font-family>Specifies the font to use in the user interface.
--font_size <size>Specifies the font size in pt to use in the user interface.
--ignore_geometryPrevents window position and size information stored during the previous session from being loaded. Useful if the information has become corrupted and causes the window to be opened off-screen.
--create_interface_layer <filename>Creates an interface layer file
filenamereferencing the remaining input files on the command line. The input filenames are inserted verbatim into the interface layer file. Non-absolute paths are interpreted relative to the directory containingfilename. It is an error iffilenameexists already. After creating the interface layer file the UI is entered with the new interface layer file as the most local layer (in addition to the other entries inBAUHAUS_CONFIG).--no_wizardPrevent the project configuration wizard from being shown at start up.
--wizardForces the project configuration wizard to be shown at start up, even if
BAUHAUS_CONFIGis set up.--wizard_font_size <size>Specifies the base font size in pt to use in the project configuration wizard.
--no_translatePrevents translation files from being loaded and forces the English UI to be shown.
--translate <locale>Overrides the system locale for finding translation files. If this option is not specified, the locale name is read from the environment variable
AXIVION_UI_LANGUAGE, and if that variable is not set, the system locale is used to determine the preferred UI language.
In addition to these options, the common options of Axivion Suite tools are supported (see Tool Reference).
2.2.10. Setting up BAUHAUS_CONFIG before running axivion_config
As explained in Configuration Files the project configuration can be split into any number of files that can be composed to create complex setups by a process called layering. This allows individual configuration files to be reused in multiple contexts, which avoids duplicating information.
The configuration GUI fully supports layering, and it also allows you to create and
edit the layer structure using the Layer management... entry in the
File menu, see Layer Management.
The easiest way to set up a new project is to use the Project
Wizard. That does not require any preparations. Simply run
axivion_config without any arguments and without setting up
BAUHAUS_CONFIG. The wizard produces a relatively simple setup with an
interface layer file grouping three JSON configuration files covering the areas:
general project configuration
compiler toolchain configuration
analysis configuration.
2.2.10.1. Simple setups
If you do not want to use the wizard and you just want to create a single configuration
file, you can run axivion_config without setting BAUHAUS_CONFIG and
without passing a command-line argument. This will cause the wizard to appear. After
leaving the wizard by clicking on the No thanks button, you can edit the
configuration in the conventional user interface. Then, as soon as you try to save your
changes, a standard file dialog appears that allows you to specify the target filename
and location. In order to continue editing this file in a later GUI session you either
have to set BAUHAUS_CONFIG or pass the file name as a command-line
parameter when re-running axivion_config.
Specifying the filename is even easier if you stick to the default filename axivion_config.json. Then, it is enough
to either set BAUHAUS_CONFIG to the directory containing the file or run axivion_config from the
command-line via:
axivion_config <parent-directory>
If the directory containing the configuration file is your current directory, then this can even be abbreviated to:
axivion_config .
Please note that axivion_config.json can be an interface layer, which can list several other configuration files.
That way, you can use multiple configuration files, e.g., a JSON file and a Python file. The recommended way to create an
interface layer file is to use the interactive layer management feature. Alternatively,
you can use the --create_interface_layer option of axivion_config via the command-line.
It is straightforward to change the layer structure later and switch from a setup with a single configuration file to using an interface layer: Simply rename your original settings file, put the interface layer in its place and reference your renamed original file from the interface layer.
If you use interface layers, the individual files they reference still appear as separate layers in the layer list in
axivion_config.
2.2.10.2. Full setups
For more complicated setups, simply set up the list of desired Python and JSON configuration files in BAUHAUS_CONFIG
before running axivion_config. There is no need to create the actual Python/JSON configuration files at this stage. If
your planned setup involves interface layer files, they need to be created first (see the previous section for the recommended
way of doing this).
By default, the most local layer, i.e., the first entry in BAUHAUS_CONFIG becomes the currently edited layer, but
you can specify any other existing layer on the command-line to make it the current layer at startup. This works not only for
top-level layers directly listed in BAUHAUS_CONFIG but also for files listed in an interface layer. If you specify a
layer that is not mentioned in BAUHAUS_CONFIG or in any interface layer, it is treated as a new most local layer for
the GUI editing session as if it had been added to the front of BAUHAUS_CONFIG.
It is worth noting that interface layers work recursively, so a file referenced by an interface layer can be another interface layer. The GUI shows all nested levels in the layer list.