
5.9.3. Toolbars and palette windows
5.9.3.1. The Node and Edge Types palettes
The Node and Edge Types palettes display the hierarchies of
node and edge types available in the currently loaded RFG. Apart from displaying the names
of the types next to their node symbols/edge colors, these palettes also serve additional
purposes:
They allow you to select the current node/edge type for node/edge creation in the

Node Tooland
Edge Tool.They control dynamic node/edge type filtering, allowing you to choose which nodes and edge types should be displayed in the active flat or hierarchical graph window. If the active graph window supports this feature, then check-boxes appear to the left of each type. Unchecking a check box hides all elements of the given type from the window. Checking the box brings them back. The

Hide alland
Show allbuttons can be used to quickly uncheck/check all check-boxes in one go.Note
Dynamic type filtering operates on top of hiding elements individually using the
Hide node/selectionoptions in the context menu, so if a node has been hidden using the context menu, it will remain hidden even when checking its type in the Node Types palette.They allow you create new node/edge types that can be used when creating new nodes and edges. To create a new top-level type, open the context menu over empty space at the bottom of the Node or Edge Types palette and choose
"Create
type..."
. To create a new subtype (derived type), open the context menu over the desired parent type and choose"Create subtype...". The dialog that opens indicates whether it creates a new top-level type or a subtype. A subtype inherits its visualization properties from its parent type: Node types inherit the node symbol and colors, and edge types inherit the edge color and the line/arrow styles.They allow you to delete types that are no longer needed or that were created in error. To delete a type from the type hierarchy open the context menu over its entry and choose
"Delete type". Please note that you can only delete types that do not have any subtypes and that are not used in the graph.
The 
Expand all button expands the complete hierarchy. The

Collapse all button collapses all expanded types, so the
display is reduced to the top-level types.
By default, the Edge Types palette shows a preview edge for each type that
demonstrates the line and arrow styles of the type. The button on the right
( /
/ ) controls whether the previews are shown.
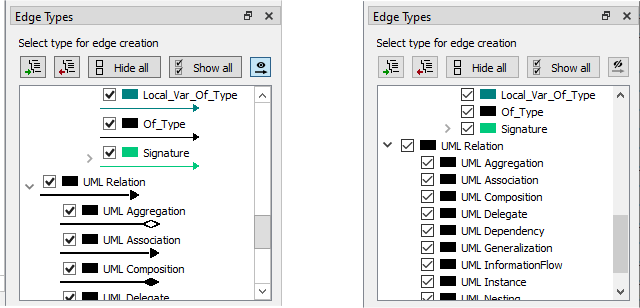
The Edge types panel with and without edge previews
5.9.3.2. The Quickfinder
The Quickfinder bar allows you to select or mark nodes based on their names or other string attributes.

The Quickfinder
In the Match Mode control you can choose between standard substring matching
( ), wildcard matching using
 * and + ( ) and regular
expression matching (
) and regular
expression matching ( ).
).
If the checkbox A=a is checked, then a case-insensitive match is made,
else it is case-sensitive.
The attribute field to the right of the A=a checkbox allows you to choose
the attribute name to search. By default, this field is set to Source.Name,
which means that nodes are matched by name, but you can choose a different string
attribute, e. g., Source.Path or Source.File to match nodes by the
directory paths or file names of the source files to which they belong.
Enter a sub-string to search for into the input field and press Return to start the search. By default, this selects all nodes whose attribute values match the search expression. While pressing Return hold down
Alt to mark the matching nodes instead of selecting them
Ctrl to deselect/unmark the matching nodes instead of selecting/marking them
Shift to also expand all parent nodes in the window to show the matched nodes
Note
By default the search sub-string is interpreted as a regular expression, so you can select groups of nodes with related names easily.
Quick summary of the most important aspects of regular expression syntax:
Expression |
Matching behavior |
|---|---|
|
matches any character |
|
matches a digit |
|
matches any alphanumeric character (letter or digit) |
|
matches any character inside the brackets; |
|
matches zero or more occurrences of the preceding expression |
|
matches one or more occurrences of the preceding expression |
|
matches zero or one occurrence of the preceding expression |
|
matches expression a or expression b |
|
groups characters, i. e., turns a sequence of characters into a single expression for operators |
|
matches the start of the name |
|
matches the end of the name |
|
escapes the following special character, so it is matched normally, e. g., |
Examples: getenv$ matches getenv and _getenv, but not getenv_s,
sym_.*table matches sym_hashtable and sym_keytable, and ^main$ only
matches main.
5.9.3.3. The Statistics Bar
The Statistics Bar displays useful statistics about the currently active window. In
addition to the statistics shown in the 
View Box it indicates how
many invisible selected and marked elements there are. This is particularly helpful
after deep or structural selection/marking operations, which often affect invisible
elements, too.
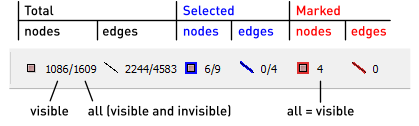
The Statistics Bar
The meaning of the individual Statistics Bar fields are explained in Figure The Statistics Bar. Each field can show two values separated by a slash, first the number of visible elements in the given category, then the total number of elements in the given category (i. e., the sum of both visible and invisible elements). If all elements of the given category are visible, only a single number is shown.
5.9.3.4. Quick Access Toolbars
The Selection Toolbar, Marking Toolbar and Edit/Hide/Show Toolbar windows show
icons for entries from the Select, Mark, Edit and Hide and Show
context menus permanently on screen for quicker access. Hovering the mouse pointer over an icon shows a tooltip.

The Quick Access Toolbars
The toolbars can be disabled temporarily or permanently using the Window menu, see the Window
menu reference.