Qt Quick How-tos
El objetivo de esta página es proporcionar una referencia útil y fácil de encontrar que muestre la forma más sencilla y mejor de realizar tareas específicas en Qt Quick. Cada solución proporciona fragmentos de código QML y/o C++ cuando es aplicable, y cada fragmento es probado automáticamente por Qt para asegurar que siguen siendo funcionales.
¿Cómo lo hago?
- Llamar a una función C++ desde QML cuando se hace clic en un botón
- Ver qué elemento tiene el foco activo
- Crear un selector de tiempo como el TimePickerDialog de Android
- Usar un enum de C++ en JavaScript
- Crear un indicador
Llamar a una función C++ desde QML cuando se pulsa un botón
Asumiendo que el tipo C++ debe estar disponible globalmente para los archivos QML de la aplicación, la forma más sencilla es convertirlo en un singleton QML con QML_SINGLETON. Por ejemplo, en el archivo de cabecera, backend.h:
#include <QObject>
#include <QQmlEngine>

class Backend : public QObject
{
    Q_OBJECT
    QML_ELEMENT
    QML_SINGLETON

public:
    Q_INVOKABLE void doStuff();
};
backend.cpp:
#include "backend.h"#include <QDebug>void Backend::doStuff(){
    qDebug() << "Did stuff!";
}
A continuación, puede llamar a esa función desde cualquier archivo QML:
import QtQuick.Controls

import MyModule

ApplicationWindow {
    width: 400
    height: 400
    title: qsTr("C++ Button example")

    Button {
        text: qsTr("Click me")
        onClicked: Backend.doStuff()
    }
}
Si el tipo C++ sólo necesita estar disponible para un pequeño conjunto de archivos QML, considere el uso de QML_ELEMENT. Para conocer más formas de exponer tipos C++ a QML, consulte Elegir el método de integración correcto entre C++ y QML.
Este ejemplo asume que el tipo Backend está disponible en un módulo QML. Con CMake, esto se hace mediante qt_add_qml_module. Para ver un ejemplo que demuestra esto en detalle, consulte Construcción de una aplicación QML.
Ver qué elemento tiene el foco activo
Escriba un controlador de señal de cambio de propiedad para la propiedad activeFocusItem de la ventana:
import QtQuick
import QtQuick.Controls

ApplicationWindow {
    width: 400
    height: 400
    visible: true
    title: qsTr("Active focus debugging example")

    onActiveFocusItemChanged: print("activeFocusItem: " + activeFocusItem)

    Row {
        TextField {
            objectName: "textField1"
        }
        TextField {
            objectName: "textField2"
        }
    }
}
Esto imprimirá en la consola el elemento que tiene actualmente el foco activo. Para garantizar que la salida sea útil, asigne a cada elemento un nombre descriptivo objectName.
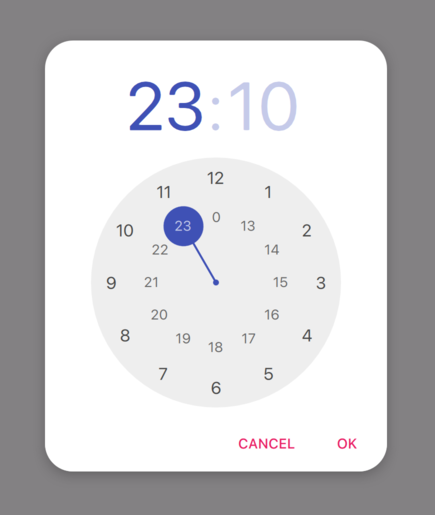
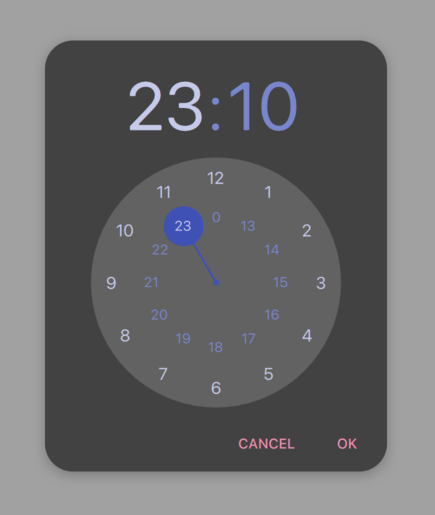
Crear un selector de tiempo como el TimePickerDialog de Android
Hemos preparado un ejemplo que consiste en unos pocos archivos QML que demuestran cómo hacer esto. Se pueden utilizar en su aplicación de la siguiente manera:
import QtQuick
import QtQuick.Layouts
import QtQuick.Controls.Material

ApplicationWindow {
    id: window
    width: 600
    height: 600
    visible: true
    title: qsTr("Time Picker Example")

    Material.theme: darkThemeSwitch.checked ? Material.Dark : Material.Light

    // Shows the selected time and opens the dialog.
    TimeComponentLabel {
        id: openDialogLabel
        width: parent.width - 80
        anchors.centerIn: parent
        font.pixelSize: Qt.application.font.pixelSize * 8
        renderTypeQuality: Text.VeryHighRenderTypeQuality
        interactive: !timePickerDialog.opened

        text: Qt.formatTime(new Date(1970, 1, 1, timePickerDialog.hours, timePickerDialog.minutes), "hh:mm")

        onTapped: timePickerDialog.openWithMode(TimePicker.Mode.Hours)
    }

    ColumnLayout {
        // We always want the openDialogLabel to be centered in the window, not us.
        // For that reason, we use anchors rather than putting the root items into a ColumnLayout.
        anchors.horizontalCenter: parent.horizontalCenter
        anchors.top: openDialogLabel.bottom
        anchors.topMargin: 24
        spacing: 12

        Switch {
            id: is24HourSwitch
            text: qsTr("24 Hour")
            checked: timePickerDialog.is24Hour
        }
        Switch {
            id: darkThemeSwitch
            text: qsTr("Dark")
        }
    }

    TimePickerDialog {
        id: timePickerDialog
        anchors.centerIn: parent
        is24Hour: is24HourSwitch.checked

        onTimeAccepted: print("A time was chosen - do something here!")
    }
}
TimePickerDialog en su tema claro. |
TimePickerDialog en su tema oscuro. |
Usar un enum de C++ en JavaScript
Para exponer un enum de C++ a JavaScript (es decir, QJSEngine, no QQmlEngine ni QQmlApplicationEngine), utilice newQMetaObject() y registerModule():
    QJSEngine engine;
    engine.installExtensions(QJSEngine::AllExtensions);

    QJSValue metaObjects = engine.newObject();
    const QJSValue backendJsMetaObject = engine.newQMetaObject(&Backend::staticMetaObject);
    metaObjects.setProperty("Backend", backendJsMetaObject);
    // Repeat the two lines above for other types as needed.
    engine.registerModule("MyApp", metaObjects);

    Backend backend(&engine);
    const bool loaded = backend.load();
El enum puede utilizarse desde JavaScript:
export function backendStatusUpdate(backendStatus) {
    if (backendStatus === Backend.Error) {
        console.warn("Error!")
        return
    }

    console.log("Backend loaded successfully")
}
Cuando se utiliza QQmlEngine o QQmlApplicationEngine, hay opciones más sencillas; consulte Elegir el método de integración correcto entre C++ y QML para obtener más información.
backend.h:
#include <QObject>
#include <QJSEngine>

class Backend : public QObject
{
    Q_OBJECT

public:
    Backend(QJSEngine *engine);

    enum Status {
        Unknown,
        Error,
        Loading,
        Loaded
    };

    Q_ENUM(Status)

    bool load();

private:
    QJSEngine *mEngine = nullptr;
};
backend.cpp:
#include "backend.h"Backend::Backend(QJSEngine *engine) : mEngine(engine) { }bool Backend::load() { // Realiza alguna carga aquí... const QJSValue module =  mEngine->importModule(":/script.mjs"); if (module.isError()) {        qWarning() << "Error loading script.mjs:" << module.toString();
       return false; } const QJSValue function = module.property("backendStatusUpdate"); if (!function.isCallable()) {        qWarning() << "backendStatusUpdate script function is not callable!";
       return false; } const QJSValue functionResult = function.call(QJSValueList()<< Loaded); if (functionResult.isError()) {        qWarning() << "backendStatusUpdate script function had errors:" << functionResult.toString();
       return false; } return true; }
Para más información, véase QObject Integration.
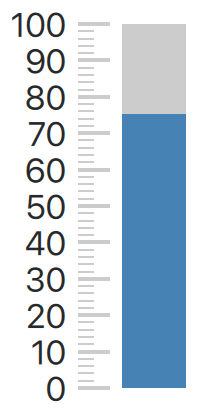
Crear un indicador
Hemos preparado un ejemplo que consiste en unos cuantos archivos C++ y QML que demuestran cómo hacer esto. Puede utilizarlos en su aplicación de la siguiente manera:
import QtQuick.Controls

import GaugeHowTo

ApplicationWindow {
    width: 400
    height: 400
    title: qsTr("Gauge example")

    Gauge {
        minimumValue: 0
        value: 75
        maximumValue: 100
    }
}
© 2026 The Qt Company Ltd. Documentation contributions included herein are the copyrights of their respective owners. The documentation provided herein is licensed under the terms of the GNU Free Documentation License version 1.3 as published by the Free Software Foundation. Qt and respective logos are trademarks of The Qt Company Ltd. in Finland and/or other countries worldwide. All other trademarks are property of their respective owners.
