
QMLオシロスコープ
このサンプルでは、Qt Charts のQML APIを使用して、厳しいパフォーマンス要件を満たすアプリケーションを実装する方法を示しています。
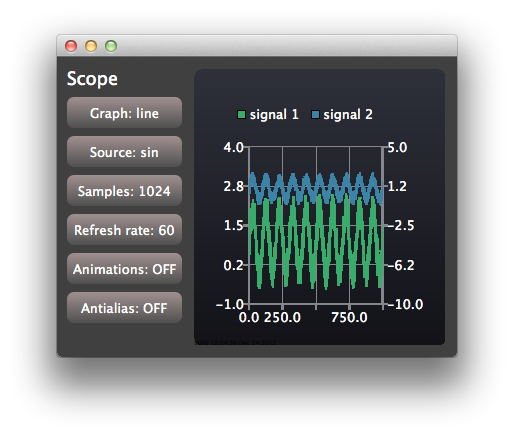
このオシロスコープ・アプリケーションは、Qt Charts QML API を使用して、厳しいパフォーマンス要件を満たすアプリケーションを実装する方法を示しています。このアプリケーションは、設定可能な特性を持つ生成データを使用して、シンプルなオシロスコープのユーザーインターフェースを模倣しています。
アプリケーションの出力コンソールに表示される実際のレンダリング速度に関する情報を取得するには、実行環境の設定で QSG_RENDER_TIMING = 1 を設定します。 これを行うには、Qt Creator で [Projects] - [Run] - [Run environment] に移動し、[Add] を選択します。その後、サンプルアプリケーションのさまざまな設定オプションを試して、お使いの環境で最高のパフォーマンスが得られる設定を見つけてください。
例のアプリケーションの実行
サンプルは次の手順で実行できます:
- Qt Creator
Welcome モードを開き、Examples からサンプルを選択します。詳細については、Qt Creator の「チュートリアル:ビルドと実行」を参照してください。
- Qt Extension for Visual Studio Code
Command Palette から「Qt: Open Qt examples 」コマンドを実行し、リストからサンプルを選択します。詳細については、Qt Extension for Visual Studio Code の「チュートリアル: ビルドと実行」を参照してください。
ビューの作成
アプリケーションウィンドウは、コントロールビューとスコープビューで共有されます:
Item {
    id: main
    width: 600
    height: 400

    ControlPanel {
        id: controlPanel
        anchors.top: parent.top
        anchors.topMargin: 10
        anchors.bottom: parent.bottom
        anchors.left: parent.left
        anchors.leftMargin: 10
    ...
    ScopeView {
        id: scopeView
        anchors.top: parent.top
        anchors.bottom: parent.bottom
        anchors.right: parent.right
        anchors.left: controlPanel.right
        height: main.height
    }
ControlView は、設定に使用されるボタンを実装しています。ScopeView は ChartView を使用して、2 つの線グラフシリーズを含むチャートを表示します:
ChartView {
    id: chartView

    property bool openGL: openGLSupported

    animationOptions: ChartView.NoAnimation
    theme: ChartView.ChartThemeDark

    onOpenGLChanged: {
        if (openGLSupported) {
            var series1 = series("signal 1")
            if (series1)
                series1.useOpenGL = openGL;
            var series2 = series("signal 2")
            if (series2)
                series2.useOpenGL = openGL;
        }
    }

    ValueAxis {
        id: axisY1
        min: -1
        max: 4
    }

    ValueAxis {
        id: axisY2
        min: -10
        max: 5
    }

    ValueAxis {
        id: axisX
        min: 0
        max: 1024
    }

    LineSeries {
        id: lineSeries1
        name: "signal 1"
        axisX: axisX
        axisY: axisY1
        useOpenGL: chartView.openGL
    }
    LineSeries {
        id: lineSeries2
        name: "signal 2"
        axisX: axisX
        axisYRight: axisY2
        useOpenGL: chartView.openGL
    }
    ...
線グラフのデータは、Qt Qml タイマーによって更新されます。実際のアプリケーションでは、Qt C++ コードからのシグナルによって更新がトリガーされる場合があります。
Timer {
    id: refreshTimer
    interval: 1 / 60 * 1000 // 60 Hz
    running: true
    repeat: true
    onTriggered: {
        dataSource.update(chartView.series(0));
        dataSource.update(chartView.series(1));
    }
}
このオシロスコープでは、信号源を可視化するために使用する系列の種類を切り替えることもできます。これは、系列を動的に破棄・生成することで実装されています:
function changeSeriesType(type) {
    chartView.removeAllSeries();

    // Create two new series of the correct type. Axis x is the same for both of the series,
    // but the series have their own y-axes to make it possible to control the y-offset
    // of the "signal sources".
    var series1
    var series2
    if (type === "line") {
        series1 = chartView.createSeries(ChartView.SeriesTypeLine, "signal 1",
                                         axisX, axisY1);
        series1.useOpenGL = chartView.openGL

        series2 = chartView.createSeries(ChartView.SeriesTypeLine, "signal 2",
                                         axisX, axisY2);
        series2.useOpenGL = chartView.openGL
    } else {
        series1 = chartView.createSeries(ChartView.SeriesTypeScatter, "signal 1",
                                         axisX, axisY1);
        series1.markerSize = 2;
        series1.borderColor = "transparent";
        series1.useOpenGL = chartView.openGL

        series2 = chartView.createSeries(ChartView.SeriesTypeScatter, "signal 2",
                                         axisX, axisY2);
        series2.markerSize = 2;
        series2.borderColor = "transparent";
        series2.useOpenGL = chartView.openGL
    }
}

function createAxis(min, max) {
    // The following creates a ValueAxis object that can be then set as a x or y axis for a series
    return Qt.createQmlObject("import QtQuick 2.0; import QtCharts 2.0; ValueAxis { min: "
                              + min + "; max: " + max + " }", chartView);
}© 2026 The Qt Company Ltd. Documentation contributions included herein are the copyrights of their respective owners. The documentation provided herein is licensed under the terms of the GNU Free Documentation License version 1.3 as published by the Free Software Foundation. Qt and respective logos are trademarks of The Qt Company Ltd. in Finland and/or other countries worldwide. All other trademarks are property of their respective owners.
