
Glow QML Type
生成源图像的模糊且上色的版本,并将其置于原始图像之后,营造出源图像仿佛在发光的效果。更多...
| Import Statement: | import Qt5Compat.GraphicalEffects |
| Since: | QtGraphicalEffects 1.0 |
| Inherits: |
属性
- cached : alias
- color : alias
- radius : alias
- samples : alias
- source : alias
- spread : alias
- transparentBorder : alias
详细说明
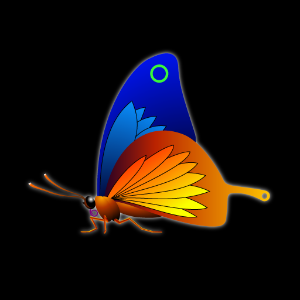
| 来源 | 已应用的效果 |
|---|---|
|
|


示例
以下示例演示了如何应用该效果。
import QtQuick
import Qt5Compat.GraphicalEffects

Item {
    width: 300
    height: 300

    Rectangle {
        anchors.fill: parent
        color: "black"
    }

    Image {
        id: butterfly
        source: "images/butterfly.png"
        sourceSize: Qt.size(parent.width, parent.height)
        smooth: true
        visible: false
    }

    Glow {
        anchors.fill: butterfly
        radius: 8
        color: "white"
        source: butterfly
    }
}
属性文档
cached : alias
此属性允许将效果的输出像素缓存起来,以提高渲染性能。
每次更改源或效果属性时,缓存中的像素都必须更新。由于需要额外的内存缓冲区来存储效果输出,因此内存消耗会增加。
当源或效果属性被动画化时,建议禁用缓存。
默认情况下,该属性设置为false 。
color : alias
此属性定义了用于生成光晕效果的 RGBA 颜色值。
默认情况下,该属性设置为"white" 。
| 使用不同颜色值的输出示例 | ||
|---|---|---|
|
|
|
| color: #ffffff | color: #00ff00 | color: #aa00ff00 |
| radius: 8 | radius: 8 | radius: 8 |
| samples: 17 | samples: 17 | samples: 17 |
| spread: 0.5 | spread: 0.5 | spread: 0.5 |


radius : alias
半径决定了光晕的柔和程度。半径越大,光晕的边缘看起来就越模糊。
根据半径值的设定,应将samples 的数值设置得足够大,以确保视觉效果的质量。
要获得理想的模糊效果,需选择samples 和radius ,使samples = 1 + radius * 2 ,例如:
| 半径 | 采样数 |
|---|---|
| 0(无模糊) | 1 |
| 1 | 3 |
| 2 | 5 |
| 3 | 7 |
默认情况下,该属性设置为floor(samples/2) 。
| 不同半径值的输出示例 | ||
|---|---|---|
|
|
|
| radius: 0 | radius: 6 | radius: 12 |
| samples: 25 | samples: 25 | samples: 25 |
| color: #ffffff | color: #ffffff | color: #ffffff |
| spread: 0 | spread: 0 | spread: 0 |


注意: radius 属性 用于计算特效的离屏缓冲区大小。数值越大,占用的内存就越多。
samples : alias
此属性定义在进行边缘柔化模糊计算时,每个像素采样多少个样本。数值越大,图像质量越好,但渲染速度越慢。
理想情况下,该值应为所需最大半径值的两倍加一,例如:
| 半径 | 采样数 |
|---|---|
| 0(无模糊) | 1 |
| 1 | 3 |
| 2 | 5 |
| 3 | 7 |
默认情况下,该属性设置为9 。
该属性不支持动画效果。更改此属性将导致底层的 OpenGL 着色器被重新编译。
source : alias
此属性定义了将作为生成的光晕源的源项目。
注意: 不支持让效果包含自身,例如将源设置为该效果的父级。
spread : alias
此属性定义了在光源边缘附近,发光颜色被增强的程度。
取值范围为 0.0 到 1.0。默认情况下,该属性设置为0.5 。
注意:该 实现针对中等和较低的扩散值进行了优化。根据光源的不同,接近 1.0 的扩散值可能会产生视觉上不对称的效果。
| 不同扩散值的输出示例 | ||
|---|---|---|
|
|
|
| spread: 0.0 | spread:0.5 | spread: 1.0 |
| radius: 8 | radius: 8 | radius: 8 |
| samples: 17 | samples: 17 | samples: 17 |
| color: #ffffff | color: #ffffff | color: #ffffff |


transparentBorder : alias
此属性用于确定该效果是否具有透明边框。
当设置为true 时,对象外部会填充一层透明边缘,使得在源纹理外部采样时使用透明度而非边缘像素。如果不设置此属性,具有不透明边缘的图像将不会产生模糊边缘。
默认情况下,该属性设置为true 。如果源图像本身已有透明边缘,请将其设置为false,以使模糊处理速度略微加快。
在下面的代码片段中,左侧的矩形具有透明边框且边缘被模糊,而右侧的矩形则没有。
import QtQuick
import Qt5Compat.GraphicalEffects

Rectangle {
    width: 180
    height: 100

    Row {
        anchors.centerIn: parent
        spacing: 16

        Rectangle {
            id: normalRect
            width: 60
            height: 60
            color: "black"
            radius: 10
            layer.enabled: true
            layer.effect: Glow {
                samples: 15
                color: "blue"
                transparentBorder: false
            }
        }

        Rectangle {
            id: transparentBorderRect
            width: 60
            height: 60
            color: "black"
            radius: 10
            layer.enabled: true
            layer.effect: Glow {
                samples: 15
                color: "blue"
                transparentBorder: true
            }
        }
    }
}
© 2026 The Qt Company Ltd. Documentation contributions included herein are the copyrights of their respective owners. The documentation provided herein is licensed under the terms of the GNU Free Documentation License version 1.3 as published by the Free Software Foundation. Qt and respective logos are trademarks of The Qt Company Ltd. in Finland and/or other countries worldwide. All other trademarks are property of their respective owners.
