Qt 3D:基本形状 C++ 示例
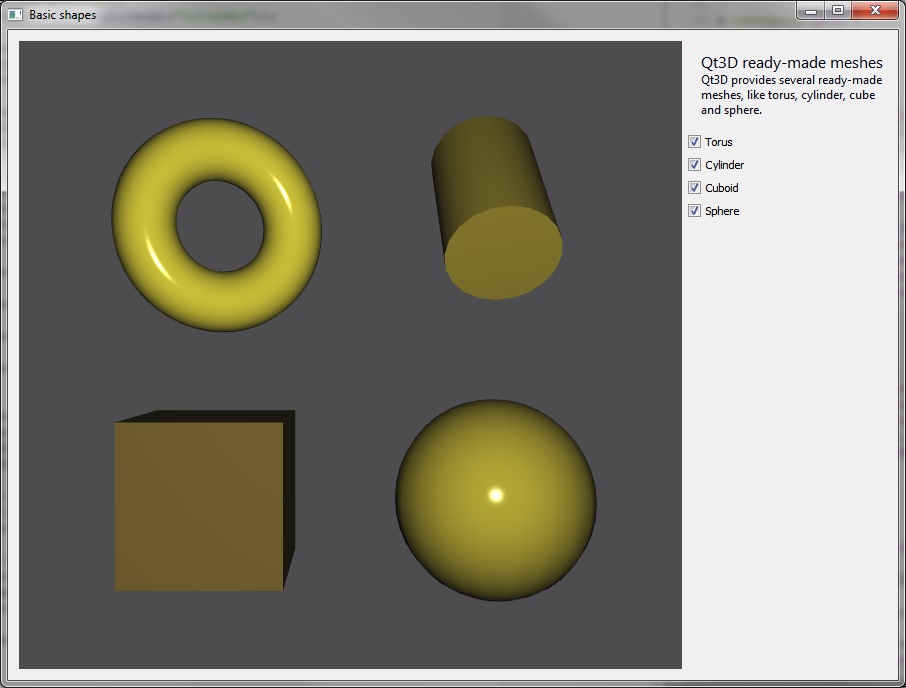
显示Qt 3D 提供的四种基本形状,并为每种形状设置网格。

基本形状显示了Qt 3D 提供的四种基本形状:环形、圆柱体、立方体和球体。该示例还展示了如何将Qt 3D 场景嵌入部件并与其他部件连接。
运行示例
要从 Qt Creator,打开Welcome 模式并从Examples 中选择示例。更多信息,请参阅Qt Creator: 教程:构建并运行。
设置环形网格
作为示例,我们将介绍如何设置环形网格。首先,我们将QTorusMesh 实例化,然后设置网格的具体参数,如半径、小半径、环数和切片数。
m_torus = new Qt3DExtras::QTorusMesh();
m_torus->setRadius(1.0f);
m_torus->setMinorRadius(0.4f);
m_torus->setRings(100);
m_torus->setSlices(20);
环状网格的大小和位置可通过变换组件进行调整。我们创建缩放、平移和旋转组件,并将它们添加到QTransform 组件中。
Qt3DCore::QTransform *torusTransform = new Qt3DCore::QTransform();
torusTransform->setScale(2.0f);
torusTransform->setRotation(QQuaternion::fromAxisAndAngle(QVector3D(0.0f, 1.0f, 0.0f), 25.0f));
torusTransform->setTranslation(QVector3D(5.0f, 4.0f, 0.0f));
要改变网格的漫反射颜色,我们需要创建一个QPhongMaterial 并设置其漫反射颜色。
Qt3DExtras::QPhongMaterial *torusMaterial = new Qt3DExtras::QPhongMaterial();
torusMaterial->setDiffuse(QColor(QRgb(0xbeb32b)));
最后一步是将环状体添加到实体树中,为此我们创建了一个具有父实体的QEntity ,并将之前创建的网格、材质和变换组件添加到其中。
m_torusEntity = new Qt3DCore::QEntity(m_rootEntity);
m_torusEntity->addComponent(m_torus);
m_torusEntity->addComponent(torusMaterial);
m_torusEntity->addComponent(torusTransform);
我们可以通过定义实体是否有父实体来控制实体的可见性。也就是说,它是否是实体树的一部分。
void SceneModifier::enableTorus(bool enabled)
{
    m_torusEntity->setEnabled(enabled);
}
© 2025 The Qt Company Ltd. Documentation contributions included herein are the copyrights of their respective owners. The documentation provided herein is licensed under the terms of the GNU Free Documentation License version 1.3 as published by the Free Software Foundation. Qt and respective logos are trademarks of The Qt Company Ltd. in Finland and/or other countries worldwide. All other trademarks are property of their respective owners.

